

Sentinel 系统自适应限流从整体维度对应用入口流量进行控制,结合应用的 Load、CPU 使用率、总体平均 RT、入口 QPS 和并发线程数等几个维度的监控指标,通过自适应的流控策略,让系统的入口流量和系统的负载达到一个平衡,让系统尽可能跑在最大吞吐量的同时保证系统整体的稳定性。
系统规则
系统保护规则是从应用级别的入口流量进行控制,从单台机器的 load、CPU 使用率、平均 RT、入口 QPS 和并发线程数等几个维度监控应用指标,让系统尽可能跑在最大吞吐量的同时保证系统整体的稳定性。系统保护规则是应用整体维度的,而不是资源维度的,并且仅对入口流量生效。入口流量指的是进入应用的流量(EntryType.IN),比如 Web 服务或 Dubbo 服务端接收的请求,都属于入口流量。
系统规则支持以下的模式:
-
Load 自适应(仅对 Linux/Unix-like 机器生效):系统的 load1 作为启发指标,进行自适应系统保护。当系统 load1 超过设定的启发值,且系统当前的并发线程数超过估算的系统容量时才会触发系统保护(BBR 阶段)。系统容量由系统的
maxQps * minRt估算得出。设定参考值一般是CPU cores * 2.5。 -
CPU usage(1.5.0+ 版本):当系统 CPU 使用率超过阈值即触发系统保护(取值范围 0.0-1.0),比较灵敏。
-
平均 RT:当单台机器上所有入口流量的平均 RT 达到阈值即触发系统保护,单位是毫秒。
-
并发线程数:当单台机器上所有入口流量的并发线程数达到阈值即触发系统保护。
-
入口 QPS:当单台机器上所有入口流量的 QPS 达到阈值即触发系统保护。
127_SentinelResource配置(上)
按资源名称限流 + 后续处理
启动Nacos成功
启动Sentinel成功
Module - cloudalibaba-sentinel-service8401
配置流控规则
配置步骤

图形配置和代码关系
表示1秒钟内查询次数大于1,就跑到我们自定义的处流,限流
测试
1秒钟点击1下,OK
超过上述,疯狂点击,返回了自己定义的限流处理信息,限流发生
{"code":444, "message":"com.alibaba.csp.sentinel.slots.block.flow.FlowException\t 服务不可用", "data":null}
额外问题
此时关闭问服务8401 -> Sentinel控制台,流控规则消失了
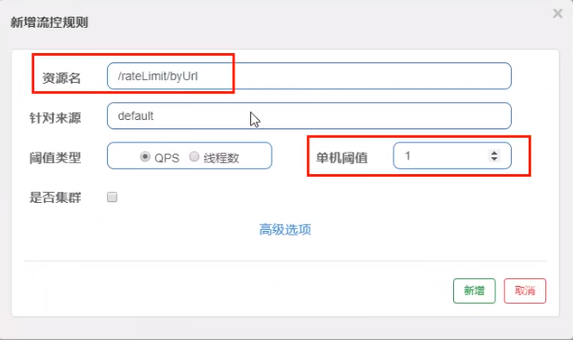
按照Url地址限流 + 后续处理
通过访问的URL来限流,会返回Sentinel自带默认的限流处理信息
业务类RateLimitController
Sentinel控制台配置
测试
-
结果 - 会返回Sentinel自带的限流处理结果 Blocked by Sentinel (flow limiting)
上面兜底方案面临的问题
-
系统默认的,没有体现我们自己的业务要求。
-
依照现有条件,我们自定义的处理方法又和业务代码耦合在一块,不直观。
-
每个业务方法都添加—个兜底的,那代码膨胀加剧。
-
全局统—的处理方法没有体现。
128_SentinelResource配置(中)
客户自定义限流处理逻辑
自定义限流处理类 - 创建CustomerBlockHandler类用于自定义限流处理逻辑
import com.alibaba.csp.sentinel.slots.block.BlockException;
import com.atguigu.springcloud.entities.CommonResult;
import com.atguigu.springcloud.entities.Payment;
public class CustomerBlockHandler {
public static CommonResult handlerException(BlockException exception) {
return new CommonResult(4444,"按客戶自定义,global handlerException----1");
}
public static CommonResult handlerException2(BlockException exception) {
return new CommonResult(4444,"按客戶自定义,global handlerException----2");
}
}
RateLimitController
Sentinel控制台配置
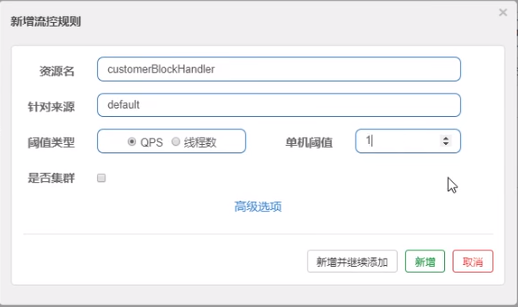
启动微服务后先调用一次 - http://localhost:8401/rateLimit/customerBlockHandler。然后,多次快速刷新http://localhost:8401/rateLimit/customerBlockHandler。刷新后,我们自定义兜底方法的字符串信息就返回到前端。
129_SentinelResource配置(下)
@SentinelResource 注解
注意:注解方式埋点不支持 private 方法。
@SentinelResource用于定义资源,并提供可选的异常处理和 fallback 配置项。@SentinelResource注解包含以下属性:
value:资源名称,必需项(不能为空)
entryType:entry 类型,可选项(默认为EntryType.OUT)
blockHandler/blockHandlerClass:blockHandler对应处理BlockException的函数名称,可选项。blockHandler 函数访问范围需要是public,返回类型需要与原方法相匹配,参数类型需要和原方法相匹配并且最后加一个额外的参数,类型为BlockException。
fallback/fallbackClass:fallback 函数名称,可选项,用于在抛出异常的时候提供 fallback 处理逻辑。fallback 函数可以针对所有类型的异常(除了exceptionsToIgnore里面排除掉的异常类型)进行处理。fallback 函数签名和位置要求:
返回值类型必须与原函数返回值类型一致;
方法参数列表需要和原函数一致,或者可以额外多一个
Throwable类型的参数用于接收对应的异常。fallback 函数默认需要和原方法在同一个类中。若希望使用其他类的函数,则可以指定
fallbackClass为对应的类的Class对象,注意对应的函数必需为 static 函数,否则无法解析。
defaultFallback(since 1.6.0):默认的 fallback 函数名称,可选项,通常用于通用的 fallback 逻辑(即可以用于很多服务或方法)。默认fallback 函数可以针对所有类型的异常(除了exceptionsToIgnore里面排除掉的异常类型)进行处理。若同时配置了 fallback 和defaultFallback,则只有 fallback 会生效。defaultFallback 函数签名要求:
返回值类型必须与原函数返回值类型一致;
方法参数列表需要为空,或者可以额外多一个
Throwable类型的参数用于接收对应的异常。defaultFallback 函数默认需要和原方法在同一个类中。若希望使用其他类的函数,则可以指定
fallbackClass为对应的类的Class对象,注意对应的函数必需为 static 函数,否则无法解析。
exceptionsToIgnore(since 1.6.0):用于指定哪些异常被排除掉,不会计入异常统计中,也不会进入 fallback 逻辑中,而是会原样抛出。
Sentinel主要有三个核心Api:
-
SphU定义资源
-
Tracer定义统计
-
ContextUtil定义了上下文
130_Sentinel服务熔断Ribbon环境预说
sentinel整合ribbon+openFeign+fallback
Ribbon系列
-
启动nacos和sentinel
-
提供者9003/9004
-
消费者84
提供者9003/9004
新建cloudalibaba-provider-payment9003/9004,两个一样的做法
POM
 <dependencies>
        <!--SpringCloud ailibaba nacos -->
        <dependency>
            <groupId>com.alibaba.cloud</groupId>
            <artifactId>spring-cloud-starter-alibaba-nacos-discovery</artifactId>
        </dependency>
        <dependency><!-- 引入自己定义的api通用包,可以使用Payment支付Entity -->
            <groupId>com.atguigu.springcloud</groupId>
            <artifactId>cloud-api-commons</artifactId>
            <version>${project.version}</version>
        </dependency>
        <!-- SpringBoot整合Web组件 -->
        <dependency>
            <groupId>org.springframework.boot</groupId>
            <artifactId>spring-boot-starter-web</artifactId>
        </dependency>
        <dependency>
            <groupId>org.springframework.boot</groupId>
            <artifactId>spring-boot-starter-actuator</artifactId>
        </dependency>
        <!--日常通用jar包配置-->
        <dependency>
            <groupId>org.springframework.boot</groupId>
            <artifactId>spring-boot-devtools</artifactId>
            <scope>runtime</scope>
            <optional>true</optional>
        </dependency>
        <dependency>
            <groupId>org.projectlombok</groupId>
            <artifactId>lombok</artifactId>
            <optional>true</optional>
        </dependency>
        <dependency>
            <groupId>org.springframework.boot</groupId>
            <artifactId>spring-boot-starter-test</artifactId>
            <scope>test</scope>
        </dependency>
    </dependencies>
YML
server
记得修改不同的端口号
主启动
业务类
测试地址 - http://localhost:9003/paymentSQL/1
消费者84
新建cloudalibaba-consumer-nacos-order84
POM
<dependencies>
        <!--SpringCloud openfeign -->
        <!--
        <dependency>
            <groupId>org.springframework.cloud</groupId>
            <artifactId>spring-cloud-starter-openfeign</artifactId>
        </dependency>
        -->
        <!--SpringCloud ailibaba nacos -->
        <dependency>
            <groupId>com.alibaba.cloud</groupId>
            <artifactId>spring-cloud-starter-alibaba-nacos-discovery</artifactId>
        </dependency>
        <!--SpringCloud ailibaba sentinel -->
        <dependency>
            <groupId>com.alibaba.cloud</groupId>
            <artifactId>spring-cloud-starter-alibaba-sentinel</artifactId>
        </dependency>
        <!-- 引入自己定义的api通用包,可以使用Payment支付Entity -->
        <dependency>
            <groupId>com.atguigu.springcloud</groupId>
            <artifactId>cloud-api-commons</artifactId>
            <version>${project.version}</version>
        </dependency>
        <!-- SpringBoot整合Web组件 -->
        <dependency>
            <groupId>org.springframework.boot</groupId>
            <artifactId>spring-boot-starter-web</artifactId>
        </dependency>
        <dependency>
            <groupId>org.springframework.boot</groupId>
            <artifactId>spring-boot-starter-actuator</artifactId>
        </dependency>
        <!--日常通用jar包配置-->
        <dependency>
            <groupId>org.springframework.boot</groupId>
            <artifactId>spring-boot-devtools</artifactId>
            <scope>runtime</scope>
            <optional>true</optional>
        </dependency>
        <dependency>
            <groupId>org.projectlombok</groupId>
            <artifactId>lombok</artifactId>
            <optional>true</optional>
        </dependency>
        <dependency>
            <groupId>org.springframework.boot</groupId>
            <artifactId>spring-boot-starter-test</artifactId>
            <scope>test</scope>
        </dependency>
    </dependencies>
YML
server
主启动
业务类
ApplicationContextConfig
CircleBreakerController
修改后请重启微服务
-
热部署对java代码级生效及时
-
对@SentinelResource注解内属性,有时效果不好
目的
-
fallback管运行异常
-
blockHandler管配置违规
测试地址 - http://localhost:84/consumer/fallback/1
没有任何配置
只配置fallback
只配置blockHandler
fallback和blockHandler都配置
忽略属性
131_Sentinel服务熔断无配置
没有任何配置 - 给用户error页面,不友好
132_Sentinel服务熔断只配置fallback
fallback只负责业务异常
测试地址 - http://localhost:84/consumer/fallback/4
页面返回结果:
{"code":444,"message":"兜底异常nandlerFal1back, exception内容illegalkrgumentEBxceptiorn,非法参数异常……","data":{"id":4,"seria:"null"}}
133_Sentinel服务熔断只配置blockHandler
blockHandler只负责sentinel控制台配置违规
测试地址 - http://localhost:84/consumer/fallback/4
134_Sentinel服务熔断fallback和blockHandler都配置
若blockHandler和fallback 都进行了配置,则被限流降级而抛出BlockException时只会进入blockHandler处理逻辑。
135_Sentinel服务熔断exceptionsToIgnore
exceptionsToIgnore,忽略指定异常,即这些异常不用兜底方法处理。
136_Sentinel服务熔断OpenFeign
修改84模块
-
84消费者调用提供者9003
-
Feign组件一般是消费侧
POM
<!--SpringCloud openfeign -->
<dependency>
<groupId>org.springframework.cloud</groupId>
<artifactId>spring-cloud-starter-openfeign</artifactId>
</dependency>
YML
# 激活Sentinel对Feign的支持
feign
业务类
带@Feignclient注解的业务接口,fallback = PaymentFallbackService.class
Controller
主启动
测试 - http://localhost:84/consumer/paymentSQL/1
测试84调用9003,此时故意关闭9003微服务提供者,84消费侧自动降级,不会被耗死。
熔断框架比较
| - | Sentinel | Hystrix | resilience4j |
|---|---|---|---|
| 隔离策略 | 信号量隔离(并发线程数限流) | 线程池隔商/信号量隔离 | 信号量隔离 |
| 熔断降级策略 | 基于响应时间、异常比率、异常数 | 基于异常比率 | 基于异常比率、响应时间 |
| 实时统计实现 | 滑动窗口(LeapArray) | 滑动窗口(基于RxJava) | Ring Bit Buffer |
| 动态规则配置 | 支持多种数据源 | 支持多种数据源 | 有限支持 |
| 扩展性 | 多个扩展点 | 插件的形式 | 接口的形式 |
| 基于注解的支持 | 支持 | 支持 | 支持 |
| 限流 | 基于QPS,支持基于调用关系的限流 | 有限的支持 | Rate Limiter |
| 流量整形 | 支持预热模式匀速器模式、预热排队模式 | 不支持 | 简单的Rate Limiter模式 |
| 系统自适应保护 | 支持 | 不支持 | 不支持 |
| 控制台 | 提供开箱即用的控制台,可配置规则、查看秒级监控,机器发观等 | 简单的监控查看 | 不提供控制台,可对接其它监控系统 |
137_Sentinel持久化规则
是什么
一旦我们重启应用,sentinel规则将消失,生产环境需要将配置规则进行持久化。
怎么玩
将限流配置规则持久化进Nacos保存,只要刷新8401某个rest地址,sentinel控制台的流控规则就能看到,只要Nacos里面的配置不删除,针对8401上sentinel上的流控规则持续有效。
步骤
修改cloudalibaba-sentinel-service8401
POM
<!--SpringCloud ailibaba sentinel-datasource-nacos 后续做持久化用到-->
<dependency>
    <groupId>com.alibaba.csp</groupId>
    <artifactId>sentinel-datasource-nacos</artifactId>
</dependency>
YML
server
添加Nacos业务规则配置

配置内容解析
[{
    "resource": "/rateLimit/byUrl",
    "IimitApp": "default",
    "grade": 1,
    "count": 1,
    "strategy": 0,
    "controlBehavior": 0,
    "clusterMode": false
}]
-
resource:资源名称;
-
limitApp:来源应用;
-
grade:阈值类型,0表示线程数, 1表示QPS;
-
count:单机阈值;
-
strategy:流控模式,0表示直接,1表示关联,2表示链路;
-
controlBehavior:流控效果,0表示快速失败,1表示Warm Up,2表示排队等待;
-
clusterMode:是否集群。
启动8401后刷新sentinel发现业务规则有了

快速访问测试接口 - http://localhost:8401/rateLimit/byUrl - 页面返回Blocked by Sentinel (flow limiting)
停止8401再看sentinel - 停机后发现流控规则没有了

重新启动8401再看sentinel
-
乍一看还是没有,稍等一会儿
-
重新配置出现了,持久化验证通过
138_分布式事务问题由来
分布式前
-
单机单库没这个问题
-
从1:1 -> 1:N -> N:N
单体应用被拆分成微服务应用,原来的三个模块被拆分成三个独立的应用,分别使用三个独立的数据源,业务操作需要调用三三 个服务来完成。此时每个服务内部的数据一致性由本地事务来保证, 但是全局的数据一致性问题没法保证。

一句话:一次业务操作需要跨多个数据源或需要跨多个系统进行远程调用,就会产生分布式事务问题。
139_Seata术语
是什么
Seata是一款开源的分布式事务解决方案,致力于在微服务架构下提供高性能和简单易用的分布式事务服务。
能干嘛
一个典型的分布式事务过程
分布式事务处理过程的一ID+三组件模型:
-
Transaction ID XID 全局唯一的事务ID
-
三组件概念
-
TC (Transaction Coordinator) - 事务协调者:维护全局和分支事务的状态,驱动全局事务提交或回滚。
-
TM (Transaction Manager) - 事务管理器:定义全局事务的范围:开始全局事务、提交或回滚全局事务。
-
RM (Resource Manager) - 资源管理器:管理分支事务处理的资源,与TC交谈以注册分支事务和报告分支事务的状态,并驱动分支事务提交或回滚。
-
处理过程:
-
TM向TC申请开启一个全局事务,全局事务创建成功并生成一个全局唯一的XID;
-
XID在微服务调用链路的上下文中传播;
-
RM向TC注册分支事务,将其纳入XID对应全局事务的管辖;
-
TM向TC发起针对XID的全局提交或回滚决议;
-
TC调度XID下管辖的全部分支事务完成提交或回滚请求。

140_Seata-Server安装
去哪下
发布说明: https://github.com/seata/seata/releases
怎么玩
本地@Transactional
全局@GlobalTransactional
SEATA 的分布式交易解决方案

我们只需要使用一个 @GlobalTransactional 注解在业务方法上:
Seata-Server安装
官网地址 - http://seata.io/zh-cn/
下载版本 - 0.9.0
seata-server-0.9.0.zip解压到指定目录并修改conf目录下的file.conf配置文件
先备份原始file.conf文件
主要修改:自定义事务组名称+事务日志存储模式为db +数据库连接信息
file.conf
service模块
service {
    ##fsp_tx_group是自定义的
    vgroup_mapping.my.test.tx_group="fsp_tx_group"
    default.grouplist = "127.0.0.1:8091"
    enableDegrade = false
    disable = false
    max.commitretry.timeout= "-1"
    max.ollbackretry.timeout= "-1"
}
store模块
## transaction log store
store {
## store mode: file, db
## 改成db
mode = "db"
## file store
file {
dir = "sessionStore"
# branch session size, if exceeded first try compress lockkey, still exceeded throws exceptions
max-branch-session-size = 16384
# globe session size, if exceeded throws exceptions
max-global-session-size = 512
# file buffer size, if exceeded allocate new buffer
file-write-buffer-cache-size = 16384
# when recover batch read size
session.reload.read_size= 100
# async, sync
flush-disk-mode = async
}
# database store
db {
## the implement of javax.sql.DataSource, such as DruidDataSource(druid)/BasicDataSource(dbcp) etc.
datasource = "dbcp"
## mysql/oracle/h2/oceanbase etc.
## 配置数据源
db-type = "mysql"
driver-class-name = "com.mysql.jdbc.Driver"
url = "jdbc:mysql://127.0.0.1:3306/seata"
user = "root"
password = "你自己密码"
min-conn= 1
max-conn = 3
global.table = "global_table"
branch.table = "branch_table"
lock-table = "lock_table"
query-limit = 100
}
}
mysql5.7数据库新建库seata,在seata库里建表
建表db_store.sql在\seata-server-0.9.0\seata\conf目录里面
-- the table to store GlobalSession data
drop table if exists `global_table`;
create table `global_table` (
`xid` varchar(128) not null,
`transaction_id` bigint,
`status` tinyint not null,
`application_id` varchar(32),
`transaction_service_group` varchar(32),
`transaction_name` varchar(128),
`timeout` int,
`begin_time` bigint,
`application_data` varchar(2000),
`gmt_create` datetime,
`gmt_modified` datetime,
primary key (`xid`),
key `idx_gmt_modified_status` (`gmt_modified`, `status`),
key `idx_transaction_id` (`transaction_id`)
);
-- the table to store BranchSession data
drop table if exists `branch_table`;
create table `branch_table` (
`branch_id` bigint not null,
`xid` varchar(128) not null,
`transaction_id` bigint ,
`resource_group_id` varchar(32),
`resource_id` varchar(256) ,
`lock_key` varchar(128) ,
`branch_type` varchar(8) ,
`status` tinyint,
`client_id` varchar(64),
`application_data` varchar(2000),
`gmt_create` datetime,
`gmt_modified` datetime,
primary key (`branch_id`),
key `idx_xid` (`xid`)
);
-- the table to store lock data
drop table if exists `lock_table`;
create table `lock_table` (
`row_key` varchar(128) not null,
`xid` varchar(96),
`transaction_id` long ,
`branch_id` long,