自己动手实现一个轻量级Spring IOC容器
最近在学Spring框架,相信学习过Spring的同学都对Spring中的IOC容器印象深刻,它像一个黑盒一样,可以从我们的xml配置文件中读取bean,并将相应的属性注入到bean中。那么这是如何实现的呢,本文将通过一个小例子仿照Spring的方式实现一个简单的IOC容器,使其具有IOC容器的基本功能,包括从xml文件中读取bean,注入属性等功能。
1、首先定义两个POJO:HelloWorldService和User,里面的成员变量和方法非常简单:
HelloWorldService.java

 1 package com.yize.ioc;
 2
 3 /**
 4  * @author: yize.jjx
 5  * @date: 2018-12-06 21:16
 6  * @desc:
 7  */
 8 public class HelloWorldService {
 9
10     private String name;
11
12     private Integer age;
13
14     public User user;
15
16     public void showHelloWorld(){
17         System.out.println(name+":"+age);
18     }
19 }
User.java
 1 package com.yize.ioc;
 2
 3 /**
 4  * @author: yize.jjx
 5  * @date: 2018-12-07 19:44
 6  * @desc:
 7  */
 8 public class User {
 9
10     private String name;
11
12     public HelloWorldService helloWorldService;
13
14     public void showUser(){
15         System.out.println(name);
16     }
17 }
这里解释一下为什么HelloWorldService这个类里面要包含User这个类的成员变量,User里面也包含了HelloWorldService这个成员变量,这样做的目的是让这两个类互相依赖,以测试我们的IOC容器在为bean注入属性的时候是否能解决这种相互依赖的问题。
2、写一个配置文件application.xml,在配置文件中声明这两个bean,并给它们设置相应的属性。
application.xml
 1 <?xml version="1.0" encoding="UTF-8"?>
 2 <beans xmlns="http://www.springframework.org/schema/beans"
 3        xmlns:xsi="http://www.w3.org/2001/XMLSchema-instance"
 4        xmlns:context="http://www.springframework.org/schema/context"
 5        xsi:schemaLocation="http://www.springframework.org/schema/beans
 6             http://www.springframework.org/schema/beans/spring-beans-3.0.xsd
 7             http://www.springframework.org/schema/context
 8             http://www.springframework.org/schema/context/spring-context-3.0.xsd">
 9
10     <bean id="helloWorldService" class="com.yize.ioc.HelloWorldService">
11         <property name="name" value="jeysin"/>
12         <property name="age" value="13"/>
13         <property name="user" ref="user"/>
14     </bean>
15
16     <bean id="user" class="com.yize.ioc.User">
17         <property name="helloWorldService" ref="helloWorldService"/>
18         <property name="name" value="yize"/>
19     </bean>
20
21 </beans>
可以看到这个配置文件的写法其实和Spring中的配置文件的写法是一样的。在这里说一下我们最终要实现的目标,我们希望我们的IOC容器最后能像Spring一样从这个xml中读取bean,然后注入属性,然后我们通过getBean方法可以从中直接取出bean来使用。就像这样:
 1 package com.yize.ioc;
 2
 3 import com.yize.ioc.context.ApplicationContext;
 4 import com.yize.ioc.context.ClassPathXmlApplicationContext;
 5 import org.junit.Test;
 6
 7 /**
 8  * @author: yize.jjx
 9  * @date: 2018-12-08 20:40
10  * @desc:
11  */
12 public class TestIOC {
13
14     @Test
15     public void testMyIOC(){
16         ApplicationContext context = new ClassPathXmlApplicationContext("application.xml");
17
18         HelloWorldService helloWorldService = (HelloWorldService) context.getBean("helloWorldService");
19         helloWorldService.showHelloWorld();
20
21         User user = (User) context.getBean("user");
22         user.showUser();
23
24     }
25 }
是不是和spring的用法一样,注意这里用的ApplicationContext和ClassPathXmlApplicationContext并不是Spring中的类,而是我们自己实现的那个IOC容器中的类,只是为了和Spring保持一致才故意命名成这样的,如果你想,完全可以换成别的名字。接下来我们就自己手动实现ApplicationContext和ClassPathXmlApplicationContext。
3、实现ApplicationContext和ClassPathXmlApplicationContext之前,先来实现另一个类:BeanDefinition
BeanDefinition.java
 1 package com.yize.ioc;
 2
 3 import java.util.Map;
 4 import java.util.concurrent.ConcurrentHashMap;
 5
 6 /**
 7  * @author: yize.jjx
 8  * @date: 2018-12-06 21:07
 9  * @desc:
10  */
11 public class BeanDefinition {
12
13     private Object bean;
14
15     private Class beanClass;
16
17     private String beanClassName;
18
19     private Map<String, Object> propertyMap = new ConcurrentHashMap<String, Object>();
20
21     public BeanDefinition(String beanClassName){
22         setBeanClassName(beanClassName);
23     }
24
25     public Object getBean(){
26         return this.bean;
27     }
28
29     public void setBean(Object bean) {
30         this.bean = bean;
31     }
32
33     public Class getBeanClass() {
34         return beanClass;
35     }
36
37     public void setBeanClass(Class beanClass) {
38         this.beanClass = beanClass;
39     }
40
41     public String getBeanClassName() {
42         return beanClassName;
43     }
44
45     public void setBeanClassName(String beanClassName) {
46         this.beanClassName = beanClassName;
47         try{
48             this.beanClass = Class.forName(beanClassName);
49         }catch (ClassNotFoundException e){
50             e.printStackTrace();
51         }
52     }
53
54     public void setProperty(String name, Object value){
55         propertyMap.put(name, value);
56     }
57
58     public Map<String, Object> getPropertyMap(){
59         return this.propertyMap;
60     }
61 }
顾名思义,BeanDefinition的作用就是对bean的一层封装,封装了bean的名字beanClassName,这个beanClassName是我们从配置文件中读取到的,反应到上面那个配置文件中也就是"com.yize.ioc.HelloWorldService"和"com.yize.ioc.User"这样的字符串,我们可以根据这样的字符串把对应的Class对象加载进来,这正是setBeanClassName这个函数干的事。propertyMap里面存的是每一个具体的bean的所有属性值,也就是xml文件中<proterty>标签里的属性名称和属性值,存在map里面方便以后注入。
4、既然要从配置文件中读取,自然要先能根据配置文件的名字找到这个文件,然后打开它,生成一个InputStream共我们读取使用。所以定义一个接口:
Resource.java
1 public interface Resource {
2
3     InputStream getInputStream() throws Exception;
4 }
以及它的实现:
URLResource.java
 1 package com.yize.ioc.io;
 2
 3 import java.io.InputStream;
 4 import java.net.URL;
 5 import java.net.URLConnection;
 6
 7 /**
 8  * @author: yize.jjx
 9  * @date: 2018-12-08 20:53
10  * @desc:
11  */
12 public class URLResource implements Resource{
13
14     private String configLocation;
15
16     public URLResource(String configLocation){
17         this.configLocation=configLocation;
18     }
19
20     @Override
21     public InputStream getInputStream() throws Exception{
22         URL url=this.getClass().getClassLoader().getResource(configLocation);
23         URLConnection urlConnection=url.openConnection();
24         urlConnection.connect();
25         return urlConnection.getInputStream();
26     }
27
28 }
5、解析配置文件之前,我们要思考一下了,遇到配置文件中的value标签到好办,直接将name和value作为一组键值对直接存入BeanDefinition中的propertyMap就好了,问题是如果遇到ref这种引用怎么办,怎样以键值对的形式也把它存入propertyMap中呢?为了解决这个问题,我们定义一个类:BeanReference
BeanReference.java
 1 package com.yize.ioc;
 2
 3 /**
 4  * @author: yize.jjx
 5  * @date: 2018-12-07 19:46
 6  * @desc:
 7  */
 8 public class BeanReference {
 9
10     private String ref;
11
12     public BeanReference(String ref){
13         this.ref = ref;
14     }
15
16     public String getRef() {
17         return ref;
18     }
19 }
这样,遇到ref的时候我们就可以把name和BeanReference作为一个键值对存入propertyMap中了。
6、接下来就要解析配置文件了,接口:
BeanDefinitionReader.java
 1 package com.yize.ioc.xml;
 2
 3 import com.yize.ioc.io.Resource;
 4
 5 import java.util.Map;
 6
 7 /**
 8  * @author: yize.jjx
 9  * @date: 2018-12-08 20:46
10  * @desc:
11  */
12 public interface BeanDefinitionReader {
13
14     void loadBeanDefinition(Resource resource);
15 }
以及相应的实现:
XmlBeanDefinitionReader.java
 1 package com.yize.ioc.xml;
 2
 3 import com.yize.ioc.BeanDefinition;
 4 import com.yize.ioc.BeanReference;
 5 import com.yize.ioc.io.Resource;
 6 import org.w3c.dom.Document;
 7 import org.w3c.dom.Element;
 8 import org.w3c.dom.Node;
 9 import org.w3c.dom.NodeList;
10
11 import javax.xml.parsers.DocumentBuilder;
12 import javax.xml.parsers.DocumentBuilderFactory;
13 import java.io.InputStream;
14 import java.util.HashMap;
15 import java.util.Map;
16
17 /**
18  * @author: yize.jjx
19  * @date: 2018-12-07 13:54
20  * @desc:
21  */
22 public class XmlBeanDefinitionReader implements BeanDefinitionReader{
23
24     private final Map<String, BeanDefinition> beanDefinitionMap = new HashMap<String, BeanDefinition>();
25
26     public XmlBeanDefinitionReader(Resource resource){
27         loadBeanDefinition(resource);
28     }
29
30     @Override
31     public void loadBeanDefinition(Resource resource) {
32         InputStream inputStream = null;
33         try {
34             DocumentBuilderFactory documentBuilderFactory = DocumentBuilderFactory.newInstance();
35             DocumentBuilder documentBuilder = documentBuilderFactory.newDocumentBuilder();
36             inputStream = resource.getInputStream();
37             Document document = documentBuilder.parse(inputStream);
38             registerBeanDefinitions(document);
39             inputStream.close();
40         }catch (Exception e){
41             e.printStackTrace();
42         }
43     }
44
45     private void registerBeanDefinitions(Document document){
46         Element root = document.getDocumentElement();
47         NodeList nodeList = root.getChildNodes();
48         for(int i=0; i<nodeList.getLength(); ++i){
49             Node node = nodeList.item(i);
50             if(node instanceof Element){
51                 Element beanNode = (Element) node;
52                 String id = beanNode.getAttribute("id");
53                 String className = beanNode.getAttribute("class");
54                 BeanDefinition beanDefinition = new BeanDefinition(className);
55                 //设置属性
56                 processProperties(beanNode, beanDefinition);
57                 //注册Bean
58                 beanDefinitionMap.put(id, beanDefinition);
59             }
60         }
61     }
62
63     private void processProperties(Element beanNode, BeanDefinition beanDefinition){
64         NodeList nodeList = beanNode.getChildNodes();
65         for(int i=0; i<nodeList.getLength(); ++i){
66             Node node = nodeList.item(i);
67             if(node instanceof Element){
68                 Element propertyNode = (Element) node;
69                 String propertyName = propertyNode.getAttribute("name");
70                 String propertyValue = propertyNode.getAttribute("value");
71                 if(null!=propertyValue && propertyValue.length()>0) {
72                     beanDefinition.setProperty(propertyName, propertyValue);
73                 }else{
74                     String propertyRef = propertyNode.getAttribute("ref");
75                     beanDefinition.setProperty(propertyName, new BeanReference(propertyRef));
76                 }
77             }
78         }
79     }
80
81     public Map<String, BeanDefinition> getBeanDefinitionMap(){
82         return beanDefinitionMap;
83     }
84 }
可以看到在processProperties这个函数中,遇到ref标签的时候,做法就是new一个BeanReference,然后把它和propertyName一起作为一个属性存入propertyMap中,这个BeanReference就相当于一个占位的类,把这个属性的位置先占住,证明这里是对另一个bean的引用,等到真正给bean注入属性的时候,发现这个占位类,再去注入对应的bean。
7、定义一个BeanFactory接口
BeanFactory.java
 1 package com.yize.ioc.factory;
 2
 3 import com.yize.ioc.BeanDefinition;
 4
 5 /**
 6  * @author: yize.jjx
 7  * @date: 2018-12-08 20:45
 8  * @desc:
 9  */
10 public interface BeanFactory {
11
12     Object getBean(String name);
13
14     void registerBeanDefinition(String name, BeanDefinition beanDefinition);
15 }
以及接口的实现:
AutowireCapableBeanFactory.java
 1 package com.yize.ioc.factory;
 2
 3 import com.yize.ioc.BeanDefinition;
 4 import com.yize.ioc.BeanReference;
 5
 6 import java.lang.reflect.Field;
 7 import java.util.Map;
 8 import java.util.concurrent.ConcurrentHashMap;
 9
10 /**
11  * @author: yize.jjx
12  * @date: 2018-12-08 21:04
13  * @desc:
14  */
15 public class AutowireCapableBeanFactory implements BeanFactory{
16
17     private Map<String, BeanDefinition> beanDefinitionMap = new ConcurrentHashMap<String, BeanDefinition>();
18
19     @Override
20     public Object getBean(String name) {
21         BeanDefinition beanDefinition = beanDefinitionMap.get(name);
22         Object bean = beanDefinition.getBean();
23         if(null == bean){
24             bean = doCreateBean(beanDefinition);
25         }
26         return bean;
27     }
28
29     @Override
30     public void registerBeanDefinition(String name, BeanDefinition beanDefinition) {
31         beanDefinitionMap.put(name, beanDefinition);
32     }
33
34     private Object doCreateBean(BeanDefinition beanDefinition) {
35         Object bean=null;
36         try{
37             bean = beanDefinition.getBeanClass().newInstance();
38         }catch (Exception e){
39             e.printStackTrace();
40         }
41         //先设置bean,再注入属性,否则会产生循环依赖
42         beanDefinition.setBean(bean);
43         applyPropertyValues(bean, beanDefinition.getPropertyMap());
44         return bean;
45     }
46
47     private void applyPropertyValues(Object bean, Map<String, Object> propertyMap) {
48
49         for (Map.Entry<String, Object> entry : propertyMap.entrySet()) {
50             try {
51                 Field field = bean.getClass().getDeclaredField(entry.getKey());
52                 field.setAccessible(true);
53                 Object value = entry.getValue();
54                 if (value instanceof BeanReference) {
55                     field.set(bean, this.getBean(((BeanReference) value).getRef()));
56                 } else {
57                     String type = field.getType().getName();
58                     if (type.equals("java.lang.String")) {
59                         field.set(bean, entry.getValue());
60                     } else if (type.equals("java.lang.Integer") || type.equals("int")) {
61                         field.set(bean, Integer.valueOf((String) entry.getValue()));
62                     }
63                 }
64             } catch (Exception e) {
65                 e.printStackTrace();
66             }
67         }
68     }
69 }
beanDefinitionMap里面存的就是name和BeanDefinition的对应关系了,这里采用先创建bean,再给bean注入属性的方式来解决循环依赖的情况。在applyPropertyValues函数中注意要判断一下属性值是否为BeanReference的实例,如果是,说明这个属性是另一个bean的引用,要先拿到这个被引用的bean然后给它注入进去;如果不是,还要判断一下这个值的类型,到底是String类型还是Integer类型,以免注入的时候由于类型不匹配而抛异常。另外值得一提的是,这里采用了lazy机制来创建bean和注入属性,即在你调用getBean函数企图通过name获取一个bean之前,这个name对应的BeanDefinition里面的bean字段其实是为null的,也就是说,只有当你调用了getBean函数,才会开始根据beanClass实例化一个bean,然后给这个bean注入相应的属性,然后把这个bean返回给你使用。
8、定义ApplicationContext接口
ApplicationContext.java
 1 package com.yize.ioc.context;
 2
 3 /**
 4  * @author: yize.jjx
 5  * @date: 2018-12-08 20:41
 6  * @desc:
 7  */
 8 public interface ApplicationContext {
 9
10     Object getBean(String name);
11 }
以及相应的实现:
ClassPathXmlApplicationContext.java
 1 package com.yize.ioc.context;
 2
 3 import com.yize.ioc.BeanDefinition;
 4 import com.yize.ioc.factory.AutowireCapableBeanFactory;
 5 import com.yize.ioc.factory.BeanFactory;
 6 import com.yize.ioc.io.URLResource;
 7 import com.yize.ioc.xml.XmlBeanDefinitionReader;
 8
 9 import java.util.Map;
10
11 /**
12  * @author: yize.jjx
13  * @date: 2018-12-08 21:10
14  * @desc:
15  */
16 public class ClassPathXmlApplicationContext implements ApplicationContext{
17
18     private String configLocation;
19
20     private BeanFactory beanFactory;
21
22     public ClassPathXmlApplicationContext(String configLocation){
23         this(configLocation, new AutowireCapableBeanFactory());
24     }
25
26     public ClassPathXmlApplicationContext(String configLocation, BeanFactory beanFactory){
27         this.configLocation = configLocation;
28         this.beanFactory = beanFactory;
29         refresh();
30     }
31
32     private void refresh(){
33         XmlBeanDefinitionReader xmlBeanDefinitionReader = new XmlBeanDefinitionReader(new URLResource(configLocation));
34         for(Map.Entry<String, BeanDefinition> entry : xmlBeanDefinitionReader.getBeanDefinitionMap().entrySet()) {
35             this.beanFactory.registerBeanDefinition(entry.getKey(), entry.getValue());
36         }
37     }
38
39     @Override
40     public Object getBean(String name) {
41         return beanFactory.getBean(name);
42     }
43 }
可以看到我们在refresh这个函数中实现了将XmlBeanDefinitionReader中读取到的bean的定义向BeanFactory中转移的过程。
9、最后,大功告成,我们可以执行文章最开始的那段代码来测试一下:
 1 package com.yize.ioc;
 2
 3 import com.yize.ioc.context.ApplicationContext;
 4 import com.yize.ioc.context.ClassPathXmlApplicationContext;
 5 import org.junit.Test;
 6
 7 /**
 8  * @author: yize.jjx
 9  * @date: 2018-12-08 20:40
10  * @desc:
11  */
12 public class TestIOC {
13
14     @Test
15     public void testMyIOC(){
16         ApplicationContext context = new ClassPathXmlApplicationContext("application.xml");
17
18         HelloWorldService helloWorldService = (HelloWorldService) context.getBean("helloWorldService");
19         helloWorldService.showHelloWorld();
20
21         User user = (User) context.getBean("user");
22         user.showUser();
23
24     }
25 }
执行结果:
jeysin:13
yize

Process finished with exit code 0
可以看到,我们的IOC容器确实实现了从xml文件中读取配置然后注入到bean中,为了测试我们的IOC是否能解决循环依赖这个问题,我们可以在测试用例中加几行测试代码:
 1 package com.yize.ioc;
 2
 3 import com.yize.ioc.context.ApplicationContext;
 4 import com.yize.ioc.context.ClassPathXmlApplicationContext;
 5 import org.junit.Test;
 6
 7 /**
 8  * @author: yize.jjx
 9  * @date: 2018-12-08 20:40
10  * @desc:
11  */
12 public class TestIOC {
13
14     @Test
15     public void testMyIOC(){
16         ApplicationContext context = new ClassPathXmlApplicationContext("application.xml");
17
18         HelloWorldService helloWorldService = (HelloWorldService) context.getBean("helloWorldService");
19         helloWorldService.showHelloWorld();
20
21         User user = (User) context.getBean("user");
22         user.showUser();
23
24         System.out.println(helloWorldService);
25         System.out.println(helloWorldService.user);
26         System.out.println(helloWorldService.user.helloWorldService);
27         System.out.println(helloWorldService.user.helloWorldService.user);
28     }
29 }
执行结果:
jeysin:13
yize
com.yize.ioc.HelloWorldService@6aa8ceb6
com.yize.ioc.User@2530c12
com.yize.ioc.HelloWorldService@6aa8ceb6
com.yize.ioc.User@2530c12

Process finished with exit code 0
最后输出的结果我就不多说了,我们的IOC容器确实解决了bean与bean之间相互依赖的问题。从最后的结果中也可以看出来,我们的IOC容器中所产生的bean都是单例,毕竟只有在单例模式下这种循环依赖的问题才是可解的,如果是非单例模式,这种循环依赖是无解的,类的实例之间一定会层层依赖下去,最终导致JVM被挤爆。
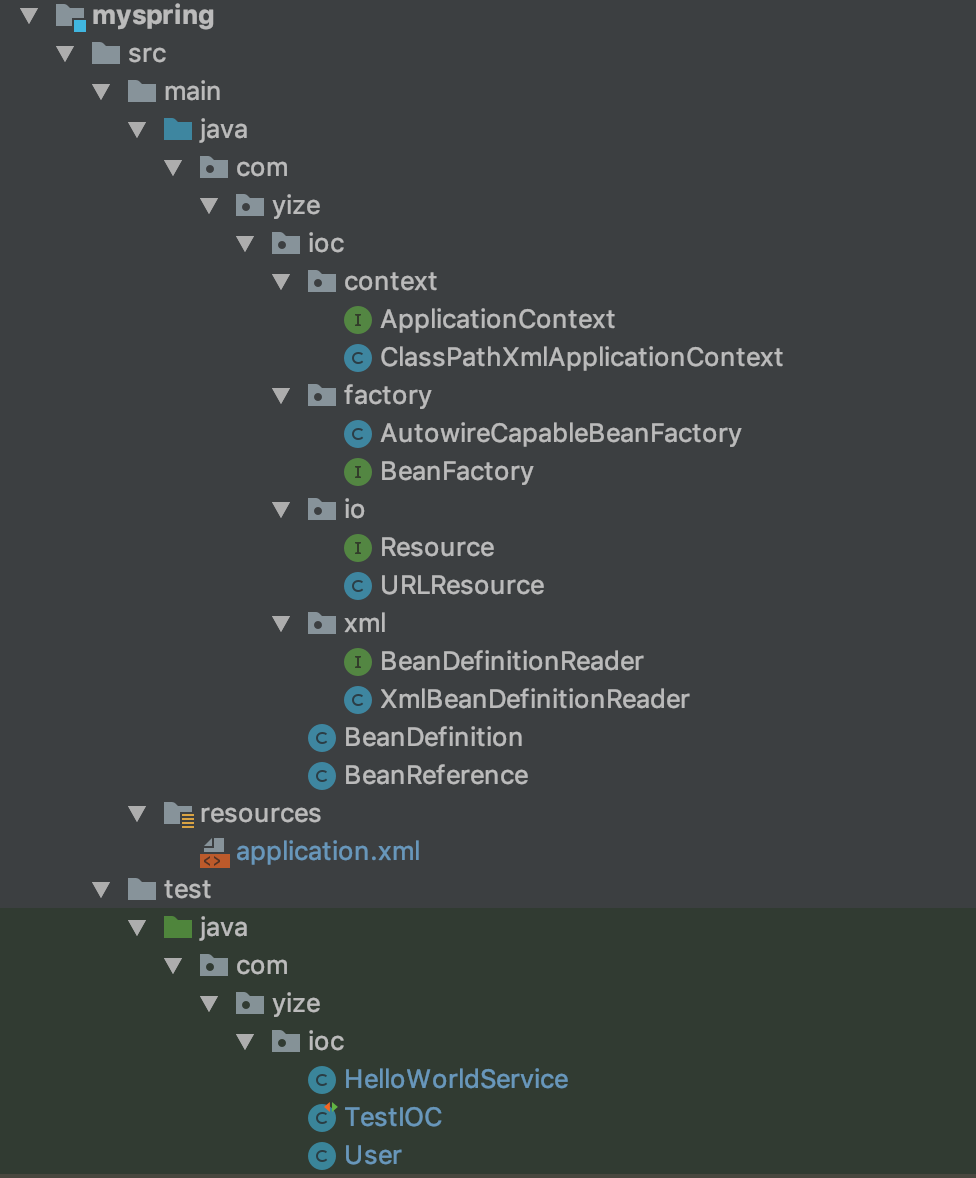
最后附上整个项目的目录结构:
参考文章:
https://github.com/code4craft/tiny-spring


【推荐】国内首个AI IDE,深度理解中文开发场景,立即下载体验Trae
【推荐】编程新体验,更懂你的AI,立即体验豆包MarsCode编程助手
【推荐】抖音旗下AI助手豆包,你的智能百科全书,全免费不限次数
【推荐】轻量又高性能的 SSH 工具 IShell:AI 加持,快人一步
· AI与.NET技术实操系列:基于图像分类模型对图像进行分类
· go语言实现终端里的倒计时
· 如何编写易于单元测试的代码
· 10年+ .NET Coder 心语,封装的思维:从隐藏、稳定开始理解其本质意义
· .NET Core 中如何实现缓存的预热?
· 分享一个免费、快速、无限量使用的满血 DeepSeek R1 模型,支持深度思考和联网搜索!
· 基于 Docker 搭建 FRP 内网穿透开源项目(很简单哒)
· 25岁的心里话
· ollama系列01:轻松3步本地部署deepseek,普通电脑可用
· 按钮权限的设计及实现