[MAUI]在.NET MAUI中复刻苹果Cover Flow
@
Cover Flow是iTunes和Finder中的一个视图选项,允许用户使用水平滚动的图像查看他们的音乐库或文件。
2007年9月5日iPod classic/nano3/touch在同一场发布会上发布,苹果首次向我们展示了Cover Flow

在iOS7之前的“音乐”App中,旋转设备90度,或在iTunes中的“查看”下,选择“Cover Flow”都可以进入到Cover Flow视图。
Cover Flow的交互设计非常优秀:通过指尖滑动从堆叠的专辑库中翻动和挑选一张专辑的交互方式不仅有趣,而且在有限的屏幕空间内,展现了更多的专辑封面。
但由于流媒体时代弱化了专辑的概念,拟物化设计退潮以及设备性能/续航等方面的考虑,苹果逐步放弃了Cover Flow。
在2012年新发布的iTunes 11,2013年新发布的iOS 7,以及2018年发布的MacOS Mojave中删除了Cover Flow界面,Gallery View取而代之
那个是乔布斯时代的苹果——使事情变得简单和有趣。最近我很怀念这个功能,但由于我手头上已经没有任何一台设备能访问这个功能了。于是在
.NET MAUI 中复刻了Cover Flow。
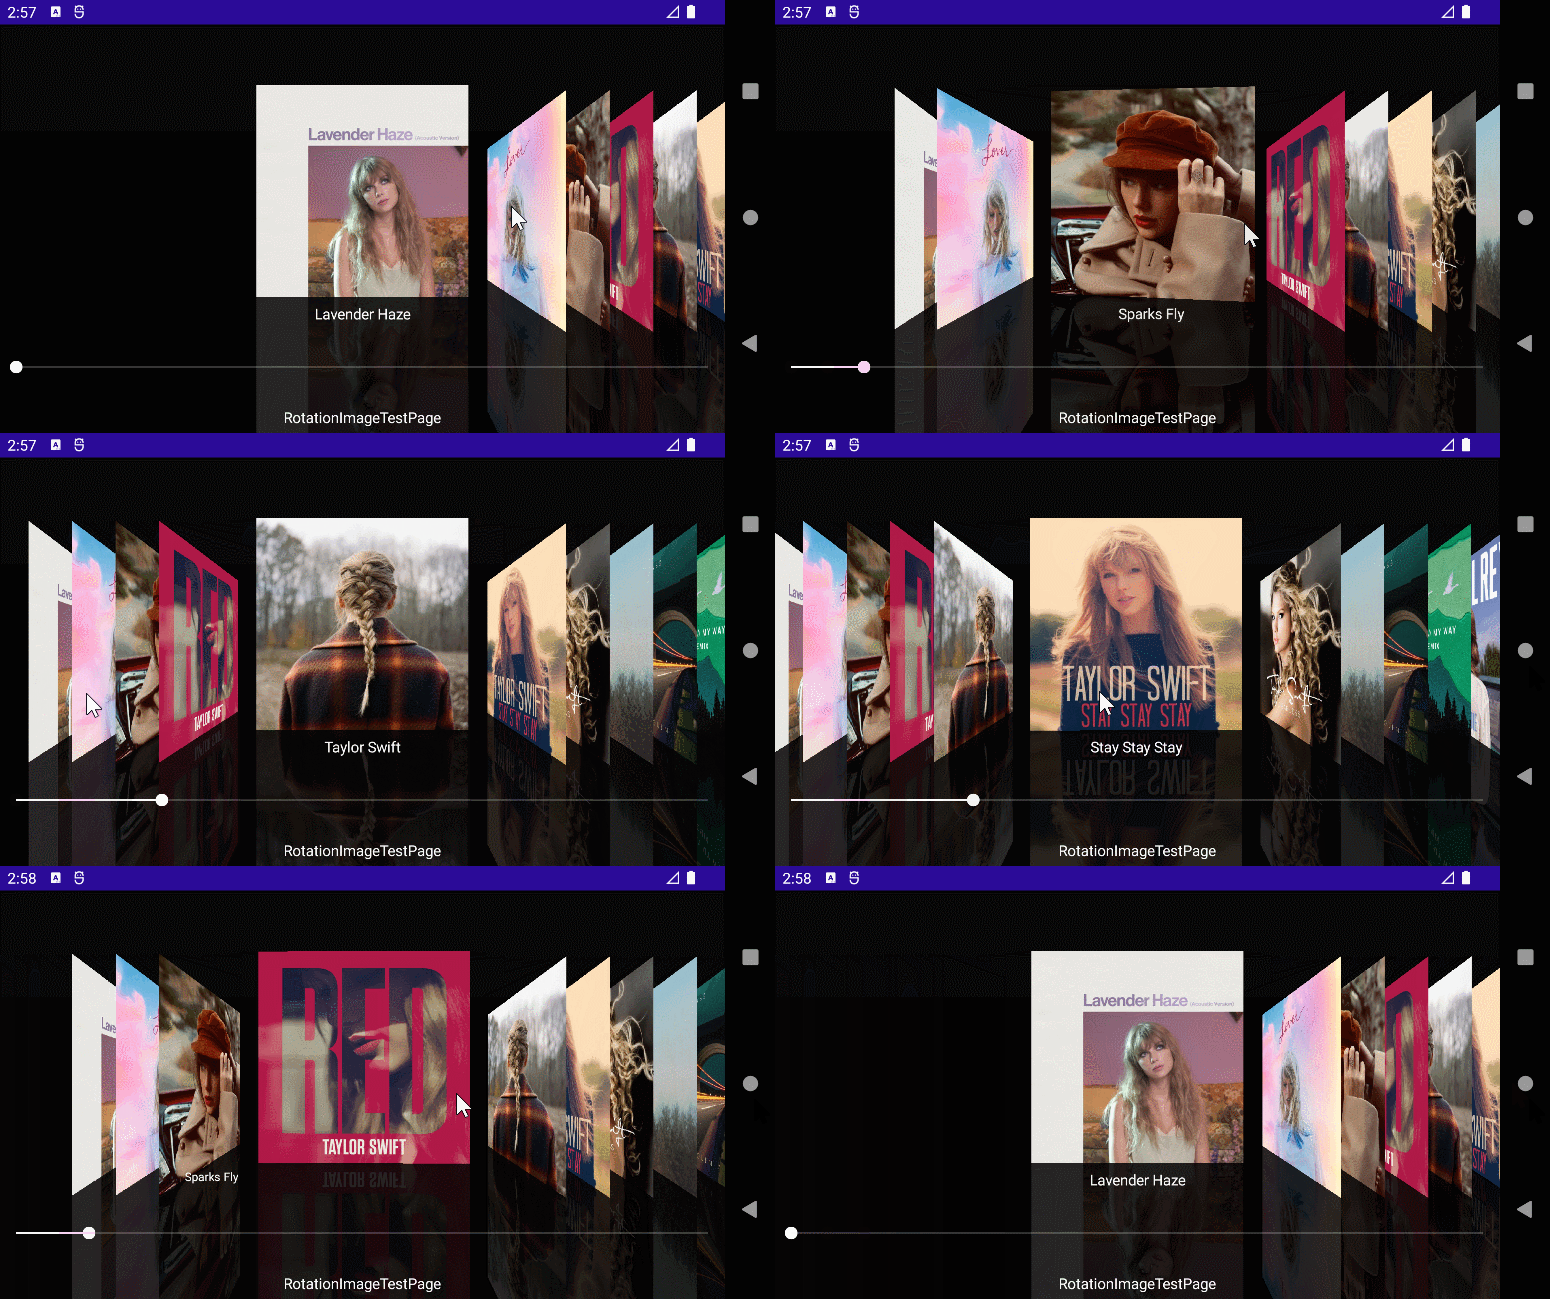
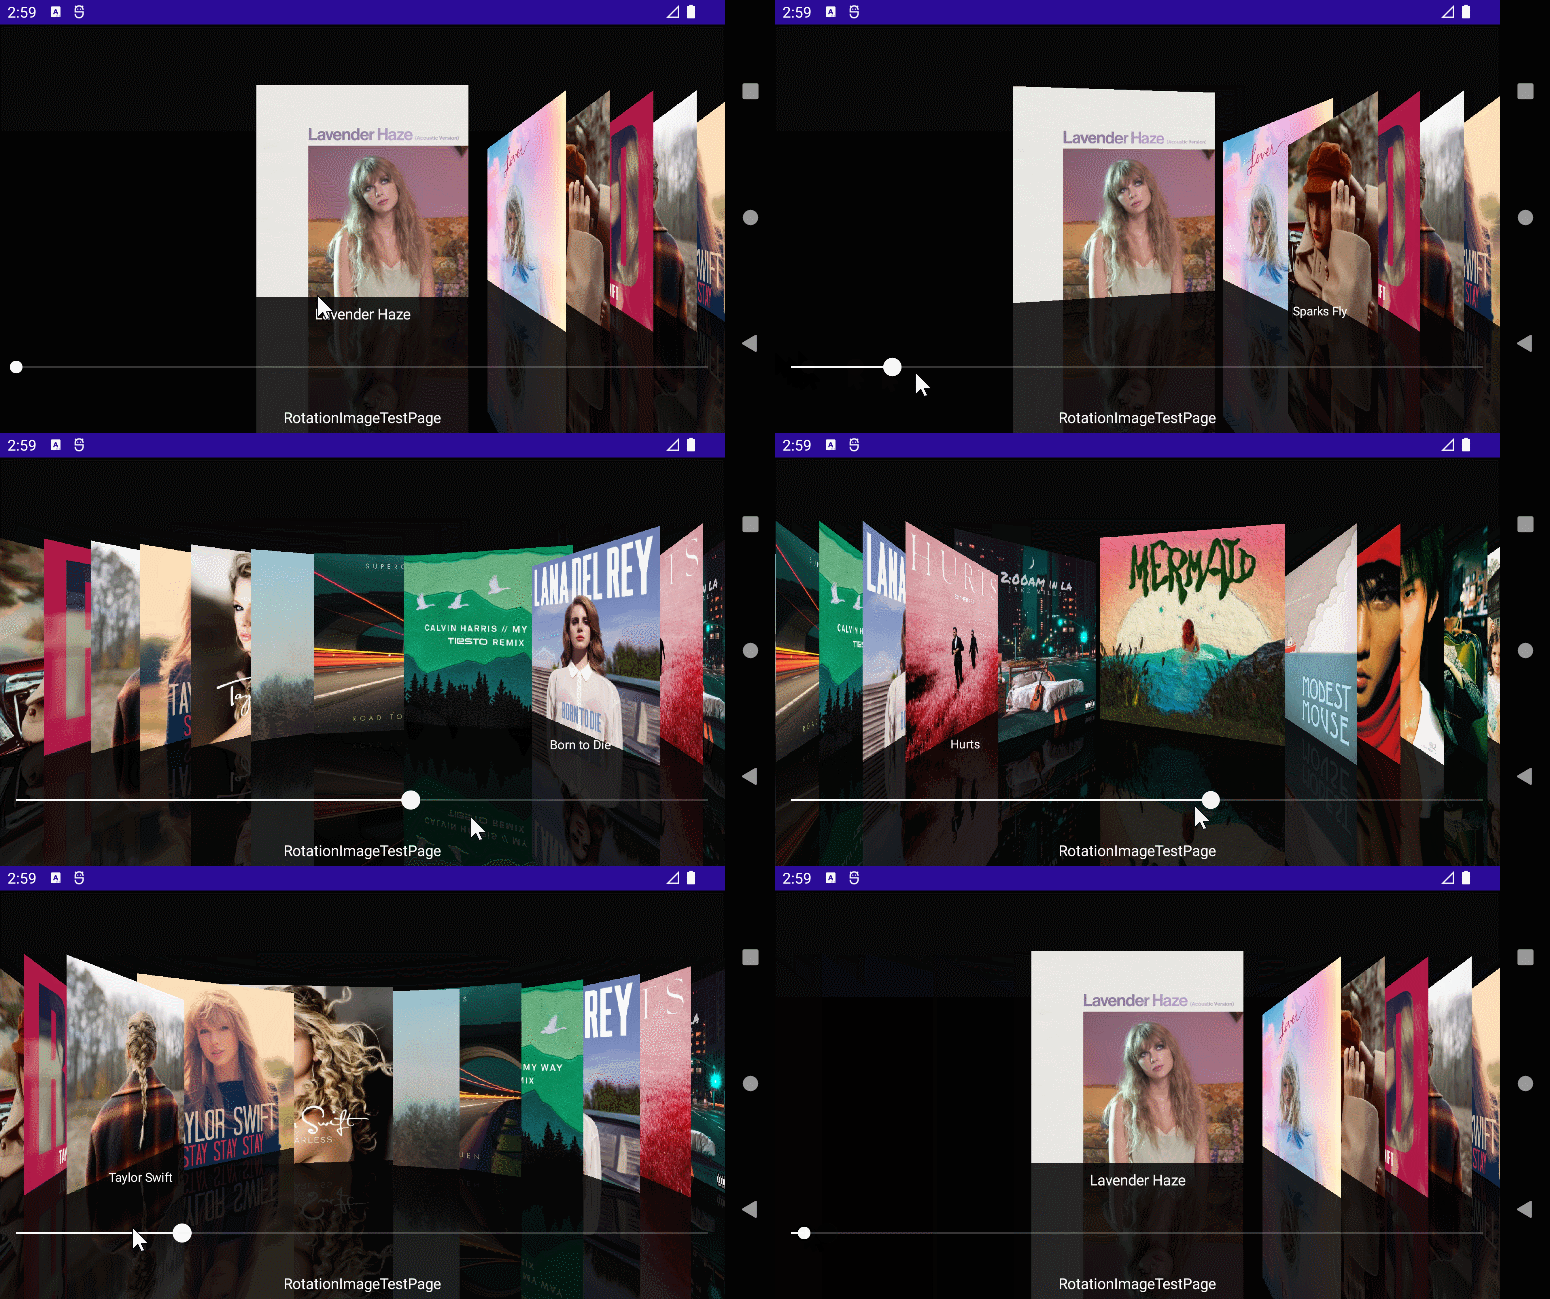
使用.NET MAUI实现跨平台支持,本项目可运行于Android、iOS平台。
原理
实际上,Cover flow的原理非常简单,核心算法是对专辑图片进行3D变换(3DTransform)。
.NET MAUI 并没有直接提供3D变换,但我们可以通过SkiaSharp来实现。
PS: Skia 本身是一个开源图形库,它提供适用于各种语言和硬件平台的通用 API,(如 C++/Qt、Chrome、Android、iOS等 ),根据本博文提到的算法,你可以用Skia尝试在你擅长的平台上实现相同的效果。
3D旋转
视图元素的3D变换(3DTransform)中,有一类是以视图元素的Y或X轴作为旋转中心做旋转,称之为3D旋转,除了专业的程序设计领域外,经常使用图形处理工具,甚至是ppt的同学可能都熟悉这个概念。在ppt中插入图形,设置形状格式,可以看到“三维旋转”的选项,如下图:
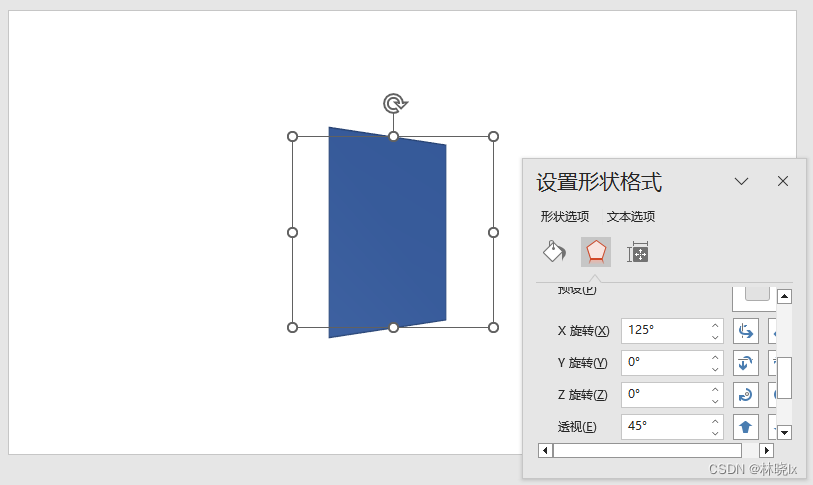
这里涉及到一个透视的概念,透视是指在视觉上,远处的物体比近处的物体小,来思考一下,在现实世界中要看到同样大小的物体,可以离得很近,视野变大,物体的畸变会变大。也可以离得很远,用一个望远镜去看,视野变小,物体的畸变也会变小。透视参数就是在屏幕中模拟了现实世界中近大远小透视效果,我简单用ptt做一个演示:
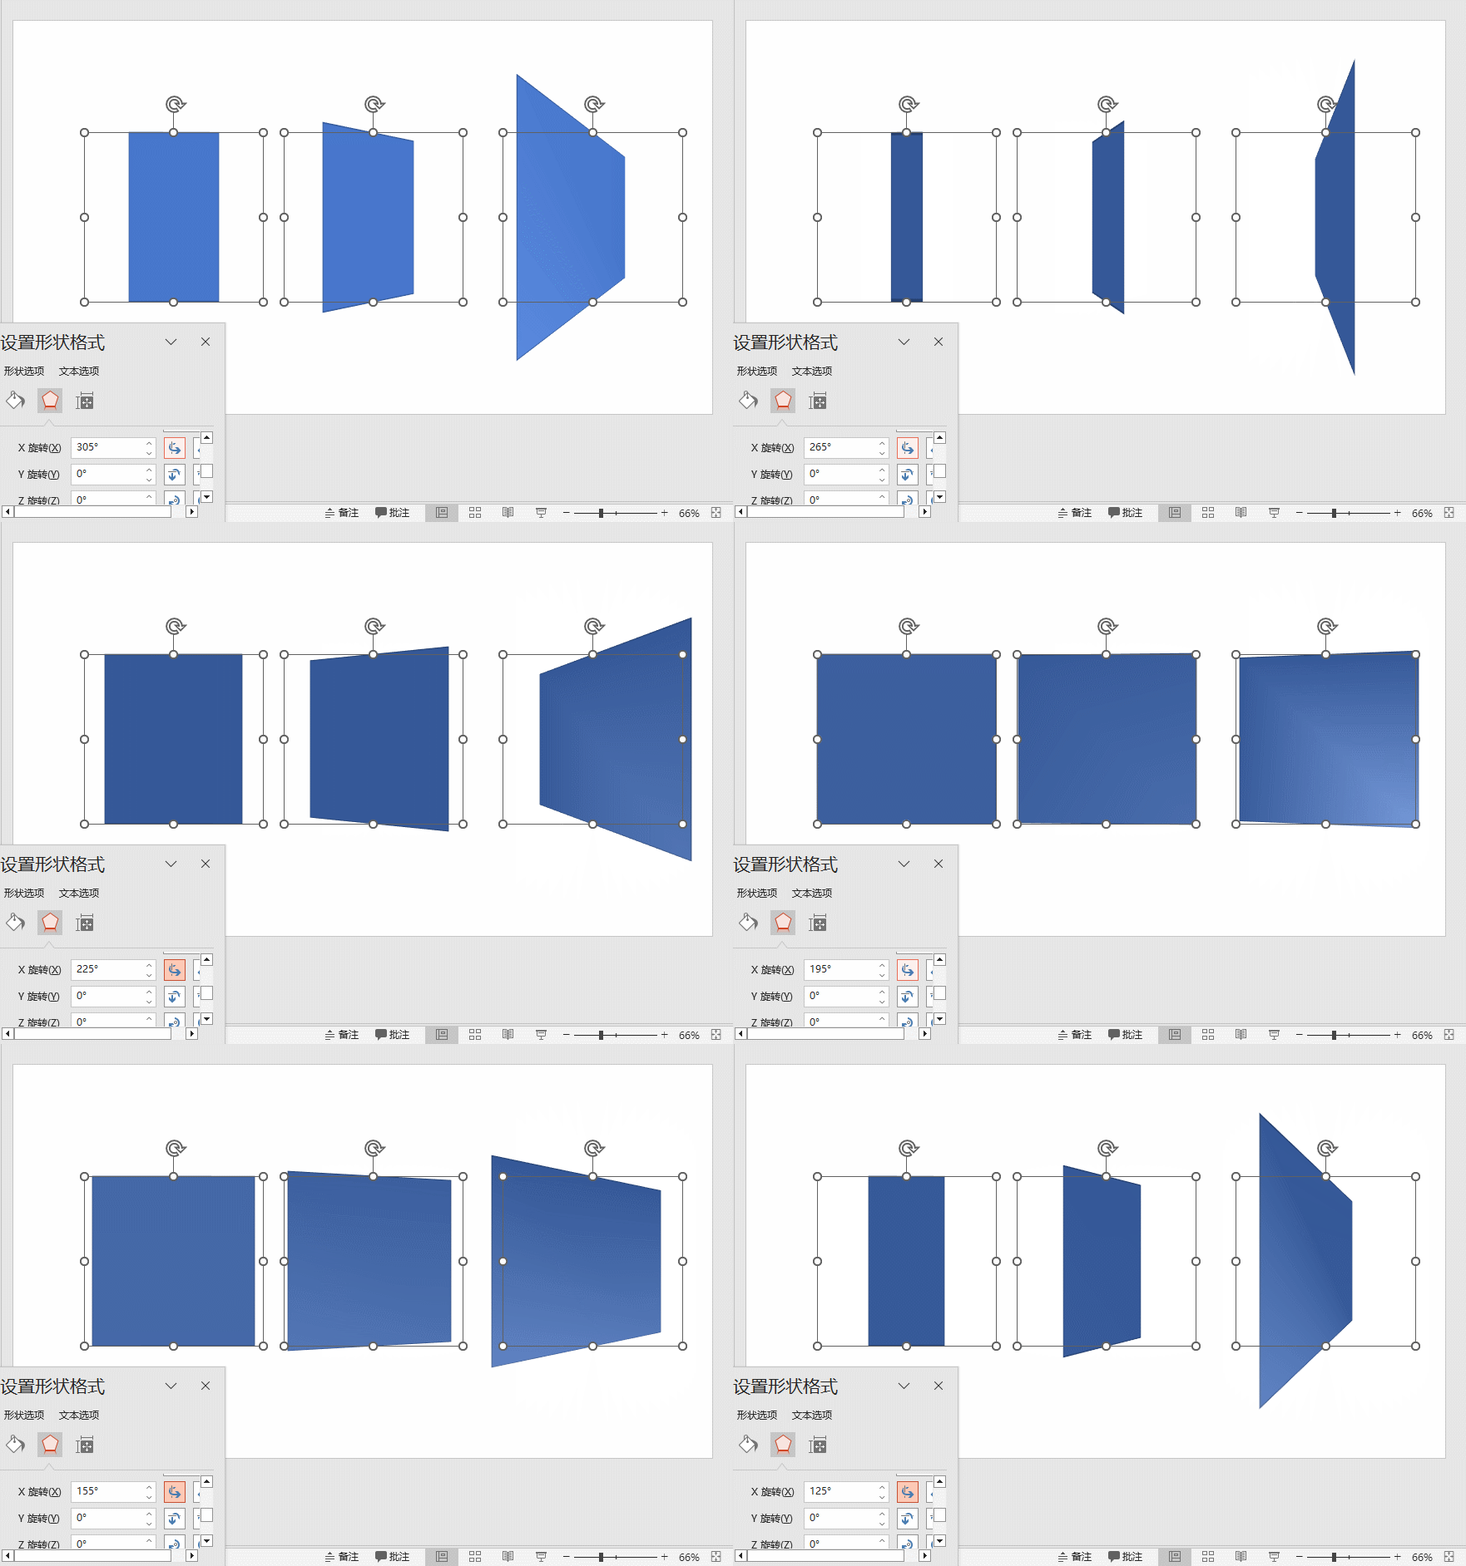
三个图形沿Y轴方向旋转, 从左到右透视距离依次减小,透视角度依次增大,换句话说是离得更近,视野变大,物体的畸变变大。
在大多数支持3D旋转的图形系统中都会包含透视这个参数变量,如css中的perspective亦或是ppt中的“透视”格式。
在Skia中,3D变换是通过矩阵乘法实现的,这里需要大致了解数字图像处理的基本知识,可以参考这里。
矩阵乘法就是把原始图像矩阵的横排和变换矩阵的竖排相应位相乘,将结果相加。
在二维空间,原始图像中的每个像素点 (x,y) 所代表的单列矩阵,通过变换矩阵相乘,得到新的像素点 (x',y')。
例如缩小图像:
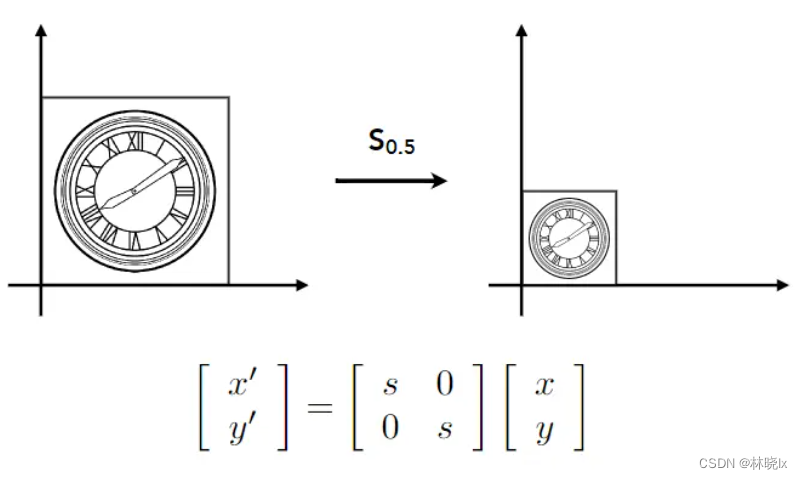
因为要考虑平移等非线性计算,常用3*3的矩阵来表示变换
在三维空间,用一个4*4的矩阵来表示变换,例如围绕Y轴旋转的变换矩阵如下:
|  cos(α)  0  –sin(α)  0  |
|    0     1     0     0  |
|  sin(α)  0   cos(α)  0  |
|    0     0     0     1  |
平行变换
另外涉及到的图像处理是平行变换(Skew),每一个平台上的值可能不同,但是原理都是通过增加或减少X轴或Y轴的值来实现平行变换。
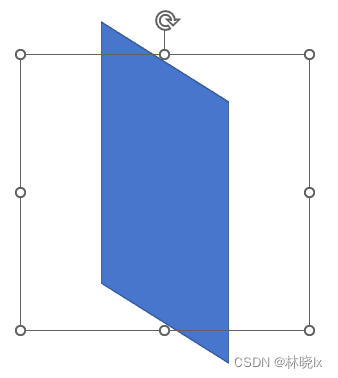
在Skia中,根据参数值转换 x' 后的值随着 y 增加而增加。 这就是导致倾斜的原因。
如有一个200*100的图形,其左上角位于 (0、0) 的点上,并且呈现 xSkew 值为 1.5,则以下并行影像结果如下:
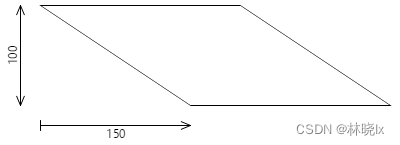
底部边缘 y 的坐标值为 100,因此将 150 像素移向右侧。
接下来我们用代码实现3D变换
创建3D变换控件
我们还是以分治的思路实现,图片变换由控件内部实现,平移及动画由控件外部实现。
新建.NET MAUI项目,命名Coverflow。将界面图片资源文件拷贝到项目\Resources\Raw中并将他们包含在MauiImage资源清单中。
<ItemGroup>
	  <MauiImage Include="Resources\Raw\*.jpg" />
</ItemGroup>
在项目中添加SkiaSharp绘制功能的引用Microsoft.Maui.Graphics.Skia以及SkiaSharp.Views.Maui.Controls。
<ItemGroup>
    <PackageReference Include="Microsoft.Maui.Graphics.Skia" Version="7.0.59" />
    <PackageReference Include="SkiaSharp.Views.Maui.Controls" Version="2.88.3" />
</ItemGroup>
创建3D变换的图片控件RotationImage.xaml,代码如下:
<?xml version="1.0" encoding="utf-8" ?>
<ContentView xmlns="http://schemas.microsoft.com/dotnet/2021/maui"
             xmlns:x="http://schemas.microsoft.com/winfx/2009/xaml"
             xmlns:forms="clr-namespace:SkiaSharp.Views.Maui.Controls;assembly=SkiaSharp.Views.Maui.Controls"
             x:Class="Coverflow.RotationImage">

        <forms:SKCanvasView x:Name="canvasView"
                           Grid.Row="8"
                           PaintSurface="OnCanvasViewPaintSurface" />

</ContentView>
绘制封面图片
在RotationImage.xaml.cs中添加代码:
SKBitmap对象
public SKBitmap bitmap { get; private set; }
初始化方法,以及在图形大小变化时应用初始化
private async void RotationImage_SizeChanged(object sender, EventArgs e)
{
    await InitBitmap();
}

private async Task InitBitmap()
{
    using (Stream stream = await FileSystem.OpenAppPackageFileAsync("./15.jpg"))
    {
        if (stream!=null)
        {
            var mainDisplayInfo = DeviceDisplay.Current.MainDisplayInfo;
            var pixcelHeight = mainDisplayInfo.Density*200;
            var pixcelWidth = mainDisplayInfo.Density*200;

            var bitmap = SKBitmap.Decode(stream);
            bitmap= bitmap.Resize(new SKImageInfo((int)pixcelHeight,
                (int)pixcelWidth),
                SKFilterQuality.Medium);
            this.bitmap=bitmap;
        }

    }
}
初始化时将读取图片资源文件,然后将图片缩放到200*200的大小。
注意此处使用mainDisplayInfo.Density将MAUI各平台的逻辑分辨率转为图片的真实分辨率
此时在画布中绘制了一个简单的200*200专辑封面图片

应用3D旋转
在Skia用SKMatrix44类来描述4*4的变换矩阵,同时提供了 CreateRotation 和 CreateRotationDegrees 方法,可用于指定旋转围绕的轴
RotationImage_SizeChanged中,添加代码如下:
SKMatrix matrix = SKMatrix.CreateTranslation(-xCenter, -yCenter);

SKMatrix44 matrix44 = SKMatrix44.CreateIdentity();
matrix44.PostConcat(SKMatrix44.CreateRotationDegrees(1, 0, 0, (float)0));
matrix44.PostConcat(SKMatrix44.CreateRotationDegrees(0, 1, 0, (float)25));
matrix44.PostConcat(SKMatrix44.CreateRotationDegrees(0, 0, 1, (float)0));

SKMatrix44 perspectiveMatrix = SKMatrix44.CreateIdentity();
perspectiveMatrix[3, 2] = -1 / 800;
matrix44.PostConcat(perspectiveMatrix);

matrix= matrix.PostConcat(matrix44.Matrix);

matrix= matrix.PostConcat(
    SKMatrix.CreateTranslation(xCenter, yCenter));
将变换矩阵应用到画布中
canvas.SetMatrix(matrix);
此时在画布中专辑封面图片以800的透视距离,绕Y轴旋转25度
应用平行变换
首先计算倾斜角度,如有一个200*100的图形,其左上角位于 (0、0) 的点上,图中的角度α:
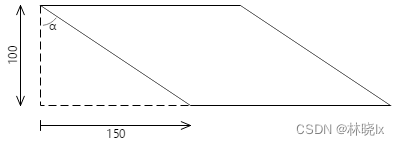
150 像素到 100 像素垂直方向的比率是该角度的正切值,即 56.3 度。
RotationImage_SizeChanged中,对matrix对象应用平行变换
matrix.SkewY = (float)Math.Tan(Math.PI * (float)15 / 180);
此时在画布中专辑封面图片以15度平行变换

绘制倒影
在cover flow中,封面图片包含倒影效果。
之前的绘制的封面图片,在控件中央(也是画布中央)的位置。为了放置倒影后仍然处于控件中心,画布应该一分为二:上半部分绘制封面图片,下半部分绘制倒影。
更改代码:
//float yBitmap = yCenter - bitmap.Height / 2;
float yBitmap = yCenter-bitmap.Height;
绘制倒影封面图片:
using (SKPaint paint = new SKPaint())
{
    paint.Color = SKColors.Black.WithAlpha((byte)(255 * 0.8));
    canvas.Scale(1, -1, 0, yCenter);
    canvas.DrawBitmap(bitmap, xBitmap, yBitmap, paint);
    SKRect rect = SKRect.Create(xBitmap, yBitmap, bitmap.Width, bitmap.Height);
    canvas.DrawRect(rect, paint);
}
倒影用一个黑色半透明的矩形覆盖在原始封面图片上,并且将画布沿Y轴翻转,使得倒影图片在封面图片的下方。

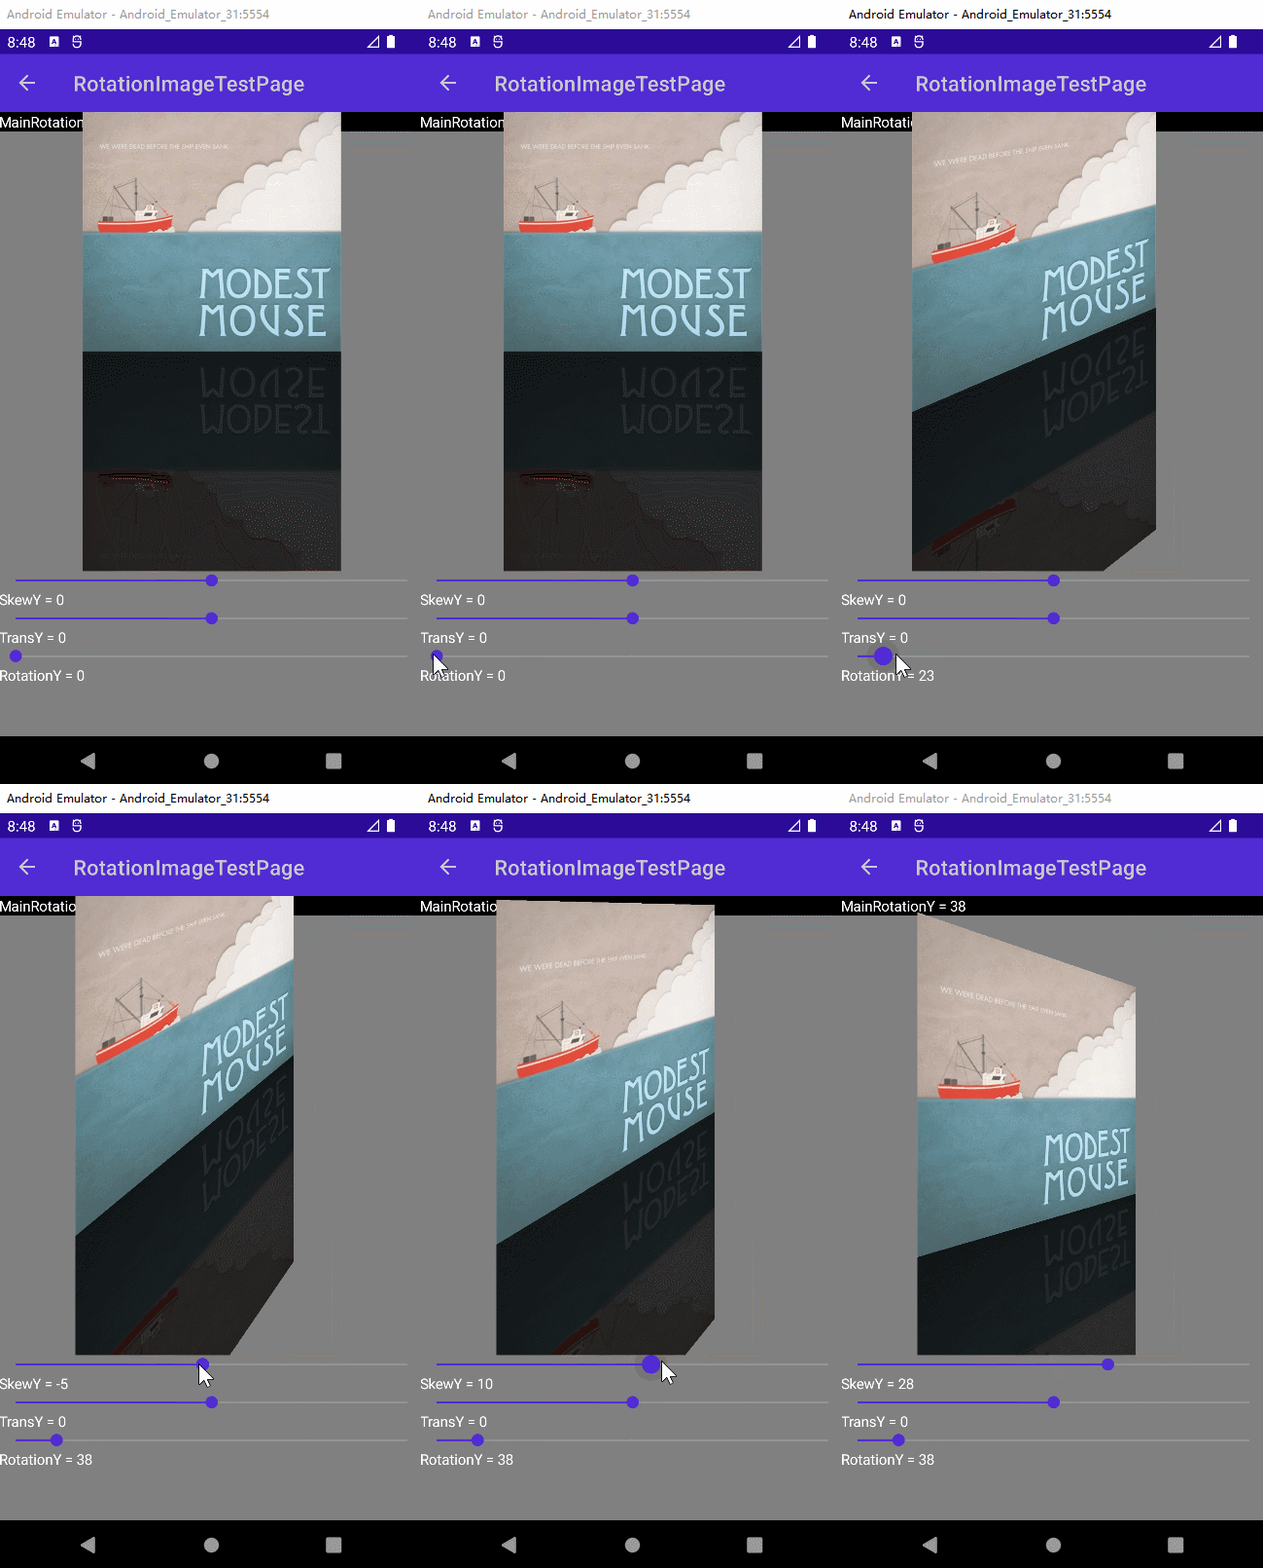
创建绑定属性
将图片源,旋转角度,平行角度等作为绑定属性,以便在XAML中绑定。代码忽略。
创建绑定数据
创建MainPageViewModel.cs,用于界面绑定数据源。
AlbumInfo描述专辑信息
public class AlbumInfo
{
    public AlbumInfo() { }

    public string AlbumName { get; set; }
    public string AlbumArtSource { get; set; }
}
在MainPageViewModel构造函数中,初始化AlbumInfo列表,在控件中绑定此列表作为数据源
创建布局
在MainPage.xaml中,创建一个Grid作为专辑封面容器,我们将使用绑定集合的方式,将专辑封面添加到这个容器中。
代码如下:
<Grid Grid.Row="1"
    x:Name="BoxLayout"
    Background="black"
    BindableLayout.ItemsSource="{Binding AlbumInfos}">
它的DataTemplate代表一个专辑信息,使用Grid布局,专辑封面图片与专辑名称分别位于Grid的第一行和第二行。
<BindableLayout.ItemTemplate>
    <DataTemplate>
        <Grid Style="{StaticResource BoxFrameStyle}"
                Background="Transparent">
            <Grid.RowDefinitions>
                <RowDefinition></RowDefinition>
                <RowDefinition Height="auto"></RowDefinition>
            </Grid.RowDefinitions>
            <controls:RotationImage WidthRequest="200"
                                    HeightRequest="500"
                                    ImageWidth="200"
                                    ImageHeight="200"
                                    Source="{Binding AlbumArtSource}"></controls:RotationImage>


            <Label Margin="0,30,0,0"
                    Text="{Binding AlbumName}"
                    HorizontalTextAlignment="Center"
                    VerticalOptions="Center"></Label>


        </Grid>
    </DataTemplate>

</BindableLayout.ItemTemplate>
对专辑封面Grid的样式进行定义:
<ContentPage.Resources>
   <Style TargetType="Grid"
               x:Key="BoxFrameStyle">
            <Setter Property="HeightRequest"
                    Value="100"></Setter>
            <Setter Property="WidthRequest"
                    Value="100"></Setter>
            <Setter Property="HorizontalOptions"
                    Value="Center"></Setter>
            <Setter Property="VerticalOptions"
                    Value="Center"></Setter>
        </Style>
</ContentPage.Resources>
效果如下:

计算位置
Cover Flow的滑动交互由两种方式实现:1. 左右轻扫屏幕,切换到上一张或下一张专辑封面;2. 拨动底部Slider控件,切换到指定的专辑封面。
两种方式都会改变当前位置,我们将当前位置定义为一个整数,表示当前专辑在容器中的索引。
private int currentPos;
当手势触发时,根据手势方向,改变当前位置:
this.currentPos=e.Direction==SwipeDirection.Right
    ? Math.Max(0, this.currentPos-1)
    : Math.Min(this.BoxLayout.Children.Count-1, this.currentPos+1);
当Slider控件的值发生变化时,根据Slider的值,计算当前位置:
var currentPos = (int)Math.Floor(e.NewValue*  (this.BoxLayout.Children.Count-1));
if (this.currentPos!=currentPos)
{
    this.currentPos = currentPos;
}
当前位置索引的值始终在0到专辑封面数量减1之间。
当前封面是从专辑堆叠中挑选出来的,它的位置是固定的,左右两边的封面相对于当前封面,有一个固定的距离,step为当前封面和左右第一张封面之间的距离,slidePadding为其它封面和当前封面之间的距离。
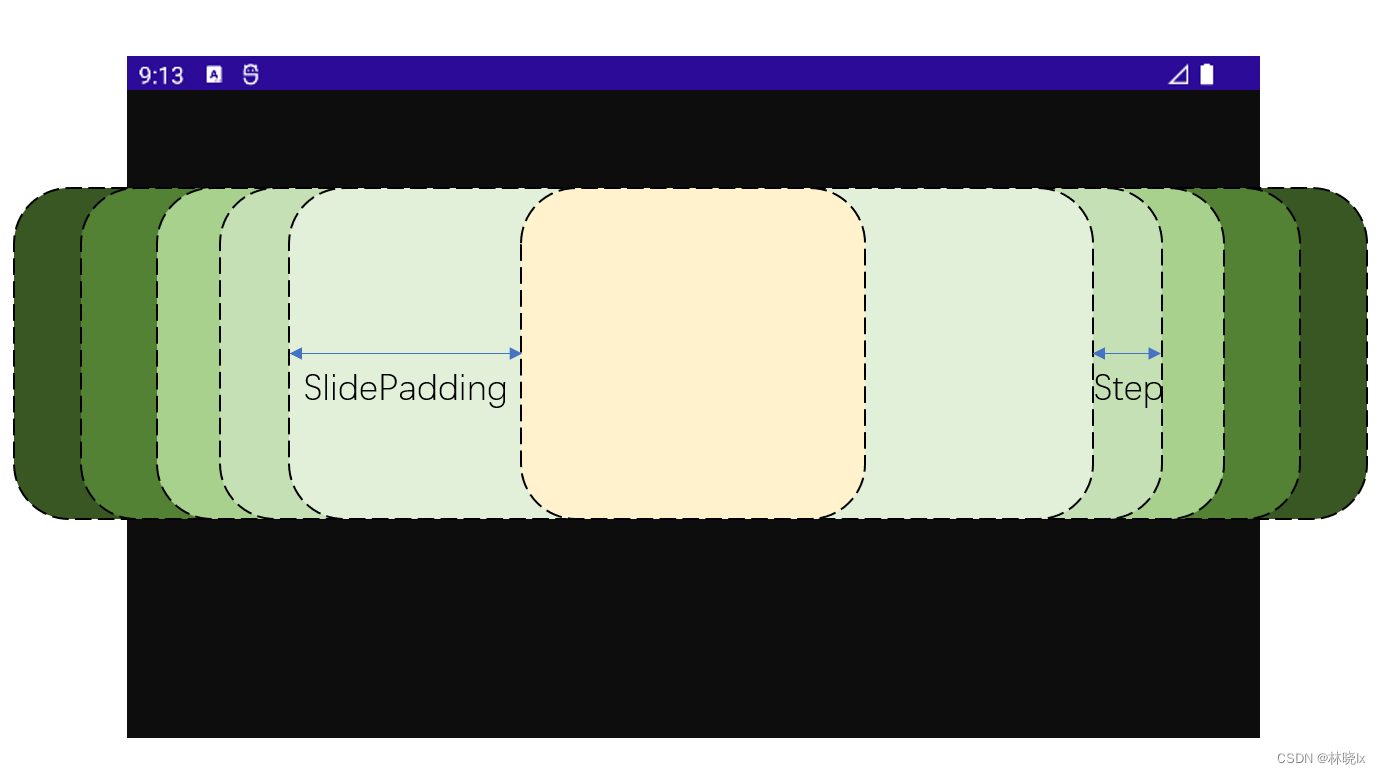
其它封面的位置,分为两种情况:1. 在当前封面的左边;2. 在当前封面的右边。
封面叠层的顺序是当前封面最靠上,左右两边的封面随着距离由近及远,依次向下叠放。
创建RenderTransform方法,作为刷新的入口,当当前位置发生变化时,调用此方法,重新计算每个专辑封面的位置和叠放顺序。
private void RenderTransform(int currentPos)
{
    var step=40.0;
    var currentSlidePadding=100.0;
    foreach (var bitmapLayout in this.BoxLayout.Children)
    {
        var pos = this.BoxLayout.Children.IndexOf(bitmapLayout);
        double xBitmap;
        int zIndex;
        if (pos < currentPos)
        {
            zIndex=pos;
            xBitmap = (double)(-(currentPos * step) + (pos * step)  - currentSlidePadding);
        }
        else if (pos > currentPos)
        {
            zIndex=this.BoxLayout.Children.Count-pos;
            xBitmap = (double)(((pos - currentPos) * step)  + currentSlidePadding);
        }
        else
        {
            xBitmap =  0;
            zIndex=this.BoxLayout.Children.Count;
        }

        (bitmapLayout as VisualElement).ZIndex = zIndex;
        (bitmapObj as RotationImage).TranslationX=xBitmap;
    }
}
创建后,运行效果如下
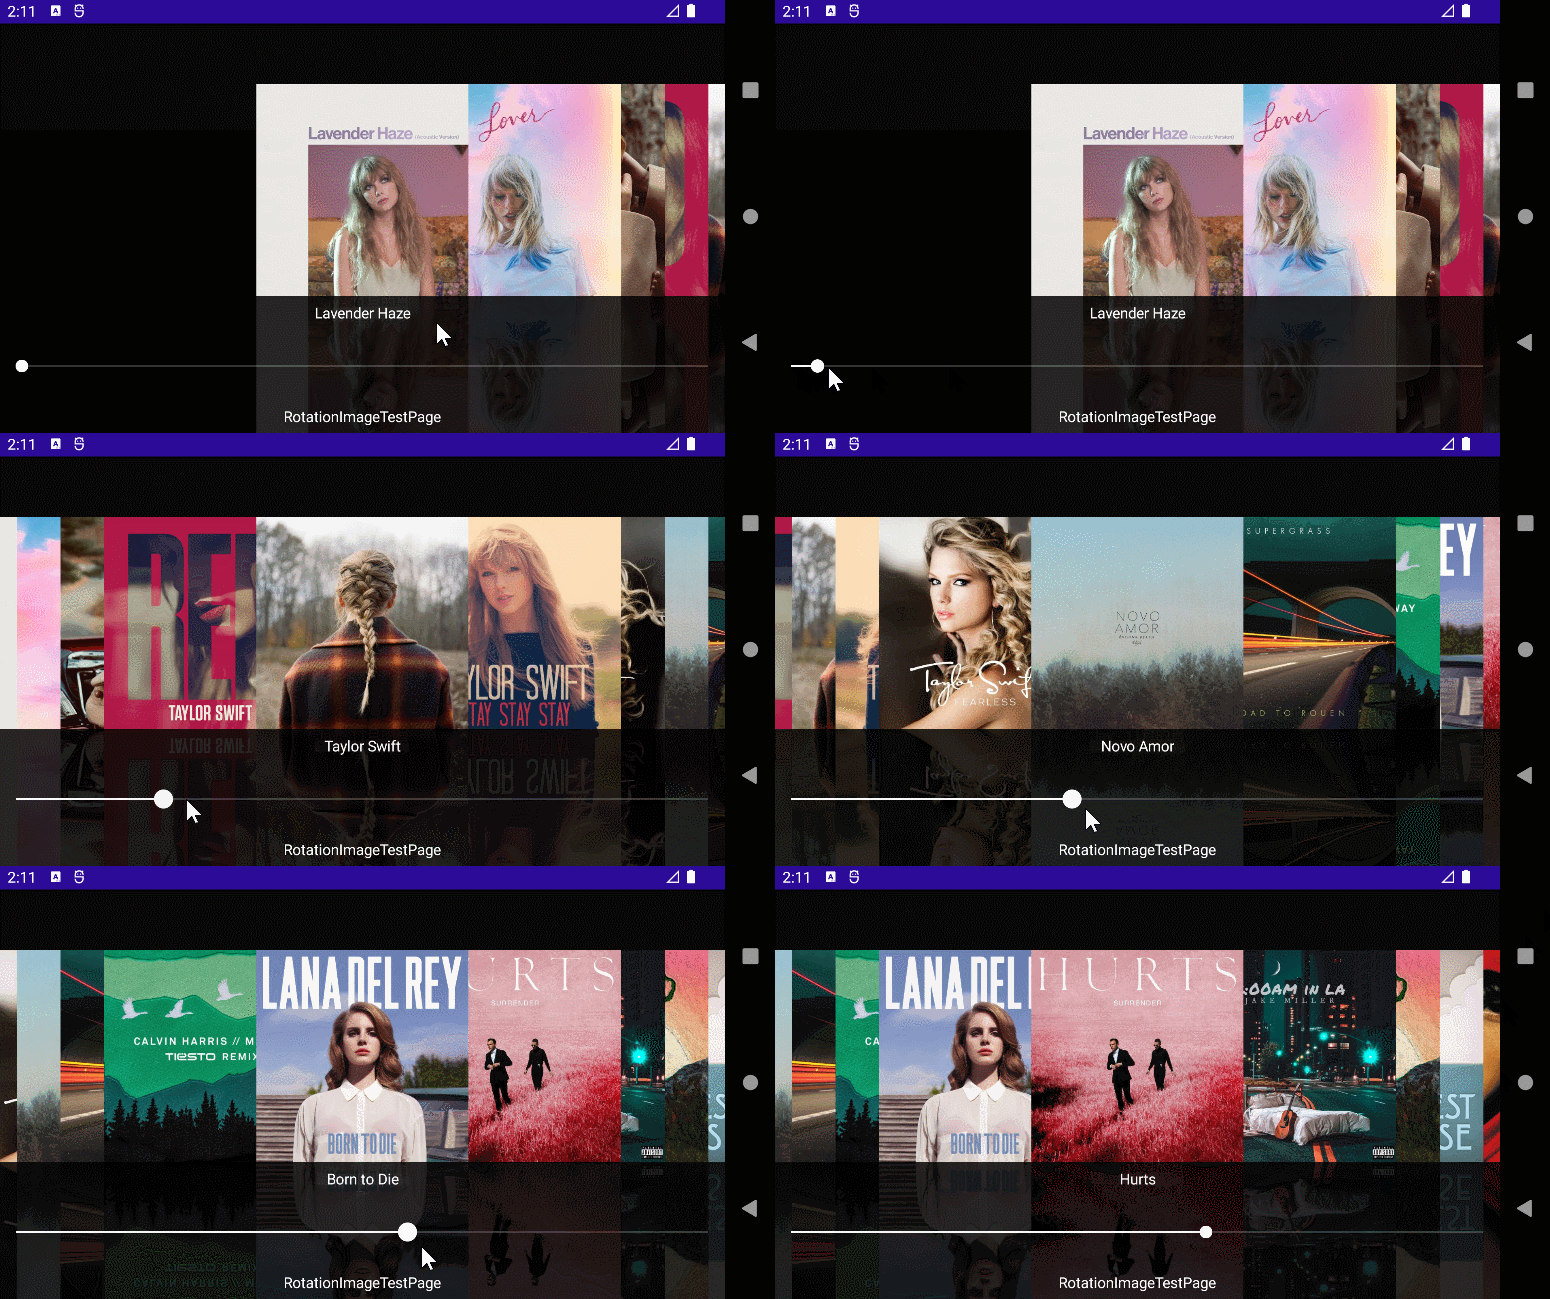
计算3D旋转
我们对当前封面的左边的封面,以及当前封面的右边的封面,分别计算旋转角度,以实现3D效果。
var rotateY = 65;
foreach (var bitmapLayout in this.BoxLayout.Children)
{
    double targetRotateY;
    if (pos < currentPos)
    {
        targetRotateY=rotateY;
    }
    else if (pos > currentPos)
    {
        targetTransY=transY;
    }
    else
    {
        targetTransY=0;
    }
    (bitmapObj as RotationImage).RotateY=targetRotateY;
}
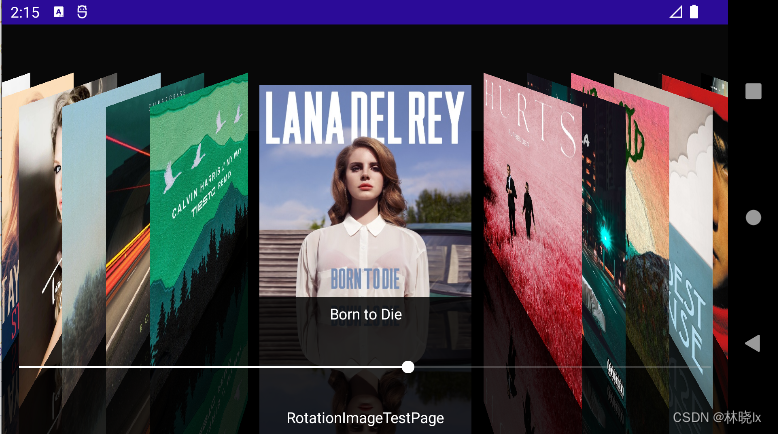
再对3D旋转的封面进行平行变换调整,并对封面位置作微调
var rotateY = 65;
var skewY = 0;
var transY = 0;
foreach (var bitmapLayout in this.BoxLayout.Children)
{

    double targetRotateY;
    double targetSkewY;
    double targetTransY;
    if (pos < currentPos)
    {

        targetRotateY=rotateY;
        targetSkewY=skewY;
        targetTransY=-transY;

    }
    else if (pos > currentPos)
    {

        targetRotateY=-rotateY;
        targetSkewY=-skewY;
        targetTransY=transY;
    }
    else
    {
        targetRotateY=0;
        targetSkewY=0;
        targetTransY=0;

    }

    (bitmapObj as RotationImage).RotateY=targetRotateY;
    (bitmapObj as RotationImage).TranslationX=xBitmap;
    (bitmapObj as RotationImage).SkewY=targetSkewY;
    (bitmapObj as RotationImage).TransY=targetTransY;
}
最后配置封面图片的缩放,以及封面标题显示、隐藏。
效果如下:
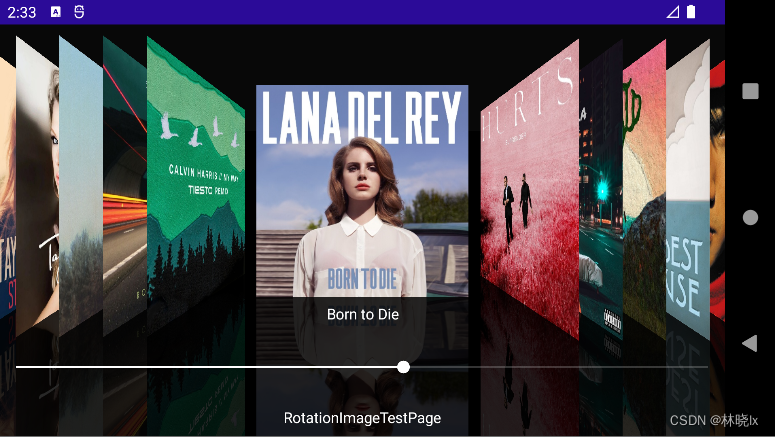
至此我们完成了静态的工作内容,下一步要让界面的过渡动画更加流畅,我们将使用MAUI的动画框架,实现平滑的过渡动画。
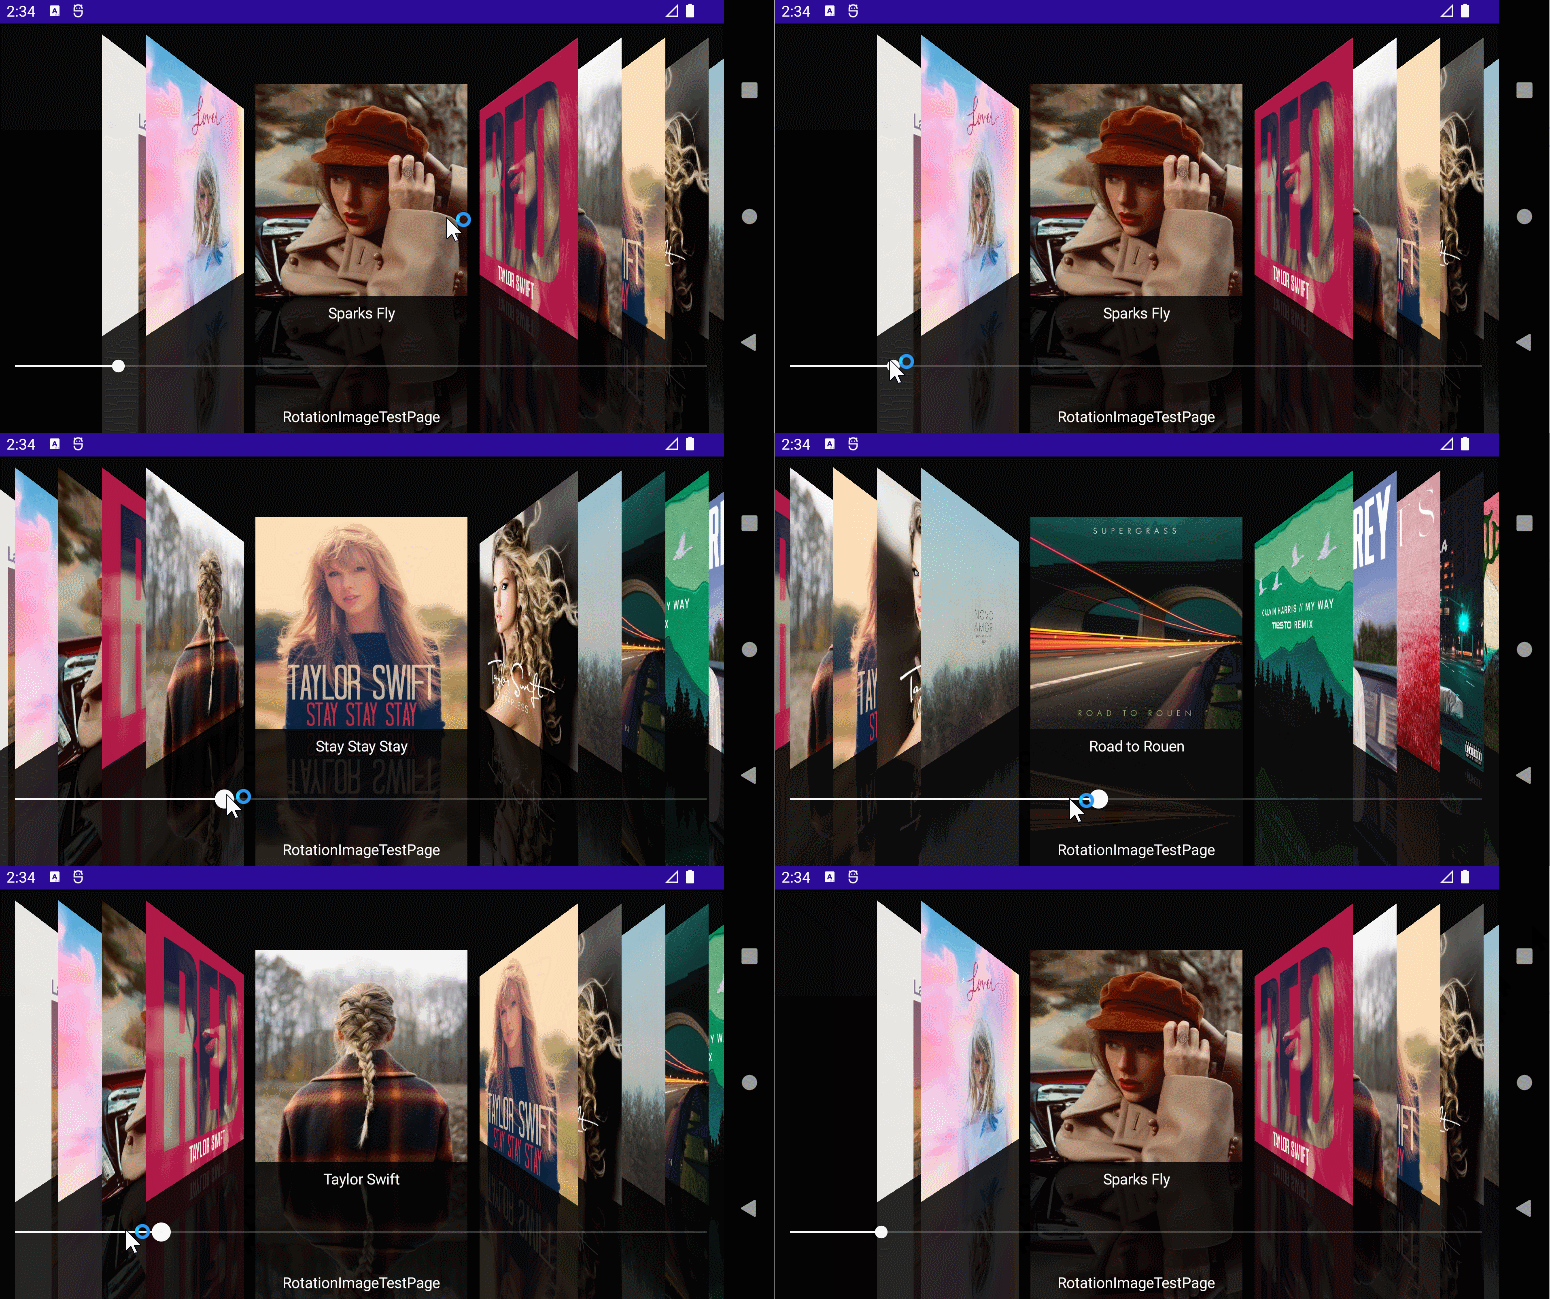
创建动效
我们通过创建Animation对象,添加子动画来实现。详情请参考Animation子动画。
RotateY、SkewY、TranslationX、Scale直接赋值的方式将由动画代替。动画是一种缓动机制,通过属性的缓慢改变实现平滑的过渡动画。
在渲染中我们为每一个封面创建一个Animation对象,然后添加子动画,最后调用Animation对象的Commit方法,
在400ms内将各属性缓慢应用到界面上。各属性步调一致,所以动画的过程是平滑的。
foreach (var bitmapLayout in this.BoxLayout.Children)
{
    uint duration = 400;
    ...

    Animation albumAnimation = new Animation();


    var originTranslationX = (bitmapLayout as VisualElement).TranslationX;
    var originScale = (bitmapLayout as VisualElement).Scale;
    var animation1 = new Animation(v => (bitmapLayout as VisualElement).TranslationX = v, originTranslationX, xBitmap, Easing.CubicInOut);
    var animation2 = new Animation(v => (bitmapLayout as VisualElement).Scale = v, originScale, targetScale, Easing.CubicInOut);


    if (targetSkewY!=(bitmapObj as RotationImage).SkewY)
    {
        var animation4 = new Animation(v => (bitmapObj as RotationImage).SkewY = v, (bitmapObj as RotationImage).SkewY, targetSkewY, Easing.CubicInOut);
        albumAnimation.Add(0, 1, animation4);

    }

    if (targetRotateY!=(bitmapObj as RotationImage).RotateY)
    {
        var animation3 = new Animation(v => (bitmapObj as RotationImage).RotateY = v, (bitmapObj as RotationImage).RotateY, targetRotateY, Easing.CubicInOut);
        albumAnimation.Add(0, 1, animation3);

    }

    if (targetTransY!=(bitmapObj as RotationImage).TransY)
    {
        var animation5 = new Animation(v => (bitmapObj as RotationImage).TransY = v, (bitmapObj as RotationImage).TransY, targetTransY, Easing.CubicInOut);
        albumAnimation.Add(0, 1, animation5);

    }
    albumAnimation.Add(0, 1, animation1);
    albumAnimation.Add(0, 1, animation2);

    albumAnimation.Commit((bitmapLayout as VisualElement), "AlbumArtImageAnimation", 16, duration);
}
效果如下:
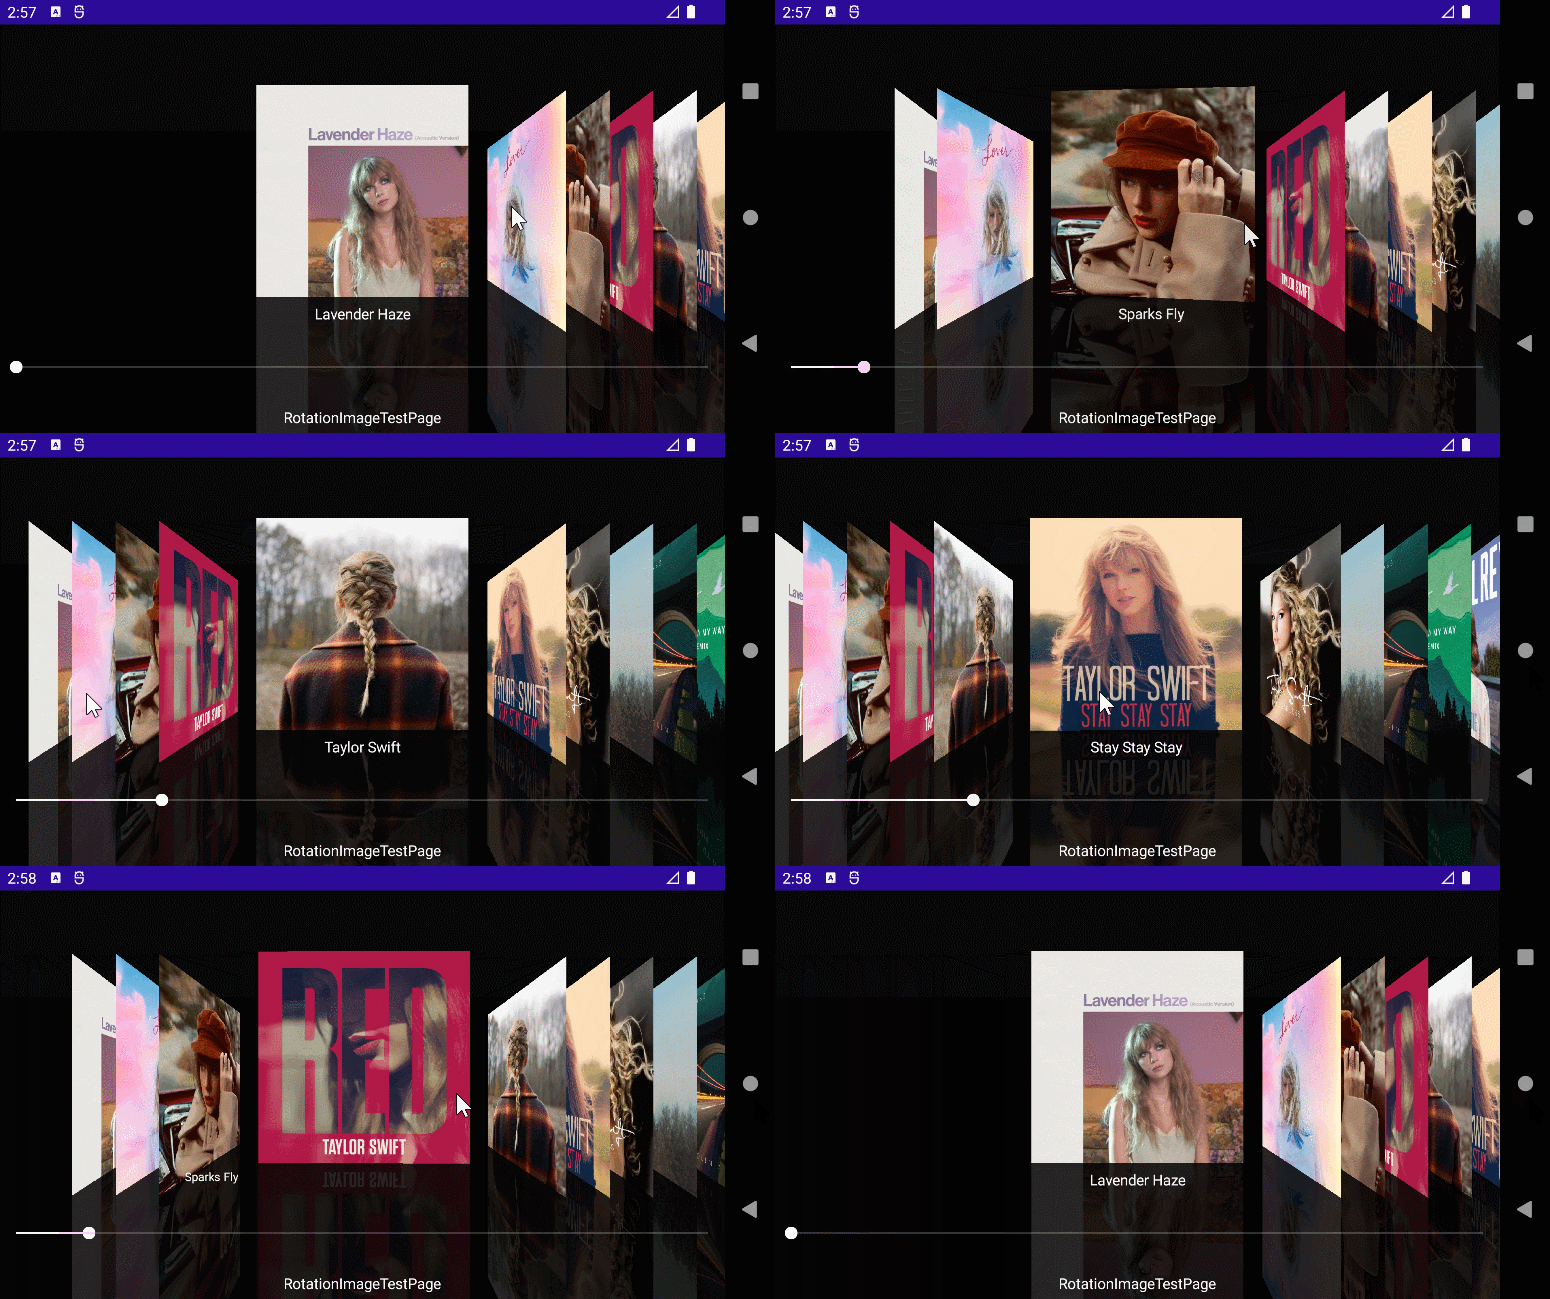
在页面大小变化时,重新渲染变换。
    private void MainPage_SizeChanged(object sender, EventArgs e)
    {
        RenderTransform(currentPos);
    }
step和currentSlidePadding值将由屏幕宽度计算得出,使得在不同屏幕大小设备,或者横竖屏切换时,效果保持一致。
var xCenter = this.BoxLayout.Width / 2;
var step = xCenter*0.12;
var currentSlidePadding = this.BoxLayout.Width * 0.15;

项目地址
关注我,学习更多.NET MAUI开发知识!
本文来自博客园,作者:林晓lx,转载请注明原文链接:https://www.cnblogs.com/jevonsflash/p/17419483.html


![[MAUI]在.NET MAUI中复刻苹果Cover Flow](https://img2023.cnblogs.com/blog/644861/202305/644861-20230521232341468-1516279050.png) Cover Flow是iTunes和Finder中的一个视图选项,允许用户使用水平滚动的图像查看他们的音乐库或文件。Cover Flow的交互设计非常优秀:通过指尖滑动从堆叠的专辑库中翻动和挑选一张专辑的交互方式不仅有趣,而且在有限的屏幕空间内,展现了更多的专辑封面。那个是乔布斯时代的苹果——使事情变得简单和有趣。最近我很怀念这个功能,但由于我手头上已经没有任何一台设备能访问这个功能了。于是在.NET MAUI中复刻了Cover Flow。
Cover Flow是iTunes和Finder中的一个视图选项,允许用户使用水平滚动的图像查看他们的音乐库或文件。Cover Flow的交互设计非常优秀:通过指尖滑动从堆叠的专辑库中翻动和挑选一张专辑的交互方式不仅有趣,而且在有限的屏幕空间内,展现了更多的专辑封面。那个是乔布斯时代的苹果——使事情变得简单和有趣。最近我很怀念这个功能,但由于我手头上已经没有任何一台设备能访问这个功能了。于是在.NET MAUI中复刻了Cover Flow。

 浙公网安备 33010602011771号