
[RN] 07 - UI Component: TextInput, Image, Picker, ProgressBar & Viewpager
输入框
- 实现目标
- 代码分析
/** * Sample React Native App * https://github.com/facebook/react-native */ 'use strict'; import React, { Component } from 'react'; import { AppRegistry, StyleSheet, PixelRatio, ScrollView, Text, TextInput, View } from 'react-native'; var onePT = 1 / PixelRatio.get(); class DongFang extends Component { render() { return ( <View style={[styles.flex,styles.topStatus]}> <Search></Search> </View> ); } } class Search extends Component {
constructor(props){ super(props); this.state = { // ----> 状态在这里 show:false, value:null, }; } hide(val){ this.setState( { show: false, value: val, } ); }
/**
* 积极改变状态中的value属性值,
* 页面也就自动更新了
*/ getValue(text){ this.setState({ show : true, value: text, }); } render(){ return( <View style={styles.flex}>
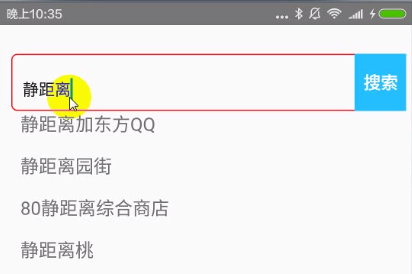
<View style={styles.flexDirection}> <View style={[styles.flex,styles.input]}> <TextInput keyboardType = "web-search" placeholder = "请输入关键词" value = {this.state.value} onChangeText = {this.getValue.bind(this)}/> </View> <View style={styles.btn}> <Text style={styles.search} onPress={this.hide.bind(this, this.state.value)}>搜索</Text> </View> </View> {this.state.show? <View style={styles.result}> <Text onPress={this.hide.bind(this, this.state.value + '加东方QQ')} style={styles.item} numberOfLines={1}>{this.state.value}加东方QQ</Text> <Text onPress={this.hide.bind(this, this.state.value + '园街')} style={styles.item} numberOfLines={1}>{this.state.value}园街</Text> <Text onPress={this.hide.bind(this, 80 + this.state.value + '综合商店')} style={styles.item} numberOfLines={1}>80{this.state.value}综合商店</Text> <Text onPress={this.hide.bind(this, this.state.value + '桃')} style={styles.item} numberOfLines={1}>{this.state.value}桃</Text> <Text onPress={this.hide.bind(this, '东方耀' + this.state.value )} style={styles.item} numberOfLines={1}>东方耀{this.state.value}</Text> </View> : null }
</View> ); } } const styles = StyleSheet.create({ item:{ fontSize:16, paddingTop:5, paddingBottom:10, }, result:{ marginTop:onePT, marginLeft:18, marginRight:5, height:200, }, flex:{ flex:1, }, flexDirection:{ flexDirection:'row', }, topStatus:{ marginTop:25, }, input:{ height:50, borderColor:'red', borderWidth:1, marginLeft:10, paddingLeft:5, borderRadius:5, }, btn:{ width:45, marginLeft:-5, marginRight:5, backgroundColor:'#23BEFF', height:50, justifyContent:'center', alignItems:'center', }, search:{ color:'#fff', fontSize:15, fontWeight:'bold', }, }); AppRegistry.registerComponent('DongFang', () => DongFang);
Image
网络图片,本地图片,相机拍照
- 实现效果

view包裹text,再利用touchable支持点击事件。
- 代码分析
/**
 * Sample React Native App
 * https://github.com/facebook/react-native
 */
'use strict';

import React, { Component } from 'react';
import {
    AppRegistry,
    StyleSheet,
    PixelRatio,
    Text,
    Image,
    TouchableOpacity,
    View
} from 'react-native';


var imgs=[
    'https://www.baidu.com/img/bd_logo1.png',
    'https://gss1.bdstatic.com/5eN1dDebRNRTm2_p8IuM_a/res/img/xiaoman2016_24.png',
    'http://bbs.izengzhi.com/template/qing/image/izengzhi.png'
];

class DongFang extends Component {
  render() {

    return (
        <View style={[styles.flex,{marginTop:45}]}>
            <MyImage imgs={imgs}> </MyImage>
        </View>
    );
  }
}

class MyImage extends Component{
    constructor(props){
        super(props);
        this.state = {
            count:0,                     // 对应数组的index
            imgs:this.props.imgs,
        };
    }


    //source={{uri:this.state.imgs[this.state.count]}}  【网络图片】
    //source={require('./xiaoman2016_24.png')}      【本地图片】

    render(){

        return(
            <View style={[styles.flex,{alignItems:'center'}]}>
                <View style={styles.image}>
                    <Image style={styles.img}
                        resizeMode ="contain"  // cover, contain, stretch
                        source     ={{uri:this.state.imgs[this.state.count]}}
                    />
                </View>

                <View style={styles.btns}>
                    <TouchableOpacity onPress={this.goPreview.bind(this)}><View style={styles.btn}><Text>上一张</Text></View></TouchableOpacity>
                    <TouchableOpacity onPress={this.goNext.bind(this)}><View style={styles.btn}><Text>下一张</Text></View></TouchableOpacity>
                </View>
            </View>
        );
    }

    // 左按键
    goPreview(){
        var count=this.state.count;
        count--;
        if(count>=0){
            this.setState({
                count:count,
            });
        }
    }

    // 右按键
    goNext(){
        var count=this.state.count;
        count++;
        if(count<this.state.imgs.length){
            this.setState({
                count:count,
            });
        }
    }
}

const styles = StyleSheet.create({

    btn:{
        width:60,
        height:30,
        borderColor:'#0089FF',
        borderWidth:1,
        justifyContent:'center',
        alignItems:'center',
        borderRadius:3,
        marginRight:20,

    },
    btns:{
        flexDirection:'row',
        marginTop:20,
        justifyContent:'center',
    },
    img:{
        height:150,
        width:200,
    },
    image:{
      borderWidth:1,
        width:300,
        height:200,
        borderRadius:5,         // 圆角
        borderColor:'#ccc',
        justifyContent:'center',
        alignItems:'center',
    },
  flex:{
    flex:1,
  },
});

AppRegistry.registerComponent('DongFang', () => DongFang);
- 使用原生开发图片资源
<Image source={{uri: 'app_icon'}} style={{width: 40, height: 40}} />
app_icon:图片的名字
Picker
- 实现效果
类似于单选。

- 代码分析
/** * Sample React Native App * https://github.com/facebook/react-native */ 'use strict'; import React, { Component } from 'react'; import { AppRegistry, StyleSheet, PixelRatio, Text, Image, TouchableOpacity, Picker, View } from 'react-native';
class DongFang1 extends Component { constructor(props){ super(props); this.state = { language:null }; } //箭头函数 ES6 render() { return ( <View style={[styles.flex,{marginTop:45}]}>
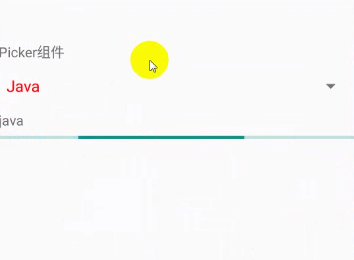
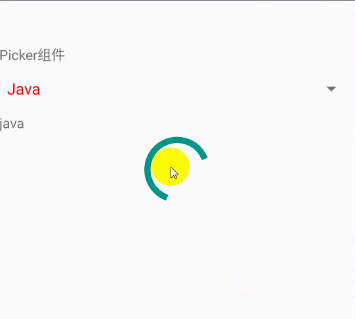
<Text>Picker组件</Text> <Picker selectedValue={this.state.language} onValueChange={lang => this.setState({language: lang})} mode ="dialog" style ={{color:'#f00'}} > <Picker.Item label="Java" value="java" /> <Picker.Item label="JavaScript" value="js" /> <Picker.Item label="C语言" value="c" /> <Picker.Item label="PHP开发" value="php" /> </Picker>
<Text>{this.state.language}</Text>
</View> ); } } const styles = StyleSheet.create({ flex:{ flex:1, }, }); AppRegistry.registerComponent('DongFang1', () => DongFang1);
进度条
- 进度条的实现在android和ios上有所不同
(1) ProgressBarAndroid
(2) ProgressViewIOS
- Horizontal 效果
- LargeInverse 效果
- 代码分析
/**
 * Sample React Native App
 * https://github.com/facebook/react-native
 */
'use strict';

import React, { Component } from 'react';
import {
    AppRegistry,
    StyleSheet,
    PixelRatio,
    Text,
    Image,
    TouchableOpacity,
    Picker,
    ProgressBarAndroid,
    Switch,
    View
} from 'react-native';

class DongFang1 extends Component {

  constructor(props){
    super(props);
    this.state = {
      language:null
    };
  }

  //箭头函数 ES6
  render() {
    return (

        <View style={[styles.flex,{marginTop:45}]}>

          <Text>Picker组件</Text>

          <Picker
              selectedValue={this.state.language}
              onValueChange={lang => this.setState({language: lang})}
              mode         ="dialog"
              style        ={{color:'#f00'}}
          >
            <Picker.Item label="Java" value="java" />
            <Picker.Item label="JavaScript" value="js" />
            <Picker.Item label="C语言" value="c" />
            <Picker.Item label="PHP开发" value="php" />
          </Picker>

          <Text>{this.state.language}</Text>

          # Horizontal Small Large Inverse SmallInverse LargeInverse
          <ProgressBarAndroid styleAttr="LargeInverse" />

        </View>
    );
  }
}

const styles = StyleSheet.create({

  flex:{
    flex:1,
  },
});

AppRegistry.registerComponent('DongFang1', () => DongFang1);
ViewPager
- 未来想法
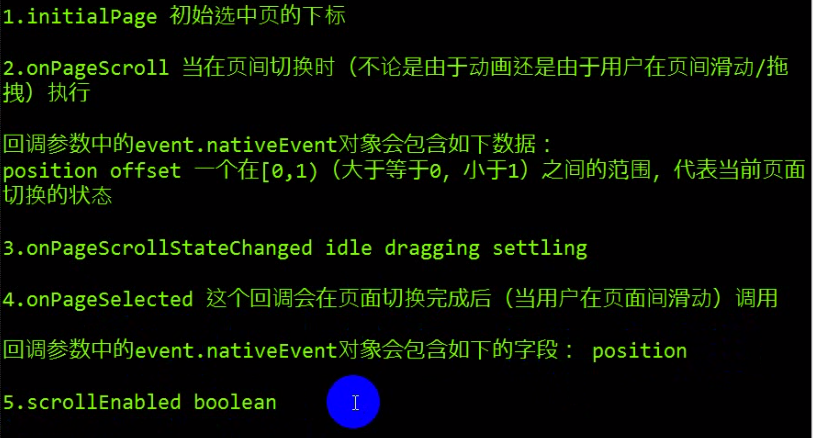
- 一些基本属性
- 代码分析
#当然,这里只是低级用法

/**
 * Sample React Native App
 * https://github.com/facebook/react-native
 */
'use strict';

import React, { Component } from 'react';
import {
    AppRegistry,
    StyleSheet,
    Text,
    ViewPagerAndroid,
    View
} from 'react-native';


class DongFang1 extends Component {
  render() {

    return (

       <ViewPagerAndroid
           initialPage={0}
           style={[styles.flex,styles.viewpager]}
       >
           <View style={styles.center}><Text style={[{fontSize:12},{color:'red'}]}>第一个页面</Text></View>
           <View style={styles.center}><Text style={{fontSize:20}}>                第二个页面</Text></View>
           <View style={styles.center}><Text style={{fontSize:30}}>                第三个页面</Text></View>
       </ViewPagerAndroid>
    );
  }
}


const styles = StyleSheet.create({

  flex:{
      flexDirection:'column',
  },
  viewpager:{
      height:200,
  },
  center:{
      justifyContent:'center',      主轴:默认垂直
      alignItems:    'center',      交叉轴
  },
});

AppRegistry.registerComponent('DongFang1', () => DongFang1);

 浙公网安备 33010602011771号