[diffusion] Stable Diffusion
从这里开始找 image2video 相关的论文。
基础知识
Stable Diffusion 架构,以及与其他模型的区别。
Goto: Stable Diffusion原理解读
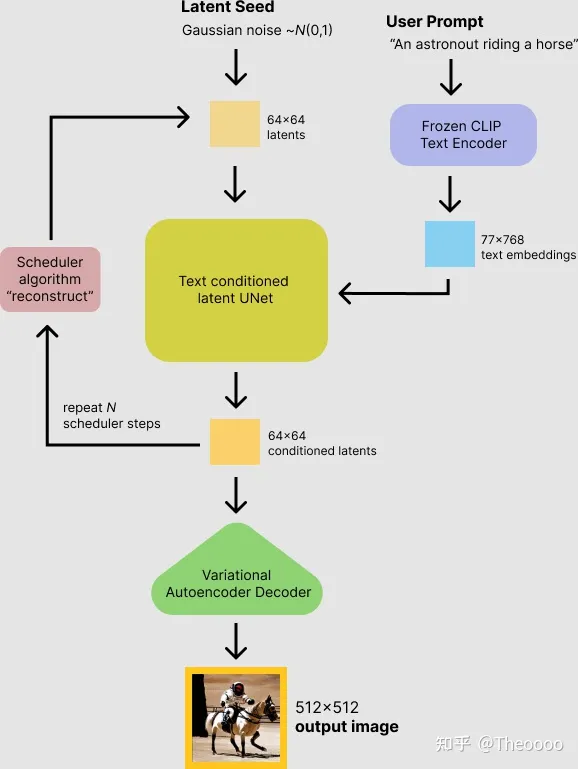
Stable Diffusion基于Latent Diffusion Models,专门用于文图生成任务。
目前,Stable Diffusion发布了v1版本,即Stable Diffusion v1,它是Latent Diffusion Models的一个具体实现。
具体来说,它特指这样的一个模型架构设置:
-
- 自动编码器下采样因子为8,
- UNet大小为860M,
- 文本编码器为CLIP ViT-L/14。# 基于2021年初的CLIP,故2021年底出现sd。
Architecture
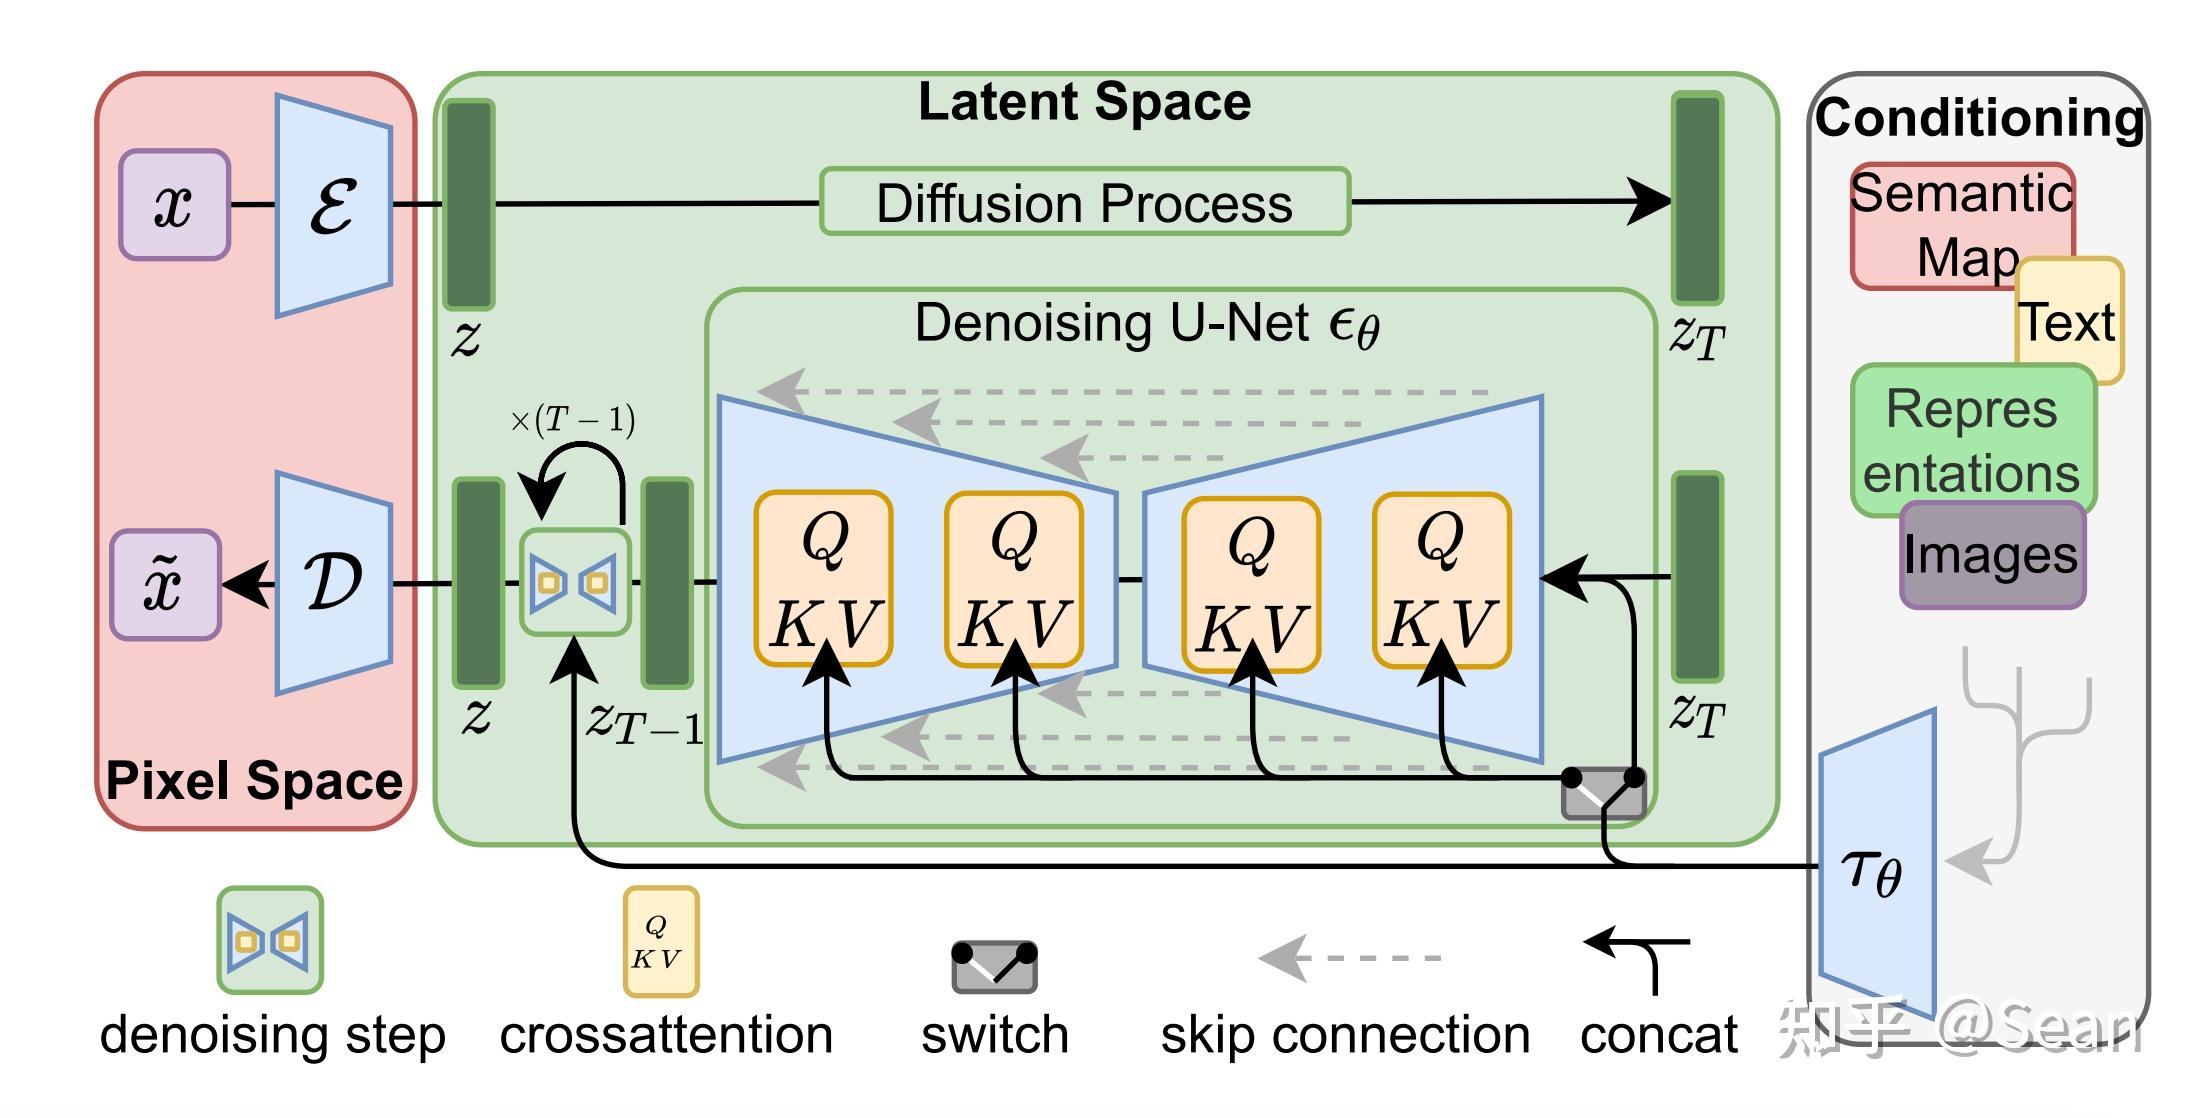
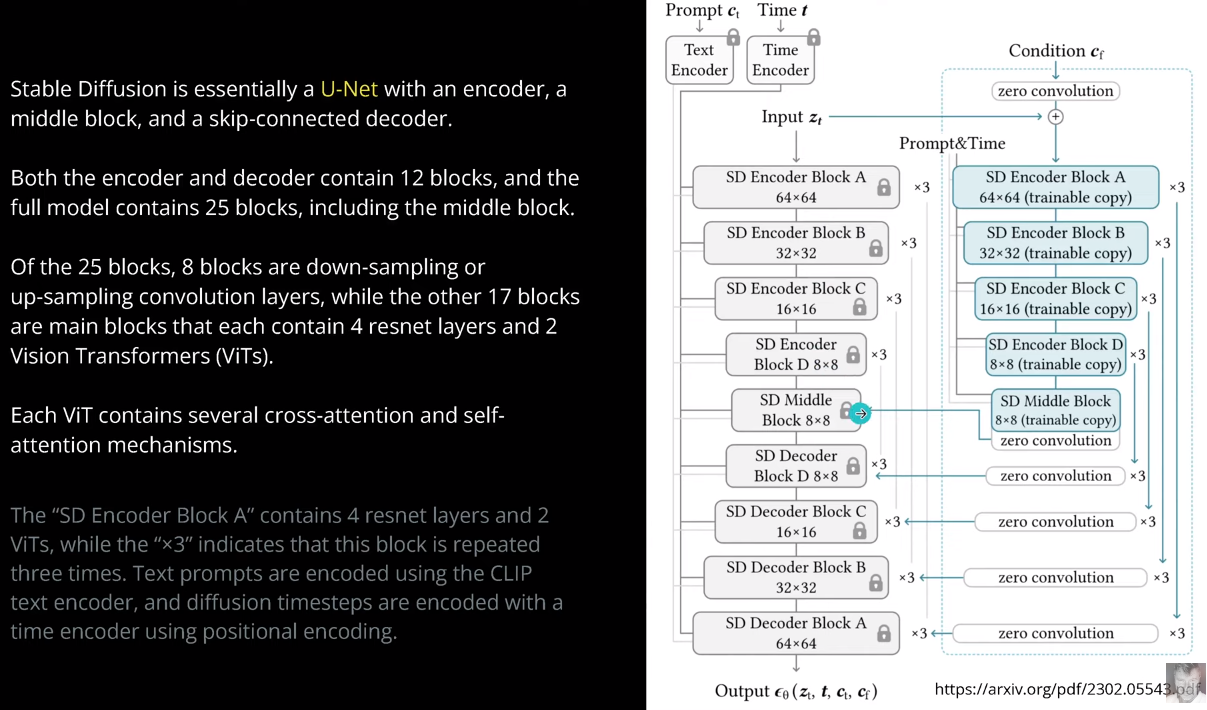
Stable diffusion又有什么区别?是否带来了进一步的改进了呢?---- 利用了夹杂了attention的UNet。
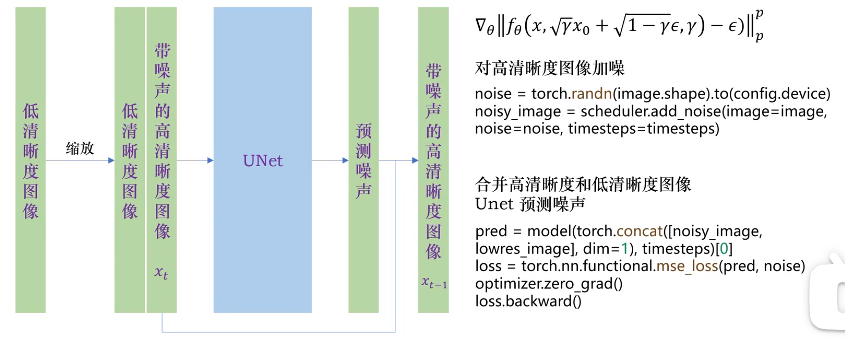
Unet 在 stable diffusion 中是用来预测图片中的噪音的。
可见与Dalle系列的区别,如下。

以下是ImaGen,思路是逐级放大。
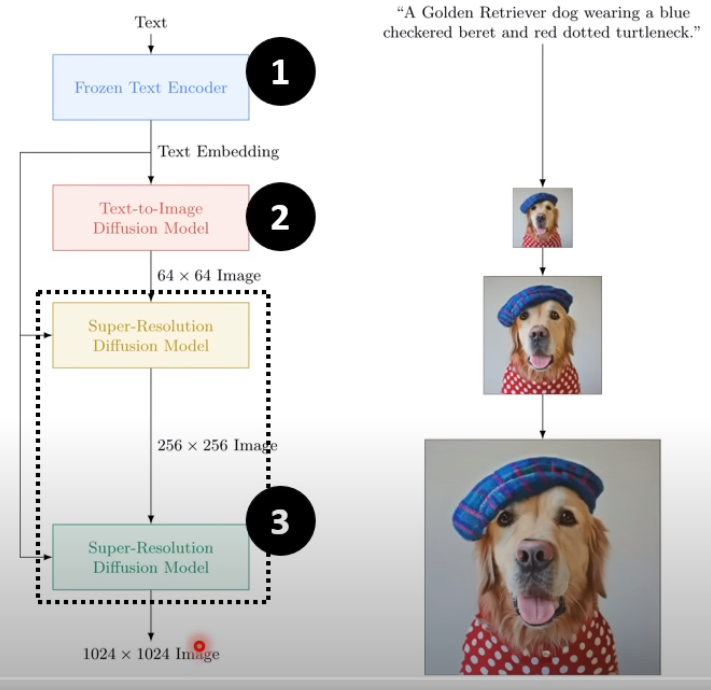
以上是第一批 图像生成,结论是:diffusion以及模型的大小 才是关键,其他的特性与技巧貌似可有可无。
Encoder 的质量很重要
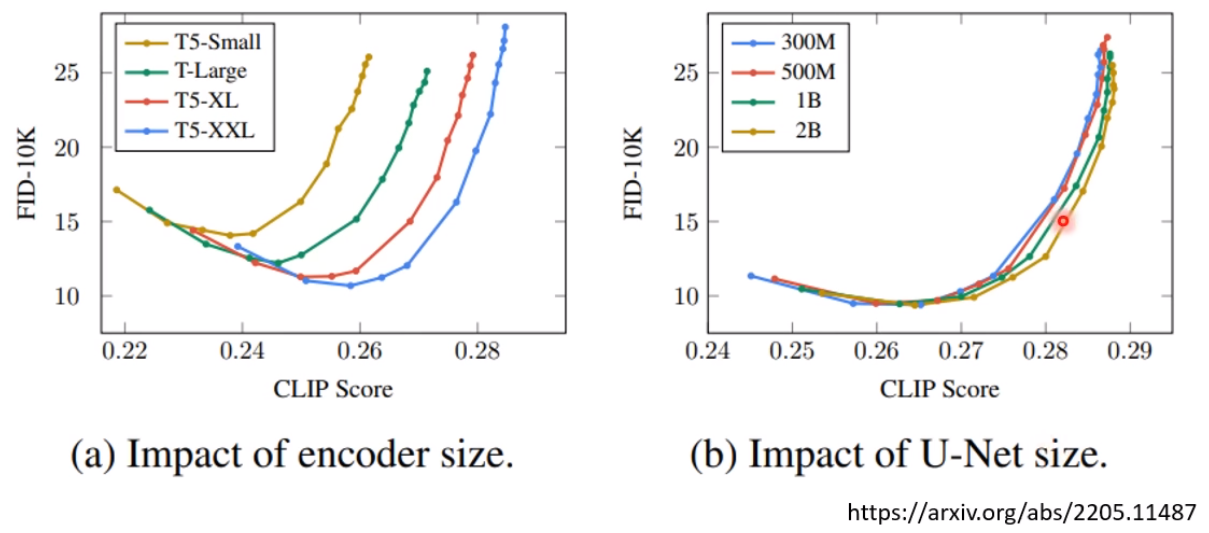
所以对此 sd2.0进行了改进。
The Stable Diffusion 2.0 release includes robust text-to-image models trained using a brand new text encoder (OpenCLIP), developed by LAION with support from Stability AI, which greatly improves the quality of the generated images compared to earlier V1 releases. The text-to-image models in this release can generate images with default resolutions of 512x512 pixels and 768x768 pixels.
These models are trained on an aesthetic subset of the LAION-5B dataset created by the DeepFloyd team at Stability AI, which is then further filtered to remove adult content using LAION’s NSFW filter.
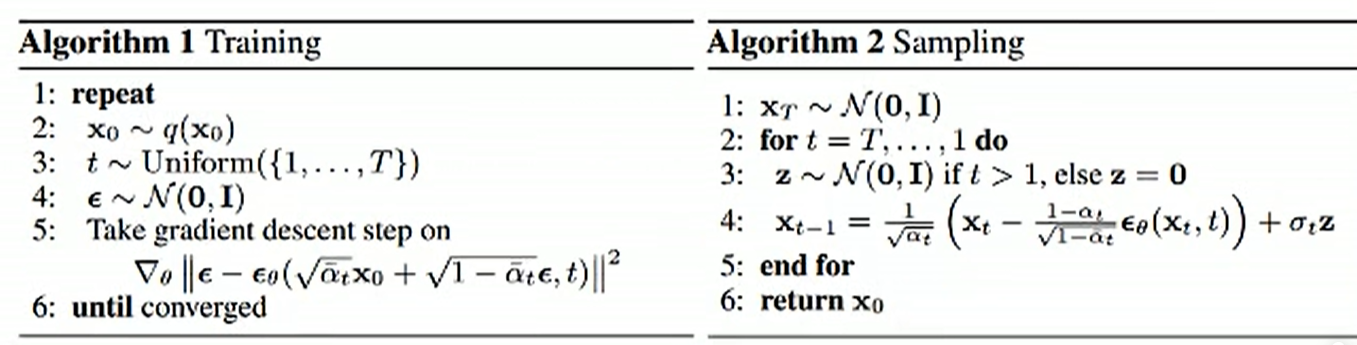
训练基本原理
先训练 Decoder。训练的数据:大图(output)变成小图作为 input。预测的是 噪音!
详细学习
菜鸡难度
科班难度
【Diffusion模型】翻遍全网终于找到!全网最全最通俗易懂Diffusion全套教程入门到精通,只需3小时就可完全学会!
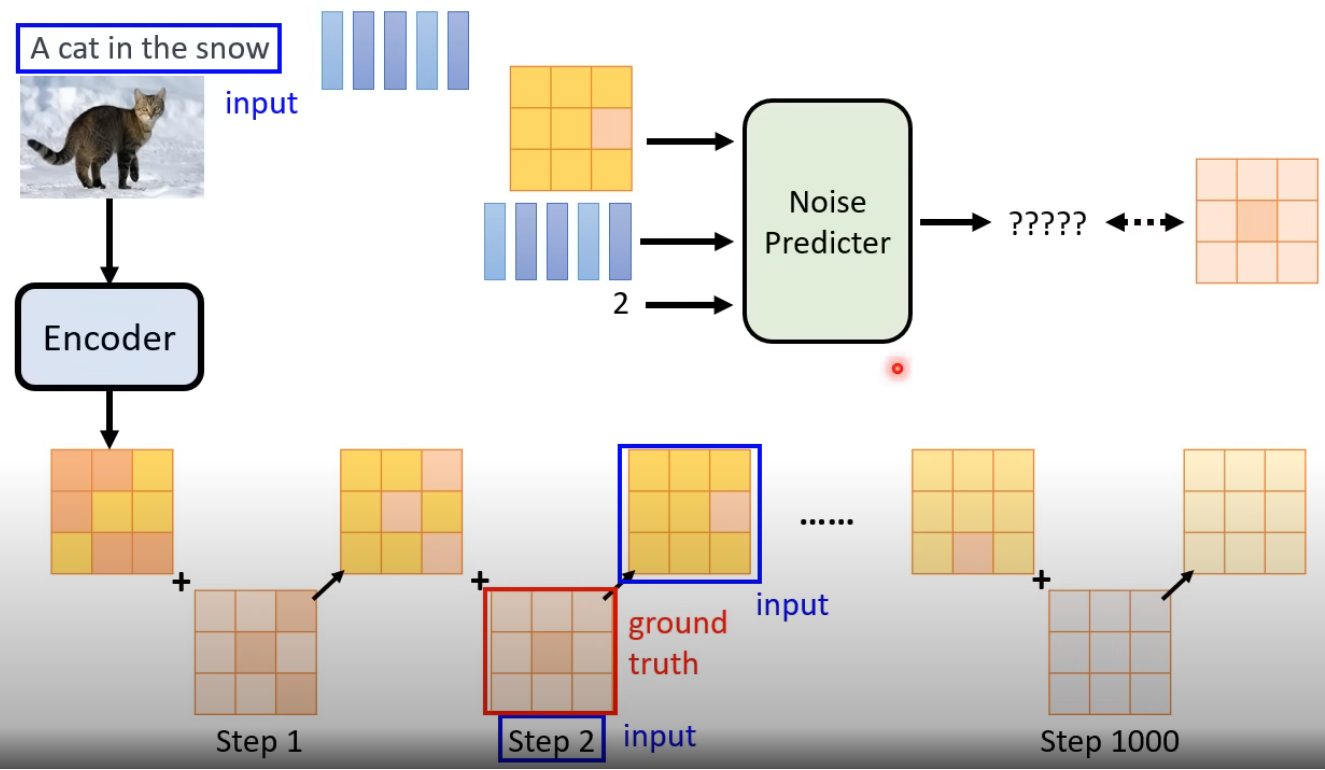
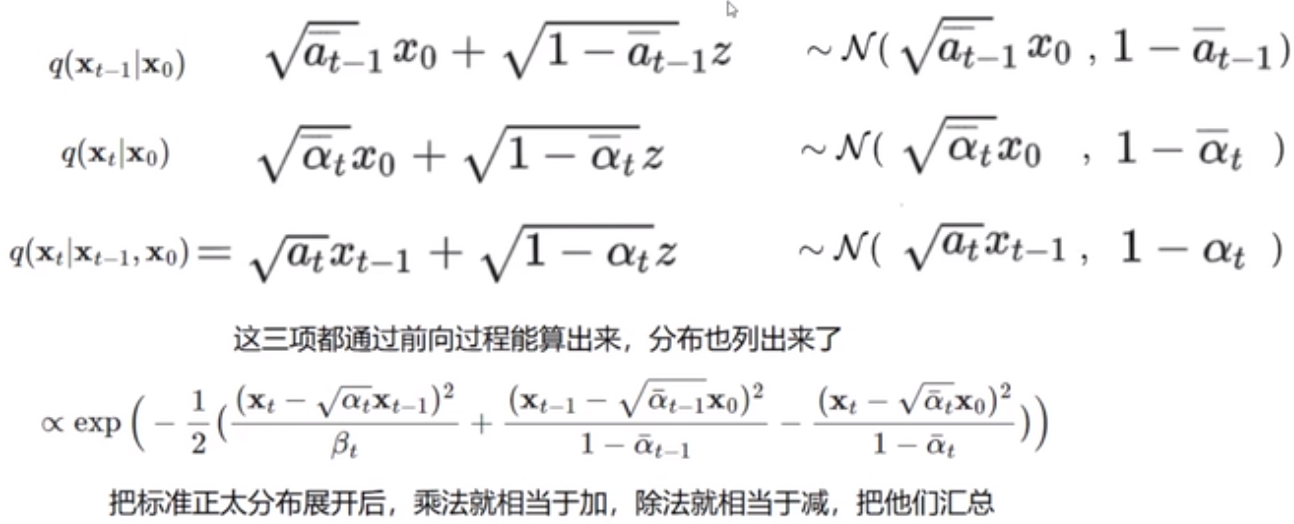
Step 1
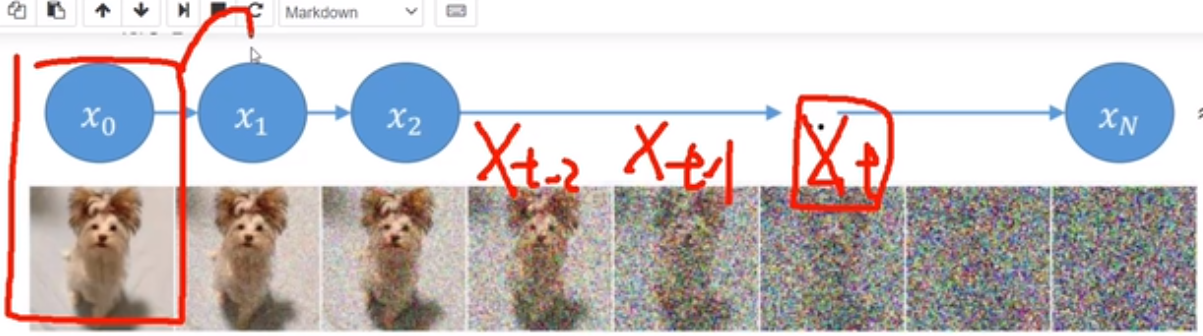
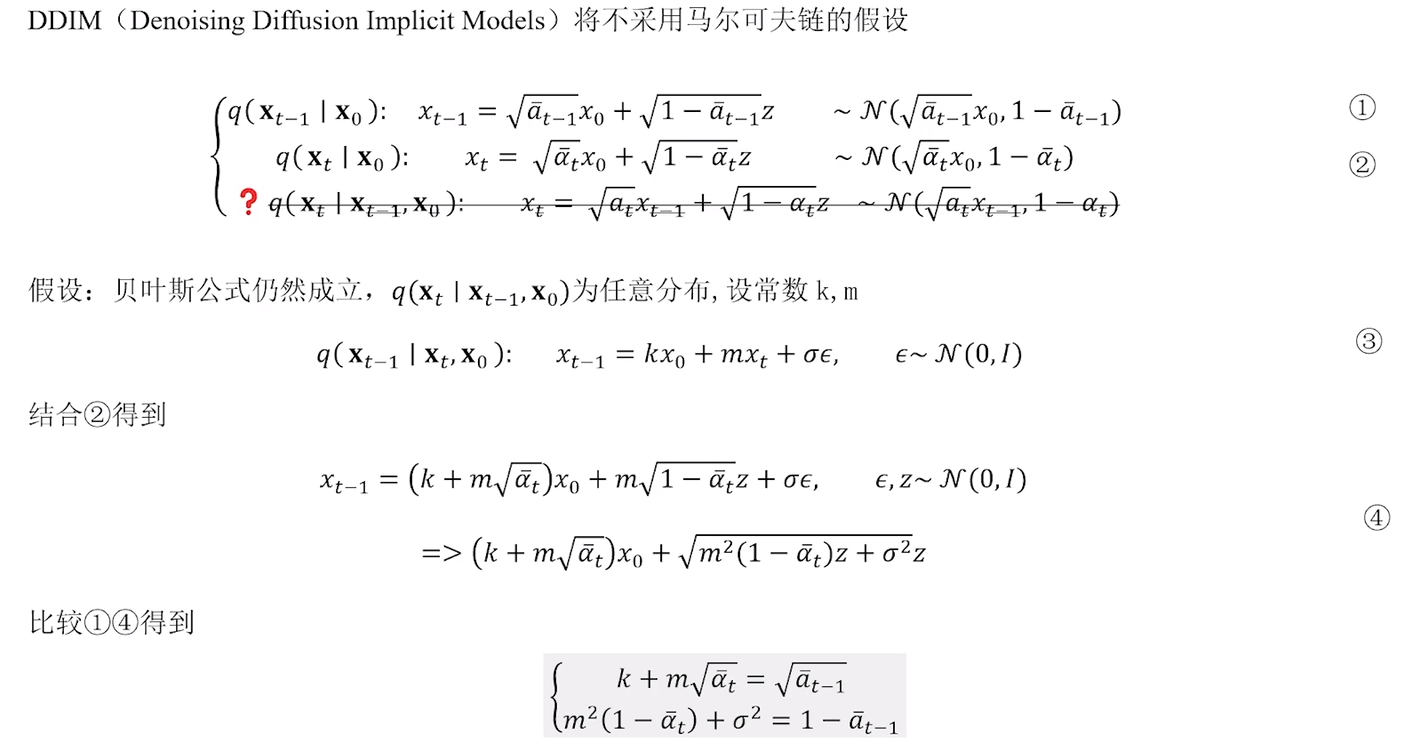
核心理解如下:左侧,与原图更相关;右边,与加的噪音更相关。

拓展到 xt-1 如下,再与上述合并,发现是两个高斯分布之和,还是一个高斯分布。
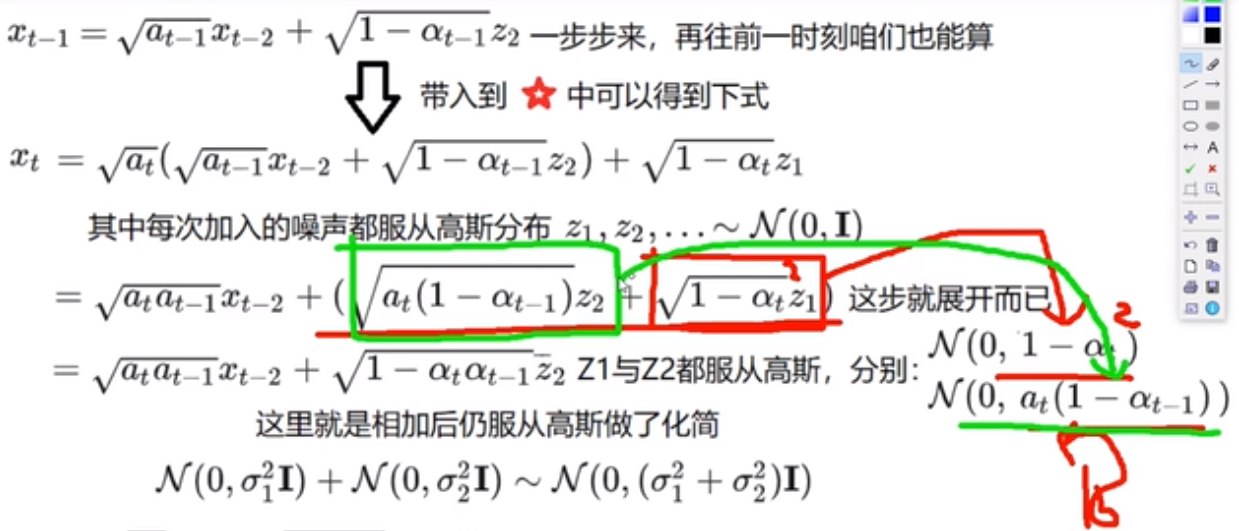
(注意:zt 上面没有bar,下图是个typo)

Step 2
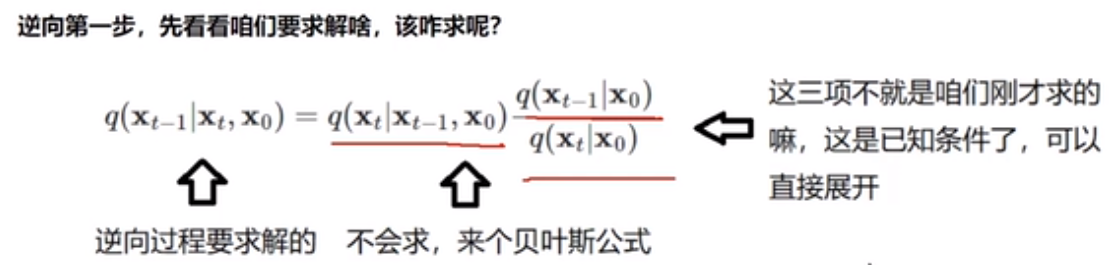
逆向第一步。
Step 3
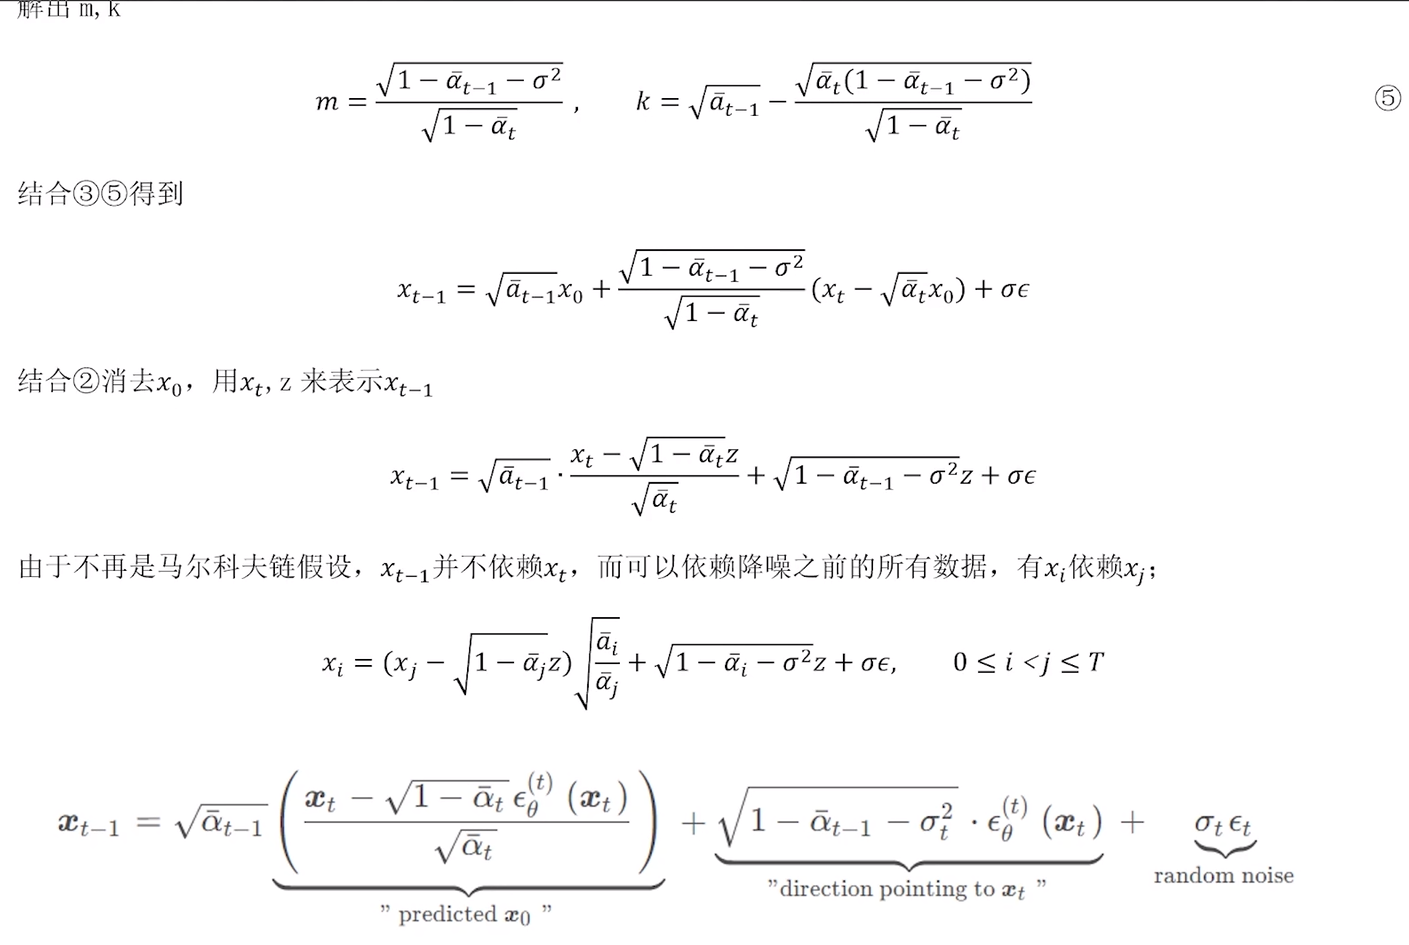
Continue to inference. We want to know what is relevant to xt-1.
As shown below, we can get the format as the last line.
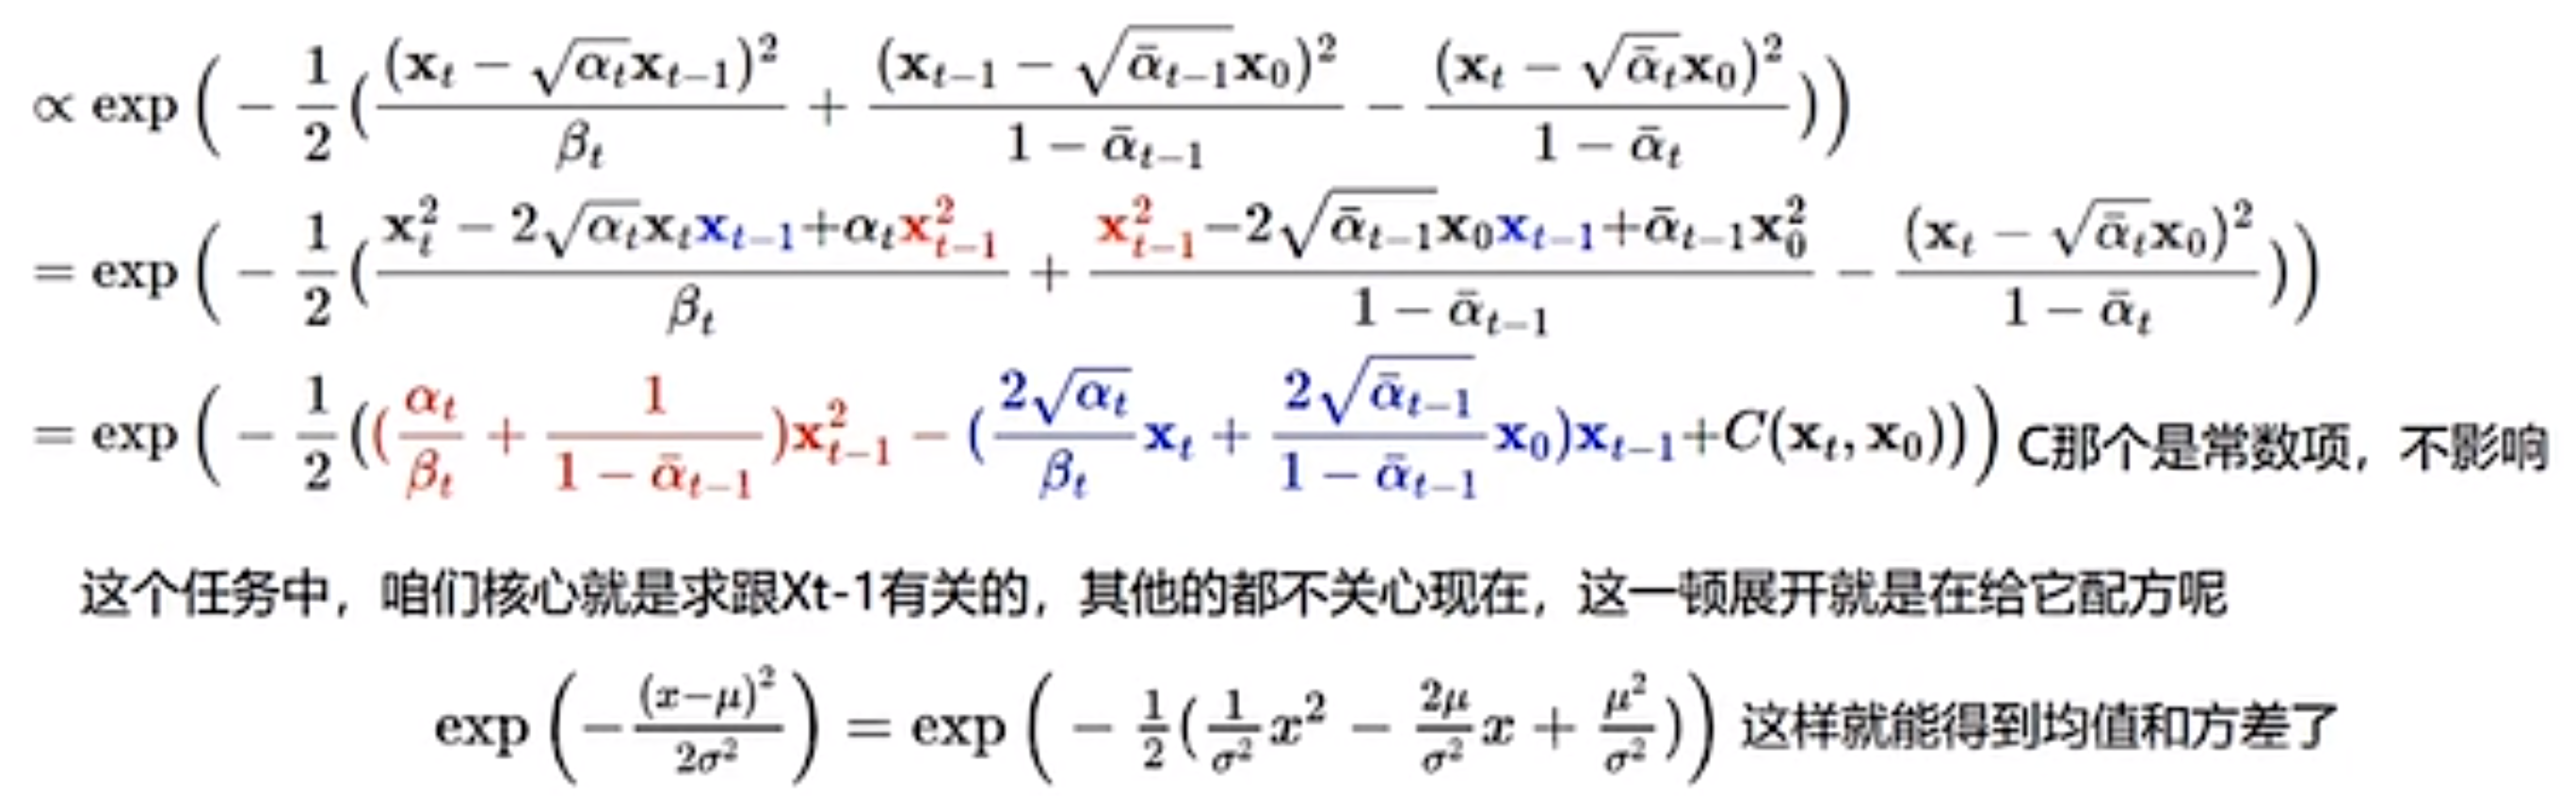
So, we get the coefficients of the distribution.

So, we get the answer of how to calculate the xt-1 by xt.
Finally, although we cannot get zt, so this is why we need dnn to find one closer zt by model training.
Summary
回味复习
https://www.deeplearning.ai/short-courses/how-diffusion-models-work/
有翻译的版本,这里只是记录一些重要的高级部分。
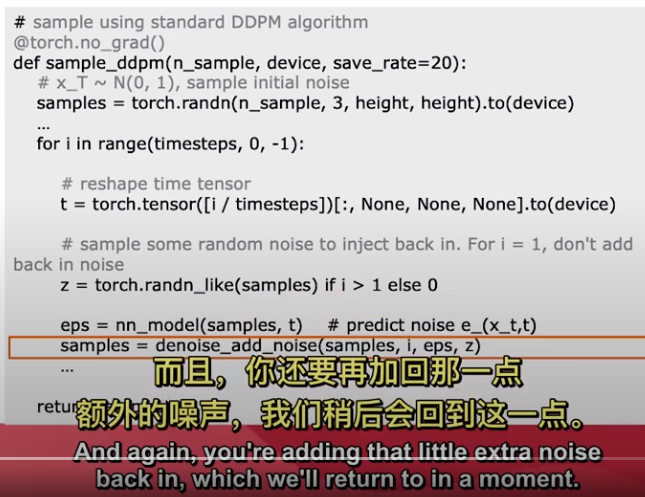
添加此额外噪声是因为在减去后添加一些额外噪声会得到更准确的结果(实验上)请讲)。
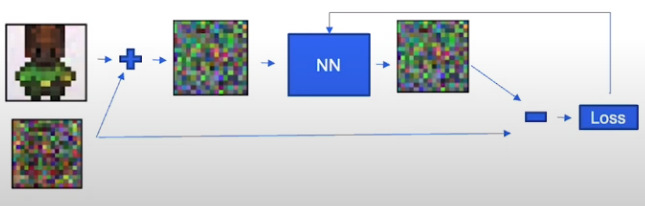
- 训练过程
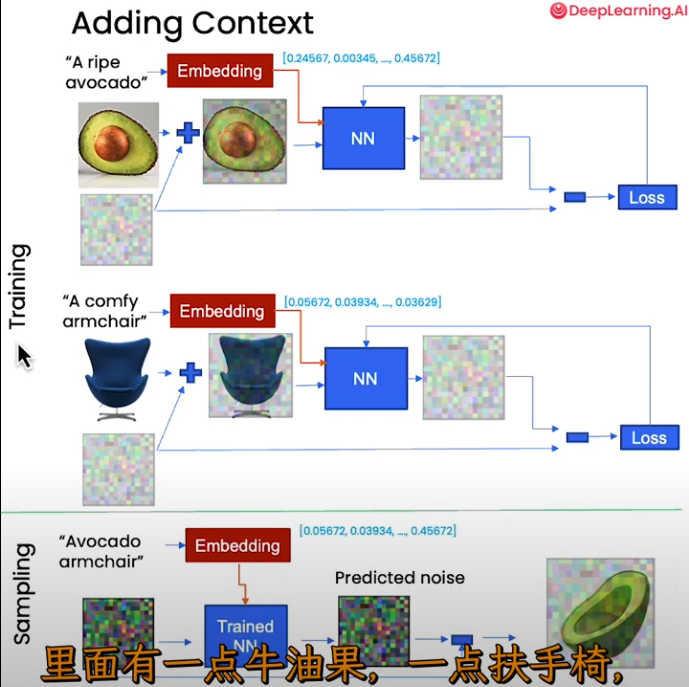
- Control by Embeddings
- DDIM
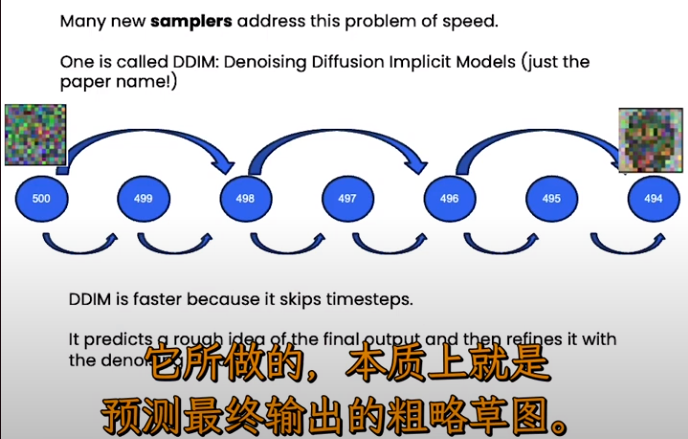
2022.6 月的 paper。
Ref: 64、扩散模型加速采样算法DDIM论文精讲与PyTorch源码逐行解读
两小时的精讲,B站太牛逼!
Ref: [算法原理快速理解]Stable Diffusion采样器攻略分享,常用sampler(DDIM,Euler)原理解析
下面解出 m, k。
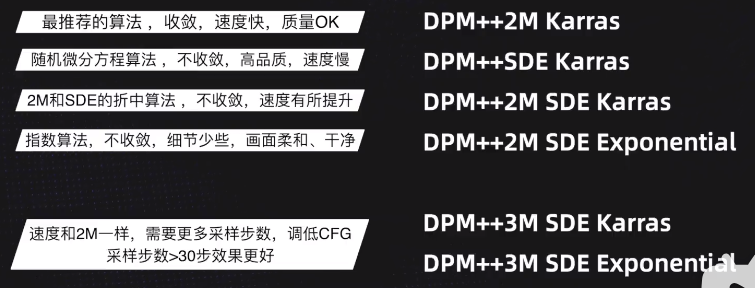
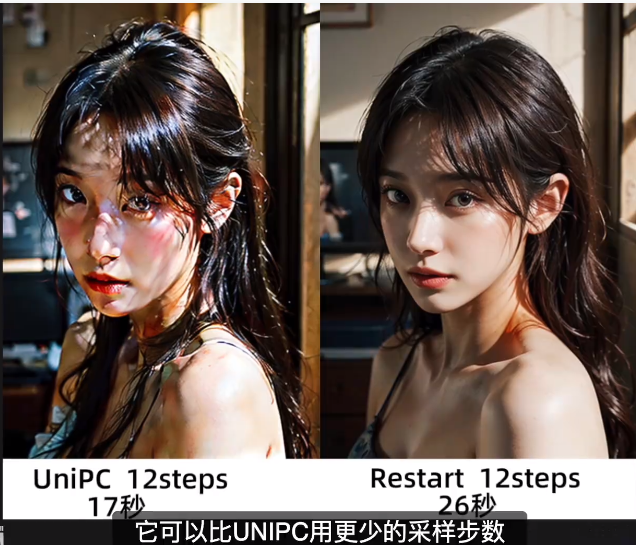
- Stable Diffusion的采样器
Ref: Stable diffusion采样器全解析,30种采样算法教程
在最基础的采样策略之后,又开发了更多的采样器如下。

其中推荐的如下:
Stable Diffusion
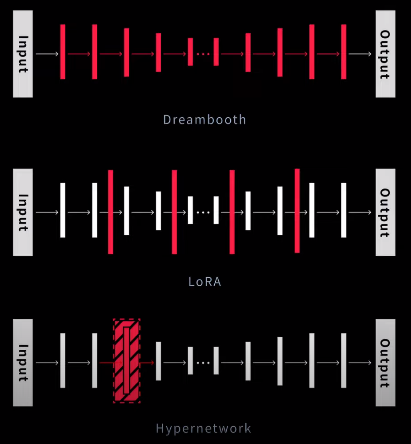
训练策略
Textual Inversion: 特别之处在训练CLIP,使之输出更准确的文本特征。
LoRA 不破坏原有模型,有点 ControlNet 的感觉,真的吗?
[Submitted on 17 Jun 2021 (v1), last revised 16 Oct 2021 (this version, v2)]
LoRA: Low-Rank Adaptation of Large Language Models
LoRA通过在checkpoint上做小的修改替换风格,具体而言,修改的地方是UNet中的cross-attention层。该层是图像和文本prompt交界的层。LORA的作者们发现微调该部分足以实现良好的性能。
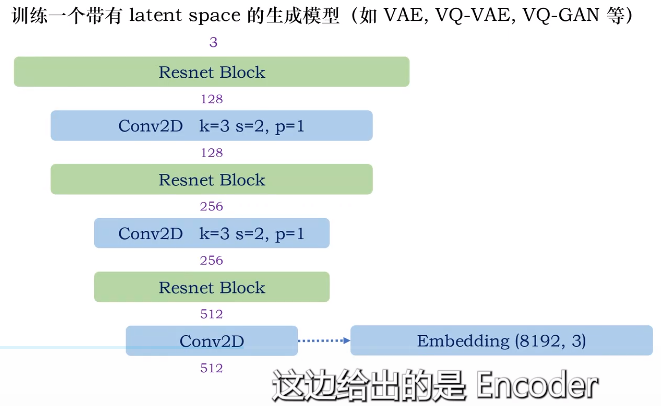
Latent Diffusion Model Structure
Ref: 如何搭建latent diffusion模型(Pytorch代码)【作者对vqvae 和 ddpm 都有对应的视频讲解代码】
Stable Diffusion没有论文,所以直接看 Latent Diffusion Model 的论文即可。
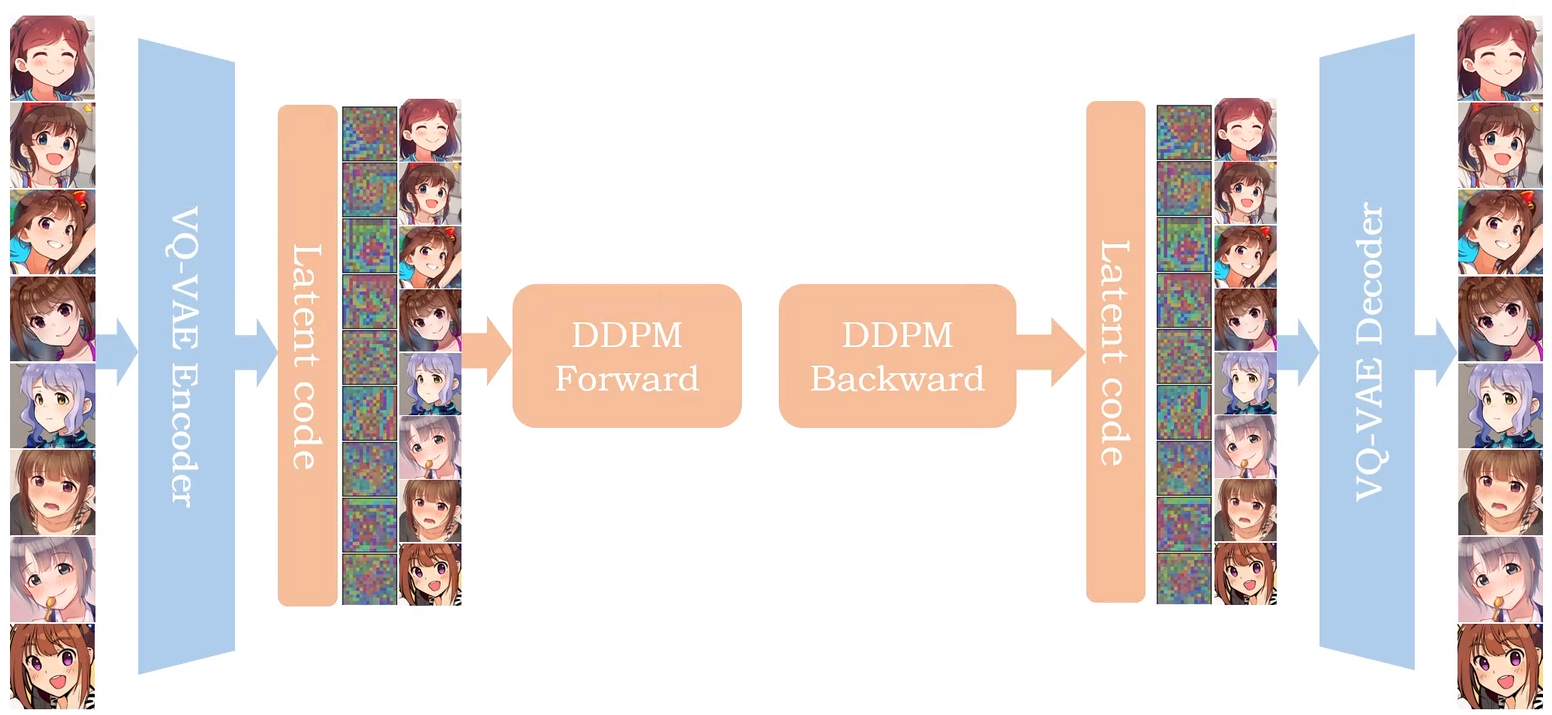
DDPM 的输入不是图片,而是 latent code。并且是对 latent code 加噪。
同样的,生成的图像也是基于 “去噪后”的latent code用以生成图片。
Super Resolution (SR3 架构)
结合该链接,理解上述内容。
为何用 Latent?
在像素空间中去噪过程的时间和内存消耗都非常昂贵(比如 DALL-E 2),尤其是生成高分辨率的图片时。
因此 Stable Diffusion 另辟蹊径,选择在低维度的潜空间(latent representations)上进行扩散,减少内存占用和生成耗时。这类模型叫做 Latent Diffusion Model (LDM)潜在扩散模型。
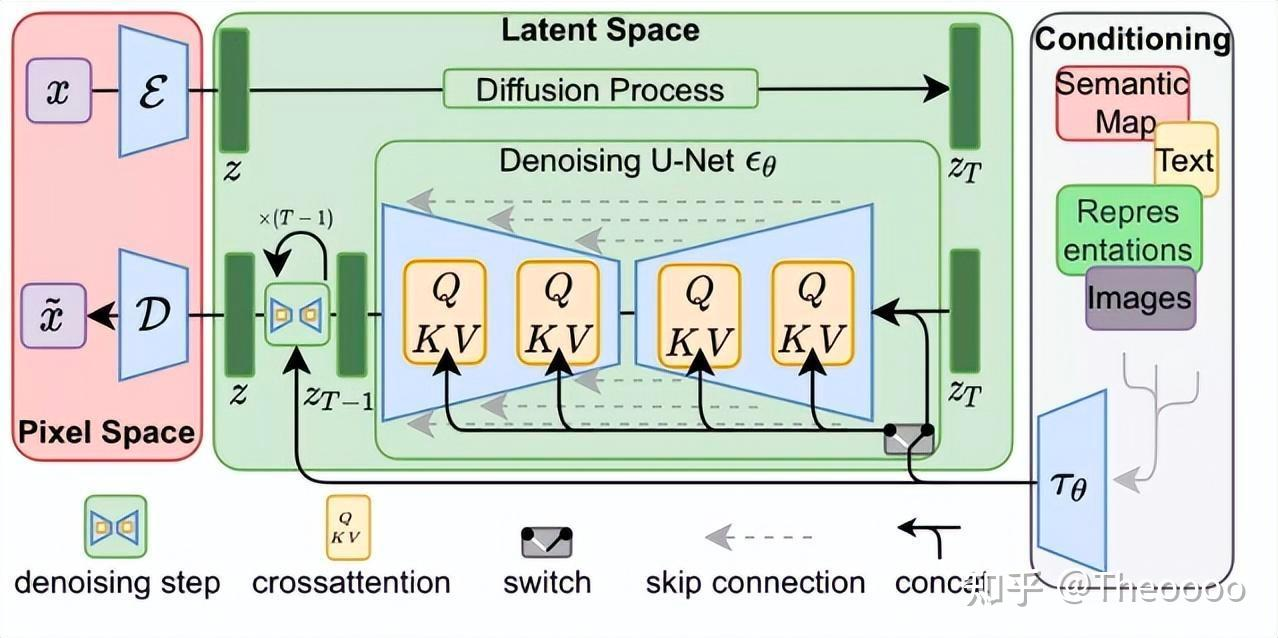
上图的简化版就是下图。
在 ControlNet之前,先通过该链接有个总体认知。
Controlnet
SDXL --> SDXL Turbo
SDXL
SDXL Turbo
Ref: AI好卷!SDXL turbo实时生图这么快!背后原理ADD到底是什么?AI生图未来发展分析!
蒸馏
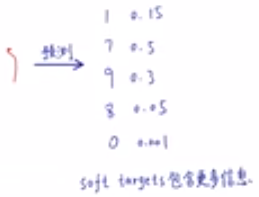
Distilling the knowledge in a Neural Network, 2015年。视频讲解
Progressive Distillation For Fast Sampling Of Diffusion Models,2022年。
Adversarial Diffusion Distillation,2023年。
利用了蒸馏;
短步骤,通过两个网络一起训练,多了一个 teacher 网络。
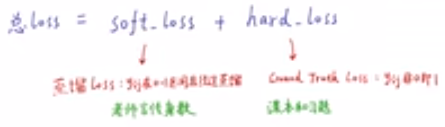
使用 teacher's network得到的 soft target(如下)去训练 student's network。


 浙公网安备 33010602011771号