[Argo] 03 - KinD
东西有点杂,只能摸石头过河~
与Minikube相比,KinD可以在单机创建多个 Clusters。
KinD更为适合Linux环境。
Ref: [ Kube 43.2 ] Getting started with KinD | Local multi-node k8s cluster in Docker containers
Ref: https://kind.sigs.k8s.io/docs/user/quick-start/
Install
Ref: [ Kube 43 ] KinD - Kubernetes Cluster using Docker containers【主要讲解安装和配置kind】
- 如果没有 kubeconfig设置,那就 “手动”生成 ~/.kube/config。
ubuntu@ip-172-30-5-71:~/kind$ ls ~/.kube/
ubuntu@ip-172-30-5-71:~/kind$
ubuntu@ip-172-30-5-71:~/kind$ sudo kubectl config view
apiVersion: v1
clusters:
- cluster:
    certificate-authority-data: DATA+OMITTED
    server: https://127.0.0.1:43585
  name: kind-kind
contexts:
- context:
    cluster: kind-kind
    user: kind-kind
  name: kind-kind
current-context: kind-kind
kind: Config
preferences: {}
users:
- name: kind-kind
  user:
    client-certificate-data: REDACTED
    client-key-data: REDACTED
ubuntu@ip-172-30-5-71:~/kind$

ubuntu@ip-172-30-5-71:~/kind$ sudo kubectl config view > ~/.kube/config
ubuntu@ip-172-30-5-71:~/kind$ vim ~/.kube/config
ubuntu@ip-172-30-5-71:~/kind$ grep server ~/.kube/config
    server: https://127.0.0.1:43585
这里给了提示,如果处理:kubeconfig!
unset KUBECONFIG 则删除./kube下的配置文件。
- kindest/node
ubuntu@ip-172-30-5-71:~/kind$ sudo docker ps
CONTAINER ID   IMAGE                  COMMAND                  CREATED          STATUS          PORTS                       NAMES
1bf49807b8ea   kindest/node:v1.25.0   "/usr/local/bin/entr…"   50 minutes ago   Up 50 minutes   127.0.0.1:43585->6443/tcp   kind-control-plane

ubuntu@ip-172-30-5-71:~/kind$ sudo docker exec -it kind-control-plane bash

root@kind-control-plane:/# which crictl
/usr/local/bin/crictl

root@kind-control-plane:/# crictl ps
CONTAINER           IMAGE               CREATED             STATE               NAME                      ATTEMPT             POD ID              POD
aa8af86ff4771       5185b96f0becf       51 minutes ago      Running             coredns                   0                   f41e8538a4f60       coredns-565d847f94-bq692
22958017f63c3       5185b96f0becf       51 minutes ago      Running             coredns                   0                   375a8a29195e2       coredns-565d847f94-gbc8l
a15643288e861       4c1e997385b8f       51 minutes ago      Running             local-path-provisioner    0                   e7b34555ad3a6       local-path-provisioner-684f458cdd-srzw8
3b8e80c6991c0       d921cee849482       51 minutes ago      Running             kindnet-cni               0                   558810e8577db       kindnet-p894w
4a0450b04665c       c12a8a85ef17f       51 minutes ago      Running             kube-proxy                0                   0352c3e341380       kube-proxy-lmgh8
04a40e7ff847b       a8a176a5d5d69       51 minutes ago      Running             etcd                      0                   bbbe96d495564       etcd-kind-control-plane
33776e6f77622       400e6a4878256       51 minutes ago      Running             kube-apiserver            0                   9732c3ac32fa7       kube-apiserver-kind-control-plane
b295296923ca5       5e5550fd0c5ae       51 minutes ago      Running             kube-controller-manager   0                   988c6b7bdf8a0       kube-controller-manager-kind-control-plane
f2b841c862558       181e17aad6bfd       51 minutes ago      Running             kube-scheduler            0                   0e3d16b0b90e4       kube-scheduler-kind-control-plane
root@kind-control-plane:/#
Ref: kindest/node v1.20.2与Kubernetes v1.19.3
启动镜像kindest/node v1.20.2后(说明 Ubuntu 20.04.2 LTS中执行kubectl命令使用的是kind集群)
在Ubuntu 20.04.2 LTS中执行kubectl命令使用的是 kind集群,启动的容器APP在docker desktop中看不见;以上是对k8s( kubectl)而言,docker命令创建容器在 Windows PowerShell和 Ubuntu 20.04.2之间互相都能看见。
ubuntu@ip-172-30-5-71:~$ sudo kubectl get pod,svc,deployment
NAME                 TYPE        CLUSTER-IP   EXTERNAL-IP   PORT(S)   AGE
service/kubernetes   ClusterIP   10.96.0.1    <none>        443/TCP   96m

ubuntu@ip-172-30-5-71:~$ sudo kubectl get pod
No resources found in default namespace.

ubuntu@ip-172-30-5-71:~$ sudo kubectl get svc
NAME         TYPE        CLUSTER-IP   EXTERNAL-IP   PORT(S)   AGE
kubernetes   ClusterIP   10.96.0.1    <none>        443/TCP   97m

ubuntu@ip-172-30-5-71:~$ sudo kubectl get deployment
No resources found in default namespace.
默认镜像
使用 kind create cluster 安装,是没有指定任何配置文件的安装方式。从安装打印出的输出来看,分为4步:
- 查看本地上是否存在一个基础的安装镜像,默认是kindest/node:v1.23.4,这个镜像里面包含了需要安装的所有东西,包括了kubectl、kubeadm、kubelet 二进制文件,以及安装对应版本 k8s 所需要的镜像,都以 tar压缩包的形式放在镜像内的一个路径下。
- 准备你的 node,这里就是做一些启动容器、解压镜像之类的工作。
- 生成对应的 kubeadm 的配置,之后通过 kubeadm安装,安装之后还会做另外的一些操作,比如像我刚才仅安装单节点的集群,会帮你删掉 master 节点上的污点,否则对于没有容忍的 pod无法部署。
- 启动完毕。
Create Two Cluster


ubuntu@ip-172-30-5-71:~/kind$ sudo kubectl get nodes -o wide
NAME                 STATUS   ROLES           AGE    VERSION   INTERNAL-IP   EXTERNAL-IP   OS-IMAGE             KERNEL-VERSION    CONTAINER-RUNTIME
kind-control-plane   Ready    control-plane   107m   v1.25.0   172.18.0.2    <none>        Ubuntu 22.04.1 LTS   5.15.0-1019-aws   containerd://1.6.7

ubuntu@ip-172-30-5-71:~/kind$ sudo kind get clusters
kind

ubuntu@ip-172-30-5-71:~/kind$ sudo kind delete cluster
Deleting cluster "kind" ...

ubuntu@ip-172-30-5-71:~/kind$ sudo kubectl cluster-info  # Get nothing due to "deleted".
To further debug and diagnose cluster problems, use 'kubectl cluster-info dump'.
The connection to the server localhost:8080 was refused - did you specify the right host or port?

ubuntu@ip-172-30-5-71:~/kind$ ls ~/.kube/
config
- (1)创建第一个cluster
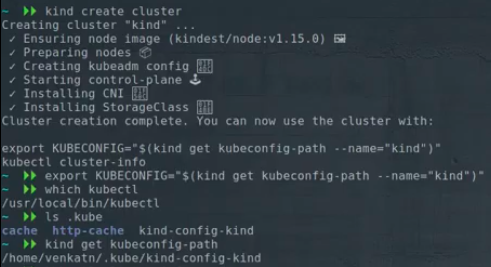
ubuntu@ip-172-30-5-71:~/kind$ sudo kind create cluster
Creating cluster "kind" ...
 ✓ Ensuring node image (kindest/node:v1.25.0) 🖼
 ✓ Preparing nodes 📦
 ✓ Writing configuration 📜
 ✓ Starting control-plane 🕹️
 ✓ Installing CNI 🔌
 ✓ Installing StorageClass 💾
Set kubectl context to "kind-kind"
You can now use your cluster with:

kubectl cluster-info --context kind-kind

Thanks for using kind! 😊

ubuntu@ip-172-30-5-71:~/kind$ sudo kind get clusters
kind

ubuntu@ip-172-30-5-71:~/kind$ sudo docker ps
CONTAINER ID   IMAGE                  COMMAND                  CREATED          STATUS          PORTS                       NAMES
4fb7117dbb67   kindest/node:v1.25.0   "/usr/local/bin/entr…"   47 seconds ago   Up 44 seconds   127.0.0.1:33687->6443/tcp   kind-control-plane

ubuntu@ip-172-30-5-71:~/kind$ sudo kubectl cluster-info
Kubernetes control plane is running at https://127.0.0.1:33687
CoreDNS is running at https://127.0.0.1:33687/api/v1/namespaces/kube-system/services/kube-dns:dns/proxy

To further debug and diagnose cluster problems, use 'kubectl cluster-info dump'.

ubuntu@ip-172-30-5-71:~/kind$ sudo kubectl get nodes
NAME                 STATUS   ROLES           AGE     VERSION
kind-control-plane   Ready    control-plane   2m30s   v1.25.0
- (2)创建第二个cluster
ubuntu@ip-172-30-5-71:~/kind$ sudo kind create cluster --name mycluster
Creating cluster "mycluster" ...
 ✓ Ensuring node image (kindest/node:v1.25.0) 🖼
 ✓ Preparing nodes 📦
 ✓ Writing configuration 📜
 ✓ Starting control-plane 🕹️
 ✓ Installing CNI 🔌
 ✓ Installing StorageClass 💾
Set kubectl context to "kind-mycluster"
You can now use your cluster with:

kubectl cluster-info --context kind-mycluster

Not sure what to do next? 😅  Check out https://kind.sigs.k8s.io/docs/user/quick-start/

ubuntu@ip-172-30-5-71:~/kind$ sudo kind get clusters
kind
mycluster

ubuntu@ip-172-30-5-71:~/kind$ sudo docker ps
CONTAINER ID   IMAGE                  COMMAND                  CREATED              STATUS              PORTS                       NAMES
0d3f606bd45d   kindest/node:v1.25.0   "/usr/local/bin/entr…"   About a minute ago   Up About a minute   127.0.0.1:42627->6443/tcp   mycluster-control-plane
4fb7117dbb67   kindest/node:v1.25.0   "/usr/local/bin/entr…"   37 minutes ago       Up 37 minutes       127.0.0.1:33687->6443/tcp   kind-control-plane

ubuntu@ip-172-30-5-71:~/kind$ sudo kubectl config view
apiVersion: v1
clusters:
- cluster:
    certificate-authority-data: DATA+OMITTED
    server: https://127.0.0.1:33687
  name: kind-kind
- cluster:
    certificate-authority-data: DATA+OMITTED
    server: https://127.0.0.1:42627
  name: kind-mycluster
contexts:
- context:
    cluster: kind-kind
    user: kind-kind
  name: kind-kind
- context:
    cluster: kind-mycluster
    user: kind-mycluster
  name: kind-mycluster
current-context: kind-mycluster
kind: Config
preferences: {}
users:
- name: kind-kind
  user:
    client-certificate-data: REDACTED
    client-key-data: REDACTED
- name: kind-mycluster
  user:
    client-certificate-data: REDACTED
    client-key-data: REDACTED

ubuntu@ip-172-30-5-71:~/kind$ sudo kubectl config view > ~/.kube/config
ubuntu@ip-172-30-5-71:~/kind$ grep server ~/.kube/config
    server: https://127.0.0.1:33687
    server: https://127.0.0.1:42627

ubuntu@ip-172-30-5-71:~/kind$ sudo kubectl get nodes
NAME                      STATUS   ROLES           AGE     VERSION
mycluster-control-plane   Ready    control-plane   3m25s   v1.25.0
ubuntu@ip-172-30-5-71:~/kind$ sudo kubectl get nodes --context kind-kind
NAME                 STATUS   ROLES           AGE   VERSION
kind-control-plane   Ready    control-plane   39m   v1.25.0
ubuntu@ip-172-30-5-71:~/kind$ sudo kubectl get nodes --context kind-mycluster
NAME                      STATUS   ROLES           AGE     VERSION
mycluster-control-plane   Ready    control-plane   4m34s   v1.25.0
ubuntu@ip-172-30-5-71:~/kind$ sudo kubectl config get-contexts
CURRENT   NAME             CLUSTER          AUTHINFO         NAMESPACE
          kind-kind        kind-kind        kind-kind
*         kind-mycluster   kind-mycluster   kind-mycluster

ubuntu@ip-172-30-5-71:~/kind$ sudo kubectl get nodes
NAME                      STATUS   ROLES           AGE     VERSION
mycluster-control-plane   Ready    control-plane   5m35s   v1.25.0
ubuntu@ip-172-30-5-71:~/kind$ sudo kubectl get nodes --context kind-kind
NAME                 STATUS   ROLES           AGE   VERSION
kind-control-plane   Ready    control-plane   42m   v1.25.0
如上,得使用上下文,才能看到另一个cluster。Thus, let's switch to another one.
ubuntu@ip-172-30-5-71:~/kind$ sudo kubectl config get-contexts  # 查看可用集群
CURRENT   NAME             CLUSTER          AUTHINFO         NAMESPACE
          kind-kind        kind-kind        kind-kind
*         kind-mycluster   kind-mycluster   kind-mycluster

ubuntu@ip-172-30-5-71:~/kind$ sudo kubectl config use-context kind-kind  # 查看集群信息
Switched to context "kind-kind".

ubuntu@ip-172-30-5-71:~/kind$ sudo kubectl config get-contexts
CURRENT   NAME             CLUSTER          AUTHINFO         NAMESPACE
*         kind-kind        kind-kind        kind-kind
          kind-mycluster   kind-mycluster   kind-mycluster
创建后,需要几秒钟时间才能所有pod处于ready状态。可通过如下命令查看状态。
$ kubectl -n kube-system get all
Delete all
ubuntu@ip-172-30-5-71:~/kind$ sudo kind delete cluster
Deleting cluster "kind" ...

ubuntu@ip-172-30-5-71:~/kind$ sudo kind delete cluster --name mycluster
Deleting cluster "mycluster" ...

ubuntu@ip-172-30-5-71:~/kind$ sudo docker ps
CONTAINER ID   IMAGE     COMMAND   CREATED   STATUS    PORTS     NAMES
删除顽疾
如果直接删除pod触发了replicas的确保机制,需删除deployment。
$kubectl get deployments
NAME        READY   UP-TO-DATE   AVAILABLE   AGE
nginx-app   1/1     1            1           24h

$kubectl delete deployment nginx-app
Goto: 如何删除Kubernetes部署【建议放在其他博文中】
Goto: [K8S] 02 - Init k8s Cluster【放在了这里】
补充
Ref: 【愚公系列】2022年04月 Kubernetes容器集群快速部署之kind单节点集群
-- 加载镜像 --
$ docker pull nginx
$ docker build -t my-custom-image:unique-tag ./my-image-dir
$ kind load docker-image my-custom-image:unique-tag
$ kubectl apply -f my-manifest-using-my-image:unique-tag
Then, a new container has been added by cmd:
$ docker exec -it kind-control-plane bash
$ crictl images
-- 创建 Pod --
Ref: kubectl命令行工具的使用
根据镜像创建Pods,这里包含了三个副本。详情请见链接内容。
$ kubectl run nginx-deployment --image=nginx --port=80 --replicas=3
** Deploy a multi-node k8s cluster **
Ref: https://youtu.be/kkW7LNCsK74?t=891【开始讲解multi-node】
Ref: How to run local multi-node Kubernetes clusters using kind
开始创建
Ref: https://kind.sigs.k8s.io/docs/user/quick-start/
(1). 准备Cluster Yaml配置:Control-plane HA
You can also have a cluster with multiple control-plane nodes:
# a cluster with 3 control-plane nodes and 3 workers
kind: Cluster
apiVersion: kind.x-k8s.io/v1alpha4
nodes:
- role: control-plane
- role: control-plane
- role: control-plane
- role: worker  # 只保留一个
- role: worker  # 本实验去掉
- role: worker  # 本实验去掉
(2). 加载并创建集群。
ubuntu@ip-172-30-5-71:~/kind$ sudo kind create cluster --config ./tmp-kind.yaml
Creating cluster "kind" ...
 ✓ Ensuring node image (kindest/node:v1.25.0) 🖼
 ✓ Preparing nodes 📦 📦 📦 📦
 ✓ Configuring the external load balancer ⚖️
 ✓ Writing configuration 📜
 ✓ Starting control-plane 🕹️
 ✓ Installing CNI 🔌
 ✓ Installing StorageClass 💾
 ✓ Joining more control-plane nodes 🎮
 ✓ Joining worker nodes 🚜
Set kubectl context to "kind-kind"
You can now use your cluster with:

kubectl cluster-info --context kind-kind

Have a nice day! 👋

ubuntu@ip-172-30-5-71:~/kind$ sudo docker ps
CONTAINER ID   IMAGE                                COMMAND                  CREATED          STATUS          PORTS                       NAMES
05421301b076   kindest/haproxy:v20220607-9a4d8d2a   "haproxy -sf 7 -W -d…"   11 minutes ago   Up 10 minutes   127.0.0.1:34189->6443/tcp   kind-external-load-balancer  # <---- Load Balancer.
fc0876a58526   kindest/node:v1.25.0                 "/usr/local/bin/entr…"   11 minutes ago   Up 10 minutes   127.0.0.1:38973->6443/tcp   kind-control-plane2
b936e420edaa   kindest/node:v1.25.0                 "/usr/local/bin/entr…"   11 minutes ago   Up 10 minutes   127.0.0.1:34905->6443/tcp   kind-control-plane
c74099a6dd5d   kindest/node:v1.25.0                 "/usr/local/bin/entr…"   11 minutes ago   Up 10 minutes                               kind-worker
91c41de7b34b   kindest/node:v1.25.0                 "/usr/local/bin/entr…"   11 minutes ago   Up 10 minutes   127.0.0.1:45191->6443/tcp   kind-control-plane3

ubuntu@ip-172-30-5-71:~/kind$ sudo kubectl config view
apiVersion: v1
clusters:
- cluster:
    certificate-authority-data: DATA+OMITTED
    server: https://127.0.0.1:34189
  name: kind-kind
contexts:
- context:
    cluster: kind-kind
    user: kind-kind
  name: kind-kind
current-context: kind-kind
kind: Config
preferences: {}
users:
- name: kind-kind
  user:
    client-certificate-data: REDACTED
    client-key-data: REDACTED
再看看"集群"信息和"节点"信息。
ubuntu@ip-172-30-5-71:~/kind$ sudo kubectl cluster-info
Kubernetes control plane is running at https://127.0.0.1:34189
CoreDNS is running at https://127.0.0.1:34189/api/v1/namespaces/kube-system/services/kube-dns:dns/proxy

To further debug and diagnose cluster problems, use 'kubectl cluster-info dump'.

ubuntu@ip-172-30-5-71:~/kind$ sudo kubectl get nodes
NAME                  STATUS   ROLES           AGE   VERSION
kind-control-plane    Ready    control-plane   16m   v1.25.0
kind-control-plane2   Ready    control-plane   16m   v1.25.0
kind-control-plane3   Ready    control-plane   15m   v1.25.0
kind-worker           Ready    <none>          15m   v1.25.0
(3) 窥探一下 Load Balancer Image 网络状态
ubuntu@ip-172-30-5-71:~/kind$ sudo docker exec -it kind-external-load-balancer sh
OCI runtime exec failed: exec failed: unable to start container process: exec: "sh": executable file not found in $PATH: unknown
这里出现一个麻烦,但进去container之后,主要是查看信息,ping其他container等等,不是特别的重要。
大家公用一个kind网络,可以通过 docker inspect进一步查看并验证各个image的network状态。
ubuntu@ip-172-30-5-71:~/kind$ sudo docker network ls
NETWORK ID     NAME      DRIVER    SCOPE
1c8384e20385   bridge    bridge    local
b0920a1e250b   host      host      local
b16cb2f67241   kind      bridge    local
72e3c29d0547   none      null      local

ubuntu@ip-172-30-5-71:~/kind$ sudo docker inspect kind-external-load-balancer | less
ubuntu@ip-172-30-5-71:~/kind$ sudo docker inspect kind-control-plane | less
Using MetalLB in KinD
Ref: [ Kube 43.1 ] Deploying & Using MetalLB in KinD Kubernetes Cluster
(1) 创建一个自定义的简单的 cluster。
ubuntu@ip-172-30-5-71:~/kind$ cat kind-config.yaml
# a cluster with 3 control-plane nodes and 3 workers
apiVersion: kind.x-k8s.io/v1alpha4
kind: Cluster
nodes:
- role: control-plane
- role: worker
- role: worker

ubuntu@ip-172-30-5-71:~/kind$ sudo kind create cluster --config kind-config.yaml
Creating cluster "kind" ...
 ✓ Ensuring node image (kindest/node:v1.25.0) 🖼
 ✓ Preparing nodes 📦 📦 📦
 ✓ Writing configuration 📜
 ✓ Starting control-plane 🕹️
 ✓ Installing CNI 🔌
 ✓ Installing StorageClass 💾
 ✓ Joining worker nodes 🚜
Set kubectl context to "kind-kind"
You can now use your cluster with:

kubectl cluster-info --context kind-kind

Have a question, bug, or feature request? Let us know! https://kind.sigs.k8s.io/#community 🙂

ubuntu@ip-172-30-5-71:~/kind$ sudo kubectl get nodes
NAME                 STATUS     ROLES           AGE   VERSION
kind-control-plane   Ready      control-plane   51s   v1.25.0
kind-worker          NotReady   <none>          14s   v1.25.0
kind-worker2         NotReady   <none>          14s   v1.25.0
ubuntu@ip-172-30-5-71:~/kind$ sudo kubectl get nodes
NAME                 STATUS   ROLES           AGE   VERSION
kind-control-plane   Ready    control-plane   64s   v1.25.0
kind-worker          Ready    <none>          27s   v1.25.0
kind-worker2         Ready    <none>          27s   v1.25.0
ubuntu@ip-172-30-5-71:~/kind$ sudo kind get nodes
kind-worker
kind-worker2
kind-control-plane
以下命令同样可以查看状态。
ubuntu@ip-172-30-5-71:~/kind$ sudo kubectl -n kube-system get all
NAME                                             READY   STATUS    RESTARTS   AGE
pod/coredns-565d847f94-vbht8                     1/1     Running   0          5m10s
pod/coredns-565d847f94-xf2np                     1/1     Running   0          5m10s
pod/etcd-kind-control-plane                      1/1     Running   0          5m25s
pod/kindnet-4vsnd                                1/1     Running   0          4m51s
pod/kindnet-csrmg                                1/1     Running   0          4m51s
pod/kindnet-hlwjk                                1/1     Running   0          5m10s
pod/kube-apiserver-kind-control-plane            1/1     Running   0          5m25s
pod/kube-controller-manager-kind-control-plane   1/1     Running   0          5m26s
pod/kube-proxy-f9vw8                             1/1     Running   0          4m51s
pod/kube-proxy-mnrrf                             1/1     Running   0          4m51s
pod/kube-proxy-xmr8t                             1/1     Running   0          5m10s
pod/kube-scheduler-kind-control-plane            1/1     Running   0          5m27s

NAME               TYPE        CLUSTER-IP   EXTERNAL-IP   PORT(S)                  AGE
service/kube-dns   ClusterIP   10.96.0.10   <none>        53/UDP,53/TCP,9153/TCP   5m25s

NAME                        DESIRED   CURRENT   READY   UP-TO-DATE   AVAILABLE   NODE SELECTOR            AGE
daemonset.apps/kindnet      3         3         3       3            3           <none>                   5m24s
daemonset.apps/kube-proxy   3         3         3       3            3           kubernetes.io/os=linux   5m25s

NAME                      READY   UP-TO-DATE   AVAILABLE   AGE
deployment.apps/coredns   2/2     2            2           5m25s

NAME                                 DESIRED   CURRENT   READY   AGE
replicaset.apps/coredns-565d847f94   2         2         2       5m10s
(2) 安装 metalLB。
Ref: https://metallb.universe.tf/installation/
kubectl apply -f https://raw.githubusercontent.com/metallb/metallb/v0.13.5/config/manifests/metallb-native.yaml
最新的安装方法,如下会自动添加了新的namespace。
ubuntu@ip-172-30-5-71:~/kind$ sudo kubectl get ns
NAME                 STATUS   AGE
default              Active   9m13s
kube-node-lease      Active   9m14s
kube-public          Active   9m14s
kube-system          Active   9m14s
local-path-storage   Active   9m9s
metallb-system       Active   6s
Next, check the pod in this namespace of metalLB.
ubuntu@ip-172-30-5-71:~/kind$ sudo kubectl -n metallb-system get all
NAME                              READY   STATUS    RESTARTS   AGE
pod/controller-8689779bc5-bhj6t   1/1     Running   0          2m24s
pod/speaker-g2d7c                 1/1     Running   0          2m24s
pod/speaker-hp4fq                 1/1     Running   0          2m24s
pod/speaker-xtxf8                 1/1     Running   0          2m24s

NAME                      TYPE        CLUSTER-IP      EXTERNAL-IP   PORT(S)   AGE
service/webhook-service   ClusterIP   10.96.158.113   <none>        443/TCP   2m24s

NAME                     DESIRED   CURRENT   READY   UP-TO-DATE   AVAILABLE   NODE SELECTOR            AGE
daemonset.apps/speaker   3         3         3       3            3           kubernetes.io/os=linux   2m24s

NAME                         READY   UP-TO-DATE   AVAILABLE   AGE
deployment.apps/controller   1/1     1            1           2m24s

NAME                                    DESIRED   CURRENT   READY   AGE
replicaset.apps/controller-8689779bc5   1         1         1       2m24s
(3) 创建metallb的配置文件。
根据什么来写这个metallb的yaml文件呢?(主要是网段信息)
ubuntu@ip-172-30-5-71:~/kind$ sudo apt install sipcalc
Reading package lists... Done
Building dependency tree
Reading state information... Done
The following NEW packages will be installed:
  sipcalc
0 upgraded, 1 newly installed, 0 to remove and 29 not upgraded.
Need to get 30.2 kB of archives.
After this operation, 74.8 kB of additional disk space will be used.
Get:1 http://us-east-1.ec2.archive.ubuntu.com/ubuntu focal/universe amd64 sipcalc amd64 1.1.6-1 [30.2 kB]
Fetched 30.2 kB in 0s (494 kB/s)
Selecting previously unselected package sipcalc.
(Reading database ... 90341 files and directories currently installed.)
Preparing to unpack .../sipcalc_1.1.6-1_amd64.deb ...
Unpacking sipcalc (1.1.6-1) ...
Setting up sipcalc (1.1.6-1) ...
Processing triggers for man-db (2.9.1-1) ...
ubuntu@ip-172-30-5-71:~/kind$ sudo kubectl get nodes -o wide
NAME                 STATUS   ROLES           AGE   VERSION   INTERNAL-IP   EXTERNAL-IP   OS-IMAGE             KERNEL-VERSION    CONTAINER-RUNTIME
kind-control-plane   Ready    control-plane   20m   v1.25.0   172.18.0.2    <none>        Ubuntu 22.04.1 LTS   5.15.0-1019-aws   containerd://1.6.7
kind-worker          Ready    <none>          19m   v1.25.0   172.18.0.3    <none>        Ubuntu 22.04.1 LTS   5.15.0-1019-aws   containerd://1.6.7
kind-worker2         Ready    <none>          19m   v1.25.0   172.18.0.4    <none>        Ubuntu 22.04.1 LTS   5.15.0-1019-aws   containerd://1.6.7
ubuntu@ip-172-30-5-71:~/kind$ sipcalc 172.18.0.1/16
-[ipv4 : 172.18.0.1/16] - 0

[CIDR]
Host address        - 172.18.0.1
Host address (decimal)    - 2886860801
Host address (hex)    - AC120001
Network address        - 172.18.0.0
Network mask        - 255.255.0.0
Network mask (bits)    - 16
Network mask (hex)    - FFFF0000
Broadcast address    - 172.18.255.255
Cisco wildcard        - 0.0.255.255
Addresses in network    - 65536
Network range        - 172.18.0.0 - 172.18.255.255
Usable range        - 172.18.0.1 - 172.18.255.254
tmp-metallb.yaml 如下这么写:
apiVersion: v1
kind: ConfigMap
metadata:
  namespace: metallb-system
  name: config
data:
  config: |
    address-pools:
    - name: default
      protocol: layer2
      addresses:
      - 172.18.0.1 - 172.18.255.250
加载创建:
ubuntu@ip-172-30-5-71:~/kind$ sudo kubectl create -f tmp-metallb.yaml
configmap/config created
(4) 这里使用了nginx作为lb的执行者,给lb赋能 by nginx。
ubuntu@ip-172-30-5-71:~/kind$ sudo kubectl get all
NAME                 TYPE        CLUSTER-IP   EXTERNAL-IP   PORT(S)   AGE
service/kubernetes   ClusterIP   10.96.0.1    <none>        443/TCP   39m

ubuntu@ip-172-30-5-71:~/kind$ sudo kubectl create deploy nginx --image nginx  # 通过镜像创建了资源
deployment.apps/nginx created

ubuntu@ip-172-30-5-71:~/kind$ vim ~/.kube/config
ubuntu@ip-172-30-5-71:~/kind$ sudo kubectl get all
NAME                        READY   STATUS    RESTARTS   AGE
pod/nginx-76d6c9b8c-rgkhs   1/1     Running   0          35s

NAME                 TYPE        CLUSTER-IP   EXTERNAL-IP   PORT(S)   AGE
service/kubernetes   ClusterIP   10.96.0.1    <none>        443/TCP   40m

NAME                    READY   UP-TO-DATE   AVAILABLE   AGE
deployment.apps/nginx   1/1     1            1           35s

NAME                              DESIRED   CURRENT   READY   AGE
replicaset.apps/nginx-76d6c9b8c   1         1         1       35s
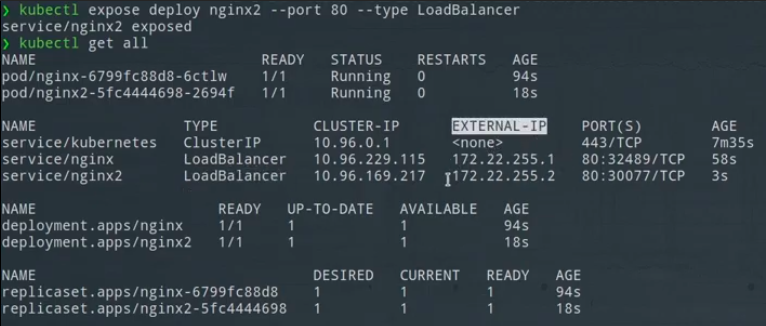
(5) 对外 暴露端口。
ubuntu@ip-172-30-5-71:~/kind$ sudo kubectl expose deploy nginx --port 80 --type LoadBalancer
service/nginx exposed

ubuntu@ip-172-30-5-71:~/kind$ sudo kubectl get all
NAME                        READY   STATUS    RESTARTS   AGE
pod/nginx-76d6c9b8c-rgkhs   1/1     Running   0          52m

NAME                 TYPE           CLUSTER-IP     EXTERNAL-IP   PORT(S)        AGE
service/kubernetes   ClusterIP      10.96.0.1      <none>        443/TCP        92m
service/nginx        LoadBalancer   10.96.77.106   <pending>     80:30792/TCP   22s  # <---- 这里出现了pending问题,未解决

NAME                    READY   UP-TO-DATE   AVAILABLE   AGE
deployment.apps/nginx   1/1     1            1           52m

NAME                              DESIRED   CURRENT   READY   AGE
replicaset.apps/nginx-76d6c9b8c   1         1         1       52m
如下,访问两个ip都可以,是同时工作的关系,而非“replica"。
End.

 浙公网安备 33010602011771号