[Argo] 01 - Create Argo Workflows
Ref: [K8S] 03 - k8s YAML, NameSpace & Pod
Ref: Argo Workflows概述,安装部署,服务的发布、加密方式
Ref: Argo Workflows —— Kubernetes的工作流引擎入门
主要还是对工作流的深入理解和实践~
Argo工作流被实现为 Kubernetes CRD (自定义资源定义)。
定义工作流,其中每个步骤都是一个容器。
安装 Argo
首先,需要一个Kubernetes集群和kubectl设置。 简单的安装步骤:
kubectl create ns argo
kubectl apply -n argo -f https://raw.githubusercontent.com/argoproj/argo-workflows/stable/manifests/quick-start-postgres.yaml  <---- 资源清单文件
Ref: https://github.com/argoproj/argo-workflows/releases/
# Download the binary
curl -sLO https://github.com/argoproj/argo-workflows/releases/download/v3.4.0-rc4/argo-linux-amd64.gz

# Unzip
gunzip argo-linux-amd64.gz

# Make binary executable
chmod +x argo-linux-amd64

# Move binary to path
mv ./argo-linux-amd64 /usr/local/bin/argo

# Test installation
argo version

# Controller and server
kubectl create namespace argo
kubectl apply -n argo -f https://github.com/argoproj/argo-workflows/releases/download/v3.4.0-rc4/install.yaml
- 新的 namespace
jeffrey@unsw-ThinkPad-T490:~$ sudo kubectl create ns argo
[sudo] password for jeffrey:
namespace/argo created

jeffrey@unsw-ThinkPad-T490:~$ kubectl get namespaces
NAME                 STATUS   AGE
argo                 Active   32s
default              Active   9h
kube-node-lease      Active   9h
kube-public          Active   9h
kube-system          Active   9h
local-path-storage   Active   9h

jeffrey@unsw-ThinkPad-T490:~$ kubectl get pods -n kube-system
NAME                                              READY   STATUS    RESTARTS   AGE
coredns-565d847f94-d8p8b                          1/1     Running   0          9h
coredns-565d847f94-jgvx9                          1/1     Running   0          9h
etcd-mycluster-control-plane                      1/1     Running   0          9h
kindnet-7cql6                                     1/1     Running   0          9h
kube-apiserver-mycluster-control-plane            1/1     Running   0          9h
kube-controller-manager-mycluster-control-plane   1/1     Running   0          9h
kube-proxy-675z6                                  1/1     Running   0          9h
kube-scheduler-mycluster-control-plane            1/1     Running   0          9h

jeffrey@unsw-ThinkPad-T490:~$ kubectl get pods -n argo
No resources found in argo namespace.
- 新的 resources
根据资源文件,创建了如下资源,等待几分钟后,才能全部启动:"ready"。
jeffrey@unsw-ThinkPad-T490:~$ kubectl get pods -n argo
NAME                                   READY   STATUS              RESTARTS   AGE
argo-server-58f7cd6b78-mchd5           0/1     ContainerCreating   0          16s
httpbin-57cc54477b-m2hlp               0/1     ContainerCreating   0          16s
minio-559d785589-2hrv9                 0/1     ContainerCreating   0          16s
postgres-6596775946-kzbwd              0/1     ContainerCreating   0          16s
workflow-controller-64d599d7c6-qlllq   0/1     ContainerCreating   0          16s

jeffrey@unsw-ThinkPad-T490:~$ kubectl get pods -n argo
NAME                                   READY   STATUS    RESTARTS        AGE
argo-server-58f7cd6b78-mchd5           1/1     Running   2 (2m36s ago)   5m32s
httpbin-57cc54477b-m2hlp               1/1     Running   0               5m32s
minio-559d785589-2hrv9                 1/1     Running   0               5m32s
postgres-6596775946-kzbwd              1/1     Running   0               5m32s
workflow-controller-64d599d7c6-qlllq   1/1     Running   2 (2m37s ago)   5m32s
资源清单描述3种工作流
这里demo了三个基本的例子。
Ref: Argo Workflows and Pipelines - CI/CD, Machine Learning, and Other Kubernetes Workflows【视频讲解】
Download from https://github.com/vfarcic/argo-workflows-demo【相关代码】

- 加载一个简单的镜像
ubuntu@ip-172-30-5-71:~/argo-workflows/argo-workflows-demo$ cat workflows/silly.yaml
---------------------------------------------------------------------------------------
apiVersion: argoproj.io/v1alpha1
kind: Workflow ----> 创建的不是pod,也不是namespace,这里却是个workflow
metadata:
  generateName: very-
  labels:
    workflows.argoproj.io/archive-strategy: "false"
spec:
  entrypoint: silly
  serviceAccountName: workflow
  templates:
  - name: silly
    container:
      image: alpine:latest
      command: [ls]
      args: ["-l"]
- 并行 工作流
Ref: https://youtu.be/UMaivwrAyTA?t=329
”- -“ 的意思在以上链接中有讲解。
ubuntu@ip-172-30-5-71:~/argo-workflows/argo-workflows-demo$ cat workflows/parallel.yaml
----------------------------------------------------------------------------------------
apiVersion: argoproj.io/v1alpha1
kind: Workflow
metadata:
  generateName: parallel-
  labels:
    workflows.argoproj.io/archive-strategy: "false"
spec:
  entrypoint: hello
  serviceAccountName: workflow
  templates:
  - name: hello
    steps:
    - - name: ls
        template: template-ls
    - - name: sleep-a
        template: template-sleep  # 与sleep-b并行
      - name: sleep-b
        template: template-sleep
    - - name: delay
        template: template-delay  # sleep-a, sleep-b 全部结束后,再执行delay
    - - name: sleep
        template: template-sleep
  - name: template-ls
    container:
      image: alpine
      command: [ls]
      args: ["-l"]
  - name: template-sleep
    script:
      image: alpine
      command: [sleep]
      args: ["10"]
  - name: template-delay
    suspend:
      duration: "600s"
- DAG 工作流
ubuntu@ip-172-30-5-71:~/argo-workflows/argo-workflows-demo$ cat workflows/dag.yaml
apiVersion: argoproj.io/v1alpha1
kind: Workflow
metadata:
  generateName: dag-
  labels:
    workflows.argoproj.io/archive-strategy: "false"
spec:
  entrypoint: full
  serviceAccountName: workflow
  volumes:
  - name: kaniko-secret
    secret:
      secretName: regcred
      items:
        - key: .dockerconfigjson
          path: config.json
  templates:
  - name: full
    dag:
      tasks:
      - name: task-a
        template: my-task  # 与 task-b, task-c 同时执行
        arguments:
          parameters:
          - name: message
            value: This is task-a
      - name: task-b
        template: my-task
        arguments:
          parameters:
          - name: message
            value: This is task-b
      - name: task-c
        template: my-task
        arguments:
          parameters:
          - name: message
            value: This is task-c
      - name: task-d
        template: my-task
        arguments:
          parameters:
          - name: message
            value: This is task-d
        dependencies:
        - task-a
      - name: task-e
        template: my-task
        arguments:
          parameters:
          - name: message
            value: This is task-e
        dependencies:
        - task-a
      - name: task-f
        template: my-task
        arguments:
          parameters:
          - name: message
            value: This is task-f
        dependencies:
        - task-a
        - task-e
      - name: task-g
        template: my-task
        arguments:
          parameters:
          - name: message
            value: This is task-g
  - name: my-task
    inputs:
      parameters:
      - name: message
    container:
      image: alpine
      command: [echo]
      args:
      - "{{inputs.parameters.message}}"
Argo Workflows-Kubernetes的工作流引擎
阅读笔记,了解一些基本概念。
mino是进行制品仓库。
Artifacts
Argo 支持接入对象存储,做全局的 Artifact 仓库,本地可以使用 MinIO.
使用对象存储存储 Artifact,最大的好处就是可以在 Pod 之间随意传数据,Pod 可以完全分布式地运行在 Kubernetes 集群的任何节点上。
Goto: [Argo] 07 - Parameters passing(For more details please check this)
另外也可以考虑借助 Artifact 仓库实现跨流水线的缓存复用(未测试),提升构建速度。
配置一个server端的ingress,即可访问UI。
apiVersion: traefik.containo.us/v1alpha1
kind: IngressRoute
metadata:
  name: minio
  namespace: argo
spec:
  entryPoints:
  - web
  routes:
  - match: Host(`minio-test.coolops.cn`)
    kind: Rule
    services:
    - name: minio
      port: 9000
核心概念
三级定义: 要了解 Argo 定义的 CRD,先从其中的三级定义入手。概念上的从大到小 分别为 WorkflowTemplate,Workflow,template。这些资源的命名有些相似,所以会稍微有些迷惑性。
-
Workflow
Workflow是Argo中最重要的资源,其主要有两个重要功能:
-
- 它定义要执行的工作流
- 它存储工作流程的状态
要执行的工作流定义在Workflow.spec字段中,其主要包括templates和entrypoint。
apiVersion: argoproj.io/v1alpha1
kind: Workflow
metadata:
  generateName: hello-world-  # Workflow的配置名称
spec:
  entrypoint: whalesay        # 解析whalesay templates
  templates:
  - name: whalesay            # 定义whalesay templates,和entrypoint保持一致
    container:                # 定义一个容器,输出"helloworld"
      image: docker/whalesay
      command: [cowsay]
      args: ["hello world"]
-
Templates
Templates 是列表结构,主要分为两类:
-
- 定义具体的工作流
- 调用其他模板提供并行控制
定义具体的工作流
-
-
Container
-
- name: whalesay
    container:
      image: docker/whalesay
      command: [cowsay]
      args: ["hello world"]
-
-
Script
-
Script是Container的另一种包装实现,其定义方式和Container相同,只是增加了source字段用于自定义脚本,如下:
- name: gen-random-int
    script:
      image: python:alpine3.6
      command: [python]
      source: |
        import random
        i = random.randint(1, 100)
        print(i)
脚本的输出结果会根据调用方式自动导出到
{{tasks.<NAME>.outputs.result}}
{{steps.<NAME>.outputs.result}}
-
-
Resource
-
Resource主要用于直接在K8S集群上 执行集群资源操作,可以 get, create, apply, delete, replace, patch 集群资源。
如下在集群中创建一个ConfigMap类型资源:( ConfigMap 是 Kubernetes 用来向应用 Pod 中注入配置数据的方法)
- name: k8s-owner-reference
    resource:
      action: create
      manifest: |
        apiVersion: v1
        kind: ConfigMap
        metadata:
          generateName: owned-eg-
        data:
          some: value
-
-
Suspend
-
Suspend主要用于暂停,可以暂停一段时间,也可以手动恢复,命令使用 argo resume 进行恢复。定义格式如下:
- name: delay
    suspend:
      duration: "20s"
调用其他模板提供并行控制
-
-
Steps
-
Steps主要是通过定义一系列步骤来定义任务,其结构是"list of lists";
外部列表将顺序执行,内部列表将并行执行。如下:
(step1和step2a是顺序执行,而step2a和step2b是并行执行)
- name: hello-hello-hello
    steps:
    - - name: step1
        template: prepare-data
    - - name: step2a
        template: run-data-first-half
      - name: step2b
        template: run-data-second-half
(a) 通过When来进行条件判断。
apiVersion: argoproj.io/v1alpha1
kind: Workflow
metadata:
  generateName: coinflip-
spec:
  entrypoint: coinflip
  templates:
  - name: coinflip
    steps:
    - - name: flip-coin
        template: flip-coin
- - name: heads
        template: heads
        when: "{{steps.flip-coin.outputs.result}} == heads"
      - name: tails
        template: tails
        when: "{{steps.flip-coin.outputs.result}} == tails"
  - name: flip-coin
    script:
      image: python:alpine3.6
      command: [python]
      source: |
        import random
        result = "heads" if random.randint(0,1) == 0 else "tails"
        print(result)
  - name: heads
    container:
      image: alpine:3.6
      command: [sh, -c]
      args: ["echo \"it was heads\""]
  - name: tails
    container:
      image: alpine:3.6
      command: [sh, -c]
      args: ["echo \"it was tails\""]
(b) 进行循环操作。
apiVersion: argoproj.io/v1alpha1
kind: Workflow
metadata:
  generateName: loops-
spec:
  entrypoint: loop-example
  templates:
  - name: loop-example
    steps:
    - - name: print-message
        template: whalesay
        arguments:
          parameters:
          - name: message
            value: "{{item}}"
        withItems:    # <---- 执行了两次该step,生成了两个pods
        - hello world
        - goodbye world
  - name: whalesay
    inputs:
      parameters:
      - name: message
    container:
      image: docker/whalesay:latest
      command: [cowsay]
      args: ["{{inputs.parameters.message}}"]
Ref: Kubernetes 工作流引擎:Argo(1)【强烈推荐过一遍】
图文讲解,不错的样子!
(1) NodePort 类型的 Service。


对一些应用的某些部分(如前端),可能希望将其暴露给 Kubernetes 集群外部的 IP 地址。

Kubernetes ServiceTypes 允许指定你所需要的 Service 类型,默认是 ClusterIP。

Type 的取值以及行为如下:

ClusterIP:通过集群的内部 IP 暴露服务,选择该值时服务只能够在集群内部访问。 这也是默认的 ServiceType。

NodePort:通过每个节点上的 IP 和静态端口(NodePort)暴露服务。 NodePort 服务会路由到自动创建的 ClusterIP 服务。 通过请求 <节点 IP>:<节点端口>,你可以从集群的外部访问一个 NodePort 服务。

LoadBalancer:使用云提供商的负载均衡器向外部暴露服务。 外部负载均衡器可以将流量路由到自动创建的 NodePort 服务和 ClusterIP 服务上。

ExternalName:通过返回 CNAME 和对应值,可以将服务映射到 externalName 字段的内容(例如,foo.bar.example.com)。 无需创建任何类型代理。
$ kubectl get pods -n argo
NAME                                   READY   STATUS              RESTARTS   AGE
argo-ui-76c6cf75b4-vh6w6               0/1     ContainerCreating   0          14s
workflow-controller-69f6ff7cbc-5pqbj   0/1     ContainerCreating   0          14s
-------------------------------------------------------------------------------------------------
$ kubectl get pods -n argo
NAME                                   READY   STATUS    RESTARTS   AGE
argo-ui-76c6cf75b4-vh6w6               1/1     Running   0          10m
workflow-controller-69f6ff7cbc-5pqbj   1/1     Running   0          10m
-------------------------------------------------------------------------------------------------
$ kubectl get svc -n argo
NAME      TYPE        CLUSTER-IP      EXTERNAL-IP   PORT(S)   AGE
argo-ui   ClusterIP   10.97.124.167   <none>        80/TCP    10m
-------------------------------------------------------------------------------------------------
$ kubectl edit svc argo-ui -n argo
kind: Service
metadata:
......
spec:
......
  sessionAffinity: None
  type: NodePort
......
service/argo-ui edited
-------------------------------------------------------------------------------------------------
$ kubectl get svc -n argo
NAME      TYPE       CLUSTER-IP      EXTERNAL-IP   PORT(S)        AGE
argo-ui   NodePort   10.97.124.167   <none>        80:32686/TCP   12m
-------------------------------------------------------------------------------------------------
$ kubectl get crd |grep argo
workflows.argoproj.io                         2019-09-10T03:27:41Z
-------------------------------------------------------------------------------------------------
$ kubectl api-versions |grep argo
argoproj.io/v1alpha1
(2) 如果出现了一个权限错误,Argo 官网上给出的解决方案是给 default:default 绑定上 admin 的 clusterrole 权限:
$ kubectl create rolebinding default-admin --clusterrole=admin --serviceaccount=default:default
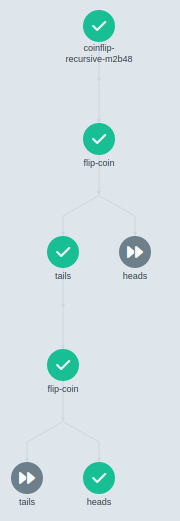
(3) 递归操作。
# coinflip-recursive is a variation of the coinflip example.
 # This is an example of a dynamic workflow which extends
 # indefinitely until it achieves a desired result. In this
 # example, the 'flip-coin' step is recursively repeated until
 # the result of the step is "heads".
 apiVersion: argoproj.io/v1alpha1
 kind: Workflow
 metadata:
   generateName: coinflip-recursive-
 spec:
   entrypoint: coinflip
   templates:
   - name: coinflip
     steps:
     - - name: flip-coin
         template: flip-coin
     - - name: heads
         template: heads
         when: "{{steps.flip-coin.outputs.result}} == heads"
       - name: tails
         template: coinflip
         when: "{{steps.flip-coin.outputs.result}} == tails"

   - name: flip-coin
     script:
       image: python:alpine3.6
       command: [python]
       source: |
         import random
         result = "heads" if random.randint(0,1) == 0 else "tails"
         print(result)

   - name: heads
     container:
       image: alpine:3.6
       command: [sh, -c]
       args: ["echo \"it was heads\""]
每一次递归调用都会产生一个 Pod!
-
-
Dag
-
Ref: Argo Workflows-Kubernetes的工作流引擎(下)
-
Variables 变量
首先在spec字段定义arguments,定义变量message,其值是hello world,然后在templates字段中需要先定义一个inputs字段,用于templates的输入参数,然后在使用"{{}}"形式引用变量。
apiVersion: argoproj.io/v1alpha1
kind: Workflow
metadata:
  generateName: hello-world-parameters-
spec:
  entrypoint: whalesay
  arguments:
    parameters:
      - name: message    # <---- 定义变量
        value: hello world
  templates:
    - name: whalesay
      inputs:
        parameters:
          - name: message
      container:
        image: docker/whalesay
        command: [ cowsay ]
        args: [ "{{inputs.parameters.message}}" ]
变量还可以进行一些函数运算,主要有:
-
- filter:过滤
- asInt:转换为Int
- asFloat:转换为Float
- string:转换为String
- toJson:转换为Json
例子:
filter([1, 2], { # > 1})
asInt(inputs.parameters["my-int-param"])
asFloat(inputs.parameters["my-float-param"])
string(1)
toJson([1, 2])
更多语法可以访问https://github.com/antonmedv/expr/blob/master/docs/Language-Definition.md进行学习。
-
制品库
在安装argo的时候,已经安装了mino作为制品库。
For more details, please check [Argo] 07 - Parameters passing - Artifacts
-
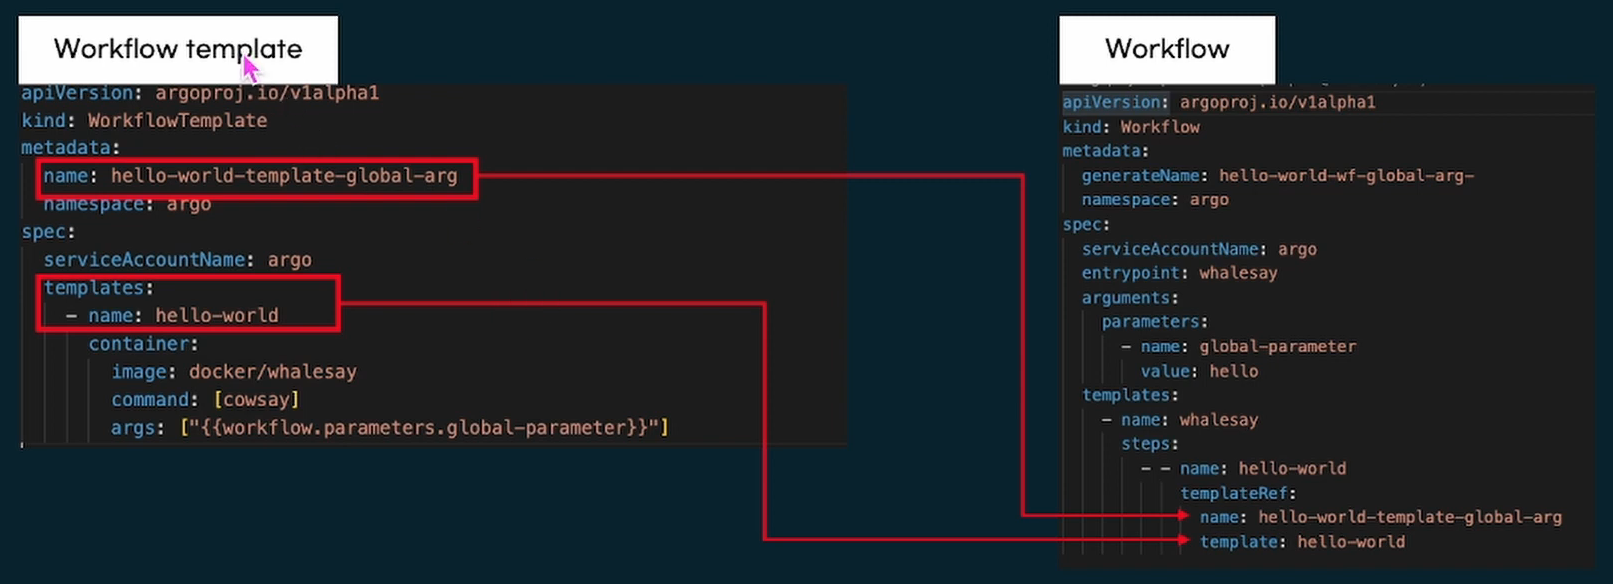
WorkflowTemplate
WorkflowTemplate 相当于是 Workflow 的模板库,和 Workflow 一样,也由 template 组成。用户在创建完 WorkflowTemplate 后,可以通过直接提交它们来执行 Workflow。
Ref: Argo Workflows-Kubernetes的工作流引擎(下)
(1) 定义了了一个 WorkflowTemplate。
apiVersion: argoproj.io/v1alpha1
kind: WorkflowTemplate
metadata:
  name: workflow-template-1
spec:
  entrypoint: whalesay-template
  arguments:
    parameters:
      - name: message
        value: hello world
  templates:
    - name: whalesay-template
      inputs:
        parameters:
          - name: message
      container:
        image: docker/whalesay
        command: [cowsay]
        args: ["{{inputs.parameters.message}}"]
(2) 加载
jeff@unsw-ThinkPad-T490:Argo$ argo template create workflowtemplate.yaml -n argo
Name:                workflow-template-1
Namespace:           argo
Created:             Sat Sep 17 17:55:12 +1000 (now)
jeffrey@unsw-ThinkPad-T490:Argo$ argo submit call_workflowtemplate.yaml -n argo
Name:                workflow-template-hello-world-5mrr4
Namespace:           argo
ServiceAccount:      unset (will run with the default ServiceAccount)
Status:              Pending
Created:             Sat Sep 17 17:56:32 +1000 (now)
Progress:
分析call_workflowtemplate.yaml 如下所示。
apiVersion: argoproj.io/v1alpha1
kind: Workflow
metadata:
  generateName: workflow-template-hello-world-
spec:
  entrypoint: whalesay
  templates:
  - name: whalesay
    steps:                                # 引用模板必须在steps/dag/template下
      - - name: call-whalesay-template
          templateRef:                    # 应用模板字段
            name: workflow-template-1     # WorkflowTemplate名
            template: whalesay-template   # 具体的template名
          arguments:                      # 参数
            parameters:
            - name: message
              value: "hello world"
-
ClusterWorkflowTemplate
ClusterWorkflowTemplate创建的是一个集群范围内的WorkflowTemplate,其他workflow可以引用它。
(1) 定义了了一个 ClusterWorkflowTemplate。
apiVersion: argoproj.io/v1alpha1
kind: ClusterWorkflowTemplate
metadata:
  name: cluster-workflow-template-whalesay-template
spec:
  templates:
  - name: whalesay-template
    inputs:
      parameters:
      - name: message
    container:
      image: docker/whalesay
      command: [cowsay]
      args: ["{{inputs.parameters.message}}"]
(2) 加载
jeffrey@unsw-ThinkPad-T490:Argo$ argo cluster-template create clusterWorkflowtemplate.yaml -n argo
Name:                cluster-workflow-template-whalesay-template
Created:             Sat Sep 17 18:07:32 +1000 (now)

jeffrey@unsw-ThinkPad-T490:Argo$ argo submit call_clusterWorkflowtemplate.yaml -n argo
Name:                workflow-template-hello-world-c7b4c
Namespace:           argo
ServiceAccount:      unset (will run with the default ServiceAccount)
Status:              Pending
Created:             Sat Sep 17 18:09:19 +1000 (now)
Progress:
分析call_clusterWorkflowtemplate.yaml 如下所示。
apiVersion: argoproj.io/v1alpha1
kind: Workflow
metadata:
  generateName: workflow-template-hello-world-
spec:
  entrypoint: whalesay
  templates:
  - name: whalesay
    steps:
      - - name: call-whalesay-template
          templateRef:                                          # 引用模板
            name: cluster-workflow-template-whalesay-template   # ClusterWorkflow名
            template: whalesay-template                         # 具体的模板名
            clusterScope: true                                  # 表示是ClusterWorkflow
          arguments:                                            #  参数
            parameters:
            - name: message
              value: "hello world"
实践CI/CD的整个流程很简单,即:拉代码->编译->构建镜像->上传镜像->部署
apiVersion: argoproj.io/v1alpha1
kind: WorkflowTemplate
metadata:
  annotations:
    workflows.argoproj.io/description: |
      Checkout out from Git, build and deploy application.
    workflows.argoproj.io/maintainer: '@joker'
    workflows.argoproj.io/tags: java, git
    workflows.argoproj.io/version: '>= 2.9.0'
  name: devops-java
spec:
  entrypoint: main
  arguments:
    parameters:
      - name: repo
        value: gitlab-test.coolops.cn/root/springboot-helloworld.git
      - name: branch
        value: master
      - name: image
        value: registry.cn-hangzhou.aliyuncs.com/rookieops/myapp:202103101613
      - name: cache-image
        value: registry.cn-hangzhou.aliyuncs.com/rookieops/myapp
      - name: dockerfile
        value: Dockerfile
      - name: devops-cd-repo
        value: gitlab-test.coolops.cn/root/devops-cd.git
      - name: gitlabUsername
        value: devops
      - name: gitlabPassword
        value: devops123456
  templates:
    - name: main
      steps:
        - - name: Checkout
            template: Checkout
        - - name: Build
            template: Build
        - - name: BuildImage
            template: BuildImage
        - - name: Deploy
            template: Deploy
    # 拉取代码
    - name: Checkout
      script:
        image: registry.cn-hangzhou.aliyuncs.com/rookieops/maven:3.5.0-alpine
        workingDir: /work
        command:
        - sh
        source: |
          git clone --branch {{workflow.parameters.branch}} http://{{workflow.parameters.gitlabUsername}}:{{workflow.parameters.gitlabPassword}}@{{workflow.parameters.repo}} .
        volumeMounts:
          - mountPath: /work
            name: work
    # 编译打包
    - name: Build
      script:
        image: registry.cn-hangzhou.aliyuncs.com/rookieops/maven:3.5.0-alpine
        workingDir: /work
        command:
        - sh
        source: mvn -B clean package -Dmaven.test.skip=true -Dautoconfig.skip
        volumeMounts:
          - mountPath: /work
            name: work
    # 构建镜像
    - name: BuildImage
      volumes:
      - name: docker-config
        secret:
          secretName: docker-config
      container:
        image: registry.cn-hangzhou.aliyuncs.com/rookieops/kaniko-executor:v1.5.0
        workingDir: /work
        args:
          - --context=.
          - --dockerfile={{workflow.parameters.dockerfile}}
          - --destination={{workflow.parameters.image}}
          - --skip-tls-verify
          - --reproducible
          - --cache=true
          - --cache-repo={{workflow.parameters.cache-image}}
        volumeMounts:
          - mountPath: /work
            name: work
          - name: docker-config
            mountPath: /kaniko/.docker/
    # 部署
    - name: Deploy
      script:
        image: registry.cn-hangzhou.aliyuncs.com/rookieops/kustomize:v3.8.1
        workingDir: /work
        command:
        - sh
        source: |
           git remote set-url origin http://{{workflow.parameters.gitlabUsername}}:{{workflow.parameters.gitlabPassword}}@{{workflow.parameters.devops-cd-repo}}
           git config --global user.name "Administrator"
           git config --global user.email "coolops@163.com"
           git clone http://{{workflow.parameters.gitlabUsername}}:{{workflow.parameters.gitlabPassword}}@{{workflow.parameters.devops-cd-repo}} /work/devops-cd
           cd /work/devops-cd
           git pull
           cd /work/devops-cd/devops-simple-java
           kustomize edit set image {{workflow.parameters.image}}
           git commit -am 'image update'
           git push origin master
        volumeMounts:
          - mountPath: /work
            name: work
  volumeClaimTemplates:
    - name: work
      metadata:
        name: work
      spec:
        storageClassName: nfs-client-storageclass
        accessModes: [ "ReadWriteOnce" ]
        resources:
          requests:
            storage: 1Gi
(1) Annotations用于非识别信息,即 Kubernetes 不关心的元数据。因此,注解键和值没有约束。因此,如果您想为其他人添加有关给定资源的信息,则注解是更好的选择。
apiVersion: argoproj.io/v1alpha1
kind: WorkflowTemplate
metadata:
  annotations:
    workflows.argoproj.io/description: |Checkout out from Git, build and deploy application.
    workflows.argoproj.io/maintainer: '@joker'
    workflows.argoproj.io/tags: java, git
    workflows.argoproj.io/version: '>= 2.9.0'
  name: devops-java
(2) Initial parameters
spec:
  entrypoint: main
  arguments:
    parameters:
      - name: repo
        value: gitlab-test.coolops.cn/root/springboot-helloworld.git
      - name: branch
        value: master
      - name: image
        value: registry.cn-hangzhou.aliyuncs.com/rookieops/myapp:202103101613
      - name: cache-image
        value: registry.cn-hangzhou.aliyuncs.com/rookieops/myapp
      - name: dockerfile
        value: Dockerfile
      - name: devops-cd-repo
        value: gitlab-test.coolops.cn/root/devops-cd.git
      - name: gitlabUsername
        value: devops
      - name: gitlabPassword
        value: devops123456
(3)
  templates:
    - name: main
      steps:
        - - name: Checkout
            template: Checkout
        - - name: Build
            template: Build
        - - name: BuildImage
            template: BuildImage
        - - name: Deploy
            template: Deploy
(3.1)
    # 拉取代码
    - name: Checkout
      script:
        image: registry.cn-hangzhou.aliyuncs.com/rookieops/maven:3.5.0-alpine
        workingDir: /work  # ----> 默认就下载到了这里
        command:
        - sh
        source: |
          git clone --branch {{workflow.parameters.branch}} http://{{workflow.parameters.gitlabUsername}}:{{workflow.parameters.gitlabPassword}}@{{workflow.parameters.repo}} .
        volumeMounts:
          - mountPath: /work
            name: work
(3.2)
    # 编译打包
    - name: Build
      script:
        image: registry.cn-hangzhou.aliyuncs.com/rookieops/maven:3.5.0-alpine
        workingDir: /work
        command:
        - sh
        source: mvn -B clean package -Dmaven.test.skip=true -Dautoconfig.skip
        volumeMounts:
          - mountPath: /work
            name: work
(3.3) 特点,镜像中 build 镜像。
    # 构建镜像
    - name: BuildImage
      volumes:
      - name: docker-config
        secret:
          secretName: docker-config
      container:
        image: registry.cn-hangzhou.aliyuncs.com/rookieops/kaniko-executor:v1.5.0
        workingDir: /work
        args:
          - --context=.
          - --dockerfile={{workflow.parameters.dockerfile}}
          - --destination={{workflow.parameters.image}}
          - --skip-tls-verify
          - --reproducible
          - --cache=true
          - --cache-repo={{workflow.parameters.cache-image}}
        volumeMounts:
          - mountPath: /work
            name: work
          - name: docker-config
            mountPath: /kaniko/.docker/
(3.4)
    # 部署
    - name: Deploy
      script:
        image: registry.cn-hangzhou.aliyuncs.com/rookieops/kustomize:v3.8.1
        workingDir: /work
        command:
        - sh
        source: |
           git remote set-url origin http://{{workflow.parameters.gitlabUsername}}:{{workflow.parameters.gitlabPassword}}@{{workflow.parameters.devops-cd-repo}}
           git config --global user.name "Administrator"
           git config --global user.email "coolops@163.com"
           git clone http://{{workflow.parameters.gitlabUsername}}:{{workflow.parameters.gitlabPassword}}@{{workflow.parameters.devops-cd-repo}} /work/devops-cd
           cd /work/devops-cd
           git pull
           cd /work/devops-cd/devops-simple-java
           kustomize edit set image {{workflow.parameters.image}}
           git commit -am 'image update'
           git push origin master
        volumeMounts:
          - mountPath: /work
            name: work
End.

 浙公网安备 33010602011771号