[SageMaker] Data Science on AWS by SageMaker
Chapter 1. Automated Machine Learning
热身例子
一、是什么
Amazon SageMaker Autopilot automatically trains and tunes the best machine learning models for classification or regression, based on your data while allowing to maintain full control and visibility.
Amazon Comprehend is a natural language processing (NLP) service that uses machine learning to find insights and relationships in text. No machine learning experience required.

二、创建 SageMaker Studio
Add one user called book1
then, open studio. (loading ...)

打开了一个网页版的IDE。
输入s3中的csv后,一些基本的配置后,原来会是全自动分析!
但,对于专业的,例如nlp问题,accuracy确实不咋地。

三、自动部署
部署后自动触发,然后如何 trigger 呢?如下。
import boto3

sagemaker_runtime = boto3.client('sagemaker-runtime')
csv_line_predict  = """I loved it!"""
ep_name           = 'reviews-endpoint'

response = sagemaker_runtime.invoke_endpoint(EndpointName=ep_name, ContentType='text/csv', Accept='text/csv', Body=csv_line_predict)

response_body = response['Body'].read().decode('utf-8').strip()
Train with boto3
一、连接 Sagemaker Service
Interact with AWS services in a programmatic way
import boto3
import sagemaker

session = sagemaker.Session(default_bucket="dsoaws-amazon-reviews")
bucket  = session.default_bucket()
role    = sagemaker.get_execution_role()
region  = boto3.Session().region_name

sm = boto3.Session().client(service_name='sagemaker', region_name=region)
二、Create our Autopilot job
先准备好参数,如下。
We create our Autopilot job. Note that we add a timestamp to the Autopilot job name which helps to keep the jobs unique and easy to track. We pass the job name, input/output configuration, job configuration and execution role. The execution role is part of the AWS Identity and Access Management (IAM) service and manages service access permissions.
-
Job 的若干配置
max_candidates = 3

job_config= {
    'CompletionCriteria': {
      'MaxRuntimePerTrainingJobInSeconds': 600,
      'MaxCandidates': max_candidates,
      'MaxAutoMLJobRuntimeInSeconds': 3600
    },
}
-
输入 or 输出的若干配置
input_data_config = [{
      'DataSource': {
        'S3DataSource': {
          'S3DataType': 'S3Prefix',
          'S3Uri': 's3://dsoaws-amazon-reviews/data/amazon_reviews_us_Digital_Software_v1_00_header.csv'
        }
      },
      'TargetAttributeName': 'star_rating'
    }
]

output_data_config = {
    'S3OutputPath': 's3://dsoaws-amazon-reviews/autopilot/output/'
}
create our Autopilot job.
from time import gmtime, strftime, sleep

timestamp_suffix = strftime('%d-%H-%M-%S', gmtime())
auto_ml_job_name = 'automl-dm-' + timestamp_suffix

sm.create_auto_ml_job(AutoMLJobName    = auto_ml_job_name,
                      InputDataConfig  = input_data_config,
                      OutputDataConfig = output_data_config,
                      AutoMLJobConfig  = job_config,
                      RoleArn=role)
三、Analyzing Data
job            = sm.describe_auto_ml_job(AutoMLJobName=auto_ml_job_name)
job_status     = job['AutoMLJobStatus']
job_sec_status = job['AutoMLJobSecondaryStatus']

if job_status not in ('Stopped', 'Failed'):

    while job_status in ('InProgress') and job_sec_status in ('AnalyzingData'):

        job            = sm.describe_auto_ml_job(AutoMLJobName=auto_ml_job_name)
        job_status     = job['AutoMLJobStatus']
        job_sec_status = job['AutoMLJobSecondaryStatus']
        print(job_status, job_sec_status)  # <---- print output

        sleep(30)
    print("Data analysis complete")

print(job)
Output:
InProgress AnalyzingData
InProgress AnalyzingData
InProgress AnalyzingData
...
Data analysis complete
四、Tuning Jobs
Once the Autopilot job has finished, you can list all model candidates:
candidates = sm.list_candidates_for_auto_ml_job(AutoMLJobName=auto_ml_job_name, SortBy='FinalObjectiveMetricValue')['Candidates']

for index, candidate in enumerate(candidates):
    print(str(index) + "  " + candidate['CandidateName'] + "  " + str(candidate['FinalAutoMLJobObjectiveMetric']['Value']))
best_candidate            = sm.describe_auto_ml_job(AutoMLJobName=auto_ml_job_name)['BestCandidate']
best_candidate_identifier = best_candidate['CandidateName']

print("Candidate name: " + best_candidate_identifier)
print("Metric name: "    + best_candidate['FinalAutoMLJobObjectiveMetric']['MetricName'])
print("Metric value: "   + str(best_candidate['FinalAutoMLJobObjectiveMetric']['Value']))

Deploy with boto3
Now, let’s deploy the best model as a REST endpoint.
一、创建 model object
model_name = 'automl-dm-model-' + timestamp_suffix

model_arn  = sm.create_model(Containers       = best_candidate['InferenceContainers'],
                             ModelName        = model_name,
                             ExecutionRoleArn = role)
print('Best candidate model ARN: ', model_arn['ModelArn'])
-
Inference pipeline 的细节
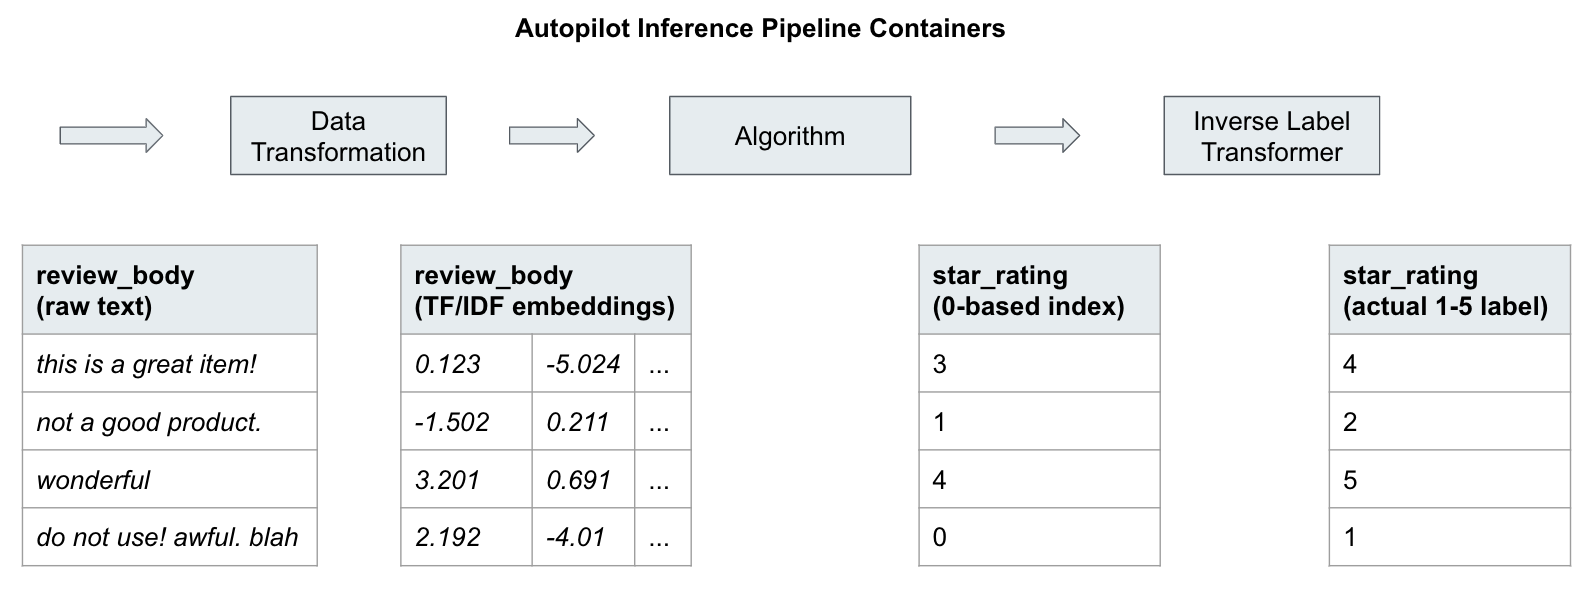
When we deploy our model as a REST endpoint, we actually deploy a whole inference pipeline.
可见,以下是三个 pipeline。

二、部署 inference pipeline
-
Deployment
endpoint configure。
# EndpointConfig name
timestamp_suffix = strftime('%d-%H-%M-%S', gmtime())
epc_name         = 'automl-dm-epc-' + timestamp_suffix

# Endpoint name
ep_name      = 'automl-dm-ep-' + timestamp_suffix
variant_name = 'automl-dm-variant-' + timestamp_suffix

ep_config    = sm.create_endpoint_config(
                   EndpointConfigName = epc_name,
                   ProductionVariants = [{'InstanceType':'ml.c5.2xlarge',
                                          'InitialInstanceCount': 1,
                                          'ModelName': model_name,
                                          'VariantName': variant_name}])

create_endpoint_response = sm.create_endpoint(
                               EndpointName=ep_name,
                               EndpointConfigName=epc_name)
并查看是否部署成功。
response = sm.describe_endpoint(EndpointName=autopilot_endpoint_name)
status = response['EndpointStatus']

print("Arn: " + response['EndpointArn'])
print("Status: " + status)
-
Testing endpoint
sagemaker_runtime = boto3.client('sagemaker-runtime')
csv_line_predict = """It's OK."""

response = sagemaker_runtime.invoke_endpoint(EndpointName=ep_name, ContentType='text/csv', Accept='text/csv', Body=csv_line_predict)
response_body = response['Body'].read().decode('utf-8').strip()
Predict with Amazon Athena 这部分暂时省略。
Automated ML with Comprehend
一、初识
AutoML 在nlp的表现,还是效果太差了,nlp就要用专门的nlp工具和服务。
参考:[IR] Information Extraction
-
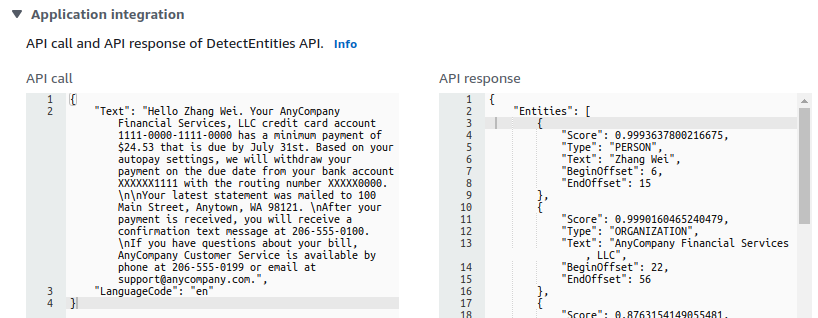
命名实体抽取(named entity extraction)

-
情感分析 Sentiment analysis
可见,这是个 “中立” 的表达。
{
    "Sentiment": {
        "Sentiment": "NEUTRAL",
        "SentimentScore": {
            "Positive": 0.0005869901506230235,
            "Negative": 0.016147520393133163,
            "Neutral": 0.9832557439804077,
            "Mixed": 0.00000969591928878799
        }
    }
}
二、自定义分类
左侧边栏:Customization --> Custom classification
设置好datasets file (csv),自动开始 training.
强烈建议,在sagemaker上直接测试代码,并写好自己的注释,这样效率高一些。
另外,这本书的代码也可以顺便过一遍: https://github.com/PacktPublishing/Learn-Amazon-SageMaker
Learn Amazon SageMaker

更多参考:
https://sagemaker-workshop.com/builtin/parallelized.html
End.


【推荐】国内首个AI IDE,深度理解中文开发场景,立即下载体验Trae
【推荐】编程新体验,更懂你的AI,立即体验豆包MarsCode编程助手
【推荐】抖音旗下AI助手豆包,你的智能百科全书,全免费不限次数
【推荐】轻量又高性能的 SSH 工具 IShell:AI 加持,快人一步
· AI与.NET技术实操系列:向量存储与相似性搜索在 .NET 中的实现
· 基于Microsoft.Extensions.AI核心库实现RAG应用
· Linux系列:如何用heaptrack跟踪.NET程序的非托管内存泄露
· 开发者必知的日志记录最佳实践
· SQL Server 2025 AI相关能力初探
· 震惊!C++程序真的从main开始吗?99%的程序员都答错了
· 【硬核科普】Trae如何「偷看」你的代码?零基础破解AI编程运行原理
· 单元测试从入门到精通
· 上周热点回顾(3.3-3.9)
· winform 绘制太阳,地球,月球 运作规律