[Advanced Python] Test-Driven Development with Python, Flask, and Docker
Ref: https://testdriven.io/courses/tdd-flask/【教程】
Ref: Flask-RESTPlus 中文文档(Flask-RESTPlus Chinese document)【看上去貌似不错】
Ref: https://flask-restx.readthedocs.io/en/latest/quickstart.html
集成了 flask-restx。
更为灵活的工具:python manage.py run


# manage.py


from flask.cli import FlaskGroup

from src import app


cli = FlaskGroup(app)


if __name__ == '__main__':
    cli()
Django项目
作为对比,manage.py 是每个Django项目中自动生成的一个用于管理项目的脚本文件,需要通过python命令执行。manage.py接受的是Django提供的内置命令。
内置命令包含,例如
python manage.py check app1
基础内容
一、./src 的内容
# src/__init__.py


from flask import Flask, jsonify
from flask_restx import Resource, Api


# instantiate the app
app = Flask(__name__)
api = Api(app)

# set config
app.config.from_object('src.config.DevelopmentConfig')  # --> 之后会修改下


class Ping(Resource):
    def get(self):
        return {
        'status': 'success',
        'message': 'pong!'
    }


api.add_resource(Ping, '/ping')
# src/config.py


class BaseConfig:
    TESTING = False


class DevelopmentConfig(BaseConfig):
    pass


class TestingConfig(BaseConfig):
    TESTING = True


class ProductionConfig(BaseConfig):
    pass
二、通过 cli 执行 app
(env)$ export FLASK_APP=src/__init__.py
(env)$ export FLASK_ENV=development
(env)$ python manage.py run
三、Docker 搭建 API
定义了一个服务。
# pull official base image
 FROM python:3.9.0-slim-buster

 # set working directory
 RUN mkdir -p /usr/src/app
 WORKDIR /usr/src/app

 # set environment variables
 ENV PYTHONDONTWRITEBYTECODE 1
 ENV PYTHONUNBUFFERED 1

 # add and install requirements
 COPY ./requirements.txt .
 RUN pip install -r requirements.txt

 # add app
 COPY . .

 # run server
 CMD python manage.py run -h 0.0.0.0
文件 docker-compose.yml,执行了这个服务。
 version: '3.7'

 services:

   api:
     build:
       context: .
       dockerfile: Dockerfile
     volumes:
       - .:/usr/src/app
     ports:
       - 5004:5000
     environment:
       - FLASK_APP=src/__init__.py
       - FLASK_ENV=development
       - APP_SETTINGS=src.config.DevelopmentConfig
__init__.py 中自动获取了 环境变量。
# set config
app_settings = os.getenv('APP_SETTINGS')
app.config.from_object(app_settings)
数据库容器
SQLAlchemy: it is the Python SQL toolkit and Object Relational Mapper that gives application developers the full power and flexibility of SQL.
一、配置思路
-
客户端
在 config.py 中添加“环境变量”。
# src/config.py


import os  # new


class BaseConfig:
    TESTING = False
    SQLALCHEMY_TRACK_MODIFICATIONS = False  # new


class DevelopmentConfig(BaseConfig):
    SQLALCHEMY_DATABASE_URI = os.environ.get('DATABASE_URL')  # new


class TestingConfig(BaseConfig):
    TESTING = True
    SQLALCHEMY_DATABASE_URI = os.environ.get('DATABASE_TEST_URL')  # new


class ProductionConfig(BaseConfig):
    SQLALCHEMY_DATABASE_URI = os.environ.get('DATABASE_URL')  # new
在 __init__.py 中定义好“模型”。
# instantiate the db
db = SQLAlchemy(app)  # new


# model
class User(db.Model):  # new
    __tablename__ = 'users'
    id = db.Column(db.Integer, primary_key=True, autoincrement=True)
    username = db.Column(db.String(128), nullable=False)
    email = db.Column(db.String(128), nullable=False)
    active = db.Column(db.Boolean(), default=True, nullable=False)

    def __init__(self, username, email):
        self.username = username
        self.email = email
等待数据库微服务的初始化。文件:entrypoint.sh
#!/bin/sh

echo "Waiting for postgres..."

while ! nc -z api-db 5432; do
  sleep 0.1
done

echo "PostgreSQL started"

python manage.py run -h 0.0.0.0
-
服务器端
postgres容器的配置。
# pull official base image
FROM postgres:13-alpine

# run create.sql on init
ADD create.sql /docker-entrypoint-initdb.d
二、SQL API
如何通过定义好的 模型 去修改数据库呢?
添加命令:namage.py
from flask.cli import FlaskGroup
from src import app, db  # new

cli = FlaskGroup(app)

# new
@cli.command('recreate_db')
def recreate_db():
    db.drop_all()
    db.create_all()
    db.session.commit()

if __name__ == '__main__':
    cli()
三、Pytest
Ref: [Advanced Python] pytest: building simple and scalable tests easy
添加pytest到requirement,然后再构建image。
$ docker-compose up -d --build

执行测试,看看效果。
jeffrey@unsw-ThinkPad-T490:flask-tdd-docker$ docker-compose exec api python -m pytest "src/tests"

======================= test session starts =======================
platform linux -- Python 3.9.0, pytest-6.1.2, py-1.9.0, pluggy-0.13.1
rootdir: /usr/src/app/src/tests, configfile: pytest.ini
collected 0 items

====================== no tests ran in 0.01s ======================

OK, 以上的测试 到底发生了什么呢?
jeffrey@unsw-ThinkPad-T490:tests$ ls
conftest.py  __init__.py  pytest.ini  test_config.py  test_ping.py
或者,按照下面去组织更好。
└── tests
    ├── __init__.py
    ├── conftest.py
    ├── functional
    │   └── test_ping.py
    ├── pytest.ini
    └── unit
        └── test_config.py
测试 执行:
$ docker-compose exec api python -m pytest -s "src/tests/"

# function name 中有 config 的就 selected
$ docker-compose exec api python -m pytest -s "src/tests" -k config
-
conftest.py
测试之前,先准备、配置好一些东西。所以,就用到了 fixture。
在起始.py文件中定义好了app。
# instantiate the app
app = Flask(__name__)

# set config
# APP_SETTINGS=src.config.DevelopmentConfig
app_settings = os.getenv('APP_SETTINGS')
app.config.from_object(app_settings)
以下fixture中导入。
import pytest
from src import app, db


@pytest.fixture(scope='module')
def test_app():
    app.config.from_object('src.config.TestingConfig')  # 加入了环境变量,用了with,说明导入的过程没有问题。
    with app.app_context():
        print("before yield app.")
        yield app  # testing happens here
        print("after  yield app.")


@pytest.fixture(scope='module')
def test_database():
    db.create_all()
    print("before yield db.")
    yield db  # testing happens here
    print("after  yield db.")
    db.session.remove()
    db.drop_all()
-
test_config.py
这里其实就是在测试环境变量。
import os

def test_development_config(test_app):
    test_app.config.from_object('src.config.DevelopmentConfig')
    assert test_app.config['SECRET_KEY'] == 'my_precious'
    assert not test_app.config['TESTING']
    assert test_app.config['SQLALCHEMY_DATABASE_URI'] == os.environ.get('DATABASE_URL')


def test_testing_config(test_app):
    test_app.config.from_object('src.config.TestingConfig')
    assert test_app.config['SECRET_KEY'] == 'my_precious'
    assert test_app.config['TESTING']
    assert not test_app.config['PRESERVE_CONTEXT_ON_EXCEPTION']
    assert test_app.config['SQLALCHEMY_DATABASE_URI'] == os.environ.get('DATABASE_TEST_URL')


def test_production_config(test_app):
    test_app.config.from_object('src.config.ProductionConfig')
    assert test_app.config['SECRET_KEY'] == 'my_precious'
    assert not test_app.config['TESTING']
    assert test_app.config['SQLALCHEMY_DATABASE_URI'] == os.environ.get('DATABASE_URL')
-
测试 REST API
http://localhost:5004/ping
多写个 test_*.py,如下:
import json

def test_ping(test_app):
    # Given
    client = test_app.test_client()

    # When
    resp = client.get('/ping')
    data = json.loads(resp.data.decode())

    # Then
    assert resp.status_code == 200
    assert 'pong' in data['message']
    assert 'success' in data['status']
Flask Blueprints
一、Flask Shell
Ref: https://dormousehole.readthedocs.io/en/stable/cli.html
打开一个 Shell,如下:
$ flask shell
Python 3.6.2 (default, Jul 20 2017, 03:52:27)
[GCC 7.1.1 20170630] on linux
App: example
Instance: /home/user/Projects/hello/instance
>>>
使用 shell_context_processor() 添加其他自动导入。
二、蓝图:将系统的代码模块化
With tests in place, let's refactor the app, adding in Blueprints.
让我们把 __init__.py 中的 app api对象的构建代码,使用Blueprints重构一下。
Ref: Flask进阶系列(六)–蓝图(Blueprint)【实践一遍示范代码】
Ref: 50 蓝图的基本定义与使用
Ref: [flask中级教程]蓝图的使用
-
蓝图初识
index.py
from flask import Flask, Blueprint
app = Flask(__name__)


bp = Blueprint('public', __name__, url_prefix="/public")

@app.route("/")
def main():
    help(bp)
    return "hello"

@bp.route("bluefun")
def bfun():
    return "bluefun"

from main import auth
app.register_blueprint(bp)
app.register_blueprint(auth.bp)

if __name__ == "__main__":
    app.run(debug=True)
 from flask import Blueprint


 bp = Blueprint('auth', __name__, url_prefix="/auth")

 @bp.route("/login")
 def login():
     return "login"
简单理解蓝图:就是将系统的代码模块化(组件化)。
但是一个Blueprint并不是一个完整的应用,它不能独立于应用运行,而必须要注册到某一个应用中。
$ ls ..
__init__.py

$ ls
models.py  ping.py
-
定义 model
文件:models.py
from sqlalchemy.sql import func
from src import db


class User(db.Model):

    __tablename__ = 'users'

    id           = db.Column(db.Integer, primary_key=True, autoincrement=True)
    username     = db.Column(db.String(128), nullable=False)
    email        = db.Column(db.String(128), nullable=False)
    active       = db.Column(db.Boolean(), default=True, nullable=False)
    created_date = db.Column(db.DateTime, default=func.now(), nullable=False)

    def __init__(self, username, email):
        self.username = username
        self.email    = email
-
定义 Api 以及 Blueprint
文件:api/ping.py
有点不一样,但这里“路由”应该是被restx主导,所以相比上面的例子就不需要 bp.route。
from flask import Blueprint
from flask_restx import Resource, Api


ping_blueprint = Blueprint('ping', __name__)
api = Api(ping_blueprint)


class Ping(Resource):
    def get(self):
        return {
            'status': 'success',
            'message': 'pong!'
        }


api.add_resource(Ping, '/ping')
- 定义 app
文件:__init__.py
在app中要注册进去。
import os

from flask import Flask  # new
from flask_sqlalchemy import SQLAlchemy


# instantiate the db
db = SQLAlchemy()


# new
def create_app(script_info=None):

    # instantiate the app
    app = Flask(__name__)

    # set config
    app_settings = os.getenv('APP_SETTINGS')
    app.config.from_object(app_settings)

    # set up extensions
    db.init_app(app)

    # register blueprints
    from src.api.ping import ping_blueprint
    app.register_blueprint(ping_blueprint)


    # shell context for flask cli,在flask shell中 注册了app和db,就不用再显式地导入了
    @app.shell_context_processor
    def ctx():
        return {'app': app, 'db': db}

    return app
@app.shell_context_processor 是个啥?
The "flask shell" Command
The shell command is basically the same, but there is a small difference in how you define additional symbols that you want auto-imported into the shell context. This is a feature that can save you a lot of time when working on an application. Normally you add your model classes, database instance, and other objects you are likely to interact with in a testing or debugging session in the shell.
Ref: https://flask-storm.readthedocs.io/en/latest/documentation.html
To make things more convenient it is recommended to provide model objects directly to the shell context. This is done easily by adding them using a shell context processor.
三、更新 manage.py
为什么要搞这个 manage.py,跟django有什么关系?涉及到如下几个知识点:
-
- FlaskGroup
- cli.command
import sys

from flask.cli import FlaskGroup

from src import create_app, db   # new
from src.api.models import User  # new


app = create_app()  # new
cli = FlaskGroup(create_app=create_app)  # new


@cli.command('recreate_db')
def recreate_db():
    db.drop_all()
    db.create_all()
    db.session.commit()


if __name__ == '__main__':
    cli()
具体内容详见: [Advanced Python] from "Flask-script" to "Click"
使用FlaskGroup的方式,执行方法:recreate_db()。
$ docker-compose exec api python manage.py recreate_db
四、常见问题
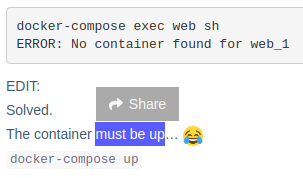
服务原本名字是:api,怎么这里报错 是 api_1?
jeffrey@unsw-ThinkPad-T490:flask-tdd-docker$ docker-compose exec api python -m pytest "src/tests"
ERROR: No container found for api_1
Ref: https://forums.docker.com/t/solved-docker-compose-exec-error-no-container-found-for-web-1/25828
SUMMARY
一、目录结构
.
├── docker-compose.yml
├── Dockerfile
├── entrypoint.sh
├── env/
├── manage.py
├── requirements.txt
└── src
    ├── api/
    │   ├── models.py
    │   └── ping.py
    ├── config.py
    ├── db/
    │   ├── create.sql
    │   └── Dockerfile
    ├── __init__.py    # 定义了app
    └── tests/
        ├── conftest.py
        ├── functional
        │   └── test_ping.py
        ├── __init__.py
        ├── pytest.ini
        └── unit
            └── test_config.py
二、容器搭配
-
第一个服务
volumes是个好东西,相当于"挂载"。
环境变量的设置
  environment:
    - FLASK_ENV=development
    - APP_SETTINGS=src.config.DevelopmentConfig
    - DATABASE_URL=postgresql://postgres:postgres@api-db:5432/api_dev
    - DATABASE_TEST_URL=postgresql://postgres:postgres@api-db:5432/api_test
后两个,给SQLALCHEMY_DATABASE_URI赋值,然后才是 APP_SETTINGS有了“可用的类”:DevelopmentConfig
【Dockfile文件】
-- 这里有两个环境变量的设置技巧。
# set environment variables
ENV PYTHONDONTWRITEBYTECODE 1
ENV PYTHONUNBUFFERED 1
a) 禁用__pycache__在服务器上,禁用字节码(.pyc)文件
b) 若需要及时输出,则:
- 置环境变量
export PYTHONUNBUFFERED=1,可以加到用户环境变量中去。 - 执行python脚本的时候加上参数
-u
-- 既然大家都是微服务,还有一个等待另一个微服务 (db服务) 的等待策略。
 #!/bin/sh

 echo "Waiting for postgres..."

 while ! nc -z api-db 5432; do
   sleep 0.1
 done

 echo "PostgreSQL started"

 python manage.py run -h 0.0.0.0
nc 命令
执行本指令可设置路由器的相关参数。
-z 使用0输入/输出模式,只在扫描通信端口时使用。
扫描通了后,就可以开始自己这边的服务了呢。
-
第二个服务
这是数据库服务。把用户名和密码设置好就可以了。
至于Dockerfile文件,就是开机启动服务即可。
三、启动测试服务
执行该命令,看上去就是服务启动了。
python manage.py run -h 0.0.0.0
在 manage.py 中,导入了三个元素:create_app, db, user model。
-
工厂方法创建应用 create_app()
1. 配置了config
2. 与 db结合
3. register_blueprint
4. 将app 和 db导入 flask shell。
-
FlaskGroup
Goto: [Advanced Python] From "Flask-script" to "Click"
可以通过命令行,直接执行 manage.py中定义的 指定的函数。
下一步,关于测试,详见:[Advanced Python] RESTfull Routes for pytest
End.

 浙公网安备 33010602011771号