[Terraform] 02 - var, provider, state, etc
本篇大纲
- Open AWS account.
- Create IAM admin user.
- Create terraform file to spin up t2.micro instance.
- Run terraform apply.
通过创建一个ec2,来学习各个概念。
一、准备工作
手动地 在 界面环境下创建一个IAM用户。Manage access to AWS resources.
二、代码资源
Goto: https://github.com/AndrewProgramming/learn_terraform_from_scratch/tree/master/first-steps
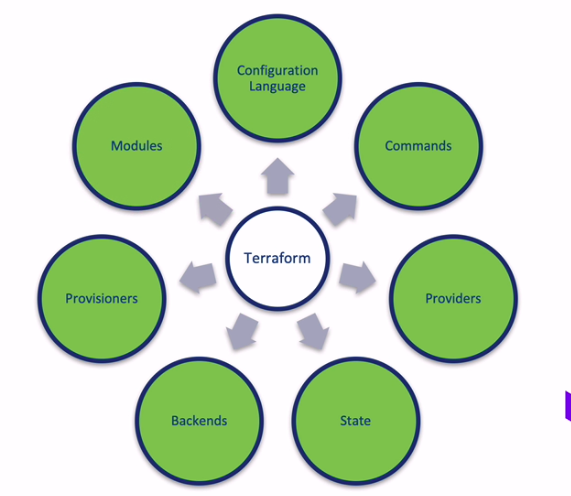
三、概念分支图
开始创建 EC2
一、简单案例
-
文件 instance.tf
provider "aws" {
  access_key = "todo"
  secret_key = "todo"
  region     = "us-east-1"
}

# HCL定义的关键字resource
# 资源类型 + 名称
resource "aws_instance" "example" {
  ami           = "ami-0d729a60"    # 使用的操作系统的镜像,去哪里找? ---->
  instance_type = "t2.micro"
}
-
文件 versions.tf
terraform {
  required_version = ">= 0.12"
}
-
-
AMI 的 ID 查找
-
by http://cloud-images.ubuntu.com/locator/ec2/

二、基础命令
$ terraform init
使用aws的provider,所以执行命令,下载该provider。

-
-
terraform init 做了什么
-
在 ./terraform/plugins/ 目录下,有 terraform init 后的配置文件,可以share。
如下,就 不用再反复输入:yes 去确认 了。
terraform apply -help
terraform apply -auto-approve
$ terraform plan
记得先配置aws的key。
$ terraform apply
具体执行。
$ terraform destroy
及时的销毁掉。
概念进阶
一、变量
Ref: https://github.com/AndrewProgramming/learn_terraform_from_scratch/tree/master/demo-1【作者提供的代码地址】
-
变量的使用
instance.tf 中的内容本地通过 var 在其他文件中去寻找。“使用” 和 “定义” 相分离。
resource "aws_instance" "example" {
  ami           = var.AMIS[var.AWS_REGION]
  instance_type = var.INSTANCE_TYPE
}
-
变量的定义
vars.tf
# define
variable "AWS_ACCESS_KEY" {  # 敏感信息的处理
}

variable "AWS_SECRET_KEY" {
}

variable "AWS_REGION" {
  default = "eu-west-1"
}

variable "AMIS" {
  type = map(string)
  default = {
    us-east-1 = "ami-13be557e"
    us-west-2 = "ami-06b94666"
    eu-west-1 = "ami-089cc16f7f08c4457"
  }
}

variable INSTANCE_TYPE {
  default = "t2.micro"
}
-
-
敏感信息
-
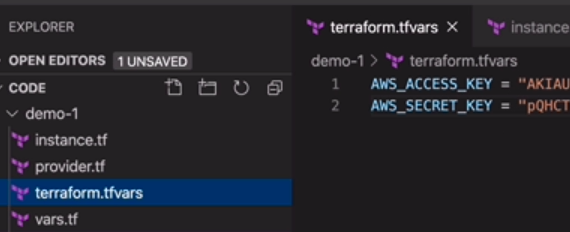
从 vars.tf 中分离出来,单独保存在了 terraform.tfvars,防止git commit上去。
在 vars.tf 中只是定义了一下。
发现 .tfvars,会自动将其中的内容作为后补 去匹配。
二、provider & state
-
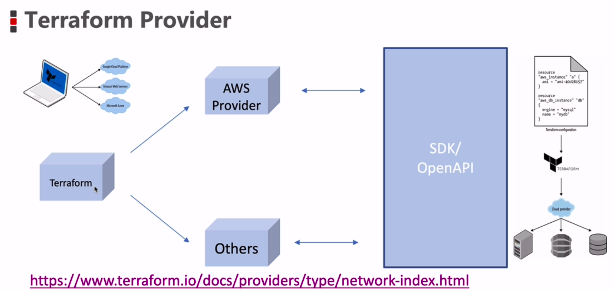
terraform provide r
Goto: https://www.terraform.io/docs/providers/index.html
面向接口编程,支持了不同平台的接口。
-
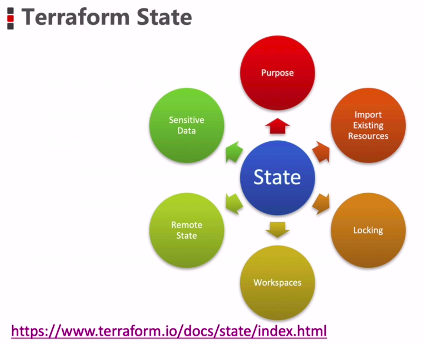
terraform state
Goto: https://www.terraform.io/docs/state/index.html
存储在本地 - terraform.tfstate
存储在远程 - 结合 “锁” 即可多人协作
-- Pre-request: Backend
-- Store in Terraform Cloud, AWS S3, Consul, etc.
存储的位置可以有多种选择,S3就是其中的一个option。
-
-
Local State file
-

-
-
Remote State on S3
-
Goto: https://www.terraform.io/docs/state/remote.html
一个人的话,backend的意义不大。
1. Working in a team.
2. Keeping sensitive information off disk.
3. Remote operations.
Ref: https://github.com/AndrewProgramming/learn_terraform_from_scratch/tree/master/demo-2-remote_state
(1) On S3, we create a bucket.
(2) 略,不是团队开发,不需要共享,暂时忽略。
三、OUTPUT
代码实例:注意对应关系。
resource "aws_instance" "example" {    # a.这里做了定义
  ami           = var.AMIS[var.AWS_REGION]
  instance_type = "t2.micro"
provisioner"local-exec" {
    command = "echo ${aws_instance.example.private_ip} >> private_ips.txt""ip" {
  value       = aws_instance.example.public_ip   # b.这里便能如此使用
  description = "demo for output"
  sensitive   = true
}
-
-
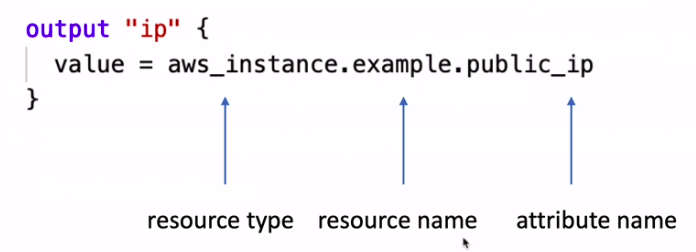
output 的格式定义
-
Ref: https://www.terraform.io/docs/configuration/outputs.html
四、Provisioner
Ref: https://www.terraform.io/docs/language/resources/provisioners/syntax.html
Provisioners can be used to model specific actions on the local machine or on a remote machine in order to prepare servers or other infrastructure objects for service.
供应商可用于对本地计算机或远程计算机上的 特定操作 进行建模,以准备服务器或其他基础结构对象以进行服务。
-
provisioner 的 类型
boot standardized AMIs, and then install the software on it.
就需要上传“预安装脚本”,再远程执行。

-
provisioner 的 使用
1. 生成公钥和私钥,有了两个文件:mykey 和 mykey.pub
ssh-keygen -f mykey
2. 自动创建EC2,并搭建好SSH。
resource "aws_key_pair" "mykey" {
  key_name   = "mykey"
  public_key = file(var.PATH_TO_PUBLIC_KEY)  # file()是个函数
}

resource "aws_instance" "example" {
  ami           = var.AMIS[var.AWS_REGION]
  instance_type = "t2.micro"
  key_name      = aws_key_pair.mykey.key_name

  # 先上传文件
  provisioner"file" {
    source      = "script.sh"
    destination = "/tmp/script.sh"
  }

  # 再远程执行
  provisioner"remote-exec" {
    inline = [
      "chmod +x /tmp/script.sh",
      "sudo sed -i -e 's/\r$//' /tmp/script.sh",  # Remove the spurious CR characters.
      "sudo /tmp/script.sh",
    ]
  }

  connection {
    host        = coalesce(self.public_ip, self.private_ip)   # 内置函数,返回第一个不为空的参数
    type        = "ssh"
    user        = var.INSTANCE_USERNAME
    private_key = file(var.PATH_TO_PRIVATE_KEY)
  }
}


output "ip" {
  value = aws_instance.example.public_ip
  description = "demo for output"
}
创建完毕后,通过以下命令远程登录EC2。
ssh -i mykey ubuntu@13.124.66.135
五、Modules
避免重复造轮子。
-
local 方式
Ref: https://github.com/AndrewProgramming/learn_terraform_from_scratch/tree/master/demo-5b_local_modules
把source指定的module为己用,名字自定义为 "consul"。
属性在这里都是consul已有的,user则根据需求自定义赋值。
module "consul" {
  source = "./module/consul-cluster"
  key_name = aws_key_pair.mykey.key_name
  key_path = var.PATH_TO_PRIVATE_KEY
  region   = var.AWS_REGION

  vpc_id   = aws_default_vpc.default.id
  subnets = {
    "0" = aws_default_subnet.default_az1.id
    "1" = aws_default_subnet.default_az2.id
    "2" = aws_default_subnet.default_az3.id
  }
}

output "consul-output" {
  value = module.consul.server_address
}
-
remote 方式
Ref: https://github.com/AndrewProgramming/learn_terraform_from_scratch/tree/master/demo-5_remote_modules
module "consul" {
  source   = "github.com/AndrewProgramming/terraform_tutrial_code_modules"  # 与本地时的代码一样,只是上传到了github
  key_name = aws_key_pair.mykey.key_name
  key_path = var.PATH_TO_PRIVATE_KEY
  region   = var.AWS_REGION
  vpc_id   = aws_default_vpc.default.id
  subnets = {
    "0" = aws_default_subnet.default_az1.id
    "1" = aws_default_subnet.default_az2.id
    "2" = aws_default_subnet.default_az3.id
  }
}

output "consul-output" {
  value = module.consul.server_address
}
另外,执行命令,下载module到./terraform中。
$ terraform get
六、Data Source
定义了一个数据源。获得 计算 结果(右)的示范如下:返回结果(数组)的第一个元素中的属性id的值。
Instance_type=${alicloud_instance_types.1c1g.instance_types.0.id}
解释:在阿里云中查找 core:1, mem size:1 的实例,结果保存在 instance_type.json 中。(右)结果,符合的instance 类型。

Goto: TERRAFORM中DATASOURCE的深度分析
Goto: 当Terraform遇上ECS(一)——DataSource篇
先列出来instance的列表,然后按照数组的方式选择一个。
七、Terraform Registry
Ref: https://registry.terraform.io/
Ref: https://registry.terraform.io/browse/modules?provider=aws
可以下载使用:providers and modules。
End.


【推荐】国内首个AI IDE,深度理解中文开发场景,立即下载体验Trae
【推荐】编程新体验,更懂你的AI,立即体验豆包MarsCode编程助手
【推荐】抖音旗下AI助手豆包,你的智能百科全书,全免费不限次数
【推荐】轻量又高性能的 SSH 工具 IShell:AI 加持,快人一步