[AWS] Deploy C++ Code for AWS Lambda
Ref: C++ Code Samples for AWS Lambda
Ref: Create a Highly Scalable Image Processing Service on AWS Lambda and API Gateway in 10 Minutes
一、Python版本效率
Ref: OPENCV: COMPARING THE SPEED OF C++ AND PYTHON CODE ON THE RASPBERRY PI FOR STEREO VISION
Final comparison of frame capture speed with C++ and Python code with the respective recommended settings:
| 1280x480 (stereoscopic) | 640x240 (stereoscopic) | |
| C++ | 40 fps | 90 fps |
| Python | 15 fps | 20 fps |
二、C++版本实操
Ref: https://github.com/daniel-fudge/aws-lambda-cpp-local-build【针对Ubuntu的版本,可用】
Ref: How to Use C++ with AWS Lambda Runtime. [实操]
Ref: Introducing the C++ Lambda Runtime [code]

老头儿就是简单地按照“实操”的命令行都执行了一遍 by AWS Cloud9。
-
环境搭建
(1). 配置基本的依赖库,yum安装各种依赖。
(2). cmake主要升级到例如3.12:
*** Download CMake from: https://cmake.org/download/
wget https://cmake.org/files/v3.12/cmake-3.12.3.tar.gz

*** Compile from source and install
tar zxvf cmake-3.*
cd cmake-3.*
./bootstrap --prefix=/usr/local
make -j$(nproc)
make install

*** Validate installation
cmake --version

cmake version *.*.*
CMake suite maintained and supported by Kitware (kitware.com/cmake).
(3) Download and compile the runtime 需要自己编译特定机器的runtime。

-
准备自定义 C++ 函数
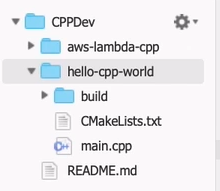
./aws-lambda-cpp/ 编译环境。
./hello-cpp-world/ 代码。

// main.cpp
#include <aws/lambda-runtime/runtime.h>

using namespace aws::lambda_runtime;

invocation_response my_handler(invocation_request const& request)
{
   string json = request.payload;
   return invocation_response::success(json, "application/json");
}

int main()
{
   run_handler(my_handler);
   return 0;
}
最后,make之后再执行如下步骤,打包成一个 hello.zip。CMakeLists.txt 中已定义好了名字。
$ make aws-lambda-package-hello
准备好了 zip,可以开始 CICD 了呢。
三、CICD - AWS CLI
-
Create the role for Lambda function
1) 准备role规则文件:trust-policy.json
{
 "Version": "2012-10-17",
  "Statement": [
    {
      "Effect": "Allow",
      "Principal": {
        "Service": ["lambda.amazonaws.com"]
      },
      "Action": "sts:AssumeRole"
    }
  ]
}
2) 创建命令。
$ aws iam create-role \
--role-name lambda-cpp-demo \
--assume-role-policy-document file://trust-policy.json
3) 可以看到新添加的role了呢。

4) 并获得了role的 Amazon Resource Names:“Arn”: “arn:aws:iam::<account_id>:role/lambda-cpp-demo”
-
Create the Lambda Function
上传.zip作为lambda的运行内容。
hello-cpp-world/build $ aws lambda create-function \
--function-name hello-world \
--role <specify the role arn from the previous step> \
--runtime provided \
--timeout 15 \
--memory-size 128 \
--handler hello \
--zip-file fileb://hello.zip
-
Test lambda
通过命令触发。
$ aws lambda invoke --function-name hello-world --payload '{ }' output.txt

{
  "StatusCode": 200
}
四、CICD - Terraform
-
Python 对比版本
Ref: The most minimal AWS Lambda + Python + Terraform setup
简单的代码。
import json

def handler(event, context):
    print("Received event: " + json.dumps(event, indent=2))
打包成zip。
zip lambda lambda.py
定义 Terraform 文件:main.tf。
provider "aws" {
  region = "us-east-1"
}

variable "function_name" {
  default = "minimal_lambda_function"
}

variable "handler" {
  default = "lambda.handler"
}

variable "runtime" {
  default = "python3.6"
}

----------------------------------------------------------

resource "aws_lambda_function" "lambda_function" {
  role             = "${aws_iam_role.lambda_exec_role.arn}"
  handler          = "${var.handler}"
  runtime          = "${var.runtime}"
  filename         = "lambda.zip"
  function_name    = "${var.function_name}"
  source_code_hash = "${base64sha256(file("lambda.zip"))}"
}

resource "aws_iam_role" "lambda_exec_role" {
  name        = "lambda_exec"
  path        = "/"
  description = "Allows Lambda Function to call AWS services on your behalf."

  assume_role_policy = <<EOF
  {
    "Version": "2012-10-17",
    "Statement": [
      {
        "Effect": "Allow",
        "Principal": {
          "Service": "lambda.amazonaws.com"
        },
        "Action": "sts:AssumeRole"
      }
    ]
  }
  EOF
}
-
Cpp 版本
/* 暂时没发现 demo code,但核心应该还是 zip;runtime 的类型也要改变一下 */
End.


【推荐】国内首个AI IDE,深度理解中文开发场景,立即下载体验Trae
【推荐】编程新体验,更懂你的AI,立即体验豆包MarsCode编程助手
【推荐】抖音旗下AI助手豆包,你的智能百科全书,全免费不限次数
【推荐】轻量又高性能的 SSH 工具 IShell:AI 加持,快人一步