
[CDH] Acquire data: Flume and Kafka
Flume
基本概念
一、是什么
数据源获取:Flume、Google Refine、Needlebase、ScraperWiki、BloomReach
开源的日志系统,包括facebook的scribe,apache的chukwa,Linkedin 的Kafka 和 Cloudera的Flume等。
Flume is a distributed, reliable, and available service for efficiently collecting, aggregating, and moving large amounts of log data. It has a simple and flexible architecture based on streaming data flows. It is robust and fault tolerant with tunable reliability mechanisms and many failover and recovery mechanisms. It uses a simple extensible data model that allows for online analytic application.
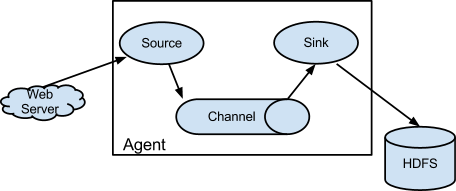
Event:事件是从Flume agent发过来的一个数据流单元。事件从 Source 到 Channel 到 Sink。
Flume agent:是一个jvm 进程。这个进程负责将外部的来源产生的Event转发到外部的目的地。
Source:负责消费有特殊格式的Event。这些Event会通过一个外部的来源 (比如一个web服务器) 传递给Source. 比如一个 AvroSource 用来接收由客户端或者在同一个流程上其他的Flume agent 发过来的 Avro Event (注意:flume的agent是可以一个接一个的串联起来的)
当Source接收到Event的时候,它会把Event存储到Channel (通道) 里面。Channel被动的存储和保持Event直到Sink消费掉它。
打个比方,有一种Channel叫 FileChannel,它使用文件系统来存储文件。
Sink:用来从Channel中移除Event,并且把Event放到外部资源库,比如hdfs(这种Sink叫HDFSEventSink)。或者也可以继续把Event推送给在同一个流程中的下一个Source。
Flume框架 对 hadoop和zookeeper 的依赖只是在jar包上,并不要求flume启动时必须将hadoop和zookeeper服务也启动。
二、做什么
支持的数据源
Flume提供了各种source的实现,包括:
| Avro Source |
Avro 数据通过 与语言无关的 schema 来定义。 schema 通过 JSON 来描述,数据被序列化成二进制文件或 JSON 文件,不过一般会使用二进制文件。 Avro 在读写文件时需要用到 schema,schema 一般会被内嵌在数据文件里。 |
| Exce Source | |
| Spooling Directory Source | |
| NetCat Source | |
| Syslog Source | |
| Syslog TCP Source | |
| Syslog UDP Source | |
| HTTP Source | |
| HDFS Source |
如果内置的Source无法满足需要, Flume还支持自定义Source。
三、怎么用
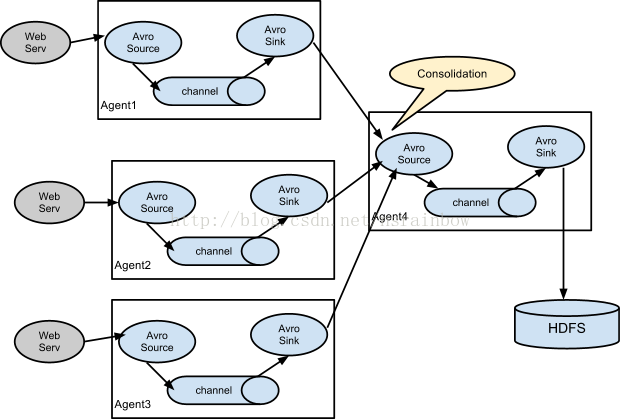
第一种串联方式
这种情况应用的场景比较多,比如要收集Web网站的用户行为日志,
Web网站为了可用性使用的负载集群模式,每个节点都产生用户行为日志,可以为每 个节点都配置一个Agent来单独收集日志数据,
然后多个Agent将数据最终汇聚到一个用来存储数据存储系统,如HDFS上。
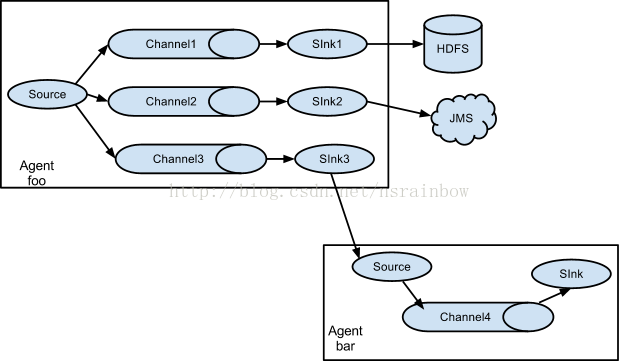
第二种串联方式
Flume还支持多级流,什么多级流?来举个例子,当syslog, java, nginx、 tomcat等混合在一起的日志流开始流入一个agent后,可以agent中将混杂的日志流分开,然后给每种日志建立一个自己的传输通道。
四、可靠性
(1) Flume的可靠性
当节点出现故障时,日志能够被传送到其他节点上而不会丢失。Flume提供了三种级别的可靠性保障,从强到弱依次分别为:
-
- end-to-end(收到数据agent首先将event写到磁盘上,当数据传送成功后,再删除;如果数据发送失败,可以重新发送。),
- Store on failure(这也是scribe采用的策略,当数据接收方crash时,将数据写到本地,待恢复后,继续发送),
- Besteffort(数据发送到接收方后,不会进行确认)。
(2) Flume的可恢复性
还是靠Channel。推荐使用FileChannel,事件持久化在本地文件系统里(性能较差)。
实战练习
一、CDH 安装
通过“增加服务”自动安装Flume;安装完毕,查看版本。
(base) [hadoop@node01 ~]$ flume-ng version

Java HotSpot(TM) 64-Bit Server VM warning: Using incremental CMS is deprecated and will likely be removed in a future release
Flume 1.6.0-cdh5.14.2
Source code repository: https://git-wip-us.apache.org/repos/asf/flume.git
Revision: 50436774fa1c7eaf0bd9c89ac6ee845695fbb687
Compiled by jenkins on Tue Mar 27 13:55:04 PDT 2018
From source with checksum 30217fe2b34097676ff5eabb51f4a11d
二、服务配置
选择一台虚拟机作为flume的agent的部署机器。
Agent name: a1。配置文件如下:
a1.sources  = r1
a1.sinks    = k1
a1.channels = c1

##########################################################################
# 三个重要的组件:(1) sources, (2) sinks, (3) channels
##########################################################################

# Describe/configure the source
a1.sources.r1.type       = exec
a1.sources.r1.command    = tail -F /root/gps/gps   # 显示出gps文件更新的内容
a1.sources.r1.fileHeader = true
#a1.sources.r1.ignorePattern=(^gps_)

# Describe the sink
a1.sinks.k1.type               = org.apache.flume.sink.kafka.KafkaSink
a1.sinks.k1.topic              = gps_topic
a1.sinks.k1.brokerList         = node01:9092,node02:9092,node03:9092
a1.sinks.k1.batchSize          = 20
a1.sinks.k1.requiredAcks       = 1
a1.sinks.k1.producer.linger.ms = 1

# Use a channel which buffers events in memory
a1.channels.c1.type                = memory
a1.channels.c1.capacity            = 1000
a1.channels.c1.transactionCapacity = 100

# Bind the source and sink to the channel
a1.sources.r1.channels = c1
a1.sinks.k1.channel    = c1
确保 Kafka已创建这样的主题:gps_topic。
[root@node03 bin]# pwd
/opt/cloudera/parcels/KAFKA/bin

[root@node03 bin]# ./kafka-topics --list --zookeeper node01:2181,node02:2181,node03:2182
三、生成数据源
逐行写入 flume source,执行该脚本。
#!/bin/bash
srcfile=/root/hao123/2019-11-01/gps/aa.log
outputpath=/root/gps/gps

echo "srcfile:"$srcfile
echo "outputpath:"$outputpath

while read line
do
#  sleep 0.01
  sleep 0.5
  echo $line
  `echo $line >>/root/gps/gps`
done <$srcfile

echo "compled!"
Kafka中没有该topic的话,就杀死flume重新操作。
#杀死flume的命令
:

#重启flume
 /opt/cloudera/parcels/CDH-5.14.2-1.cdh5.14.2.p0.3/bin/flume-ng  agent --name a1 --conf-file /opt/cm-5.14.2/run/cloudera-scm-agent/process/159-flume-AGENT/flume.conf
四、状态监控
Initially, we will start all the services on Cloudera Manager, and then we have to stop the flume service due to an internal bug.
Then, we will start flume again by cmd.
echo '/opt/cloudera/parcels/CDH-5.14.2-1.cdh5.14.2.p0.3/bin/flume-ng  agent --name a1 --conf-file /opt/cm-5.14.2/run/cloudera-scm-agent/process/159-flume-AGENT/flume.conf'
echo
echo 'which is the latest xxx-flume-AGENT'
echo
find /opt/cm-5.14.2/run/cloudera-scm-agent/process/ -name "*-flume-AGENT"
echo
野战练习
一、用法初识
Ref: Flume 使用总结
Sqoop是一个用来将Hadoop和关系型数据库中的数据相互转移的工具。
爬虫就是爬虫,没啥更多的内涵。
更多的数据源
Flume可以采集文件,socket数据包、文件夹等各种形式源数据,
又可以将采集到的数据输出到HDFS、hbase、hive、kafka等众多外部存储系统中。
二、存储在HDFS
(1) 采集目录到HDFS
Ref: Flume 拦截器
1、Timestamp Interceptor(时间戳拦截器)
2、Host Interceptor(主机拦截器)
3、静态拦截器(Static Interceptor)
4、正则过滤拦截器(Regex Filtering Interceptor)
5、Regex Extractor Interceptor
6、UUID Interceptor
7、Morphline Interceptor
8、Search and Replace Interceptor
#定义三大组件的名称

agent1.sources  = source1
agent1.sinks    = sink1
agent1.channels = channel1

# 配置source组件

agent1.sources.source1.type       = spooldir
agent1.sources.source1.spoolDir   = /root/data/
agent1.sources.source1.fileHeader = false

# 配置拦截器

agent1.sources.source1.interceptors         = i1
agent1.sources.source1.interceptors.i1.type = timestamp

# 配置sink组件

agent1.sinks.sink1.type              = hdfs
agent1.sinks.sink1.hdfs.path         = /weblog/flume-collection/%y-%m-%d/%H-%M
agent1.sinks.sink1.hdfs.filePrefix   = access_log
agent1.sinks.sink1.hdfs.maxOpenFiles = 5000
agent1.sinks.sink1.hdfs.batchSize    = 100
agent1.sinks.sink1.hdfs.fileType     = DataStream
agent1.sinks.sink1.hdfs.writeFormat  = Text

#滚动生成的文件按大小生成

agent1.sinks.sink1.hdfs.rollSize = 102400

#滚动生成的文件按行数生成

agent1.sinks.sink1.hdfs.rollCount = 1000000

#滚动生成的文件按时间生成

agent1.sinks.sink1.hdfs.rollInterval = 60

#开启滚动生成目录

agent1.sinks.sink1.hdfs.round = true

#以10为一梯度滚动生成

agent1.sinks.sink1.hdfs.roundValue = 10

#单位为分钟

agent1.sinks.sink1.hdfs.roundUnit = minute

# Use a channel which buffers events in memory

agent1.channels.channel1.type                = memory
agent1.channels.channel1.capacity            = 500000
agent1.channels.channel1.transactionCapacity = 600
agent1.channels.channel1.keep-alive          = 120# Bind the source and sink to the channel

agent1.sources.source1.channels = channel1
agent1.sinks.sink1.channel      = channel1
(2) 采集文件到HDFS
agent1.sources  = source1
agent1.sinks    = sink1
agent1.channels = channel1

# Describe/configure tail -F source1

agent1.sources.source1.type     = exec
agent1.sources.source1.command  = tail -F /home/hadoop/logs/access_log
agent1.sources.source1.channels = channel1

#configure host for source

agent1.sources.source1.interceptors               = i1 i2
agent1.sources.source1.interceptors.i1.type       = host
agent1.sources.source1.interceptors.i1.hostHeader = hostname

# Describe sink1

agent1.sinks.sink1.type = hdfs

#a1.sinks.k1.channel = c1

agent1.sinks.sink1.hdfs.path=hdfs://itcast01:9000/file/%{hostname}/%y-%m-%d/%H-%M
agent1.sinks.sink1.hdfs.filePrefix = access_log
agent1.sinks.sink1.hdfs.batchSize= 100
agent1.sinks.sink1.hdfs.fileType = DataStream
agent1.sinks.sink1.hdfs.writeFormat =Text
agent1.sinks.sink1.hdfs.rollSize = 10240
agent1.sinks.sink1.hdfs.rollCount = 1000
agent1.sinks.sink1.hdfs.rollInterval = 10
agent1.sinks.sink1.hdfs.round = true
agent1.sinks.sink1.hdfs.roundValue = 10
agent1.sinks.sink1.hdfs.roundUnit = minute

# Use a channel which buffers events in memory

agent1.channels.channel1.type                = memory
agent1.channels.channel1.keep-alive          = 120
agent1.channels.channel1.capacity            = 500000
agent1.channels.channel1.transactionCapacity = 600# Bind the source and sink to the channel

agent1.sources.source1.channels = channel1
agent1.sinks.sink1.channel      = channel1
(3) 多个agent串联
比如业务系统使用log4j生成的日志
Flume-agent1
[tail-avro-avro-logger.conf]
# Name the components on this agent

a1.sources  = r1
a1.sinks    = k1
a1.channels = c1

# Describe/configure the source

a1.sources.r1.type     = exec
a1.sources.r1.command  = tail -F /root/logs/test.log
a1.sources.r1.channels = c1

# Describe the sink

##sink端的avro是一个数据发送者

a1.sinks.k1.type       = avro
a1.sinks.k1.hostname   = itcast02
a1.sinks.k1.port       = 41414
a1.sinks.k1.batch-size = 10# Use a channel which buffers events in memory

a1.channels.c1.type                = memory
a1.channels.c1.capacity            = 1000
a1.channels.c1.transactionCapacity = 100# Bind the source and sink to the channel

a1.sources.r1.channels = c1
a1.sinks.k1.channel    = c1
启动命令:
bin/flume-ng agent -n agent1 -c conf -f conf/flume-client.conf -Dflume.root.logger=DEBUG,console
Flume-agent2
[avro-hdfs.conf]
a1.sources  = r1
a1.sinks    = s1
a1.channels = c1

##source中的avro组件是一个接收者服务

a1.sources.r1.type = avro
a1.sources.r1.bind = 0.0.0.0
a1.sources.r1.port = 41414

a1.sinks.s1.type = hdfs
a1.sinks.s1.hdfs.path         = hdfs://itcast01:9000/flumedata
a1.sinks.s1.hdfs.filePrefix   = access_log
a1.sinks.s1.hdfs.batchSize    = 100
a1.sinks.s1.hdfs.fileType     = DataStream
a1.sinks.s1.hdfs.writeFormat  = Text
a1.sinks.s1.hdfs.rollSize     = 10240
a1.sinks.s1.hdfs.rollCount    = 1000
a1.sinks.s1.hdfs.rollInterval = 10
a1.sinks.s1.hdfs.round        = true
a1.sinks.s1.hdfs.roundValue   = 10
a1.sinks.s1.hdfs.roundUnit    = minute

a1.channels.c1.type                = memory
a1.channels.c1.capacity            = 1000
a1.channels.c1.transactionCapacity = 100

a1.sources.r1.channels = c1
a1.sinks.s1.channel    = c1
启动命令:
bin/flume-ng agent -n agent1 -c conf -f conf/flume-server.conf -Dflume.root.logger=DEBUG,console
(4) 高可用配置案例
(一)failover故障转移
(二)load balance负载均衡
详情参见链接: https://blog.csdn.net/qq_21989939/article/details/79505032
Kafka
复习一下
一、方法论
Ref: Setting up an End-to-End Data Streaming Pipeline
与Kafka的集成会有若干种,可参见链接。
Ref: [Spark] 05 - Apache Kafka
Ref: kafka(一)—基本概念
教材:《深入理解Kafka:核心设计与实践原理》_朱忠华
一个topic的内容被分为多个partition,自然地,每个partition的message不同;
* Partition可以分布在不同的broker。
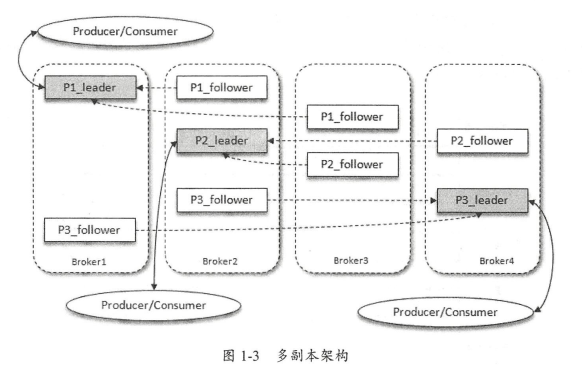
* 执行时序过程。
生产者-消费者
一、基本概念
图形界面,可以通过Cloudera Manager查看。
# 创建主题
kafka-topics.bat --create --zookeeper localhost:2181 --replication-factor 1 --partitions 1 --topic EvanFirstTopic

# 创建生产者
kafka-console-producer.bat --broker-list localhost:9092 --topic EvanFirstTopic

# 创建消费者
kafka-console-consumer.bat --zookeeper localhost:2181 --topic EvanFirstTopic

# 查询当前所有的topic
kafka-topics.bat --list --zookeeper localhost:2181

# 查询某个topic的详细信息
kafka-topics.bat --describe --topic baby181012 --zookeeper localhost:2181
二、消费数据
public class Consumer extends ShutdownableThread {

  ...

    public Consumer(String topic, String groupId) {
        super("KafkaConsumerExample", false);

        Properties props = new Properties();

        props.put("bootstrap.servers",  "192.168.56.120:9092");
        props.put("group.id",           groupId);
        props.put("enable.auto.commit", "true");
        props.put("auto.offset.reset",  "earliest");
        props.put("session.timeout.ms", "30000");
        props.put("key.deserializer",   "org.apache.kafka.common.serialization.StringDeserializer");
        props.put("value.deserializer", "org.apache.kafka.common.serialization.StringDeserializer");

        consumer = new KafkaConsumer<>(props);
        System.out.println("consumer:"+consumer);
        this.topic = topic;
    }

    @Override
    public void doWork() {

        consumer.subscribe(Collections.singletonList(this.topic));
        ConsumerRecords<Integer, String> records = consumer.poll(Duration.ofSeconds(1));  // 获得"数据"
        System.out.println("消费到消息数:" + records.count());
        if (records.count() > 0) {
            for (ConsumerRecord<Integer, String> record : records) {
                LOG.warn("Received message: (" + record.key() + ", " + record.value() + ") at offset " + record.offset());
                String value = record.value();
            }
        }
    }

  ...
}
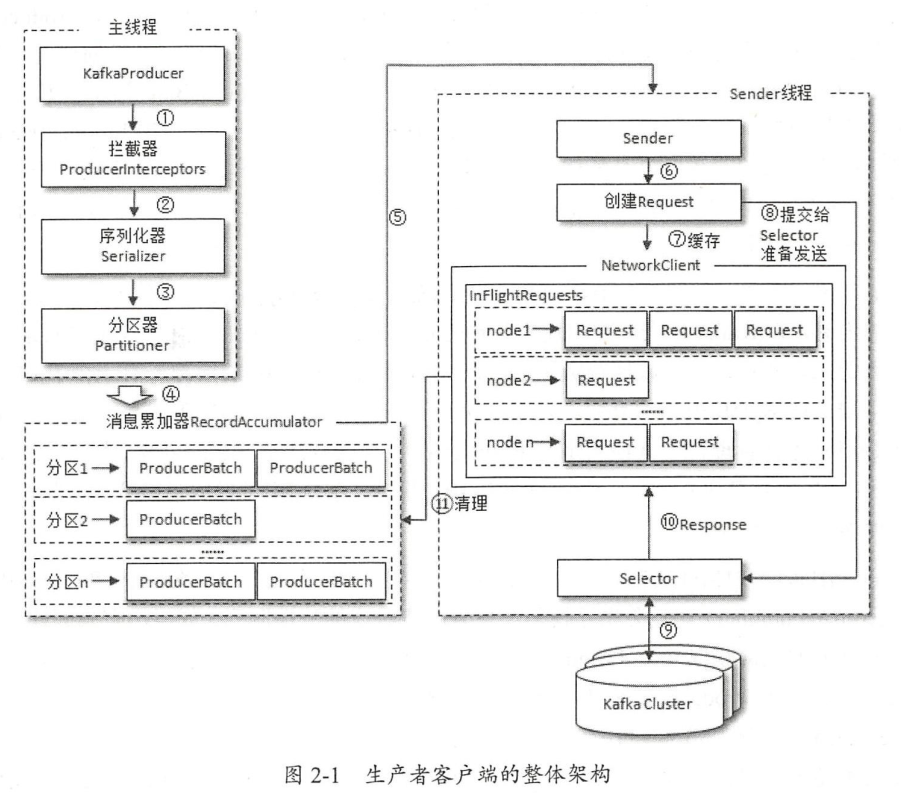
三、生产数据
public class Producer extends Thread {

  ...

    /**
     * @param topic
     * @param isAsync
     */
    public Producer(String topic, Boolean isAsync) {
        Properties props = new Properties();

        props.put("bootstrap.servers", "192.168.56.100:9092, 192.168.56.110:9092, 192.168.56.120:9092");
        props.put("acks",              "all");
        props.put("retries",           0);
        props.put("batch.size",        16384);
        props.put("linger.ms",         1);
        props.put("buffer.memory",     33554432);
        props.put("key.serializer",    "org.apache.kafka.common.serialization.StringSerializer");
        props.put("value.serializer",  "org.apache.kafka.common.serialization.StringSerializer");


        producer = new KafkaProducer<>(props);
        this.topic = topic;
        this.isAsync = isAsync;
    }


    public void run() {
        int messageNo = 1;

        while (true) {
            String messageStr = "Message_" + messageNo;
            LOG.warn("message:" + messageStr);
            long startTime = System.currentTimeMillis();

            if (isAsync) { // 异步发送 Send asynchronously
                producer.send(new ProducerRecord<>(topic, messageStr), new DemoCallBack(startTime, messageNo, messageStr));

            } else {       // Send synchronously
                try {
                    producer.send(new ProducerRecord<>(topic,messageStr)).get();
                    LOG.warn("Sent message: (" + messageNo + ", " + messageStr + ")");  // 发送"数据"

                } catch (InterruptedException | ExecutionException e) {
                    e.printStackTrace();
                }
            }
            ++messageNo;
        }
    }

  ...
}
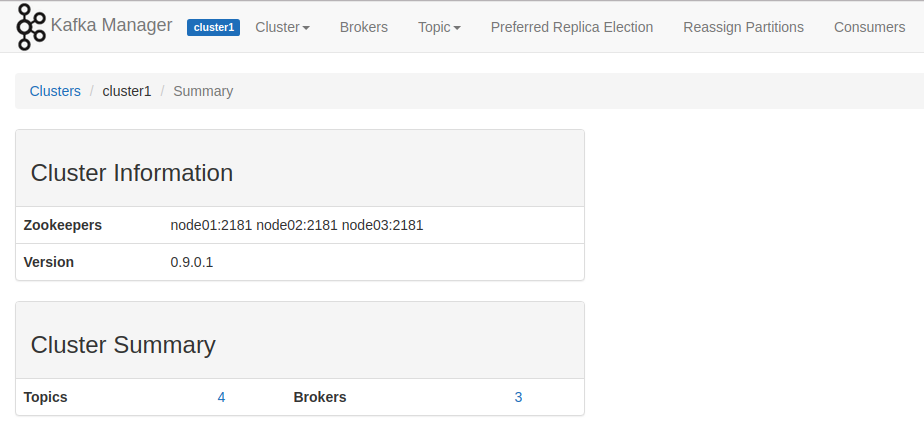
Kafka Manager
注意,是在target文件夹中。
nohup /opt/kafka-manager-1.3.1.6/target/universal/kafka-manager-1.3.1.6/bin/kafka-manager -Dconfig.file=/opt/kafka-manager-1.3.1.6/target/universal/kafka-manager-1.3.1.6/conf/application.conf -Dhttp.port=8080 &
Ref: http://192.168.56.100:8080/clusters/cluster1
如何通过Kafka查看内部消息的,这是一个好问题。
Kafka Monitor
Download KafkaOffsetMonitor-assembly-0.2.0.jar, then
#! /bin/bash
nohup java -Xms512M -Xmx512M -Xss1024K -XX:PermSize=256m -XX:MaxPermSize=512m -cp KafkaOffsetMonitor-assembly-0.2.0.jar com.quantifind.kafka.offsetapp.OffsetGetterWeb \
--port 8888 \
--zk node01:2181,node02:2181,node03:2181 \
--refresh 1.minutes \
--retain 1.day >/dev/null 2>&1 &
启动脚本后,可以通过IP:8888进入监控页面.
End.

 浙公网安备 33010602011771号