Request笔记
1 Request 的简介和运行环境
1.HttpServletRequest 概述
我们在创建 Servlet 时会覆盖 service()方法,或 doGet()/doPost(),这些
方法都有两个参数,一个为代表请求的 request 和代表响应 response。
service 方法中的 request 的类型是 ServletRequest,而 doGet/doPost 方
法 的 request 的 类 型 是 HttpServletRequest , HttpServletRequest 是
ServletRequest 的 子 接 口 , 功 能 和 方 法 更 加 强 大 , 今 天 我 们 学 习
HttpServletRequest。
2.request 的运行流程
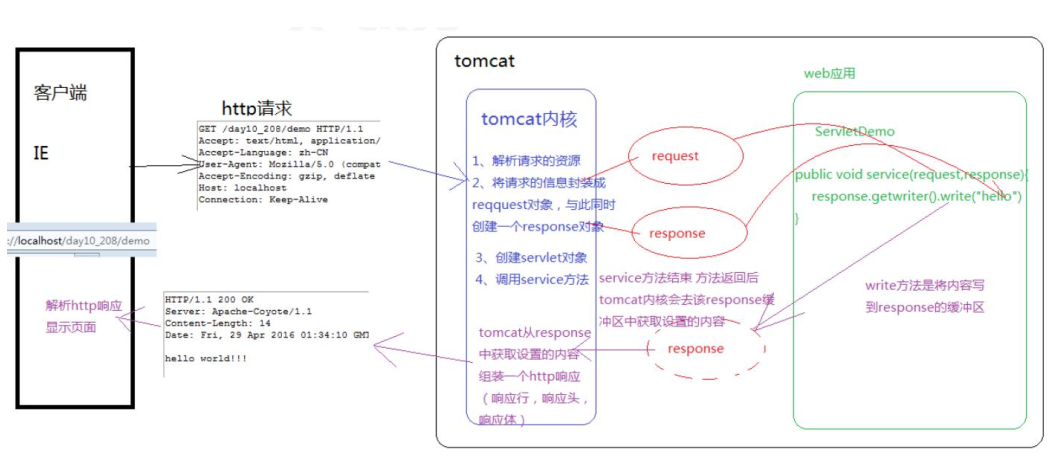
2 通过 request 获得【请求行】
1 通过抓包工具抓取 Http 请求
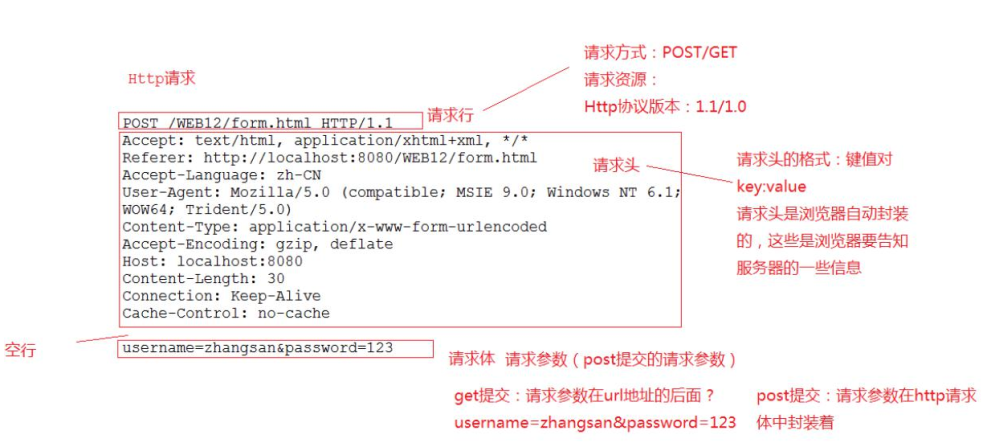
因为 request代表请求,所以我们可以通过该对象分别获得 Http请求的请求行,请求头和请求体
。
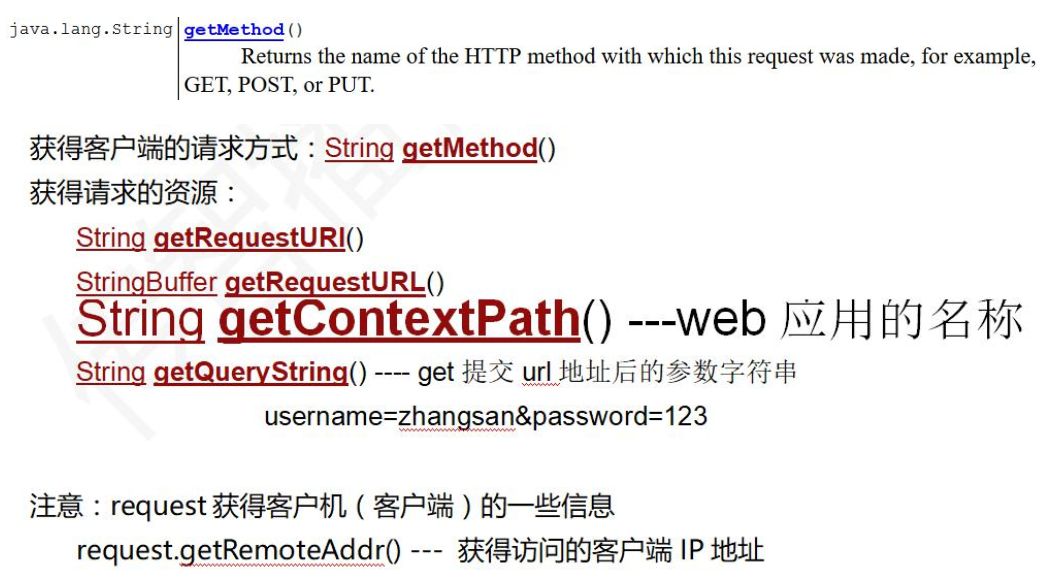
2 通过 request 获得请求行
![]()

html部分代码:
<!DOCTYPE html>
<html>
<head>
<meta charset="UTF-8">
<title>Insert title here</title>
</head>
<body>
    <form action="/WEBTest13/line" method="get">
        <input type="text" name="username"><br> <input
            type="password" name="password"><br> <input
            type="submit" value="提交"><br>
    </form>
</body>
</html>
servlet代码:
package p5.request;

import java.io.IOException;
import javax.servlet.ServletException;
import javax.servlet.http.HttpServlet;
import javax.servlet.http.HttpServletRequest;
import javax.servlet.http.HttpServletResponse;

public class LineServlet extends HttpServlet {

    public void doGet(HttpServletRequest request, HttpServletResponse response) throws ServletException, IOException {
        //首先解决respone中文乱码
        response.setContentType("text/html;charset=UTF-8");

        // 1 获取客户端的请求方法
        String method = request.getMethod();
        System.out.println("method:"+method);

       // 2 获得请求的资源相关的内容
        String requestURI = request.getRequestURI();
        StringBuffer requestURL = request.getRequestURL();
        System.out.println("requestURI:"+requestURI);
        System.out.println("requestURL:"+requestURL);

        // 3 获取web应用的名称
        String contextPath = request.getContextPath();
        System.out.println("contextPath:"+contextPath);

        // 4 获取地址后的参数字符串
        String queryString = request.getQueryString();
        System.out.println("queryString:"+queryString);

        // 5 获得请求的协议版本
        String protocol = request.getProtocol();
        System.out.println("protocol:"+protocol);
    }

    public void doPost(HttpServletRequest request, HttpServletResponse response) throws ServletException, IOException {
        doGet(request, response);
    }

}
运行结果:


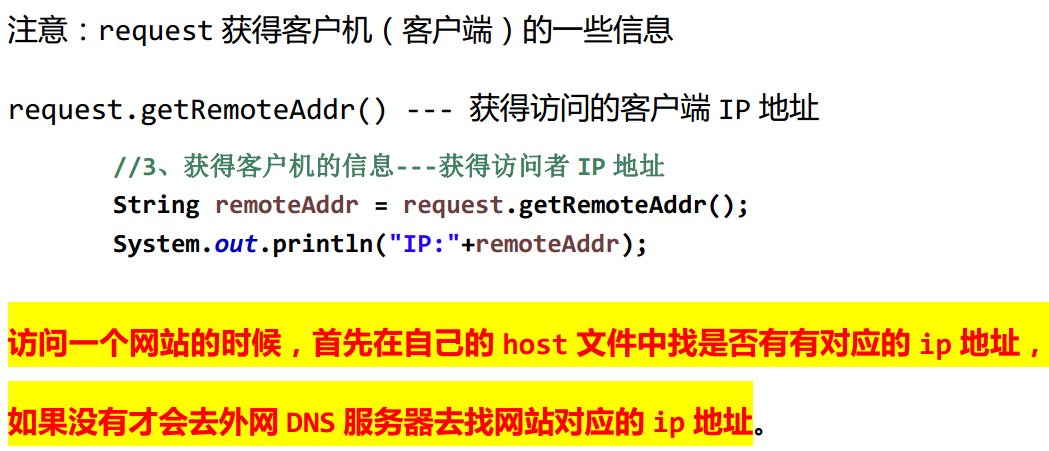
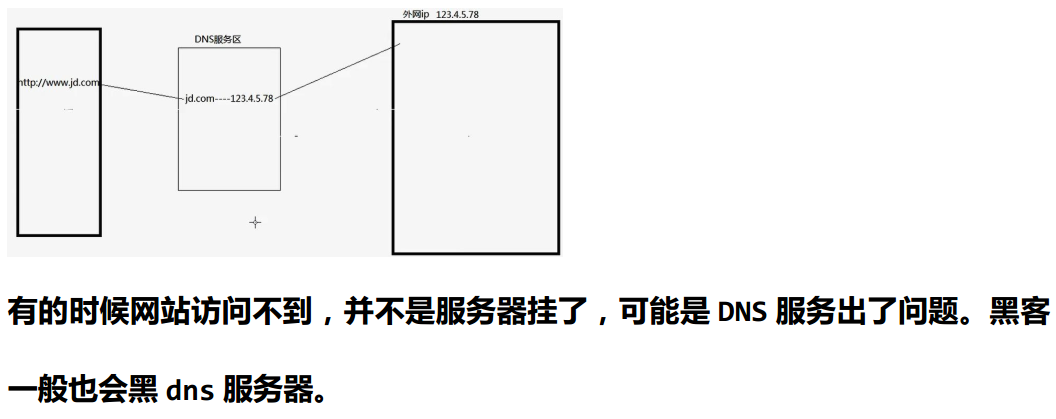
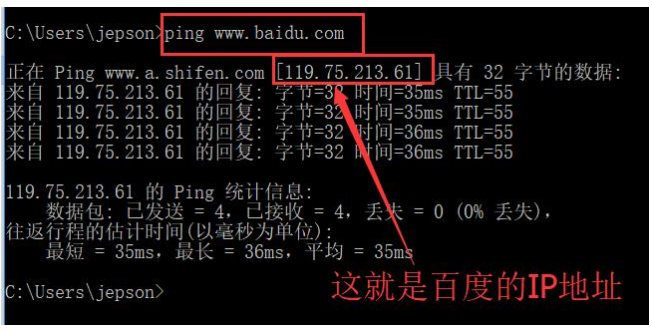
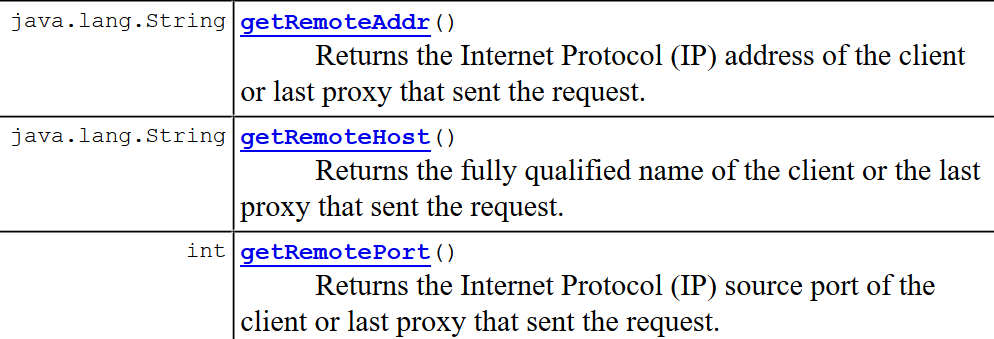
3 Resquest 获得客户机的信息

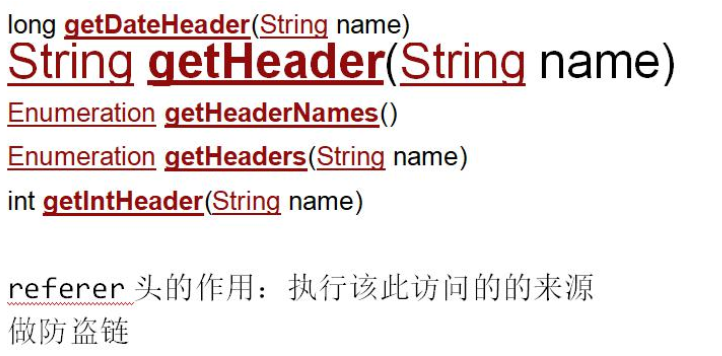
4 通过 request 获得【请求头】
servlet代码:
package header;

import java.io.IOException;
import java.util.Enumeration;

import javax.servlet.ServletException;
import javax.servlet.http.HttpServlet;
import javax.servlet.http.HttpServletRequest;
import javax.servlet.http.HttpServletResponse;

public class HeaderServlet extends HttpServlet {

    protected void doGet(HttpServletRequest request, HttpServletResponse response)
            throws ServletException, IOException {

        //1、获得指定的头
        String header = request.getHeader("User-Agent");
        System.out.println(header);
        //2、获得所有的头的名称
        Enumeration<String> headerNames = request.getHeaderNames();
        while(headerNames.hasMoreElements()){
            String headerName = headerNames.nextElement();
            String headerValue = request.getHeader(headerName);
            System.out.println(headerName+":"+headerValue);
        }

    }

    protected void doPost(HttpServletRequest request, HttpServletResponse response)
            throws ServletException, IOException {
        doGet(request, response);
    }
}
html代码:
<!DOCTYPE html>
<html>
<head>
<meta charset="UTF-8">
<title>Insert title here</title>
</head>
<body>
    <a href="/WEB15/referer">访问 headerServlet 资源</a>
    <form action="/WEBTest13/line" method="get">
        <input type="text" name="username"><br> <input
            type="password" name="password"><br> <input
            type="submit" value="提交"><br>
    </form>
</body>
</html>
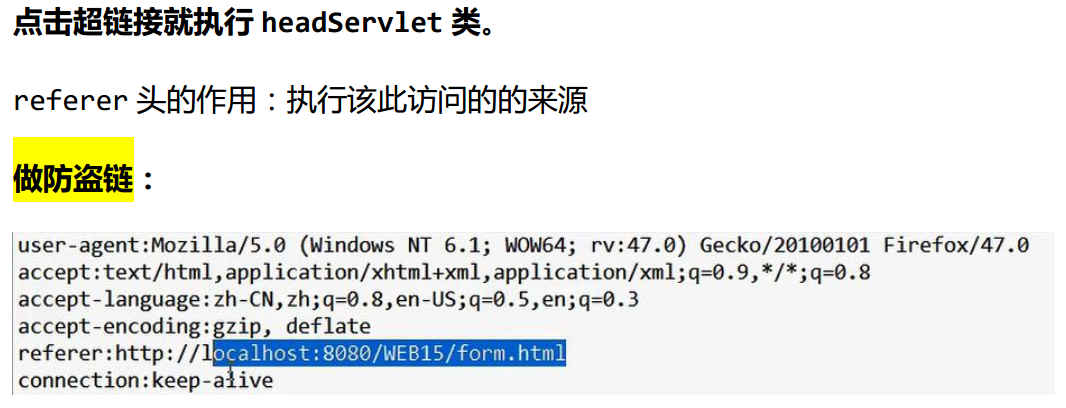
演示做防盗链代码实现
html部分代码:
<!DOCTYPE html>
<html>
<head>
<meta charset="UTF-8">
<title>Insert title here</title>
</head>
<body>
    <a href="/WEB15/referer">奥运会金牌100块</a>
</body>
</html>
servlet代码
package header;

import java.io.IOException;
import javax.servlet.ServletException;
import javax.servlet.http.HttpServlet;
import javax.servlet.http.HttpServletRequest;
import javax.servlet.http.HttpServletResponse;

public class RefererServlet extends HttpServlet {

    protected void doGet(HttpServletRequest request, HttpServletResponse response)
            throws ServletException, IOException {
        //解决乱码问题
        response.setContentType("text/html;charset=UTF-8");

        //对该新闻的来源的进行判断
        String header = request.getHeader("referer");
        if(header!=null&&header.startsWith("http://localhost")){
            //是从我自己的网站跳转过来的 可以看新闻
            response.getWriter().write("中国确实已经拿到100块金牌....");
        }else{
            response.getWriter().write("你是盗链者,可耻!!");
        }


    }

    protected void doPost(HttpServletRequest request, HttpServletResponse response)
            throws ServletException, IOException {
        doGet(request, response);
    }
}
5 通过 request 获得【请求体】


html部分的代码:
<!DOCTYPE html>
<html>
<head>
<meta charset="UTF-8">
<title>Insert title here</title>
</head>
<body>
    <a href="/WEBTest13/referer">访问headerServlet资源</a>
    <form action="/WEBTest13/line" method="get">
        <input type="text" name="username"><br>
        <input type="password" name="password"><br>
        <input type="submit" value="提交"><br>
    </form>
    <hr/>
    <form action="/WEBTest13/content" method="get">
        <input type="text" name="username"><br>
        <input type="password" name="password"><br>
        <input type="checkbox" name="hobby" value="zq">足球
        <input type="checkbox" name="hobby" value="pq">排球
        <input type="checkbox" name="hobby" value="ppq">乒乓球<br>
        <input type="submit" value="提交"><br>
    </form>
</body>
</html>
servlet部分代码:
package cotnet;

import java.io.IOException;
import java.util.Enumeration;
import java.util.Map;

import javax.servlet.ServletException;
import javax.servlet.http.HttpServlet;
import javax.servlet.http.HttpServletRequest;
import javax.servlet.http.HttpServletResponse;

public class ContentServlet extends HttpServlet {

    protected void doGet(HttpServletRequest request, HttpServletResponse response)
            throws ServletException, IOException {

        //1、获得单个表单值
        String username = request.getParameter("username");
        System.out.println(username);
        String password = request.getParameter("password");
        System.out.println(password);
        //2、获得多个表单的值
        String[] hobbys = request.getParameterValues("hobby");
        for(String hobby:hobbys){
            System.out.println(hobby);
        }
        //3、获得所有的请求参数的名称
        Enumeration<String> parameterNames = request.getParameterNames();
        while(parameterNames.hasMoreElements()){
            System.out.println(parameterNames.nextElement());
        }
        System.out.println("------------------");
        //4、获得所有的参数 参数封装到一个Map<String,String[]>
        Map<String, String[]> parameterMap = request.getParameterMap();
        for(Map.Entry<String, String[]> entry:parameterMap.entrySet()){
            System.out.println(entry.getKey());
            for(String str:entry.getValue()){
                System.out.println(str);
            }
            System.out.println("---------------------------");
        }

    }
    protected void doPost(HttpServletRequest request, HttpServletResponse response)
            throws ServletException, IOException {
        doGet(request, response);
    }
}
6 Resquest 域对象和请求转发
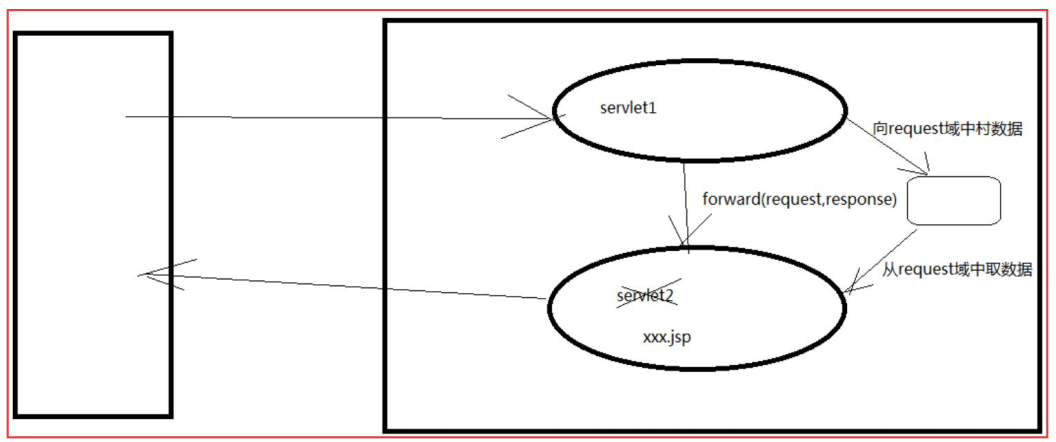
1 request 是一个域对象

2 request 完成请求转发

servlet1代码:
package forward;

import java.io.IOException;

import javax.servlet.RequestDispatcher;
import javax.servlet.ServletException;
import javax.servlet.http.HttpServlet;
import javax.servlet.http.HttpServletRequest;
import javax.servlet.http.HttpServletResponse;

public class Servlet1 extends HttpServlet {

    protected void doGet(HttpServletRequest request, HttpServletResponse response)
            throws ServletException, IOException {

        //想request域中存储数据
        request.setAttribute("name", "tom");


        //servlet1 将请求转发给servlet2
        RequestDispatcher dispatcher = request.getRequestDispatcher("/servlet2");
        //执行转发的方法
        dispatcher.forward(request, response);

    }

    protected void doPost(HttpServletRequest request, HttpServletResponse response)
            throws ServletException, IOException {
        doGet(request, response);
    }
}
servlet2代码:
package forward;

import java.io.IOException;
import javax.servlet.ServletException;
import javax.servlet.http.HttpServlet;
import javax.servlet.http.HttpServletRequest;
import javax.servlet.http.HttpServletResponse;

public class Servlet2 extends HttpServlet {

    protected void doGet(HttpServletRequest request, HttpServletResponse response)
            throws ServletException, IOException {

        //从request域中取出数据
        Object attribute = request.getAttribute("name");

        response.getWriter().write("hello haohao..."+attribute);
    }

    protected void doPost(HttpServletRequest request, HttpServletResponse response)
            throws ServletException, IOException {
        doGet(request, response);
    }
}
运行结果:

3 ServletContext 域与 Request 域的生命周期比较?
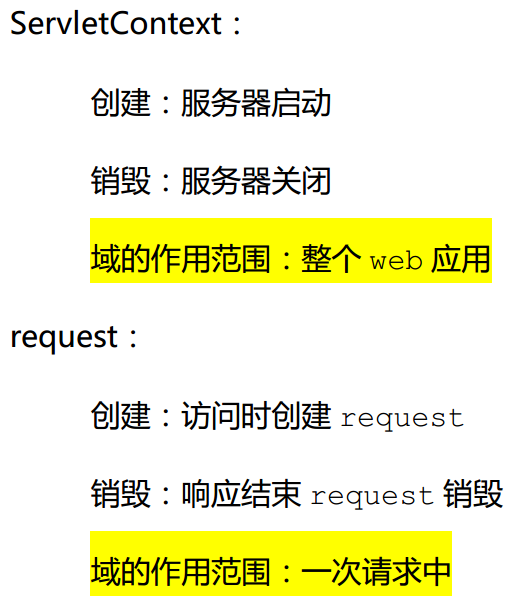
4转发与重定向的区别?


5 客户端地址与服务器端地址的写法?

7 注册分析
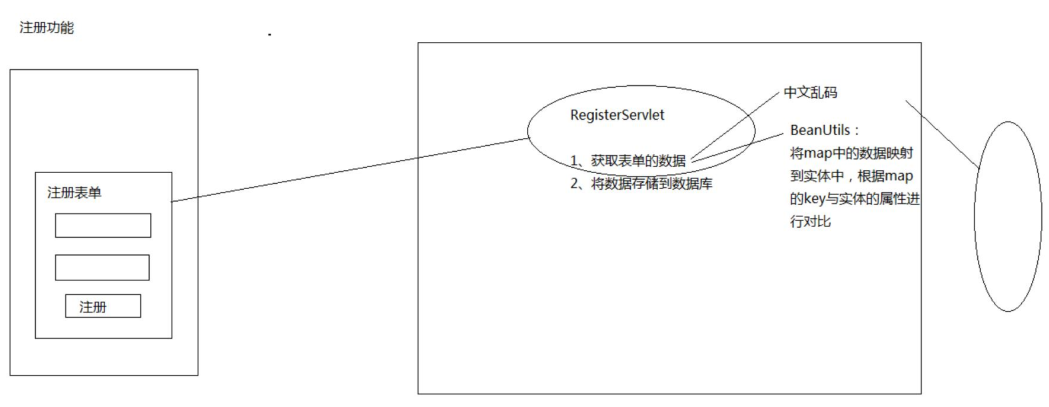
8 注册的基本实现
1 创建user表
CREATE TABLE `user` (
  `uid` varchar(50) NOT NULL,
  `username` varchar(20) DEFAULT NULL,
  `password` varchar(20) DEFAULT NULL,
  `name` varchar(20) DEFAULT NULL,
  `email` varchar(30) DEFAULT NULL,
  `telephone` varchar(20) DEFAULT NULL,
  `birthday` varchar(20) DEFAULT NULL,
  `sex` varchar(10) DEFAULT NULL,
  `state` int(11) DEFAULT NULL,
  `code` varchar(64) DEFAULT NULL,
  PRIMARY KEY (`uid`)
)
2 Servlet代码
package register;

import java.io.IOException;
import java.lang.reflect.InvocationTargetException;
import java.sql.SQLException;
import java.util.Map;
import java.util.UUID;

import javax.servlet.ServletException;
import javax.servlet.http.HttpServlet;
import javax.servlet.http.HttpServletRequest;
import javax.servlet.http.HttpServletResponse;

import org.apache.commons.beanutils.BeanUtils;
import org.apache.commons.dbutils.QueryRunner;

import com.ithiema.utils.DataSourceUtils;

public class RegisterServlet extends HttpServlet {

    protected void doGet(HttpServletRequest request, HttpServletResponse response)
            throws ServletException, IOException {
        //设置request的编码---只适合post方式
        request.setCharacterEncoding("UTF-8");

        //get方式乱码解决
        //String username = request.getParameter("username");//乱码
        //先用iso8859-1编码 在使用utf-8解码
        //username = new String(username.getBytes("iso8859-1"),"UTF-8");


        //1、获取数据
        //String username = request.getParameter("username");
        //System.out.println(username);
        //String password = request.getParameter("password");
        //.....

        //2、将散装的封装到javaBean
        //User user = new User();
        //user.setUsername(username);
        //user.setPassword(password);

        //使用BeanUtils进行自动映射封装
        //BeanUtils工作原理:将map中的数据 根据key与实体的属性的对应关系封装
        //只要key的名字与实体的属性 的名字一样 就自动封装到实体中
        Map<String, String[]> properties = request.getParameterMap();
        User user = new User();
        try {
            BeanUtils.populate(user, properties);
        } catch (IllegalAccessException | InvocationTargetException e) {
            e.printStackTrace();
        }

        //现在这个位置 user对象已经封装好了
        //手动封装uid----uuid---随机不重复的字符串32位--java代码生成后是36位
        user.setUid(UUID.randomUUID().toString());

        //3、将参数传递给一个业务操作方法
        try {
            regist(user);
        } catch (SQLException e) {
            e.printStackTrace();
        }

        //4、认为注册成功跳转到登录页面
        response.sendRedirect(request.getContextPath()+"/login.jsp");


    }

    //注册的方法
    public void regist(User user) throws SQLException{
        //操作数据库
        QueryRunner runner = new QueryRunner(DataSourceUtils.getDataSource());
        String sql = "insert into user values(?,?,?,?,?,?,?,?,?,?)";

        runner.update(sql,user.getUid(),user.getUsername(),user.getPassword(),user.getName(),
                user.getEmail(),null,user.getBirthday(),user.getSex(),null,null);
    }

    protected void doPost(HttpServletRequest request, HttpServletResponse response)
            throws ServletException, IOException {
        doGet(request, response);
    }
}
2 User类

package register;

public class User {

    private String uid;
    private String username;
    private String password;
    private String name;
    private String email;
    private String sex;
    private String birthday;
    public String getUid() {
        return uid;
    }
    public void setUid(String uid) {
        this.uid = uid;
    }
    public String getUsername() {
        return username;
    }
    public void setUsername(String username) {
        this.username = username;
    }
    public String getPassword() {
        return password;
    }
    public void setPassword(String password) {
        this.password = password;
    }
    public String getName() {
        return name;
    }
    public void setName(String name) {
        this.name = name;
    }
    public String getEmail() {
        return email;
    }
    public void setEmail(String email) {
        this.email = email;
    }
    public String getSex() {
        return sex;
    }
    public void setSex(String sex) {
        this.sex = sex;
    }
    public String getBirthday() {
        return birthday;
    }
    public void setBirthday(String birthday) {
        this.birthday = birthday;
    }
    @Override
    public String toString() {
        return "User [uid=" + uid + ", username=" + username + ", password=" + password + ", name=" + name + ", email="
                + email + ", sex=" + sex + ", birthday=" + birthday + "]";
    }


}
9 注册的乱码解决


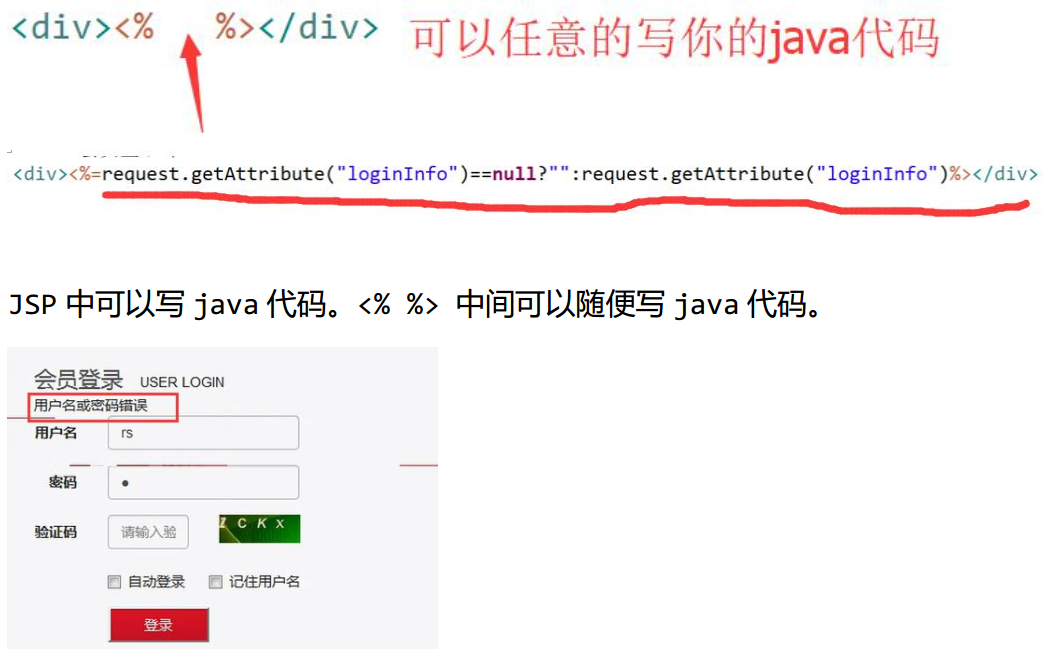
10 用户登录失败的信息回显
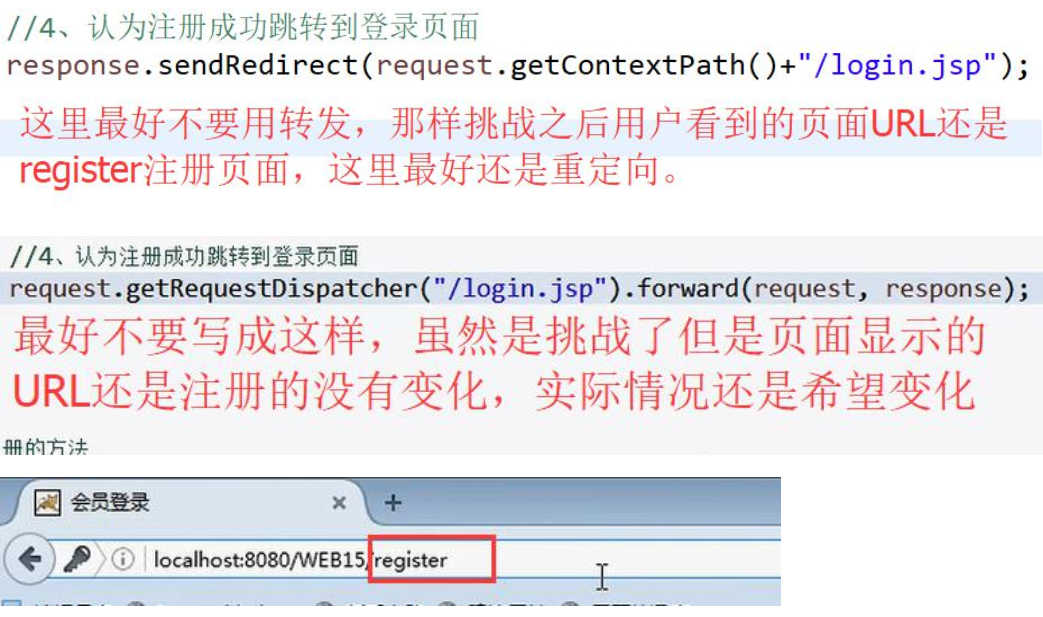
![]()
1 LoginServlet 代码 :
package login;

import java.io.IOException;
import java.sql.SQLException;

import javax.servlet.ServletException;
import javax.servlet.http.HttpServlet;
import javax.servlet.http.HttpServletRequest;
import javax.servlet.http.HttpServletResponse;

import org.apache.commons.dbutils.QueryRunner;
import org.apache.commons.dbutils.handlers.BeanHandler;

import com.ithiema.register.User;
import com.ithiema.utils.DataSourceUtils;

public class LoginServlet extends HttpServlet {

    protected void doGet(HttpServletRequest request, HttpServletResponse response)
            throws ServletException, IOException {

        request.setCharacterEncoding("UTF-8");

        //1、获得用户名和密码
        String username = request.getParameter("username");
        String password = request.getParameter("password");
        //2、调用一个业务方法进行该用户查询
        User login = null;
        try {
            login = login(username,password);
        } catch (SQLException e) {
            e.printStackTrace();
        }
        //3、通过user是否为null判断用户名和密码是否正确
        if(login!=null){
            //用户名和密码正确
            //登录成功 跳转到网站的首页
            response.sendRedirect(request.getContextPath());
        }else{
            //用户名或密码错误
            //跳回当前login.jsp
            //使用转发 转发到login.jsp  向request域中存储错误信息
            request.setAttribute("loginInfo", "用户名或密码错误");
            request.getRequestDispatcher("/login.jsp").forward(request, response);
        }

    }

    public User login(String username,String password) throws SQLException{
        QueryRunner runner = new QueryRunner(DataSourceUtils.getDataSource());
        String sql = "select * from user where username=? and password=?";
        User user = runner.query(sql, new BeanHandler<User>(User.class), username,password);
        return user;
    }

    protected void doPost(HttpServletRequest request, HttpServletResponse response)
            throws ServletException, IOException {
        doGet(request, response);
    }
}
2 login.jsp代码
<%@ page language="java" contentType="text/html; charset=UTF-8" pageEncoding="UTF-8"%> <!DOCTYPE html> <html> <head> <meta name="viewport" content="width=device-width, initial-scale=1"> <title>会员登录</title> <link rel="stylesheet" href="css/bootstrap.min.css" type="text/css" /> <script src="js/jquery-1.11.3.min.js" type="text/javascript"></script> <script src="js/bootstrap.min.js" type="text/javascript"></script> <!-- 引入自定义css文件 style.css --> <link rel="stylesheet" href="css/style.css" type="text/css" /> <style> body { margin-top: 20px; margin: 0 auto; } .carousel-inner .item img { width: 100%; height: 300px; } .container .row div { /* position:relative; float:left; */ } font { color: #666; font-size: 22px; font-weight: normal; padding-right: 17px; } </style> </head> <body> <!-- 引入header.jsp --> <jsp:include page="/header.jsp"></jsp:include> <div class="container" style="width: 100%; height: 460px; background: #FF2C4C url('images/loginbg.jpg') no-repeat;"> <div class="row"> <div class="col-md-7"> <!--<img src="./image/login.jpg" width="500" height="330" alt="会员登录" title="会员登录">--> </div> <div class="col-md-5"> <div style="width: 440px; border: 1px solid #E7E7E7; padding: 20px 0 20px 30px; border-radius: 5px; margin-top: 60px; background: #fff;"> <font>会员登录</font>USER LOGIN <div><%=request.getAttribute("loginInfo")==null?"":request.getAttribute("loginInfo")%></div> <form class="form-horizontal" action="/WEB15/login" method="post"> <div class="form-group"> <label for="username" class="col-sm-2 control-label">用户名</label> <div class="col-sm-6"> <input type="text" class="form-control" id="username" name="username" placeholder="请输入用户名"> </div> </div> <div class="form-group"> <label for="inputPassword3" class="col-sm-2 control-label">密码</label> <div class="col-sm-6"> <input type="password" class="form-control" id="inputPassword3" name="password" placeholder="请输入密码"> </div> </div> <div class="form-group"> <label for="inputPassword3" class="col-sm-2 control-label">验证码</label> <div class="col-sm-3"> <input type="text" class="form-control" id="inputPassword3" placeholder="请输入验证码"> </div> <div class="col-sm-3"> <img src="./image/captcha.jhtml" /> </div> </div> <div class="form-group"> <div class="col-sm-offset-2 col-sm-10"> <div class="checkbox"> <label> <input type="checkbox"> 自动登录 </label> <label> <input type="checkbox"> 记住用户名 </label> </div> </div> </div> <div class="form-group"> <div class="col-sm-offset-2 col-sm-10"> <input type="submit" width="100" value="登录" name="submit" style="background: url('./images/login.gif') no-repeat scroll 0 0 rgba(0, 0, 0, 0); height: 35px; width: 100px; color: white;"> </div> </div> </form> </div> </div> </div> </div> <!-- 引入footer.jsp --> <jsp:include page="/footer.jsp"></jsp:include> </body> </html>
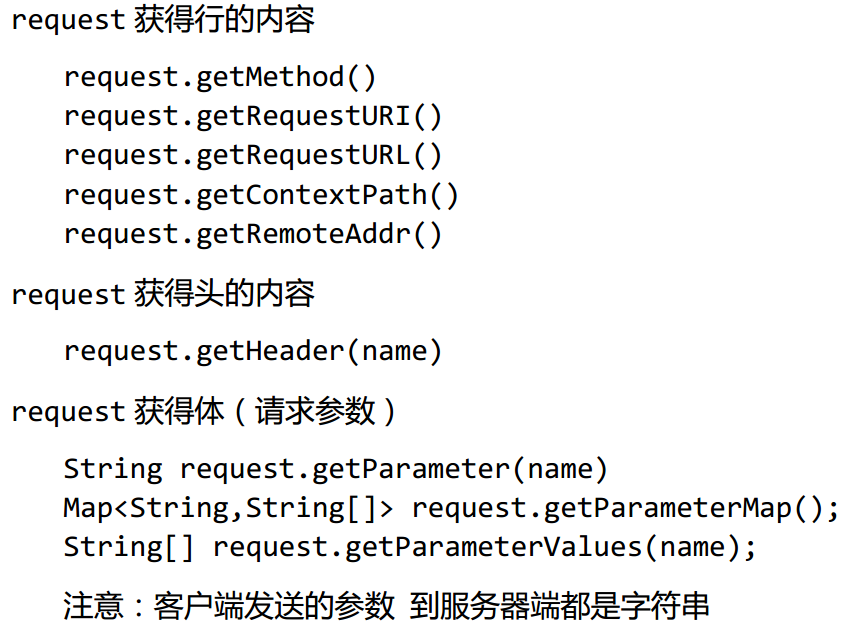
11 知识点总结

12 Xmind_总结


