RabbitMQ初探
RabbitMQ初探
结合SpringAMQP,讨论RabbitMQ的几种消息模型
工程结构
├─consumer
└─publisher
父工程pom.xml
<parent>
    <groupId>org.springframework.boot</groupId>
    <artifactId>spring-boot-starter-parent</artifactId>
    <version>2.3.9.RELEASE</version>
    <relativePath/>
</parent>

<dependencies>
    <!--AMQP依赖,包含RabbitMQ-->
    <dependency>
        <groupId>org.springframework.boot</groupId>
        <artifactId>spring-boot-starter-amqp</artifactId>
    </dependency>
    <!--单元测试-->
    <dependency>
        <groupId>org.springframework.boot</groupId>
        <artifactId>spring-boot-starter-test</artifactId>
    </dependency>
</dependencies>
各微服务application.yaml
spring:
  rabbitmq:
    host: 192.168.8.114 # rabiitMQ 服务 ip
    port: 5672          # rabiitMQ 服务 port
    username: root      # rabiitMQ 用户名
    password: root      # rabiitMQ 密码
    virtual-host: /     # rabiitMQ 要使用的虚拟主机
AMQP发送消息
@RunWith(SpringRunner.class)
@SpringBootTest
public class SpringAmqpTest {

    // SpringAMQP 的模板类
    @Resource
    private RabbitTemplate rabbitTemplate;

    @Test
    public void sendMsgToSimpleQueue() {

        // 要投递的队列名(String)-simple.queue
        String queueName = "simple.queue";

        // 要投递的消息(Object)
        String msg = "hello spring amqp!!!!!!";

        // 投递消息
        rabbitTemplate.convertAndSend(queueName, msg);
    }
}
AMQP接收消息
@Component
public class SpringRabbitListener {
    // 要接收的队列(String[])
    @RabbitListener(queues = "simple.queue")
    public void listenSimpleQueueMessage(String msg) { // msg 为String, 为取消息体
        System.out.println("msg:" + msg);
    }
}
Hello,World
单队列,单生产者,单消费者

是基本案例,这里跳过
Work Queues
多消费者绑定同一队列,加速消息的提取和处理,同一消息只会被一个消费者处理
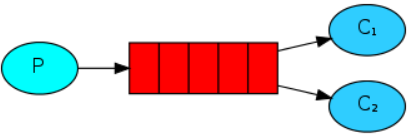
RabbitMQ在这种模式下,默认使用了“预取”机制,即所有消费者依次获取一个消息,直到消息消费完成
“预取”案例
P
@RunWith(SpringRunner.class)
@SpringBootTest
public class SpringAmqpTest {
    @Resource
    private RabbitTemplate rabbitTemplate;

    @Test
    public void sendMsgToSWorkQueue() throws InterruptedException {

        String queueName = "simple.queue";

        String msg = "hello spring amqp__";

        for (int i = 0; i < 10; i++) { // 1s内发送10条消息
            Thread.sleep(20);
            rabbitTemplate.convertAndSend(queueName, msg + i);
        }
    }
}
C1+C2
@Component
public class SpringRabbitListener {

    @RabbitListener(queues = "simple.queue")
    public void listenWorkQueueMessage1(String msg) throws InterruptedException {
        System.out.println("consumer[1]msg: " + msg + ";" + LocalTime.now());
        Thread.sleep(20); // 50/s
    }


    @RabbitListener(queues = "simple.queue")
    public void listenWorkQueueMessage2(String msg) throws InterruptedException {
        System.err.println("consumer[2]msg: " + msg + ";" + LocalTime.now());
        Thread.sleep(100); // 10/s
    }

}
结果
可见低速的C2,依旧接收到了一半的消息(此处为奇数)耗费了较长时间
consumer[1]msg: hello spring amqp__0;10:58:28.552860100
consumer[2]msg: hello spring amqp__1;10:58:28.556858500
consumer[1]msg: hello spring amqp__2;10:58:28.588858800
consumer[1]msg: hello spring amqp__4;10:58:28.621858500
consumer[2]msg: hello spring amqp__3;10:58:28.658858100
consumer[1]msg: hello spring amqp__6;10:58:28.661859100
consumer[1]msg: hello spring amqp__8;10:58:28.702858400
consumer[2]msg: hello spring amqp__5;10:58:28.760866
consumer[2]msg: hello spring amqp__7;10:58:28.861865900
consumer[2]msg: hello spring amqp__9;10:58:28.963866700
克服“预取”,适应消费者的能力
spring:
  rabbitmq:
    listener:
      simple:
        prefetch: 1 # 每次取1消息,处理完成后再取
改进后的结果
按能力接受,耗费时间较优
consumer[2]msg: hello spring amqp__1;10:59:01.193174400
consumer[1]msg: hello spring amqp__0;10:59:01.193174400
consumer[1]msg: hello spring amqp__2;10:59:01.222183900
consumer[1]msg: hello spring amqp__3;10:59:01.261184400
consumer[1]msg: hello spring amqp__4;10:59:01.287184800
consumer[2]msg: hello spring amqp__5;10:59:01.297183800
consumer[1]msg: hello spring amqp__6;10:59:01.311184200
consumer[1]msg: hello spring amqp__7;10:59:01.339185
consumer[1]msg: hello spring amqp__8;10:59:01.370183900
consumer[1]msg: hello spring amqp__9;10:59:01.395184200
Publish/Subscribe
允许将一条消息送达到多个队列中,发布订阅的核心由exchange实现
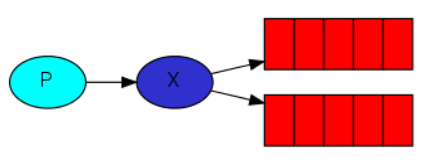
Fanout Exchange
将接收到的消息路由到每一个与其绑定的queue
交换机不能缓存消息,路由失败则消息丢失
案例
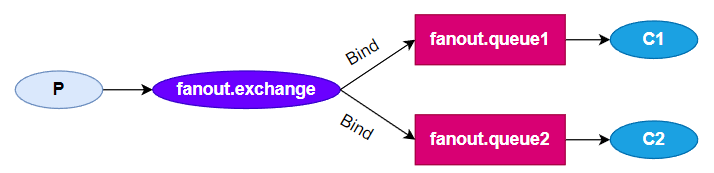
Exchange+Queue
// Bean形式
@Configuration
public class FanoutConfig {

    // Exchange
    @Bean
    public FanoutExchange fanoutExchange() {
        return new FanoutExchange("fanout.exchange");
    }

    // Queue
    @Bean
    public Queue fanoutQueue1() {
        return new Queue("fanout.queue1");
    }

    @Bean
    public Queue fanoutQueue2() {
        return new Queue("fanout.queue2");
    }

    // Bind
    @Bean
    public Binding fanoutBinding1(
            Queue fanoutQueue1,
            FanoutExchange fanoutExchange) {
        return BindingBuilder
                .bind(fanoutQueue1)
                .to(fanoutExchange);
    }

    @Bean
    public Binding fanoutBinding2(
            Queue fanoutQueue2,
            FanoutExchange fanoutExchange) {
        return BindingBuilder
                .bind(fanoutQueue2)
                .to(fanoutExchange);
    }

}
C1+C2
@RabbitListener(queues = "fanout.queue1")
public void listenFanoutQueue1Message(String msg) {
    System.out.println("fanout.queue1:" + msg);
}

@RabbitListener(queues = "fanout.queue2")
public void listenFanoutQueue2Message(String msg) {
    System.out.println("fanout.queue2:" + msg);
}
P
@Test
public void sendMsgToFanoutExchange() {

    String exchangeName = "fanout.exchange";

    String msg = "hello spring amqp clients!";

    // 交换机名称, RoutingKey, 消息
    rabbitTemplate.convertAndSend(exchangeName, "", msg);

}
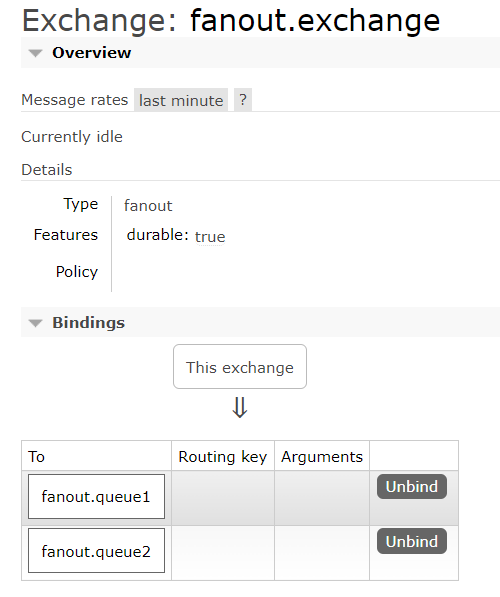
结果
fanout.queue1:hello spring amqp clients!
fanout.queue2:hello spring amqp clients!
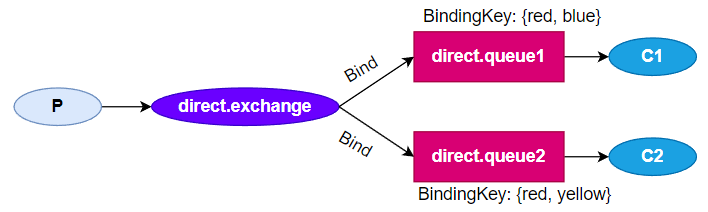
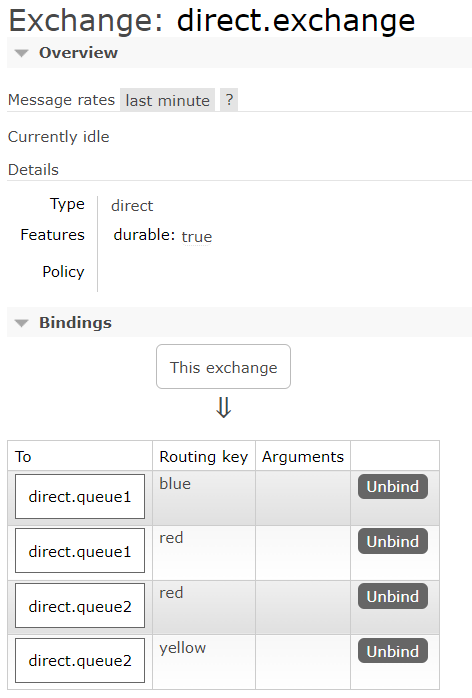
Direct Exchange
根据路由规则,将消息发送到指定的Queue,称为路由模式(routes)
每一个Queue都与Exchange设置一个BindingKey(RoutingKey)
发布者发布消息,也应当指定BindingKey(RoutingKey)
案例
// @RabbitListener形式声明
@RabbitListener(bindings = @QueueBinding(
    value = @Queue(name = "direct.queue1"),
    // @Exchange.type 默认是 direct
    exchange = @Exchange(name = "direct.exchange"),
    key = {"red", "blue"}
))
public void listenDirectQueue1Msg(String msg) {
    System.out.println("direct.queue1:" + msg);
}

@RabbitListener(bindings = @QueueBinding(
    value = @Queue(name = "direct.queue2"),
    exchange = @Exchange(name = "direct.exchange", type = ExchangeTypes.DIRECT),
    key = {"red", "yellow"}
))
public void listenDirectQueue2Msg(String msg) {
    System.out.println("direct.queue2:" + msg);
}
P
@Test
public void sendMsgToDirectExchange() {

    String exchangeName = "direct.exchange";

    String msgBlue = "blue!";
    String msgYellow = "yellow!";
    String msgRed = "red!";

    rabbitTemplate.convertAndSend(exchangeName, "blue", msgBlue);
    rabbitTemplate.convertAndSend(exchangeName, "yellow", msgYellow);
    rabbitTemplate.convertAndSend(exchangeName, "red", msgRed);

}
结果
direct.queue1:blue!
direct.queue2:yellow!
direct.queue2:red!
direct.queue1:red!
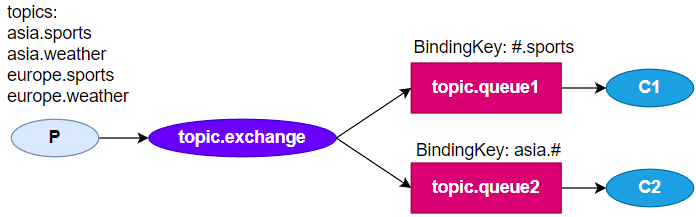
Topic Exchange
与Direct Exchange相似,区别在于:RoutingKey必须是多个单词的列表,并且以
.分隔
使用通配符,让BindingKey(RoutingKey)更高效
#指0个或多个单词*指一个单词
案例
E+C
@RabbitListener(bindings = @QueueBinding(
    value = @Queue(name = "topic.queue1"),
    exchange = @Exchange(name = "topic.exchange", type = ExchangeTypes.TOPIC),
    key = "#.sports"
))
public void listenTopicQueue1Msg(String msg) {
    System.out.println("topic.queue1:" + msg);
}

@RabbitListener(bindings = @QueueBinding(
    value = @Queue(name = "topic.queue2"),
    exchange = @Exchange(name = "topic.exchange", type = ExchangeTypes.TOPIC),
    key = "asia.#"
))
public void listenTopicQueue2Msg(String msg) {
    System.out.println("topic.queue2:" + msg);
}
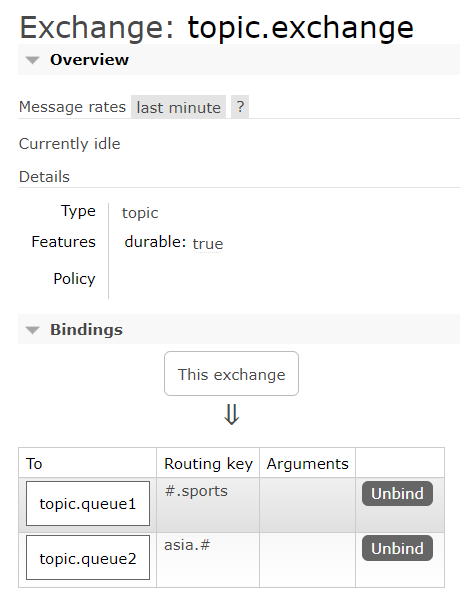
# queue1: #.sports
# queue2: asia.#
topic.queue1:asia.sports msg
topic.queue2:asia.sports msg
topic.queue1:europe.sports msg
topic.queue2:asia.weather msg
对象的序列化
前面代码中,发送的消息都是String类型,而Spring AMQP支持发送Object类型
这一过程牵扯到序列化,Spring默认的序列化器使用JDK的序列化,体积大
通常使用Jackson序列化器
(发送方和接收方一定要使用相同的序列化器)
<!--jackson-->
<dependency>
    <groupId>com.fasterxml.jackson.core</groupId>
    <artifactId>jackson-databind</artifactId>
</dependency>
Bean
// jackson serializer
@Bean
public MessageConverter messageConverter() {
    return new Jackson2JsonMessageConverter();
}
模拟发送Object
Queue
@Bean
public Queue objectQueue() {
    return new Queue("object.queue");
}
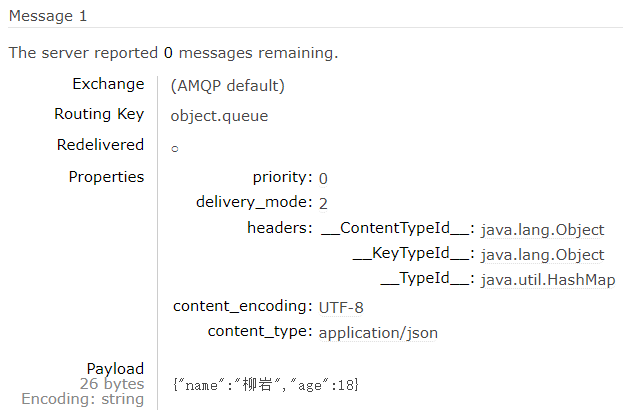
P
@Test
public void sendMsgWithObject() {
    String queueName = "object.queue";
    HashMap<String, Object> msg = new HashMap<>();
    msg.put("name", "柳岩");
    msg.put("age", 18);
    rabbitTemplate.convertAndSend(queueName, msg);
}
添加C
@RabbitListener(queues = "object.queue")
public void listenObjectQueue(Map<String, Object> msg) {
    System.err.println("object.queue:" + msg);
}
输出
object.queue:{name=柳岩, age=18}
