
同事入职与离职的设置
一、新来同事rose2
建用户名
[root@localhost ~]# useradd rose2
正在创建信箱文件: 文件已存在
建用户ID
[root@localhost ~]# id rose2
uid=3244(rose2) gid=3244(rose2) 组=3244(rose2)
建密码
[root@localhost ~]# passwd rose2
12345678
还需要把办公软件复制过去
/etc/skel/是商店文件夹
cp -r /etc/skel/.[!.]* /home/rose2/
建邮箱
[root@localhost ~]# touch /var/spool/mail/rose2
[root@localhost ~]# ls -l -d /var/spool/mail/rose2
-rw-r--r-- 1 root root 0 10月 22 04:06 /var/spool/mail/rose2
[root@localhost ~]# chown -R rose2.rose2 /var/spool/mail/rose2
[root@localhost ~]# ls -l -d /var/spool/mail/rose2
-rw-r--r-- 1 rose2 rose2 0 10月 22 04:06 /var/spool/mail/rose2
查看用户资料
[root@localhost ~]# cat /etc/passwd
[root@localhost ~]# cat /etc/shadow
[root@localhost ~]# cat /etc/group
[root@localhost ~]# cat /etc/gshadow
二、同事rose离职(先关掉正在使用的rose账号,exit)
[root@localhost ~]# rm -rf /var/spool/mail/rose
[root@localhost ~]# rm -rf /home/rose
[root@localhost ~]# userdel -r rose
userdel:用户“rose”不存在
————————————————————————————————————————————
三、修改某人的文件权限
[root@localhost tmp]# mkdir /test
[root@localhost tmp]# ll -ld /test
drwxr-xr-x 2 root root 6 10月 22 05:02 /test
[root@localhost tmp]# chmod 777 /test
[root@localhost tmp]# ls -ld /test
drwxrwxrwx 2 root root 6 10月 22 05:02 /test
创建文件
[root@localhost tmp]# touch a.txt
[root@localhost tmp]# ll a.txt
-rw-r--r-- 1 root root 0 10月 22 05:08 a.txt
o=-就是其他组的人不要
[root@localhost tmp]# chmod o=- a.txt
[root@localhost tmp]# ll a.txt
-rw-r----- 1 root root 8 10月 22 05:35 a.txt
换别的组的账号访问,得到权限不够
[root@localhost tmp]# touch 999.txt
[root@localhost tmp]# ll -d 999.txt
-rw-r--r-- 1 root root 0 10月 22 18:24 999.txt
[root@localhost tmp]# chmod o=- 999.txt
[root@localhost tmp]# echo ls > 999.txt
[root@localhost tmp]# cat 999.txt
ls
[root@localhost tmp]# ll -d 999.txt
-rw-r----- 1 root root 3 10月 22 18:27 999.txt
[root@localhost ~]# su - xiezhi
上一次登录:日 10月 22 07:38:49 CST 2017pts/1 上
[xiezhi@localhost ~]$ cd /tmp
[xiezhi@localhost tmp]$ cat 999.txt
cat: 999.txt: 权限不够
建组的权限,如果组有某个权限,那加入这个组就可以了
把xiezhi放到root组中
usermod -G root xiezhi
[root@localhost tmp]# usermod -G root xiezhi
还是不行
[xiezhi@localhost tmp]$ cat 999.txt
cat: 999.txt: 权限不够
退出再重新登录
[xiezhi@localhost tmp]$ exit
登出
[root@localhost ~]# su - xiezhi
[xiezhi@localhost ~]$ cd /tmp
[xiezhi@localhost tmp]$ cat 999.txt
ls
[xiezhi@localhost tmp]$
四、设置目录的权限
在UU下建目录:
[root@localhost ~]# useradd carmen
[root@localhost ~]# id carmen
uid=3246(carmen) gid=3246(carmen) 组=3246(carmen)
[root@bogon ~]# passwd carmen
更改用户 carmen 的密码 。
新的 密码:
[root@localhost ~]# mkdir test
[root@localhost ~]# ls
把test目录全开放
[root@localhost ~]# chmod 777 test
[root@localhost ~]# ll -d test
drwxrwxrwx 2 root root 6 10月 22 19:27 test
用xiezhi的账号把test下建test1
[xiezhi@localhost root]$ mkdir /root/test/test1
[xiezhi@localhost root]$ ll -d /root/test
drwxrwxrwx 3 root root 19 10月 22 19:36 /root/test
[xiezhi@localhost root]$ ll -d /root/test/test1
drwxrwxr-x 2 xiezhi xiezhi 6 10月 22 19:36 /root/test/test1
退出
[xiezhi@localhost root]$ exit
[root@localhost ~]# ll -d /root/test/test1
drwxrwxr-x 2 xiezhi xiezhi 38 10月 22 19:39 /root/test/test1
[root@localhost /]# ls /root/test/test1/
zhi1.txt zhi2.txt
确保root是全部用户都可以进
[root@localhost /]# chmod 777 /root
[root@localhost /]#
对文件夹的读权限是可以知道有什么文件
[carmen@localhost /]$ ls /root/test/test1
zhi1.txt zhi2.txt
[carmen@localhost /]$
把其他组的人可读权限取消
[root@localhost /]# chmod o=- /root/test/test1
[root@localhost /]# ll -d /root/test/test1
drwxrwx--- 2 xiezhi xiezhi 38 10月 22 19:39 /root/test/test1
[root@localhost /]#
于是carmen就看不到这个文件夹有什么文件了
[carmen@localhost /]$ ls /root/test/test1
ls: 无法打开目录/root/test/test1: 权限不够
[carmen@localhost /]$
现在给其他组可读权限
[root@localhost /]# chmod o=r /root/test/test1
[root@localhost /]#
结果:能可看到有什么文件
[carmen@localhost /]$ ls /root/test/test1
ls: 无法访问/root/test/test1/zhi1.txt: 权限不够
ls: 无法访问/root/test/test1/zhi2.txt: 权限不够
zhi1.txt zhi2.txt
也进入不了
[carmen@localhost /]$ cd /root/test/test1
-bash: cd: /root/test/test1: 权限不够
增加可执行权限
[root@localhost /]# chmod o=rx /root/test/test1
[root@localhost /]#
可以进入:
[carmen@localhost test]$ cd /root/test/test1
不过写不了
[carmen@localhost test1]$ mkdir /root/test/test1/rr.txt
mkdir: 无法创建目录"/root/test/test1/rr.txt": 权限不够
[carmen@localhost test1]$
写权限需要与可执行一起才行,可执行就是可进入
[root@localhost /]# chmod o=wx /root/test/test1
[root@localhost /]#
[carmen@localhost test1]$ mkdir /root/test/test1/rr.txt
[carmen@localhost test1]$
把其他组的权限全部取消
[root@localhost /]# ll -d /root/test/test1
drwxrwx--- 2 xiezhi xiezhi 38 10月 22 20:26 /root/test/test1
[root@localhost /]#
把carmen放到xiezhi组中
[root@localhost /]# usermod -G xiezhi carmen
[root@localhost /]#
[carmen@localhost test1]$ exit
登出
[root@localhost ~]# su - carmen
上一次登录:日 10月 22 19:52:48 CST 2017pts/0 上
[carmen@localhost ~]$ cd /root/test/test1
[carmen@localhost test1]$
对目录有写权限不一定对里面的文件有写权限,因为文件的权限与目录权限是不同的
文件:
Read:能看内容;
Write:修改内容
X:执行文件
目录:
Read:浏览目录下的子目录名,子文件名
Write:创建,重命名,删除子目录名,子文件名
X:可以cd切换进入
打包命令tar,linux没有文件后缀,跟windows不同,为了区分好文件类型,要自己加
cvf的意思是创建文件,v显示哪些文件打包,f test.tar打包后的文件名,a.txt b.txt要打包的文件,打包意思是归档,不是压缩。
[root@localhost ~]# tar cvf test.tar a.txt b.txt
a.txt
b.txt
[root@localhost ~]# tar cf test.tar1 a.txt b.txt
要查看打包文件内有什么文件
[root@localhost ~]# tar -tf test.tar
a.txt
b.txt
解开打包文件xf
[root@localhost ~]# tar xf test.tar
[root@localhost ~]# ls
解压到/root/test/bar下
[root@localhost ~]# tar xf test.tar -C /root/test/bar
[root@localhost ~]#
压缩文件
[root@localhost ~]# gzip a.txt
解压缩
[root@localhost ~]# gunzip a.txt.gz
打包压缩到某个文件夹中
tar cf dabao.tar a.txt b.txt
gzip dabao.tar
也可以
tar cfz dabao1.tar.gz a.txt b.txt
tar cfjv dabao2.tar.bz2 a.txt b.txt
bzip2 a.txt
解压
[root@localhost ~]# tar xf dabao1.tar.gz -C /root/dabao
[root@localhost ~]#
压缩文件夹
tar cfz yasuo.tar.gz /etc/
[root@localhost ~]# tar -tf yasuo.tar.gz |less
解压后带上etc,
[root@localhost ~]# mkdir congcong
[root@localhost ~]# tar xf yasuo.tar.bz2 -C /root/congcong
[root@localhost ~]# ls congcong
etc
[root@localhost ~]#
如果不想带etc,只要里面的文件
[root@localhost /]# cd /etc
[root@localhost etc]# tar czf dapigu.tar.gz *
[root@localhost /]# tar xf /etc/dapigu.tar.gz -C /congcong
[root@localhost /]# ls congcong
当用户登录后就pwd,就看到根目录
查看文件夹内的详细信息
[root@localhost ~]# ls -l /tmp
查看文件夹目录的详细信息
[root@localhost ~]# ls -ld /tmp
drwxrwxrwt. 94 root root 8192 10月 21 07:04 /tmp
[root@localhost ~]# ls -ld /home/rose1
drwx------. 3 rose1 rose1 78 10月 21 06:27 /home/rose1
3代表硬链接数目
属主(谁有权限:可读可写可执行) 属组(谁在哪个部门) 字节 创建时间 家目录

rwx 属主对文件有可读可写可执行权限
r-x 不属主属组对文件有可读不可写可执行权限
r-x 不属组对文件有可读不可写可执行权限
开头是d,代表目录
[root@localhost ~]# ls -ld /etc/passwd
-rw-r--r--. 1 root root 2480 10月 21 06:27 /etc/passwd
开头是-,代表普通文件
[root@localhost ~]# ls -ld /etc
drwxr-xr-x. 137 root root 8192 10月 21 06:35 /etc
etc下文件的详细信息
ls -l /etc/
lrwxrwxrwx. 1 root root 14 10月 11 07:59 system-release -> centos-release
开头是l,代表快捷方式
开头是p,代表管道文件
开头是c,代表字符设备
开头是b,代表其他文件
/dev/sda是装磁盘用的
[root@localhost ~]# ls -l /dev/sda
brw-rw----. 1 root disk 8, 0 10月 21 17:25 /dev/sda
[root@localhost ~]#
.是代表linux有美国国防部开发的一个软件,为了加强软件的安全性,不过一般不用,因为经常导致程序卡住,关闭的做法:
输入vim /etc/sysconfig/selinux
选e
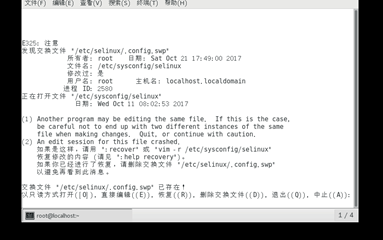
这时修改不了的,要先i,才能修改,把enforcing改为disabled
# This file controls the state of SELinux on the system.
# SELINUX= can take one of these three values:
# enforcing - SELinux security policy is enforced.
# permissive - SELinux prints warnings instead of enforcing.
# disabled - No SELinux policy is loaded.
SELINUX=enforcing
# SELINUXTYPE= can take one of three two values:
# targeted - Targeted processes are protected,
# minimum - Modification of targeted policy. Only selected processes are protected.
# mls - Multi Level Security protection.
SELINUXTYPE=targeted
然后按esc,按:wq就保存了,之后再建文件就没这个点了
[root@localhost ~]# ls –l可以简称为ll
[root@localhost ~]# ls -l -d /home/xiezhi
drwx------. 15 xiezhi 1000 4096 10月 20 05:59 /home/xiezhi
[root@localhost ~]# ll -d /home/rose1
drwx------. 3 rose1 rose1 78 10月 21 06:27 /home/rose1
老师下面的情况是rose在root权限中,需要修改,用
[root@localhost ~]# chown -R rose1.rose1 /home/rose1
这样rose这用户才拥有这个家目录
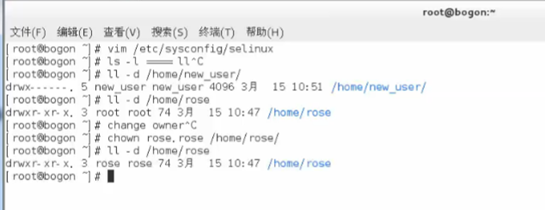
一定要加-R,否则只改了一部分,改好后就可以用rose1账号建文件了

[root@localhost ~]# su - rose1
[rose1@localhost ~]$ touch qwe.txt
[rose1@localhost ~]$ ls
qwe.txt
[rose1@localhost ~]$ ls -l
总用量 0
-rw-rw-r--. 1 rose1 rose1 0 10月 21 18:57 qwe.txt
[rose1@localhost ~]$
T是高级权限
[root@localhost tmp]# ls -l -d /tmp
drwxrwxrwt. 99 root root 8192 10月 22 04:33 /tmp
[root@localhost tmp]#
权限的修改
[root@localhost tmp]# mkdir /test
[root@localhost tmp]# ll -ld /test
drwxr-xr-x 2 root root 6 10月 22 05:02 /test
[root@localhost tmp]# chmod 777 /test
[root@localhost tmp]# ls -ld /test
drwxrwxrwx 2 root root 6 10月 22 05:02 /test
[root@localhost ~]# su - xiezhi
上一次登录:五 10月 20 05:59:17 CST 2017:0 上
验证可读权限
[xiezhi@localhost ~]$ cat /tmp/a.txt
cat: /tmp/a.txt: 权限不够
[xiezhi@localhost ~]$
o=r就是其他组有可读权限
[root@localhost tmp]# chmod o=r a.txt
[root@localhost tmp]#
验证可写权限
[xiezhi@localhost ~]$ echo pipi > /tmp/a.txt
-bash: /tmp/a.txt: 权限不够
在root上设置权限
[root@localhost tmp]# chmod o=rw a.txt
验证可以写了
[xiezhi@localhost ~]$ echo 4567 >> /tmp/a.txt
[xiezhi@localhost ~]$ cat /tmp/a.txt
1234567
4567
[xiezhi@localhost ~]$
验证可执行
先在a.txt上放可执行的语句
[root@localhost tmp]# echo ls > a.txt
[root@localhost tmp]# cat a.txt
ls
[root@localhost tmp]# echo 123 >> a.txt
[root@localhost tmp]# cat a.txt
ls
123
[xiezhi@localhost ~]$ cd /tmp
[xiezhi@localhost tmp]$ ./a.txt
-bash: ./a.txt: 权限不够
[xiezhi@localhost tmp]$
因为执行就一定要能读,所以给可读可执行权限
[root@localhost tmp]# chmod o=rx a.txt
[root@localhost tmp]# ll a.txt
-rw-r--r-x 1 root root 13 10月 22 06:08 a.txt
[xiezhi@localhost tmp]$ ./a.txt
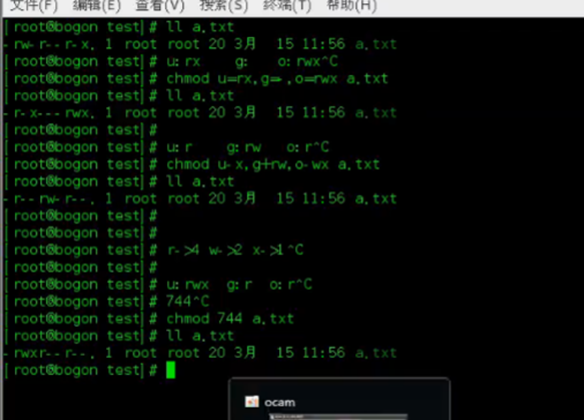
属主 属组 其他
u g o
练习 u:rx g: o:rwx
[root@localhost tmp]# chmod u=rx,g=-,o=rwx a.txt
[root@localhost tmp]# ll a.txt
-r-x---rwx 1 root root 12 10月 22 06:24 a.txt
[root@localhost tmp]#
除了用=外,还可以用+,-,赋值来表示
[root@localhost tmp]# ll a.txt
-r-x---rwx 1 root root 12 10月 22 06:24 a.txt
[root@localhost tmp]# chmod u-x a.txt
[root@localhost tmp]# ll a.txt
-r-----rwx 1 root root 12 10月 22 06:24 a.txt
[root@localhost tmp]# chmod u+x a.txt
[root@localhost tmp]# ll a.txt
-r-x---rwx 1 root root 12 10月 22 06:24 a.txt
[root@localhost tmp]#
默认r=4,w=2,x=1
[root@localhost tmp]# chmod 774 a.txt
[root@localhost tmp]# ll a.txt
-rwxrwxr-- 1 root root 12 10月 22 06:24 a.txt
[root@localhost tmp]#
建组的权限,如果组有某个权限,那加入这个组就可以了
把rose2放到xiezhi组中
usermod -G xiezhi rose2
[root@localhost tmp]# su - xiezhi
上一次登录:日 10月 22 06:00:08 CST 2017pts/1 上
[xiezhi@localhost ~]$ touch xiezhi.txt
[xiezhi@localhost ~]$ echo 'echo 123' > xiezhi.txt
[xiezhi@localhost ~]$ cat xiezhi.txt
echo 123
[xiezhi@localhost ~]$ ./xiezhi.txt
-bash: ./xiezhi.txt: 权限不够
[xiezhi@localhost ~]$ ll xiezhi.txt
-rw-rw-r-- 1 xiezhi xiezhi 9 10月 22 07:02 xiezhi.txt
[xiezhi@localhost ~]$ exit
登出
[root@localhost tmp]# cat /home/xiezhi/xiezhi.txt
echo 123
[root@localhost tmp]#
换别的组的账号:
[xiezhi@localhost tmp]$ su - rose2
密码:
[rose2@localhost ~]$ echo eee >> /home/xiezhi/xiezhi.txt
-bash: /home/xiezhi/xiezhi.txt: 权限不够
把rose2加入到xiezhi组中
[root@localhost tmp]# usermod -G xiezhi rose2
[root@localhost tmp]#
38 cd /tmp
39 touch y1.txt
40 ls
41 ll y1.txt
42 echo y1.txt
43 echo er > y1.txt
44 cat y1.txt
!cat表示执行之前以cat开头的程序
