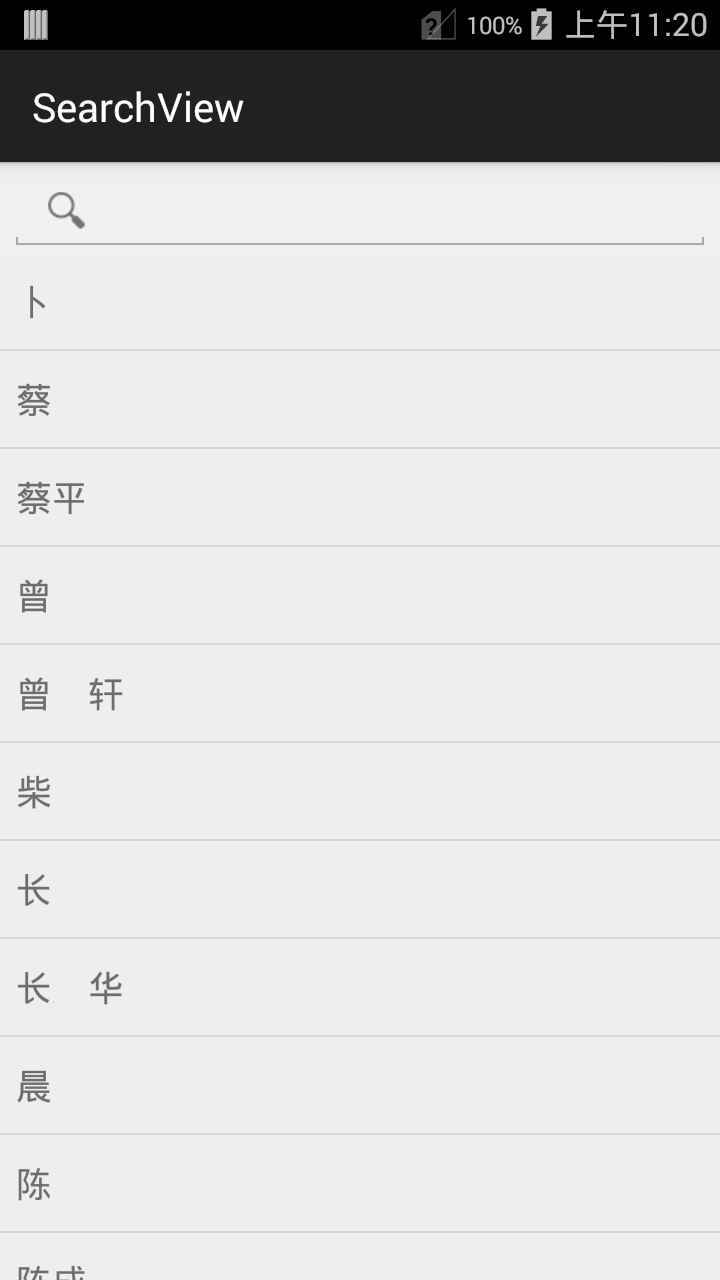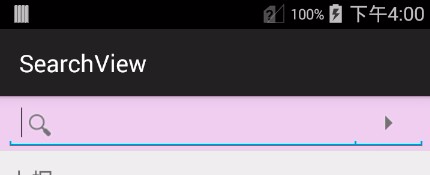
本篇讲的是如何用searchView实现搜索框,其实原理和之前的没啥差别,也算是个复习吧。
一、Manifest.xml
这里我用一个activity进行信息的输入和展示,配置方式还是老样子,写一个输入框的配置文件,然后写定一个action
<?xml version="1.0" encoding="utf-8"?><manifest xmlns:android="http://schemas.android.com/apk/res/android"
    package="com.kale.searchview"
    android:versionCode="1"
    android:versionName="1.0" ><uses-permission android:name="android.permission.READ_CONTACTS"/><uses-sdk
        android:minSdkVersion="11"
        android:targetSdkVersion="18" /><application
        android:allowBackup="true"
        android:icon="@drawable/ic_launcher"
        android:label="@string/app_name"
        android:theme="@style/AppTheme" ><activity
            android:name=".MainActivity"
            android:label="@string/app_name"
            android:windowSoftInputMode = "adjustPan"><intent-filter><action android:name="android.intent.action.MAIN" /><category android:name="android.intent.category.LAUNCHER" /></intent-filter><intent-filter><action android:name="android.intent.action.SEARCH" /></intent-filter><meta-data
                android:name="android.app.searchable"
                android:resource="@xml/searchable" /></activity></application></manifest>
二、searchable.xml
<?xml version="1.0" encoding="utf-8"?><!-- 配置搜索模式 --><searchable xmlns:android="http://schemas.android.com/apk/res/android"
    android:label="@string/app_name"
    android:hint="@string/search_hint"
    android:icon="@drawable/ic_launcher"
    android:searchMode="queryRewriteFromText" />
三、MainActivity
3.1 设置SearchView
贴代码之前先说下searchview的设置,searchview有很多设置方案,详细可以参考官方的文档,下面是我举得几个例子:

mSearchView = (SearchView) findViewById(R.id.search);
        /**
         * 默认情况下, search widget是"iconified“的,只是用一个图标 来表示它(一个放大镜),
         * 当用户按下它的时候才显示search box . 你可以调用setIconifiedByDefault(false)让search
         * box默认都被显示。 你也可以调用setIconified()让它以iconified“的形式显示。
         */
        mSearchView.setIconifiedByDefault(true);
        /**
         * 默认情况下是没提交搜索的按钮,所以用户必须在键盘上按下"enter"键来提交搜索.你可以同过setSubmitButtonEnabled(
         * true)来添加一个提交按钮("submit" button)
         * 设置true后,右边会出现一个箭头按钮。如果用户没有输入,就不会触发提交(submit)事件
         */
        mSearchView.setSubmitButtonEnabled(true);
        /**
         * 初始是否已经是展开的状态
         * 写上此句后searchView初始展开的,也就是是可以点击输入的状态,如果不写,那么就需要点击下放大镜,才能展开出现输入框
         */
        mSearchView.onActionViewExpanded();
        // 设置search view的背景色
        mSearchView.setBackgroundColor(0x22ff00ff);
        /**
         * 默认情况下, search widget是"iconified“的,只是用一个图标 来表示它(一个放大镜),
         * 当用户按下它的时候才显示search box . 你可以调用setIconifiedByDefault(false)让search
         * box默认都被显示。 你也可以调用setIconified()让它以iconified“的形式显示。
         */
        mSearchView.setIconifiedByDefault(true);
3.2 配置监听器
这段代码之前见过,监听器中的方法会在用户输入和提交搜索结果时触发
mSearchView.setOnQueryTextListener(new OnQueryTextListener() {

            private String TAG = getClass().getSimpleName();

            /*
             * 在输入时触发的方法,当字符真正显示到searchView中才触发,像是拼音,在舒服法组词的时候不会触发
             *
             * @param queryText
             *
             * @return false if the SearchView should perform the default action
             * of showing any suggestions if available, true if the action was
             * handled by the listener.
             */
            @Override
            public boolean onQueryTextChange(String queryText) {
                Log.d(TAG, "onQueryTextChange = " + queryText);

                String selection = RawContacts.DISPLAY_NAME_PRIMARY + " LIKE '%" + queryText + "%' " + " OR "
                        + RawContacts.SORT_KEY_PRIMARY + " LIKE '%" + queryText + "%' ";
                // String[] selectionArg = { queryText };
                mCursor = getContentResolver().query(RawContacts.CONTENT_URI, PROJECTION, selection, null, null);
                mAdapter.swapCursor(mCursor); // 交换指针,展示新的数据return true;
            }

            /*
             * 输入完成后,提交时触发的方法,一般情况是点击输入法中的搜索按钮才会触发。表示现在正式提交了
             *
             * @param queryText
             *
             * @return true to indicate that it has handled the submit request.
             * Otherwise return false to let the SearchView handle the
             * submission by launching any associated intent.
             */
            @Override
            public boolean onQueryTextSubmit(String queryText) {
                Log.d(TAG, "onQueryTextSubmit = " + queryText);

                if (mSearchView != null) {
                    // 得到输入管理对象
                    InputMethodManager imm = (InputMethodManager) getSystemService(Context.INPUT_METHOD_SERVICE);
                    if (imm != null) {
                        // 这将让键盘在所有的情况下都被隐藏,但是一般我们在点击搜索按钮后,输入法都会乖乖的自动隐藏的。
                        imm.hideSoftInputFromWindow(mSearchView.getWindowToken(), 0); // 输入法如果是显示状态,那么就隐藏输入法                    }
                    mSearchView.clearFocus(); // 不获取焦点                }
                return true;
            }
        });
3.3 全部代码
package com.kale.searchview;

import android.app.SearchManager;
import android.content.Context;
import android.content.Intent;
import android.database.Cursor;
import android.os.Bundle;
import android.provider.ContactsContract;
import android.provider.ContactsContract.RawContacts;
import android.support.v7.app.ActionBarActivity;
import android.util.Log;
import android.view.inputmethod.InputMethodManager;
import android.widget.AbsListView;
import android.widget.AbsListView.OnScrollListener;
import android.widget.ListView;
import android.widget.SearchView;
import android.widget.SearchView.OnQueryTextListener;
import android.widget.SimpleCursorAdapter;

public class MainActivity extends ActionBarActivity {

    private SearchView mSearchView;
    private ListView mListView;
    private SimpleCursorAdapter mAdapter;
    private Cursor mCursor;

    static final String[] PROJECTION = new String[] { ContactsContract.RawContacts._ID, ContactsContract.RawContacts.DISPLAY_NAME_PRIMARY };

    @Override
    protected void onCreate(Bundle savedInstanceState) {
        super.onCreate(savedInstanceState);
        setContentView(R.layout.activity_main);

        // 得到联系人名单的指针
        mCursor = getContentResolver().query(RawContacts.CONTENT_URI, PROJECTION, null, null, null);
        // 通过传入mCursor,将联系人名字放入listView中。
        mAdapter = new SimpleCursorAdapter(this, android.R.layout.simple_list_item_1, mCursor,
                new String[] { RawContacts.DISPLAY_NAME_PRIMARY }, new int[] { android.R.id.text1 }, 0);

        mListView = (ListView) findViewById(android.R.id.list);
        mListView.setAdapter(mAdapter);
        mListView.setOnScrollListener(new OnScrollListener() {

            @Override
            public void onScrollStateChanged(AbsListView view, int scrollState) {
                InputMethodManager imm = (InputMethodManager) getSystemService(Context.INPUT_METHOD_SERVICE);
                if (imm != null) {
                    imm.hideSoftInputFromWindow(mListView.getWindowToken(), 0); // 输入法如果是显示状态,那么就隐藏输入法                }
            }

            @Override
            public void onScroll(AbsListView view, int firstVisibleItem, int visibleItemCount, int totalItemCount) {

            }
        });

        mSearchView = (SearchView) findViewById(R.id.search);
        /**
         * 默认情况下, search widget是"iconified“的,只是用一个图标 来表示它(一个放大镜),
         * 当用户按下它的时候才显示search box . 你可以调用setIconifiedByDefault(false)让search
         * box默认都被显示。 你也可以调用setIconified()让它以iconified“的形式显示。
         */
        mSearchView.setIconifiedByDefault(true);
        /**
         * 默认情况下是没提交搜索的按钮,所以用户必须在键盘上按下"enter"键来提交搜索.你可以同过setSubmitButtonEnabled(
         * true)来添加一个提交按钮("submit" button)
         * 设置true后,右边会出现一个箭头按钮。如果用户没有输入,就不会触发提交(submit)事件
         */
        mSearchView.setSubmitButtonEnabled(true);
        /**
         * 初始是否已经是展开的状态
         * 写上此句后searchView初始展开的,也就是是可以点击输入的状态,如果不写,那么就需要点击下放大镜,才能展开出现输入框
         */
        mSearchView.onActionViewExpanded();
        // 设置search view的背景色
        mSearchView.setBackgroundColor(0x22ff00ff);
        /**
         * 默认情况下, search widget是"iconified“的,只是用一个图标 来表示它(一个放大镜),
         * 当用户按下它的时候才显示search box . 你可以调用setIconifiedByDefault(false)让search
         * box默认都被显示。 你也可以调用setIconified()让它以iconified“的形式显示。
         */
        mSearchView.setIconifiedByDefault(true);
        mSearchView.setOnQueryTextListener(new OnQueryTextListener() {

            private String TAG = getClass().getSimpleName();

            /*
             * 在输入时触发的方法,当字符真正显示到searchView中才触发,像是拼音,在舒服法组词的时候不会触发
             *
             * @param queryText
             *
             * @return false if the SearchView should perform the default action
             * of showing any suggestions if available, true if the action was
             * handled by the listener.
             */
            @Override
            public boolean onQueryTextChange(String queryText) {
                Log.d(TAG, "onQueryTextChange = " + queryText);

                String selection = RawContacts.DISPLAY_NAME_PRIMARY + " LIKE '%" + queryText + "%' " + " OR "
                        + RawContacts.SORT_KEY_PRIMARY + " LIKE '%" + queryText + "%' ";
                // String[] selectionArg = { queryText };
                mCursor = getContentResolver().query(RawContacts.CONTENT_URI, PROJECTION, selection, null, null);
                mAdapter.swapCursor(mCursor); // 交换指针,展示新的数据return true;
            }

            /*
             * 输入完成后,提交时触发的方法,一般情况是点击输入法中的搜索按钮才会触发。表示现在正式提交了
             *
             * @param queryText
             *
             * @return true to indicate that it has handled the submit request.
             * Otherwise return false to let the SearchView handle the
             * submission by launching any associated intent.
             */
            @Override
            public boolean onQueryTextSubmit(String queryText) {
                Log.d(TAG, "onQueryTextSubmit = " + queryText);

                if (mSearchView != null) {
                    // 得到输入管理对象
                    InputMethodManager imm = (InputMethodManager) getSystemService(Context.INPUT_METHOD_SERVICE);
                    if (imm != null) {
                        // 这将让键盘在所有的情况下都被隐藏,但是一般我们在点击搜索按钮后,输入法都会乖乖的自动隐藏的。
                        imm.hideSoftInputFromWindow(mSearchView.getWindowToken(), 0); // 输入法如果是显示状态,那么就隐藏输入法                    }
                    mSearchView.clearFocus(); // 不获取焦点                }
                return true;
            }
        });
    }

}
四、ActionBar上的搜索框
如果我们想要实现下面这种效果,将搜索框放在actionbar上,该怎么做呢?


实现方式在menu菜单中添加一个searchview,然后在初始化菜单的时候进行配置
4.1 options_menu.xml
<!--
/*
** Copyright 2010, The Android Open Source Project
**
** Licensed under the Apache License, Version 2.0 (the "License");
** you may not use this file except in compliance with the License.
** You may obtain a copy of the License at
**
**     http://www.apache.org/licenses/LICENSE-2.0
**
** Unless required by applicable law or agreed to in writing, software
** distributed under the License is distributed on an "AS IS" BASIS,
** WITHOUT WARRANTIES OR CONDITIONS OF ANY KIND, either express or implied.
** See the License for the specific language governing permissions and
** limitations under the License.
*/
--><!-- Options Menu for SearchableActivity and WordActivity.
 --><menu xmlns:android="http://schemas.android.com/apk/res/android"><item android:id="@+id/search"
          android:title="@string/search"
          android:icon="@drawable/ic_menu_search"
          android:showAsAction="collapseActionView|ifRoom"
          android:actionViewClass="android.widget.SearchView" /></menu>
Java
这里我没绑定监听器,其实完全可以在这里给searchview绑定监听器的。
/*
     * search widget现在已经被配置好了,系统也能够把搜索命令发送到你的Searchable activity.
     * 你也可以在 search widget中使用search suggestions。
     *
     * @param menu
     * @return
     */
    @Override
    public boolean onCreateOptionsMenu(Menu menu) {

        getMenuInflater().inflate(R.menu.options_menu, menu);

        SearchManager searchManager = (SearchManager) getSystemService(Context.SEARCH_SERVICE);
        SearchView searchView = (SearchView) menu.findItem(R.id.search).getActionView();
        SearchableInfo info = searchManager.getSearchableInfo(getComponentName());
        searchView.setSearchableInfo(info);

        searchView.setIconifiedByDefault(false); // Do not iconify the widget; expand it by defaultreturn true;
    }
这样写完后,search后的结果就会传送到你想要处理搜索结果的activity中了(本例是当前的activity)
    @Override
    protected void onNewIntent(Intent intent) {
        setIntent(intent);
        handleIntent(intent);
    }

    private void handleIntent(Intent intent) {
        if (Intent.ACTION_SEARCH.equals(intent.getAction())) {
            String query = intent.getStringExtra(SearchManager.QUERY);
            doMySearch(query);
        }
    }

    private void doMySearch(String query) {
        // TODO 自动生成的方法存根
        Toast.makeText(this, "do search " + query, 0).show();
    }
全部代码:
package com.kale.searchview;


import android.app.Activity;
import android.app.SearchManager;
import android.app.SearchableInfo;
import android.content.Context;
import android.content.Intent;
import android.database.Cursor;
import android.os.Bundle;
import android.provider.ContactsContract;
import android.provider.ContactsContract.RawContacts;
import android.util.Log;
import android.view.Menu;
import android.view.inputmethod.InputMethodManager;
import android.widget.AbsListView;
import android.widget.AbsListView.OnScrollListener;
import android.widget.ListView;
import android.widget.SearchView;
import android.widget.Toast;
import android.widget.SearchView.OnQueryTextListener;
import android.widget.SimpleCursorAdapter;

public class MainActivity extends Activity {

    private SearchView mSearchView;
    private ListView mListView;
    private SimpleCursorAdapter mAdapter;
    private Cursor mCursor;

    static final String[] PROJECTION = new String[] { ContactsContract.RawContacts._ID, ContactsContract.RawContacts.DISPLAY_NAME_PRIMARY };

    @Override
    protected void onCreate(Bundle savedInstanceState) {
        super.onCreate(savedInstanceState);
        setContentView(R.layout.activity_main);

        // 得到联系人名单的指针
        mCursor = getContentResolver().query(RawContacts.CONTENT_URI, PROJECTION, null, null, null);
        // 通过传入mCursor,将联系人名字放入listView中。
        mAdapter = new SimpleCursorAdapter(this, android.R.layout.simple_list_item_1, mCursor,
                new String[] { RawContacts.DISPLAY_NAME_PRIMARY }, new int[] { android.R.id.text1 }, 0);

        mListView = (ListView) findViewById(android.R.id.list);
        mListView.setAdapter(mAdapter);
        mListView.setOnScrollListener(new OnScrollListener() {

            @Override
            public void onScrollStateChanged(AbsListView view, int scrollState) {
                InputMethodManager imm = (InputMethodManager) getSystemService(Context.INPUT_METHOD_SERVICE);
                if (imm != null) {
                    imm.hideSoftInputFromWindow(mListView.getWindowToken(), 0); // 输入法如果是显示状态,那么就隐藏输入法                }
            }

            @Override
            public void onScroll(AbsListView view, int firstVisibleItem, int visibleItemCount, int totalItemCount) {

            }
        });

        mSearchView = (SearchView) findViewById(R.id.search);
        /**
         * 默认情况下, search widget是"iconified“的,只是用一个图标 来表示它(一个放大镜),
         * 当用户按下它的时候才显示search box . 你可以调用setIconifiedByDefault(false)让search
         * box默认都被显示。 你也可以调用setIconified()让它以iconified“的形式显示。
         */
        mSearchView.setIconifiedByDefault(true);
        /**
         * 默认情况下是没提交搜索的按钮,所以用户必须在键盘上按下"enter"键来提交搜索.你可以同过setSubmitButtonEnabled(
         * true)来添加一个提交按钮("submit" button)
         * 设置true后,右边会出现一个箭头按钮。如果用户没有输入,就不会触发提交(submit)事件
         */
        mSearchView.setSubmitButtonEnabled(true);
        /**
         * 初始是否已经是展开的状态
         * 写上此句后searchView初始展开的,也就是是可以点击输入的状态,如果不写,那么就需要点击下放大镜,才能展开出现输入框
         */
        mSearchView.onActionViewExpanded();
        // 设置search view的背景色
        mSearchView.setBackgroundColor(0xff000000);
        /**
         * 默认情况下, search widget是"iconified“的,只是用一个图标 来表示它(一个放大镜),
         * 当用户按下它的时候才显示search box . 你可以调用setIconifiedByDefault(false)让search
         * box默认都被显示。 你也可以调用setIconified()让它以iconified“的形式显示。
         */
        mSearchView.setIconifiedByDefault(true);
        mSearchView.setOnQueryTextListener(new OnQueryTextListener() {

            private String TAG = getClass().getSimpleName();

            /*
             * 在输入时触发的方法,当字符真正显示到searchView中才触发,像是拼音,在舒服法组词的时候不会触发
             *
             * @param queryText
             *
             * @return false if the SearchView should perform the default action
             * of showing any suggestions if available, true if the action was
             * handled by the listener.
             */
            @Override
            public boolean onQueryTextChange(String queryText) {
                Log.d(TAG, "onQueryTextChange = " + queryText);

                String selection = RawContacts.DISPLAY_NAME_PRIMARY + " LIKE '%" + queryText + "%' " + " OR "
                        + RawContacts.SORT_KEY_PRIMARY + " LIKE '%" + queryText + "%' ";
                // String[] selectionArg = { queryText };
                mCursor = getContentResolver().query(RawContacts.CONTENT_URI, PROJECTION, selection, null, null);
                mAdapter.swapCursor(mCursor); // 交换指针,展示新的数据return true;
            }

            /*
             * 输入完成后,提交时触发的方法,一般情况是点击输入法中的搜索按钮才会触发。表示现在正式提交了
             *
             * @param queryText
             *
             * @return true to indicate that it has handled the submit request.
             * Otherwise return false to let the SearchView handle the
             * submission by launching any associated intent.
             */
            @Override
            public boolean onQueryTextSubmit(String queryText) {
                Log.d(TAG, "onQueryTextSubmit = " + queryText);

                if (mSearchView != null) {
                    // 得到输入管理对象
                    InputMethodManager imm = (InputMethodManager) getSystemService(Context.INPUT_METHOD_SERVICE);
                    if (imm != null) {
                        // 这将让键盘在所有的情况下都被隐藏,但是一般我们在点击搜索按钮后,输入法都会乖乖的自动隐藏的。
                        imm.hideSoftInputFromWindow(mSearchView.getWindowToken(), 0); // 输入法如果是显示状态,那么就隐藏输入法                    }
                    mSearchView.clearFocus(); // 不获取焦点                }
                return true;
            }
        });
    }


    @Override
    protected void onNewIntent(Intent intent) {
        setIntent(intent);
        handleIntent(intent);
    }

    private void handleIntent(Intent intent) {
        if (Intent.ACTION_SEARCH.equals(intent.getAction())) {
            String query = intent.getStringExtra(SearchManager.QUERY);
            doMySearch(query);
        }
    }

    private void doMySearch(String query) {
        // TODO 自动生成的方法存根
        Toast.makeText(this, "do search " + query, 0).show();
    }


    /*
     * search widget现在已经被配置好了,系统也能够把搜索命令发送到你的Searchable activity.
     * 你也可以在 search widget中使用search suggestions。
     *
     * @param menu
     * @return
     */
    @Override
    public boolean onCreateOptionsMenu(Menu menu) {

        getMenuInflater().inflate(R.menu.options_menu, menu);

        SearchManager searchManager = (SearchManager) getSystemService(Context.SEARCH_SERVICE);
        SearchView searchView = (SearchView) menu.findItem(R.id.search).getActionView();
        SearchableInfo info = searchManager.getSearchableInfo(getComponentName());
        searchView.setSearchableInfo(info);

        searchView.setIconifiedByDefault(false); // Do not iconify the widget; expand it by defaultreturn true;
    }

}
源码下载:http://download.csdn.net/detail/shark0017/8364947
关于全局搜索请参考:http://blog.csdn.net/imdxt1986/article/details/7311958
再贴一个之前收集的demo,感觉是比较完善,但不效果不是很好。需要的话可以参考:http://download.csdn.net/detail/shark0017/8365121
参考自:
http://blog.csdn.net/hudashi/article/details/7052846


 浙公网安备 33010602011771号