【转载】利用Unity自带的合图切割功能将合图切割成子图
虽然目前网上具有切割合图功能的工具不少,但大部分都是自动切割或者根据plist之类的合图文件切割的,
这种切割往往不可自己微调或者很难维调,导致效果不理想。
今天逛贴吧发现了一位网友写的切割合图插件很不错,就分享下,
利用的是Unity自带的合图切割功能,原生的切割功能虽然很方便而且很容易微调,但无法导出,这个网友将它们导出了,
来自:百度Unity3D贴吧的13471713164
链接:http://tieba.baidu.com/p/3217039693
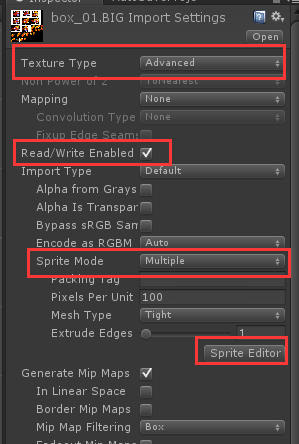
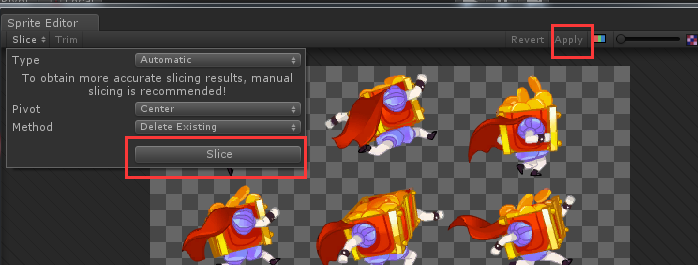
using UnityEngine;
using UnityEditor;
using System.Collections.Generic;
using System.IO;

/// <summary>
/// 可以将Unity里自带的合图切割功能切割后的合图导出为子图
/// 使用方法:
/// 1.先导入Png合图
/// 2.图片Texture Type要选择Advanced并且下面那个Read/Wite Enable要打勾
/// 3.将图片格式设置为合图“mult”,并点击“Editor”开始切割合图
/// 4.切割完毕后先选中该张图片,点击Process to Sprites后便可以导出
/// </summary>
public static class SpriteSheetPackerImport
{
    [MenuItem("Assets/Sprite Sheet Packer/Process to Sprites")]
    static void ProcessToSprite()
    {
        Texture2D image = Selection.activeObject as Texture2D;                          //获取旋转的对象
        string rootPath = Path.GetDirectoryName(AssetDatabase.GetAssetPath(image));     //获取路径名称
        string path = rootPath + "/" + image.name + ".PNG";                             //图片路径名称


        TextureImporter texImp = AssetImporter.GetAtPath(path) as TextureImporter;


        AssetDatabase.CreateFolder(rootPath, image.name);                               //创建文件夹


        foreach (SpriteMetaData metaData in texImp.spritesheet)                         //遍历小图集
        {
            Texture2D myimage = new Texture2D((int)metaData.rect.width, (int)metaData.rect.height);


            //abc_0:(x:2.00, y:400.00, width:103.00, height:112.00)
            for (int y = (int)metaData.rect.y; y < metaData.rect.y + metaData.rect.height; y++)//Y轴像素
            {
                for (int x = (int)metaData.rect.x; x < metaData.rect.x + metaData.rect.width; x++)
                    myimage.SetPixel(x - (int)metaData.rect.x, y - (int)metaData.rect.y, image.GetPixel(x, y));
            }


            //转换纹理到EncodeToPNG兼容格式
            if (myimage.format != TextureFormat.ARGB32 && myimage.format != TextureFormat.RGB24)
            {
                Texture2D newTexture = new Texture2D(myimage.width, myimage.height);
                newTexture.SetPixels(myimage.GetPixels(0), 0);
                myimage = newTexture;
            }
            var pngData = myimage.EncodeToPNG();


            //AssetDatabase.CreateAsset(myimage, rootPath + "/" + image.name + "/" + metaData.name + ".PNG");
            File.WriteAllBytes(rootPath + "/" + image.name + "/" + metaData.name + ".PNG", pngData);
        }
    }
}

 浙公网安备 33010602011771号