一、安装
1、安装包下载:
方式1:官网:https://www.anaconda.com/distribution/
方式2:清华镜像源:https://mirrors.tuna.tsinghua.edu.cn/anaconda/archive/
2、安装方式:
windows版本(linux版本往下翻):
1)下载exe文件,双击安装即可
2)配置环境变量
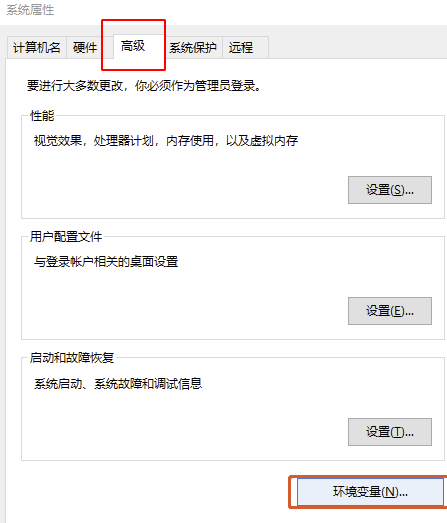
计算机(我的电脑)鼠标右键-->属性:


“高级”-->“环境变量”:
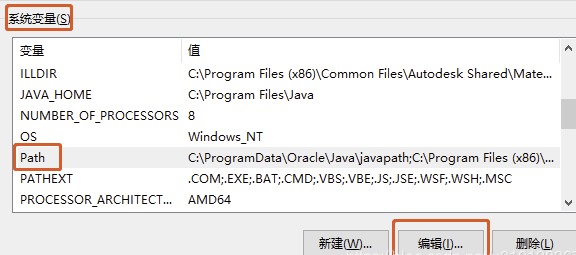
“Path’-->”编辑“:
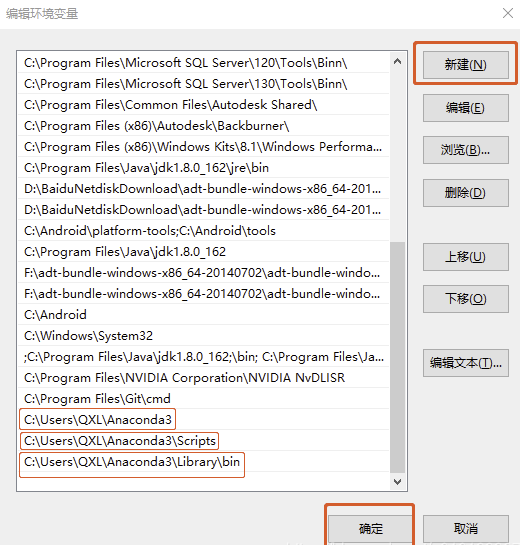
根据所安装路径,新建3个变量
3)windows中设置jupyter notebook工作目录
法一:进入cmd终端,先切换到相应工作目录,再输入jupyter notebook命令,即在当前目录下运行
法二:配置默认工作目录:
首先,通过启动菜单找到Anaconda下Jupyter Notebook的快捷方式,右键–属性,如下图所示。
然后,将“目标”和“起始位置”框中%USERPROFILE% 更改为实际工作目录,如"D:\PythonStudy\PythonProgram"。重新启动Jupyter Notebook即可。
如果上面方法不行:
就将%USERPROFILE%位置数据删除
再在shell中输入:```jupyter notebook --generate-config```
根据提示的路径位置打开`jupyter_notebook_config.py`文件,然后搜索The directory to use for notebooks and kernel
然后将c.NotebookApp.notebook_dir=''取消注释,将工程目录写入引号中即可
4)配置清华镜像源
先添加镜像源
# 添加Anaconda的TUNA镜像
conda config --add channels https://mirrors.tuna.tsinghua.edu.cn/anaconda/pkgs/free/
conda config --add channels https://mirrors.tuna.tsinghua.edu.cn/anaconda/pkgs/main/

# 为避免上述镜像源中不存在,再添加几个第三方源
conda config --add channels https://mirrors.tuna.tsinghua.edu.cn/anaconda/cloud/conda-forge/
conda config --add channels https://mirrors.tuna.tsinghua.edu.cn/anaconda/cloud/msys2/
conda config --add channels https://mirrors.tuna.tsinghua.edu.cn/anaconda/cloud/bioconda/
conda config --add channels https://mirrors.tuna.tsinghua.edu.cn/anaconda/cloud/menpo/
conda config --add channels https://mirrors.tuna.tsinghua.edu.cn/anaconda/cloud/pytorch/

# 设置搜索时显示通道地址
conda config --set show_channel_urls yes

# 若想恢复官方源,即使用如下命令
conda config --remove-key channels
再去C:\Users\用户名(当前)下,找到 ".condarc"文件,用记事本打开

删掉 ‘-defaults’ 这一行,保存即可

通过conda info命令,即可看到镜像源改为清华镜像源了,可以享受高速下载安装了。
linux版本
1)下载.sh文件
2)在.sh文件目录中打开终端,或者终端切换到.sh安装包目录
3)修改.sh文件权限,命令如下:
# xxx.sh为安装包名字
sudo chmod  777 xxx.sh
4)运行安装命令
# xxx.sh为安装包名字
./xxx.sh
5)一路回车,输入y(es)即可。
注意最后一步询问是否安装vscode,一般输no,因为在服务器里面都是用vim编辑器的,没必要多装一个。
6)配置环境变量
# anaconda3(2),根据版本确定
export PATH="/home/Sweeneys/anaconda3/bin:$PATH"

# 刷新环境变量
source ~/.bashrc
7)配置清华镜像源。
因为anaconda服务器在国外,安装package时候会很慢,甚至会经常出现连接不上服务器的情况,所以需将镜像源映射到国内清华镜像源(国内被授权的),命令如下:
# 添加Anaconda的TUNA镜像
conda config --add channels https://mirrors.tuna.tsinghua.edu.cn/anaconda/pkgs/free/
conda config --add channels https://mirrors.tuna.tsinghua.edu.cn/anaconda/pkgs/main/
# 为避免上述镜像源中不存在,再添加几个第三方源
conda config --add channels https://mirrors.tuna.tsinghua.edu.cn/anaconda/cloud/conda-forge/
conda config --add channels https://mirrors.tuna.tsinghua.edu.cn/anaconda/cloud/msys2/
conda config --add channels https://mirrors.tuna.tsinghua.edu.cn/anaconda/cloud/bioconda/
conda config --add channels https://mirrors.tuna.tsinghua.edu.cn/anaconda/cloud/menpo/
conda config --add channels https://mirrors.tuna.tsinghua.edu.cn/anaconda/cloud/pytorch/
# 设置搜索时显示通道地址
conda config --set show_channel_urls yes

# 若想恢复官方源,即使用如下命令
conda config --remove-key channels
配置好后,就开始放心使用了
8)anaconda卸载
其实anaconda就是在home下多了一个目录,直接删掉即可:
# 1、删除文件夹
rm -rf anaconda3

# 2、清理环境变量:打开~/.bashrc
# 注释掉下面的内容,或者直接删掉
# export PATH=/home/lq/anaconda3/bin:$PATH

# 3、刷新,立即生效:
source ~/.bashrc

# 4、关闭当前已运行的所有的anconda终端,重新打开新的终端即可。因为卸载之前已运行的终端上还是可以运行的
二、常用命令
1、查看已安装的包
# 查看当前环境中的已安装的包
conda list

# 查看具有python的包
conda list | grep python

# 查看指定环境中的包
conda list -n python36

# 查看安装包的版本
conda show python

# 查看conda版本
conda --version
2、查找在线package信息
# 查看pandas在annaconda中所的版本
conda search pandas
3、安装package
# -n指定环境名称,不指定就是当前环境
# 可以通过-c指定通过某channel进行安装
conda install -n python36 pandas

# 更新包,-n指定环境
conda update -n python36 pandas
# 不指定环境,就是更新当前环境下的包
conda update pandas

# 删除package
conda remove -n python36 pandas
# 或者
conda uninstall -n python36 pandas
4、环境基本命令
# 创建python3.6的名为xxxx的环境
conda create -n xxxx python=3.6

# 进入xxxx环境
conda activate xxxx

# 关闭当前环境
conda deactivate

# 显示所有的虚拟环境
conda env list
# 或者
conda info --envs

# 重命名环境
conda create --name newname --clone oldname  # 以新名字克隆一个环境,--name=-n
conda remove --name oldname --all  # 删除旧环境

#update最新版本的conda
conda update -n base conda  # 指定环境
conda update conda  # 当前环境

# 更新anaconda
conda update anaconda
三、其他问题
1、若安装后,在终端出现(base),解决办法:
1.打开文件:
gedit ~/.bashrc

2.在文件最后面添加命令:
conda deactivate

3.再次打开终端即可

注:其实在终端中输入conda deactivate也可,不过是临时的,下次打开终端还是会出现。
2、windows中,激活环境出现错误:
Your shell has not been properly configured to use 'conda activate'. If using 'conda activate' from a batch script, change your invocation to 'CALL conda.bat activate'
解决办法:
管理员模式打开powershell-->输入conda init 命令-->在cmd中,键入conda activate,即可正常激活conda环境。
注:不能再powershell中激活环境,依然会报错,切换到cmd中即可正常运行。
若想在powershell中运行,也是有解决办法的,自行百度。
