google的GCM推送使用简介
pom
<!-- https://mvnrepository.com/artifact/com.google.gcm/gcm-server -->
        <dependency>
            <groupId>com.google.gcm</groupId>
            <artifactId>gcm-server</artifactId>
            <version>1.0.0</version>
        </dependency>
Demo
        Sender sender = new Sender("your_google_key");//需要去谷歌注册,然后获取你的key
        Message message = new Message.Builder().addData("标题", "消息体").build();

        MulticastResult resultMulti = null;
        try {
            Integer retries = 5;//如果失败重新发送的次数
            List<String> appKeys = new ArrayList<>();
            appKeys.add("手机的唯一标识");
            resultMulti = sender.send(message, appKeys, retries);
            Integer successCount = resultMulti.getSuccess();
            Integer failCount = resultMulti.getFailure();
            // TODO:统计成功和失败次数
            return Boolean.TRUE;
        } catch (IOException e) {
            LOGGER.error("androidMessage send fail" + title + body);
            return Boolean.FALSE;
        }
转载请注明出处:http://blog.csdn.net/newhope1106/article/details/54709916
GCM即Google Cloud Messaging,主要用于消息推送的,即使在应用没有起来的情况下,客户端也能通过GCM收到来自服务器的消息。GCM支持Android、IOS和Chrome。由于GCM需要google service支持,在国内基本不能用,经常会断线,不过最近项目要求,只在美国上线该项目,因此可以采用GCM实现推送的方式,国内相关文章较少,特意整理了一下客户端使用的官方文档。
首先来看看目前应用不启动实现推送的方式有哪些:
1.使用Google自带的GCM实现推送
2.采用监听开机广播的方式,启动后台服务,为了防止被杀死,采用多进程的方式,监听服务是否被杀,被杀之后,把它拉起来(比较流氓)
3.采用第三发方案,如友盟、极光、信鸽
国内第二种和第三种用得比较多,本文主要讲解第一种方案,也就是GCM,以下内容均来自官网
一、概述
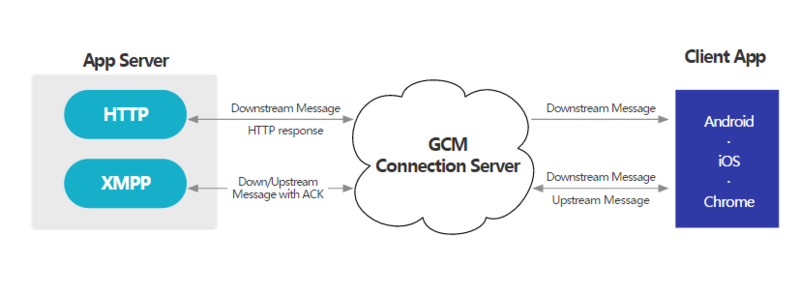
GCM可以让开发者在客户端和服务器之间传递消息,有2种方式实现消息推送,一种是xmpp,它即可让服务器把消息推送给客户端,也可让客户端把消息推送给服务器,另一种方式是http,只能服务器将消息推送给客户端,以下是其架构图。

GCM服务器接收应用服务器的消息,然后再把消息转发给客户端,服务器端根据自己的需要实现xmpp或者http接口,和GCM服务器进行通信,客户端想要接收消息,需要使用GCM提供的API。
二.客户端使用GCM
1.使用限制:
a.最低要求Android 2.2+的设备,并且安装了Google应用商店
b.想要使用GCM新特性,要求Android 2.3+
c.低于Android 4.0.4版本,需要Google账号,Android 4.0.4+不需要
2.客户端使用GCM流程
和使用一般的sdk类似,首先需要在官网注册自己的应用,获取一个appid,出于安全要求,需要在本地使用这个appid去获取动态token,需要把token上传给服务器,每隔一段时间token可能会失效,需要去重新获取token。按照上面的过程我们来看看怎么使用的。以下针对Android Studio开发的。
(1)官网注册应用
首先我们需要到这个网址:https://console.firebase.google.com/ 去注册自己的应用,按照相关步骤操作之后,点击下载配置文件,会下载一个叫google-services.json的文件,把它放到自己的项目的app/目录下。
(2)添加配置文件解析插件依赖
上述下载的google-services.json需要插件进行解析,要在项目中按照下面步骤添加依赖
a.在项目级别(project-level)的build.gradle添加下面依赖
classpath 'com.google.gms:google-services:3.0.0'
b.在自己的应用级别(app-level)的build.gradle添加下面插件
apply plugin: 'com.google.gms.google-services'
(3)添加GCM依赖
代码中需要用到gcm的api,因此需要添加gcm的依赖,版本请使用最新的版本,下面只是示范
dependencies {
compile "com.google.android.gms:play-services-gcm:10.0.0"
}
(4)修改AndroidMenifest.xml文件
a.添加权限,因为我们不允许其他的应用接收和发送属于自己应用的消息,因此添加权限屏蔽其他应用,权限格式:<application-package-name> + ".permission.C2D_MESSAGE"
b.定义一个GcmReceiver接收器,用来接收发送给应用的消息,需要添加com.google.android.c2dm.permission.SEND权限
c.定义GcmListenerService服务器,用来处理各种不同的下发信息,上发状态,自动显示通知等
d.定义一个集成InstanceIDListenerService的服务,用来获取、刷新token
e.额外的,可以添加android.permission.WAKE_LOCK权限,保证消息到达的时候,可以得到及时处理
以下是一个demo
<manifest package="com.example.gcm" ...>
<uses-sdk android:minSdkVersion="8" android:targetSdkVersion="17"/>
<uses-permission android:name="android.permission.WAKE_LOCK" />
<permission android:name="<your-package-name>.permission.C2D_MESSAGE"
android:protectionLevel="signature" />
<uses-permission android:name="<your-package-name>.permission.C2D_MESSAGE" />
<application ...>
<receiver
android:name="com.google.android.gms.gcm.GcmReceiver"
android:exported="true"
android:permission="com.google.android.c2dm.permission.SEND" >
<intent-filter>
<action android:name="com.google.android.c2dm.intent.RECEIVE" />
<category android:name="com.example.gcm" />
</intent-filter>
</receiver>
<service
android:name="com.example.MyGcmListenerService"
android:exported="false" >
<intent-filter>
<action android:name="com.google.android.c2dm.intent.RECEIVE" />
</intent-filter>
</service>
<service
android:name="com.example.MyInstanceIDListenerService"
android:exported="false">
<intent-filter>
<action android:name="com.google.android.gms.iid.InstanceID" />
</intent-filter>
</service>
<service
android:name="gcm.play.android.samples.com.gcmquickstart.RegistrationIntentService"
android:exported="false">
</service>
</application>
</manifest>
如果是android 4.4之前的版本,需要在receiver中添加的intent-filter中添加下面的action
<action android:name="com.google.android.c2dm.intent.REGISTRATION" />
3.客户端获取、刷新token
(1)先来看看获取token的接口
String authorizedEntity = PROJECT_ID; // Project id from Google Developer Console
String scope = "GCM"; // e.g. communicating using GCM, but you can use any
// URL-safe characters up to a maximum of 1000, or
// you can also leave it blank.
String token = InstanceID.getInstance(context).getToken(authorizedEntity,scope);
上述的PROJECT_ID是在https://console.developers.google.com/project中注册得到的,scope,可以自定义
(2)token的更新
在前面有提到AndroidMenifest.xml中注册一个继承InstanceIDListenerService的服务,看看具体的实现
public class MyInstanceIDService extends InstanceIDListenerService {
public void onTokenRefresh() {
refreshAllTokens();
}
private void refreshAllTokens() {
// assuming you have defined TokenList as
// some generalized store for your tokens
ArrayList<TokenList> tokenList = TokensList.get();
InstanceID iid = InstanceID.getInstance(this);
for(tokenItem : tokenList) {
tokenItem.token =
iid.getToken(tokenItem.authorizedEntity,tokenItem.scope,tokenItem.options);
// send this tokenItem.token to your server
}
}
}
第一次获取token,虽然没有获取过token,但本质还是刷新,都是调用onTokenRefresh接口,并且把获取的token发送给服务器。
上面的处理可以最好用一个IntentService来异步处理,不要放在主线程中,上述给一个使用范例而已。
(3)InstanceID
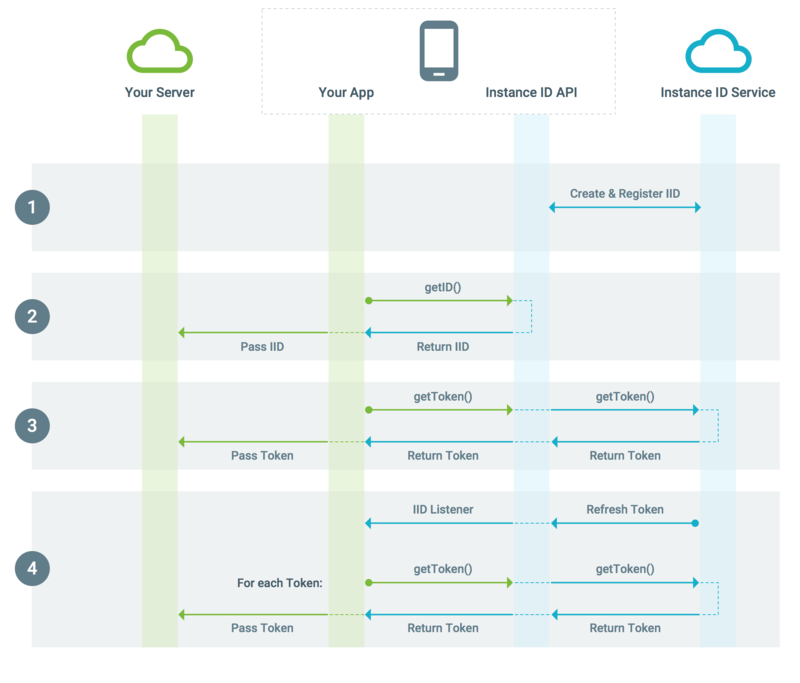
上面我们看到,获取token的时候,首先需要InstanceID,当设备上线的时候,Instance ID Service会分配一个InstanceID, InstanceID是由一对公钥和私钥共同维护的,私钥保存在本地,公钥由Instance ID Service注册产生。可以通过调用geId()方法,随时更新InstanceId,因为生成的token都是依赖这个InstanceID的。
String iid = InstanceID.getInstance(context).getId();
你也可以删除一个InstanceID,那么对应的所有token都会失效,用新的InstanceID生成新的token
InstanceID.getInstance(context).deleteInstanceID();
String newIID = InstanceID.getInstance(context).getId();
(4)Instance ID 的生命周期图

4.客户端接收服务器下发信息
a.服务器可以通过HTTP(单向)和XMPP(双向)发送信息,看看下面的demo
HTTP POST Request
https://gcm-http.googleapis.com/gcm/send
Content-Type:application/json
Authorization:key=AIzaSyZ-1u...0GBYzPu7Udno5aA
{ "data": {
"score": "5x1",
"time": "15:10"
},
"to" : "bk3RNwTe3H0:CI2k_HHwgIpoDKCIZvvDMExUdFQ3P1..."
}
XMPP Message
<message id="">
<gcm xmlns="google:mobile:data">
{ "data": {
"score": "5x1",
"time": "15:10"
},
"to" : "bk3RNwTe3H0:CI2k_HHwgIpoDKCIZvvDMExUdFQ3P1..."
}
</gcm>
</message>
b.客户端处理下发消息
服务器发送的消息,GCM会将接收到的消息转发给客户端,在前面的AndroidManifest.xml中,我们定义了一个GcmListenerService来处理消息,可以自己继承GcmListenerService并且覆盖onMessageReceived方法。
@Override
public void onMessageReceived(String from, Bundle data) {
String message = data.getString("message");
Log.d(TAG, "From: " + from);
Log.d(TAG, "Message: " + message);
if (from.startsWith("/topics/")) {
// message received from some topic.
} else {
// normal downstream message.
}
// ...
}
5.客户端上发消息
public void onClick(final View view) {
if (view == findViewById(R.id.send)) {
new AsyncTask<void, void,="" string="" style="box-sizing: inherit;">() {
@Override
protected String doInBackground(Void... params) {
String msg = "";
try {
Bundle data = new Bundle();
data.putString("my_message", "Hello World");
data.putString("my_action","SAY_HELLO");
String id = Integer.toString(msgId.incrementAndGet());
gcm.send(SENDER_ID + "@gcm.googleapis.com", id, data);
msg = "Sent message";
} catch (IOException ex) {
msg = "Error :" + ex.getMessage();
}
return msg;
}
@Override
protected void onPostExecute(String msg) {
mDisplay.append(msg + "\n");
}
}.execute(null, null, null);
} else if (view == findViewById(R.id.clear)) {
mDisplay.setText("");
}
}</void,>
主要是利用了gcm的send接口,上述需要服务器支持xmpp
6.服务器端的实现
可以参考:https://developers.google.com/cloud-messaging/的GCM Connection Server部分
有兴趣的可以参考google的代码demo
https://github.com/google/gcm/
https://github.com/googlesamples/google-services/
---------------------
作者:newhope1106
来源:CSDN
原文:https://blog.csdn.net/newhope1106/article/details/54709916
版权声明:本文为博主原创文章,转载请附上博文链接!


【推荐】编程新体验,更懂你的AI,立即体验豆包MarsCode编程助手
【推荐】凌霞软件回馈社区,博客园 & 1Panel & Halo 联合会员上线
【推荐】抖音旗下AI助手豆包,你的智能百科全书,全免费不限次数
【推荐】轻量又高性能的 SSH 工具 IShell:AI 加持,快人一步
· 深入理解 Mybatis 分库分表执行原理
· 如何打造一个高并发系统?
· .NET Core GC压缩(compact_phase)底层原理浅谈
· 现代计算机视觉入门之:什么是图片特征编码
· .NET 9 new features-C#13新的锁类型和语义
· Spring AI + Ollama 实现 deepseek-r1 的API服务和调用
· 《HelloGitHub》第 106 期
· 数据库服务器 SQL Server 版本升级公告
· 深入理解Mybatis分库分表执行原理
· 使用 Dify + LLM 构建精确任务处理应用