attention与transformer
1、自注意力案例
import torch
import torch.nn as nn

class Selfattention(nn.Module):
    def __init__(self,input_dim):

        super(Selfattention, self).__init__()

        self.query = nn.Linear(input_dim,input_dim)
        self.key = nn.Linear(input_dim,input_dim)
        self.value = nn.Linear(input_dim,input_dim)
        self.softmax= nn.Softmax(dim=-1)
        self.dropout = nn.Dropout(0.2) #选择添加

    def forward(self,x):
        q=self.query(x)
        k=self.query(x)
        v=self.query(x)

        score = torch.bmm(q,k.transpose(1,2))  #K转置后维度才能算内积
        att_weight = self.softmax(score)  #(batch_size,seq_len,seq_len)
        context_vector  =  torch.bmm(att_weight, v) #(batch_size,seq_len,dim)
        output =self.dropout(context_vector)

        return output

# 创建输入数据
batch_size = 2
seq_len = 3
input_dim = 4


x = torch.randn(batch_size, seq_len, input_dim)
self_att= Selfattention(input_dim)
output = self_att.forward(x)

print (output)


#输出
tensor([[[-0.1971, -0.0943,  0.1433, -0.0590],
         [-0.0270,  0.0940, -0.3715, -0.4299],
         [ 0.3545, -0.3037, -1.3532, -0.9181]],

        [[-0.0363, -0.3110, -0.3745,  0.0531],
         [-0.0182, -0.3026, -0.3475,  0.0766],
         [-0.0538, -0.3153, -0.3854,  0.0132]]], grad_fn=<BmmBackward0>)
2、多头注意力案例
import torch
import torch.nn as nn

class MultiheadAttention(nn.Module):
    def __init__(self, input_dim, num_heads):
        super(MultiheadAttention, self).__init__()
        self.num_heads = num_heads
        self.query = nn.Linear(input_dim, input_dim)
        self.key = nn.Linear(input_dim, input_dim)
        self.value = nn.Linear(input_dim, input_dim)
        self.softmax = nn.Softmax(dim=2)

    def forward(self, x):
        q = self.query(x)
        k = self.key(x)
        v = self.value(x)

        batch_size, seq_len, _ = x.size()


        head_dim = input_dim // self.num_heads  # Calculate the head dimension

        print ("origin_q_size:"+str(q.size()))
        # Reshape query, key, and value tensors
        q = q.view(batch_size, seq_len, self.num_heads, head_dim).transpose(1, 2)
        k = k.view(batch_size, seq_len, self.num_heads, head_dim).transpose(1, 2)
        v = v.view(batch_size, seq_len, self.num_heads, head_dim).transpose(1, 2)

        print ("trans_q_size:"+str(q.size()))

        scores = torch.matmul(q, k.transpose(-2, -1))
        attention_weights = self.softmax(scores)

        output = torch.matmul(attention_weights, v)
        output = output.transpose(1, 2).contiguous().view(batch_size, seq_len, input_dim)

        return output

# 创建输入数据
batch_size = 2
seq_len = 3
input_dim = 4
num_head =2


x = torch.randn(batch_size, seq_len, input_dim)
mh_att= MultiheadAttention(input_dim,num_head)
output = mh_att.forward(x)

print (output)

#输出
origin_q_size:torch.Size([2, 3, 4])
trans_q_size:torch.Size([2, 2, 3, 2])
tensor([[[ 0.3837,  0.1198, -0.2621,  0.3031],
         [ 0.4219, -0.0307, -0.1981,  0.2589],
         [ 0.8475, -0.2611, -0.3065,  0.3577]],

        [[ 0.1067,  0.4801, -0.4982,  0.2262],
         [ 0.1212,  0.7254, -0.4276,  0.2498],
         [ 0.0941,  0.3030, -0.4351,  0.1991]]], grad_fn=<ViewBackward0>)
3、transformer模型结构
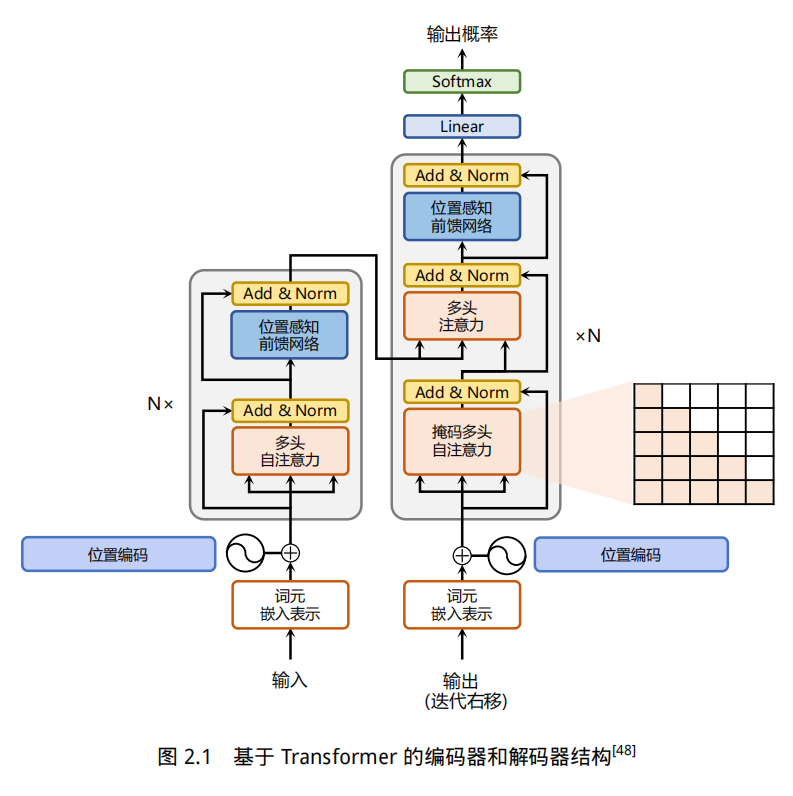
- 注意力层:使用多头注意力(Multi-Head Attention)机制整合上下文语义,它使得序列中任意两个单词之间的依赖关系可以直接被建模而不基于传统的循环结构,从而更好地解决文本的长程依赖。
- 位置感知前馈层(Position-wise FFN):通过全连接层对输入文本序列中的每个单词表示进行更复杂的变换。
- 残差连接:对应图中的 Add 部分。它是一条分别作用在上述两个子层当中的直连通路,被用于连接它们的输入与输出。从而使得信息流动更加高效,有利于模型的优化。
- 层归一化:对应图中的 Norm 部分。作用于上述两个子层的输出表示序列中,对表示序列进行层归一化操作,同样起到稳定优化的作用。
- 位置编码:序列中每一个单词所在的位置都对应一个向量。这一向量会与单词表示对
应相加并送入到后续模块中做进一步处理。在训练的过程当中,模型会自动地学习到如何利用这
部分位置信息。
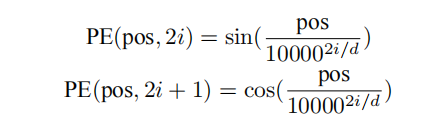
为了得到不同位置对应的编码,Transformer 模型使用不同频率的正余弦函数如下所示:
其中,pos 表示单词所在的位置,2i 和 2i+ 1 表示位置编码向量中的对应维度,d 则对应位置编码的![]()
总维度。通过上面这种方式计算位置编码有这样几个好处:首先,正余弦函数的范围是在 [-1,+1],
导出的位置编码与原词嵌入相加不会使得结果偏离过远而破坏原有单词的语义信息。其次,依据
三角函数的基本性质,可以得知第 pos + k 个位置的编码是第 pos 个位置的编码的线性组合,这就
意味着位置编码中蕴含着单词之间的距离信息。

 浙公网安备 33010602011771号