linux下conda环境搭建
一,anaconda 与miniconda简介
Anaconda 是一个用于科学计算的 Python 发行版,支持 Linux, Mac, Windows, 包含了众多流行的科学计算、数据分析的 Python 包。
Miniconda是一个轻量级的conda安装,它是Anaconda的最小版本。Conda是一个开源的软件包管理系统和环境管理系统,用于在同一计算机上安装和管理多个软件包和它们的依赖项。通过使用Miniconda,您可以轻松地安装和管理各种Python软件包和环境。建议通过miniconda+虚拟环境的方式进行部署
二、安装包下载与安装
1、可以从以下载连接下载对应操作系统软件,推荐使用清华镜像
清华镜像:
anaconda:https://mirrors.tuna.tsinghua.edu.cn/anaconda/archive/
miniconda:https://mirrors.tuna.tsinghua.edu.cn/anaconda/miniconda/
官网网址
https://repo.anaconda.com/miniconda/
https://repo.anaconda.com/archive/index.html
下载案例:wget https://repo.anaconda.com/miniconda/Miniconda3-py37_23.1.0-1-Linux-x86_64.sh
2、 打开安装程序,并按照指示进行安装。在安装过程中,您可以选择设置环境变量以使conda在终端中全局可用,也可以选择不设置环境变量并手动添加它们。
3、安装完成后,您可以通过打开终端并输入以下命令来验证Miniconda是否已成功安装:conda --version
三、jupyter 配置与启动
1、找到conda安装位置,以/usr/local环境为例子,生成jupyter 密码设置
/usr/local/anaconda/bin/jupyter notebook password
生成密码后将json文件中的加密密码添加到config文件
c.NotebookApp.password = u'sha1:xxxxxxxxxxxxxxxxx'
2、修改config文件 端口 禁止密码修改 启动路径
/usr/local/anaconda/bin/jupyter notebook --generate-config
vim ~/.jupyter/jupyter_notebook_config.py
添加以下配置
c.NotebookApp.port = 8100 #启动端口
c.KernelManager.autorestart = False #建议添加,方便kill进程
c.NotebookApp.notebook_dir = '/data' #启动路径
c.NotebookApp.allow_password_change = False
c.NotebookApp.password = u'sha1:xxxxxxxxxxxxxxxxx'
3、jupyter服务启动与停止
nohup /usr/local/anaconda/bin/jupyter-lab --no-browser --port 8100 --ip=* --allow-root > jupyter.out 2>&1 &
若无需日志文件则执行命令:
nohup /usr/local/anaconda/bin/jupyter-lab --no-browser --port 8100 --ip=* --allow-root >/dev/null 2>&1 &
miniconda启动jupyter-lab
pip install jupyter -i https://pypi.douban.com/simple/
pip install jupyterlab -i https://pypi.douban.com/simple/
nohup jupyter-lab --no-browser --port 8100 --ip=* --allow-root >/dev/null 2>&1 &
ps -ef | grep 'jupyter' 查看已经启动jupyter的pid, kill -9 pid 杀掉进程即可关闭jupyter服务
4、nbextension插件安装
/usr/local/anaconda/bin/pip install jupyter_contrib_nbextensions -i https://mirrors.aliyun.com/pypi/simple
/usr/local/anaconda/bin/pip install jupyter_nbextensions_configurator -i https://mirrors.aliyun.com/pypi/simple
usr/local/anaconda/bin/jupyter contrib nbextension install
/usr/local/anaconda/bin/jupyter nbextensions_configurator enable
四、python三方包的安装
1、pip 源
阿里云 https://mirrors.aliyun.com/pypi/simple/
中国科技大学 https://pypi.mirrors.ustc.edu.cn/simple/
豆瓣 (速度较快) https://pypi.douban.com/simple/
中国科学院 https://pypi.mirrors.opencas.cn/simple/
清华大学 https://pypi.tuna.tsinghua.edu.cn/simple/
配置pip源
mkdir ~/.pip/
touch ~/.pip/pip.conf
vim ~/.pip/pip.conf
[global]
index-url = https://pypi.douban.com/simple/
extra-index-url = https://pypi.tuna.tsinghua.edu.cn/simple/
2、tensorflow与pytorch的安装
tensorflow 2.3.1 安装:
/usr/local/anaconda/pip install -U --ignore-installed wrapt enum34 simplejson netaddr
/usr/local/anaconda/bin/pip install tensorflow==2.3.1 -i https://mirrors.aliyun.com/pypi/simple
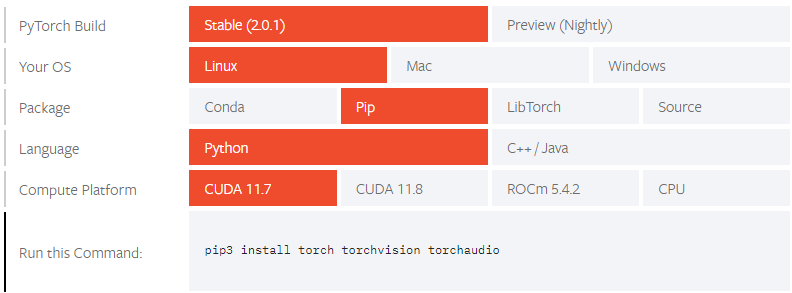
pytorch安装:
https://pytorch.org/官网可以根据操作系统、显卡驱动版本,安装命令选择安装,推荐使用清华源
pip批量安装:
/usr/local/anaconda/bin/pip install -r pkg.txt -i https://mirrors.aliyun.com/pypi/simple --ignore-installed PyYAML
3、GPU可用测试
import tensorflow as tf
print(tf.test.is_gpu_available())
print(tf.test.is_built_with_cuda())
五、jupyter多内核配置
1、conda 源配置a、conda config --add channels r 生成配置文件,b、vim ~/.condarc编辑配置文件
show_channel_urls: true
default_channels:
  - https://mirrors.tuna.tsinghua.edu.cn/anaconda/pkgs/main
  - https://mirrors.tuna.tsinghua.edu.cn/anaconda/pkgs/r
  - https://mirrors.tuna.tsinghua.edu.cn/anaconda/pkgs/msys2
custom_channels:
  conda-forge: https://mirrors.tuna.tsinghua.edu.cn/anaconda/cloud
  msys2: https://mirrors.tuna.tsinghua.edu.cn/anaconda/cloud
  bioconda: https://mirrors.tuna.tsinghua.edu.cn/anaconda/cloud
  menpo: https://mirrors.tuna.tsinghua.edu.cn/anaconda/cloud
  pytorch: https://mirrors.tuna.tsinghua.edu.cn/anaconda/cloud
  pytorch-lts: https://mirrors.tuna.tsinghua.edu.cn/anaconda/cloud
  simpleitk: https://mirrors.tuna.tsinghua.edu.cn/anaconda/cloud
  deepmodeling: https://mirrors.tuna.tsinghua.edu.cn/anaconda/cloud/
2、python3.8环境搭建
a 、添加conda指令: vim ~/.bashrc 添加代码 export PATH=$PATH:/usr/local/anaconda/bin ,source ~/.bashrc
b、创建python环境 conda create -n py38 python=3.8
c 、进入py38环境: conda activate py38
d、切换到目标conda环境安装ipykernel: pip install ipykernel
e、jupter安装新环境:python -m ipykernel install --name py38 --user
f、查看已经安装的kernel:jupyter kernelspec list
g、删除kernel:jupyter kernelspec remove py38
3、报错处理
a、 conda create -n py38 python=3.8 可能报错无法识别指令,可执行代码 echo ". /usr/local/anaconda/etc/profile.d/conda.sh" >> ~/.bashrc\
b、jupyter 可能报错A connection to the notebook server could not be established 可能是tornado版本问题,可执行指令 pip install tornado==5.1.1

 浙公网安备 33010602011771号