Spring Cloud Hystrix(熔断器)
1 介绍及使用
Hystrix 是 Netflix 针对微服务分布式系统采用的熔断保护中间件,相当于电路中的保险丝。
在分布式环境中,许多服务依赖项中的一些必然会失败。Hystrix 是一个库,通过添加延迟容忍和容错逻辑,帮助你控制这些分布式服务之间的交互。Hystrix 通过隔离服务之间的访问点、停止级联失败和提供回退选项来实现这一点,所有这些都可以提高系统的整体弹性。
在微服务架构下,很多服务都相互依赖,如果不能对依赖的服务进行隔离,那么服务本身也有可能发生故障,Hystrix 通过 HystrixCommand 对调用进行隔离,这样可以阻止故障的连锁效应,能够让接口调用快速失败并迅速恢复正常,或者回退并优雅降级。
2 Spring Cloud Hystrix资源隔离策略(线程、信号量)
Hystrix 的资源隔离策略有两种,分别为线程池和信号量。那我们为什么需要资源隔离呢?
在一个分布式系统中,服务之间都是相互调用的,例如,我们容器(Tomcat)配置的线程个数为 1000,服务 A-服务 R,其中服务 I 的并发量非常的大,需要 500 个线程来执行,此时,服务 I 又挂了,那么这 500 个线程很可能就夯死了,那么剩下的服务,总共可用的线程为 500 个,随着并发量的增大,剩余服务挂掉的风险就会越来越大,最后导致整个系统的所有服务都不可用,直到系统宕机。
以上就是服务的雪崩效应。Hystrix 就是用来做资源隔离的,比如说,当客户端向服务端发送请求时,给服务 I 分配了 10 个线程,只要超过了这个并发量就走降级服务,就算服务 I 挂了,最多也就导致服务 I 不可用,容器的 10 个线程不可用了,但是不会影响系统中的其他服务。
下面,我们就来具体说下这两种隔离策略。
2.1 信号量策略配置
用于隔离本地代码或可快速返回的远程调用可以直接使用信号量隔离,降低线程隔离的上下文切换开销。如 memcached,redis。
线程隔离会带来线程开销,有些场景(比如无网络请求场景)可能会因为用开销换隔离得不偿失,为此 hystrix 提供了信号量隔离。
主要适用于并发需求不大的依赖调用,因为如果并发需求较大,相应的信号量的数量就要设置得够大,因为 Tomcat 线程与处理线程为同一个线程,那么这个依赖调用就会占用过多的 Tomcat 线程资源,有可能会影响到其他服务的接收。
信号量策略配置方法代码如下所示。
super(HystrixCommand.Setter.withGroupKey(HystrixCommandGroupKey.Factory.asKey("MyGroup"))
        .andCommandPropertiesDefaults(HystrixCommandProperties.Setter()
            .withExecutionIsolationStrategy(HystrixCommandProperties.ExecutionIsolationStrategy.SEMAPHORE
            )));
    this.name = name;
}
之前在 run 方法中特意输出了线程名称,通过这个名称就可以确定当前是线程隔离还是信号量隔离。
2.2 线程隔离策略配置
执行依赖代码的线程与请求线程(比如 Tomcat 线程)分离,请求线程可以自由控制离开的时间,这也是我们通常说的异步编程,Hystrix 是结合 RxJava 来实现的异步编程。
通过为每个包裹了 HystrixCommand 的 API 接口设置独立的、固定大小的线程池(hystrix.threadpool.default.coreSize)来控制并发访问量,当线程饱和的时候可以拒绝服务,防止依赖问题扩散。
系统默认采用线程隔离策略,我们可以通过 andThreadPoolPropertiesDefaults 配置线程池的一些参数,代码如下所示。
public MyHystrixCommand(String name) {
    super(HystrixCommand.Setter.withGroupKey(HystrixCommandGroupKey.Factory.asKey("MyGroup"))
            .andCommandPropertiesDefaults(HystrixCommandProperties.Setter()
                    .withExecutionIsolationStrategy(HystrixCommandProperties.ExecutionIsolationStrategy.THREAD))
            .andThreadPoolPropertiesDefaults(HystrixThreadPoolProperties.Setter().withCoreSize(10)
                    .withMaxQueueSize(100).withMaximumSize(100)));
    this.name = name;
}
线程隔离策略的优点如下:
- 一个依赖调用可以给予一个线程池,这个依赖的异常不会影响其他的依赖。
- 使用线程可以完全隔离业务代码,请求线程可以快速返回。
- 可以完全模拟异步调用,方便异步编程。
线程隔离策略的缺点:使用线程池的缺点主要是增加了计算的开销。每一个依赖调用都会涉及到队列,调度,上下文切换,而这些操作都有可能在不同的线程中执行。
3 Spring Cloud Hystrix缓存与合并请求
缓存在开发中经常用到,我们常用 Redis 这种第三方的缓存数据库对数据进行缓存处理。本节讲解 Hystrix 缓存的实现和清除,以及请求的合并。
3.1 结果缓存
在 Hystrix 中也为我们提供了方法级别的缓存。通过重写 getCacheKey 来判断是否返回缓存的数据,getCacheKey 可以根据参数来生成。这样,同样的参数就可以都用到缓存了。
改造之前的 MyHystrixCommand,在其中增加 getCacheKey 的重写实现,代码如下所示。
@Override
protected String getCacheKey() {
    return String.valueOf(this.name);
}
在上面的代码中,我们把创建对象时传进来的 name 参数作为缓存的 key。
为了证明能够用到缓存,在 run 方法中加一行输出,在调用多次的情况下,如果控制台只输出了一次,那么可以知道后面的都是走的缓存逻辑,代码如下所示。
@Override
protected String run() {
    System.err.println("get data");
    return this.name + ":" + Thread.currentThread().getName();
}
执行 main 方法,发现程序报错了,报错如下:
Caused by: java.lang.IllegalStateException: Request caching is not available. Maybe you need to initialize the HystrixRequestContext?
根据错误提示可以知道,缓存的处理取决于请求的上下文,我们必须初始化 Hystrix-RequestContext。
改造 main 方法中的调用代码,初始化 HystrixRequestContext,代码如下所示。
public static void main(String[] args) throws InterruptedException, ExecutionException {
    HystrixRequestContext context = HystrixRequestContext.initializeContext();
    String result = new MyHystrixCommand("zhangsan").execute();
    System.out.println(result);
    Future<String> future = new MyHystrixCommand("zhangsan").queue();
    System.out.println(future.get());
    context.shutdown();
}
改造完之后重写执行 main 方法,就可以做正常运行了,输出结果如图所示:

我们可以看到只输出了一次 get data,缓存生效。
3.2 缓存清除
刚刚我们学习了如何使用 Hystrix 来实现数据缓存功能。有缓存必然就有清除缓存的动作。
当数据发生变动时,必须将缓存中的数据也更新掉,不然就会出现脏数据的问题。同样地,Hystrix 也有清除缓存的功能。
增加一个支持缓存清除的类,代码如下所示。
package com.yxkj.command;

import com.netflix.hystrix.HystrixCommand;
import com.netflix.hystrix.HystrixCommandGroupKey;
import com.netflix.hystrix.HystrixCommandKey;
import com.netflix.hystrix.HystrixRequestCache;
import com.netflix.hystrix.strategy.concurrency.HystrixConcurrencyStrategyDefault;
import com.netflix.hystrix.strategy.concurrency.HystrixRequestContext;

import java.util.concurrent.ExecutionException;
import java.util.concurrent.Future;

/**
 * @USER:
 * @DATE: 2021-06-18
 * @description:功能描述
 */
public class ClearCacheHystrixCommond extends HystrixCommand<String> {

    private final String name;
    private static final HystrixCommandKey GETTER_KEY = HystrixCommandKey.Factory.asKey("MyKey");


    protected ClearCacheHystrixCommond(String name) {
        super(HystrixCommand.Setter.withGroupKey(HystrixCommandGroupKey.Factory.asKey("MyGroup")).andCommandKey(GETTER_KEY));
        this.name = name;
    }

     public static void flushCache(String name){
         HystrixRequestCache.getInstance(GETTER_KEY, HystrixConcurrencyStrategyDefault.getInstance()).clear(name);
     }

    @Override
    protected String getCacheKey() {
        return String.valueOf(name);
    }

    @Override
    protected String getFallback() {
        return "失败了";
    }

    @Override
    protected String run() throws Exception {
        System.out.println("get Data");

        return this.name + ":" + Thread.currentThread().getName();
    }

    public static void main(String[] args) throws ExecutionException, InterruptedException {
        HystrixRequestContext context = HystrixRequestContext.initializeContext();
        String result = new ClearCacheHystrixCommond("zhangshan").execute();
        System.out.println(result);
        ClearCacheHystrixCommond.flushCache("zhangshan");
        Future<String> future = new ClearCacheHystrixCommond("zhangshan").queue();
        System.out.println(future.get());
    }
}
执行两次相同的 key,在第二次执行之前调用缓存清除的方法,也就是说第二次用不到缓存,输出结果如图 所示:
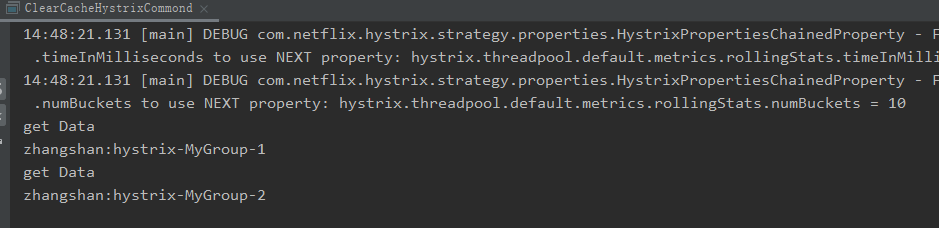
由此可以看出,输出两次 get data,这证明缓存确实被清除了。可以把 ClearCache-HystrixCommand.flushCache 这行代码注释掉再执行一次,就会发现只输出了一次 get data,缓存是有效的;
3.3 合并请求
Hystrix 支持将多个请求自动合并为一个请求(代码如下所示),利用这个功能可以节省网络开销,比如每个请求都要通过网络访问远程资源。如果把多个请求合并为一个一起执行,将多次网络交互变成一次,则会极大地节省开销。
package com.yxkj.command;

import com.netflix.hystrix.HystrixCollapser;
import com.netflix.hystrix.HystrixCommand;
import com.netflix.hystrix.HystrixCommandGroupKey;
import com.netflix.hystrix.HystrixCommandKey;
import com.netflix.hystrix.strategy.concurrency.HystrixRequestContext;

import java.util.ArrayList;
import java.util.Collection;
import java.util.List;
import java.util.concurrent.ExecutionException;
import java.util.concurrent.Future;

/**
 * @USER:
 * @DATE: 2021-06-18
 * @description:Hystrix 支持将多个请求自动合并为一个请求(代码如下所示),利用这个功能可以节省网络开销,
 * 比如每个请求都要通过网络访问远程资源。如果把多个请求合并为一个一起执行,将多次网络交互变成一次,则会极大地节省开销。
 */
public class MyHystrixCollapser extends HystrixCollapser<List<String>,String,String> {

    private final String name;

    public MyHystrixCollapser(String name) {
        this.name = name;
    }

    @Override
    public String getRequestArgument() {
        return name;
    }

    @Override
    protected HystrixCommand<List<String>> createCommand(Collection<CollapsedRequest<String, String>> requests) {
        return new BatchCommand(requests);
    }

    @Override
    protected void mapResponseToRequests(List<String> batchResponse, Collection<CollapsedRequest<String, String>> collapsedRequests) {
                int count = 0;
                for(CollapsedRequest<String,String> request : collapsedRequests){
                    request.setResponse(batchResponse.get(count++));
                }
    }
    private static final class BatchCommand extends  HystrixCommand<List<String>>{

            private final Collection<CollapsedRequest<String,String>> requests;

        protected BatchCommand( Collection<CollapsedRequest<String, String>> requests) {
            super(Setter.withGroupKey(HystrixCommandGroupKey.Factory.asKey("ExampleGroup"))
            .andCommandKey(HystrixCommandKey.Factory.asKey("GetValueForKey")));
            this.requests = requests;
        }

        @Override
        protected List<String> run() throws Exception {
            System.out.println("真正执行请求....");
            ArrayList<String> response = new ArrayList<>();
            for(CollapsedRequest<String,String> request : requests){
                response.add("返回结果:"+request.getArgument());
            }
            return response;
        }
    }

    public static void main(String[] args) throws ExecutionException, InterruptedException {
        HystrixRequestContext context = HystrixRequestContext.initializeContext();
        Future<String> f1= new MyHystrixCollapser("zhangshan").queue();
        Future<String> f2 = new MyHystrixCollapser("zhangshan333").queue();
        System.out.println(f1.get()+"="+f2.get());
        context.shutdown();
    }
}
通过 MyHystrixCollapser 创建两个执行任务,按照正常的逻辑肯定是分别执行这两个任务,通过 HystrixCollapser 可以将多个任务合并到一起执行。从输出结果就可以看出,任务的执行是在 run 方法中去做的,输出结果如图  所示:
所示:
4 Spring Cloud使用Hystrix实现容错处理
增加 Hystrix 的依赖,代码如下所示。
<dependency>
    <groupId>org.springframework.cloud</groupId>
    <artifactId>spring-cloud-starter-netflix-hystrix</artifactId>
</dependency>
在启动类上添加 @EnableHystrix 或者 @EnableCircuitBreaker。注意,@EnableHystrix 中包含了 @EnableCircuitBreaker。
然后编写一个调用接口的方法,在上面增加一个 @HystrixCommand 注解,用于指定依赖服务调用延迟或失败时调用的方法,代码如下所示。
@GetMapping("/callHello")
@HystrixCommand(fallbackMethod = "defaultCallHello")
public String callHello() {
    String result = restTemplate.getForObject("http://localhost:8088/house/hello", String.class);
    return result;
}
当调用失败触发熔断时会用 defaultCallHello 方法来回退具体的内容,定义 default-CallHello 方法的代码如下所示。
public String defaultCallHello() {
    return "fail";
}
只要不启动 8088 端口所在的服务,调用 /callHello 接口,就可以看到返回的内容是“fail”
将启动类上的 @EnableHystrix 去掉,重启服务,再次调用 /callHello 接口可以看到返回的是 500 错误信息,这个时候就没有用到回退功能了。
{
  code: 500,
  message: "I/O error on GET request for
    "http://localhost:8088/house/hello": Connection refused; nested
      exception is java.net.ConnectException: Connection refused
        ", data:
        null
}
4.1 配置详解
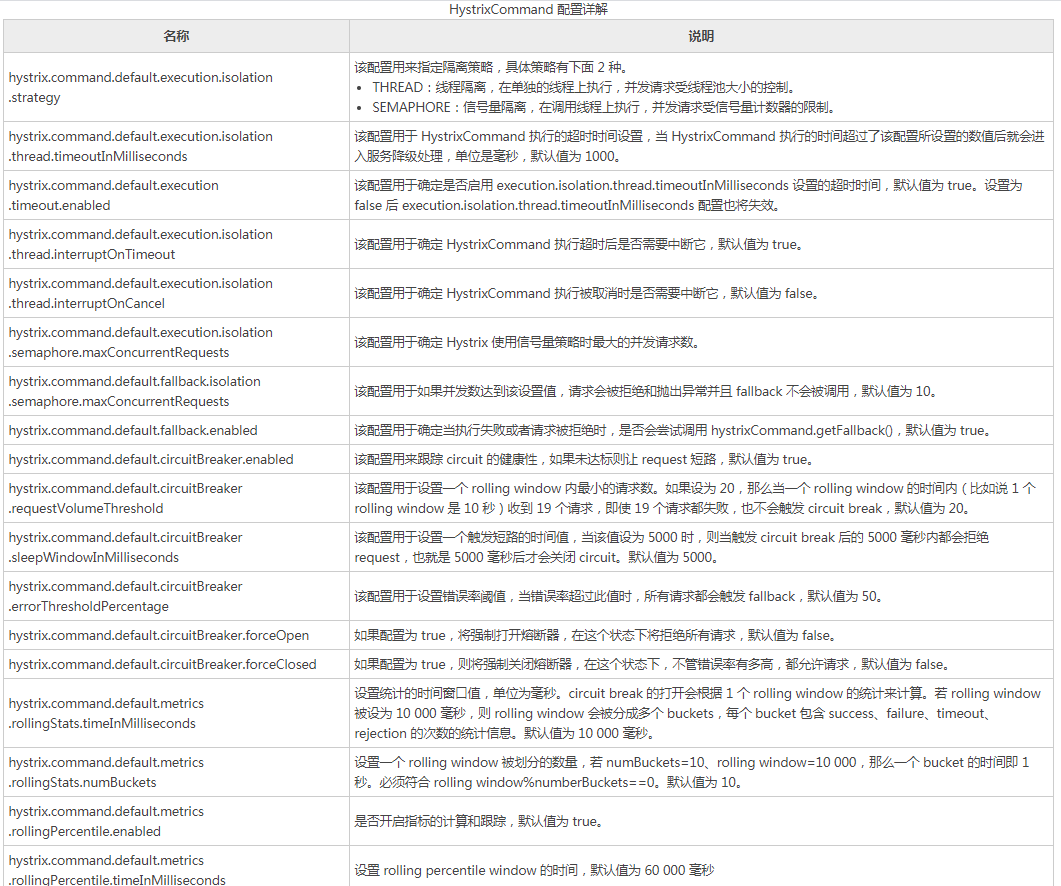
HystrixCommand 中除了 fallbackMethod 还有很多的配置,下面我们来看看这些配置,如下表所示:

5 Spring Cloud Feign整合Hystrix实现容错处理
在属性文件中开启 Feign 对 Hystrix 的支持:
feign:
  hystrix:
    enabled: true
5.1 1 Fallback 方式
在 Feign 的客户端类上的 @FeignClient 注解中指定 fallback 进行回退(代码如下所示),创建一个 Feign 的客户端类 UserRemoteClient,为其配置 fallback。
@FeignClient(value = "hystrix-feign",fallback = UserRemoteClientFallback.class)
public interface UserRemoteClient {
    @GetMapping(value = "/user/hello")
    String hello();
}
UserRemoteClientFallback 类需要实现 UserRemoteClient 类中所有的方法,返回回退时的内容,代码如下所示。
@Component
public class UserRemoteClientFallback implements UserRemoteClient {
    @Override
    public String hello() {
        return "fail";
    }
}
停掉所有 eureka-client-user-service 服务,然后访问 /callHello 接口,这个时候 eureka-client-user-service 服务是不可用的,必然会触发回退,返回的内容是 fail 字符串,这证明回退生效了。
在这种情况下,如果你的接口调用了多个服务的接口,那么只有 eureka-client-user-service 服务会没数据,不会影响别的服务,如果不用 Hystrix 回退处理,整个请求都将失败。
{
    code:200,
    message:"",
    data:{
        id:1,
        money:100.12,
        name:"fail"
    }
}
下面我们将启用 Hystrix 断路器禁用:
feign:
  hystrix:
    enabled: false
再次访问 /callHello 可以看到返回的就是 500 错误信息了,整个请求失败。
5.2 FallbackFactory 方式
通过 fallback 已经可以实现服务不可用时回退的功能,如果你想知道触发回退的原因,可以使用 FallbackFactory 来实现回退功能,代码如下所示。
@Component
public class UserRemoteClientFallbackFactory  implements FallbackFactory<UserRemoteClient> {
    private Logger logger = LoggerFactory.getLogger(UserRemoteClientFallbackFactory.class);


    @Override
    public UserRemoteClient create(Throwable cause) {
        logger.error("UserRemoteClient回退:",cause);
        return new UserRemoteClient() {
            @Override
            public String hello() {
                return "fail";
            }
        };
    }
}
FallbackFactory 的使用就是在 @FeignClient 中用 fallbackFactory 指定回退处理类,代码如下所示。
@FeignClient(value = "eureka-client-user-service", configuration = FeignConfiguration.class, fallbackFactory = UserRemoteClientFallbackFactory.class)
笔者在这个回退处理的时候,将异常信息通过日志输出了,我们重新调用接口,可以看到异常信息在开发工具的控制台中输出了,FallbackFactory 和 Fallback 唯一的区别就在这里。
5.3 Feign 中禁用 Hystrix
禁用 Hystrix 还是比较简单的,目前有两种方式可以禁用,一种是在属性文件中进行全部禁用,默认就是禁用的状态。
feign.hystrix.enabled=false
另一种是通过代码的方式禁用某个客户端,在 Feign 的配置类中增加如下所示的代码。
@Configuration
public class FeignConfiguration {
    @Bean
    @Scope("prototype")
    public Feign.Builder feignBuilder() {
        return Feign.builder();
    }
}
6 Hystrix的实时监控功能
在微服务架构中,Hystrix 除了实现容错外,还提供了实时监控功能。在服务调用时,Hystrix 会实时累积关于 HystrixCommand 的执行信息,比如每秒的请求数、成功数等。
更多的指标信息请查看官方文档:https://github.com/Netflix/Hystrix/wiki/Metrics-and-Monitoring。
Hystrix 监控需要两个必备条件:
- 必须有 Actuator 的依赖,代码如下所示。
<dependency>
    <groupId>org.springframework.boot</groupId>
    <artifactId>spring-boot-starter-actuator</artifactId>
</dependency>
- 必须有 Hystrix 的依赖,Spring Cloud 中必须在启动类中添加 @EnableHystrix 开启 Hystrix,代码如下所示。
<dependency>
    <groupId>org.springframework.cloud</groupId>
    <artifactId>spring-cloud-starter-netflix-hystrix</artifactId>
</dependency>
3.所有依赖
<dependencies>
        <dependency>
            <groupId>org.springframework.cloud</groupId>
            <artifactId>spring-cloud-starter-netflix-eureka-client</artifactId>
        </dependency>
        <dependency>
            <groupId>org.springframework.cloud</groupId>
            <artifactId>spring-cloud-starter-netflix-hystrix</artifactId>
        </dependency>
        <dependency>
            <groupId>org.springframework.cloud</groupId>
            <artifactId>spring-cloud-starter-netflix-hystrix-dashboard</artifactId>
        </dependency>
        <dependency>
            <groupId>org.springframework.boot</groupId>
            <artifactId>spring-boot-starter-actuator</artifactId>
        </dependency>
    </dependencies>
    <dependencyManagement>
        <dependencies>
            <dependency>
                <groupId>org.springframework.cloud</groupId>
                <artifactId>spring-cloud-dependencies</artifactId>
                <version>Finchley.RELEASE</version>
                <type>pom</type>
                <scope>import</scope>
            </dependency>
        </dependencies>
    </dependencyManagement>
4.配置
@Configuration
public class HystrixConfiguration {


    @Bean
    public ServletRegistrationBean getServlet(){
        HystrixMetricsStreamServlet streamServlet = new HystrixMetricsStreamServlet();
        ServletRegistrationBean registrationBean = new ServletRegistrationBean(streamServlet);
        registrationBean.setLoadOnStartup(1);
        registrationBean.addUrlMappings("/hystrix.stream");
        registrationBean.setName("HystrixMetricsStreamServlet");
        return registrationBean;
    }
}
5.启动类需要加入:
@SpringBootApplication
@EnableEurekaClient
@EnableCircuitBreaker
@EnableHystrixDashboard
public class HystrixdashboardApplication {
    public static void main(String[] args) {
        SpringApplication.run(HystrixdashboardApplication.class,args);
    }
}
7 Hystrix Dashboard(熔断仪表盘)查看监控数据
我们已经知道 Hystrix 提供了监控的功能,可以通过 hystrix.stream 端点来获取监控数据,但是这些数据是以字符串的形式展现的,实际使用中不方便查看。我们可以借助 Hystrix Dashboard 对监控进行图形化展示。
Hystrix Dashboard 是一款针对 Hystrix 进行实时监控的工具,通过 Hystrix Dashboard 可以直观地看到各 Hystrix Command 的请求响应时间,请求成功率等数据。
下面我们单独创建一个项目来集成 dashboard。
创建一个 Maven 项目 hystrix-dashboard,在 pom.xml 中添加 dashboard 的依赖,代码如下所示。
 <dependencies>
        <dependency>
            <groupId>org.springframework.cloud</groupId>
            <artifactId>spring-cloud-starter-netflix-eureka-client</artifactId>
        </dependency>
        <dependency>
            <groupId>org.springframework.cloud</groupId>
            <artifactId>spring-cloud-starter-netflix-hystrix</artifactId>
        </dependency>
        <dependency>
            <groupId>org.springframework.cloud</groupId>
            <artifactId>spring-cloud-starter-netflix-hystrix-dashboard</artifactId>
        </dependency>
        <dependency>
            <groupId>org.springframework.boot</groupId>
            <artifactId>spring-boot-starter-actuator</artifactId>
        </dependency>
    </dependencies>
    <dependencyManagement>
        <dependencies>
            <dependency>
                <groupId>org.springframework.cloud</groupId>
                <artifactId>spring-cloud-dependencies</artifactId>
                <version>Finchley.RELEASE</version>
                <type>pom</type>
                <scope>import</scope>
            </dependency>
        </dependencies>
    </dependencyManagement>
启动服务代码:
@SpringBootApplication
@EnableEurekaClient
@EnableCircuitBreaker
@EnableHystrixDashboard
public class HystrixdashboardApplication {
    public static void main(String[] args) {
        SpringApplication.run(HystrixdashboardApplication.class,args);
    }
}
访问 http://localhost:8087/hystrix 就可以看到 dashboard 的主页,
在主页中有 3 个地方需要我们填写,第一行是监控的 stream 地址,也就是将之前文字监控信息的地址输入到第一个文本框中。第二行的 Delay 是时间,表示用多少毫秒同步一次监控信息,Title 是标题,这个可以随便填写如图 所示。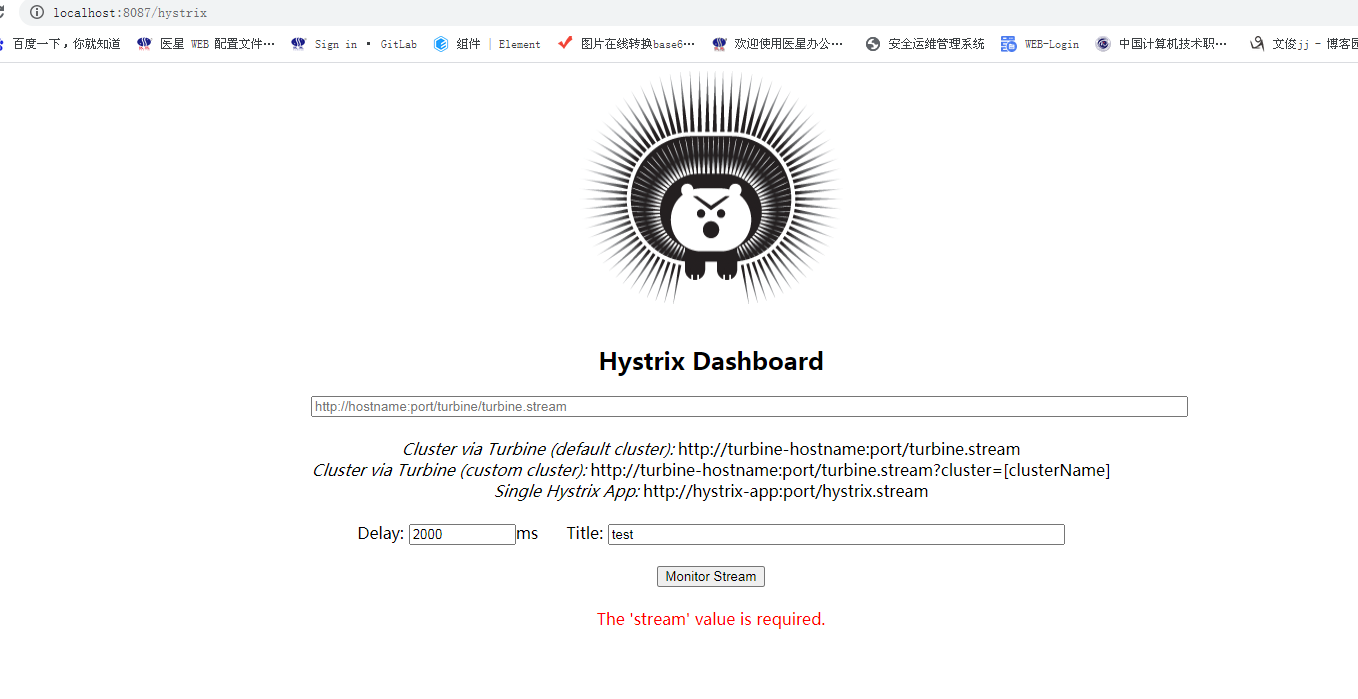
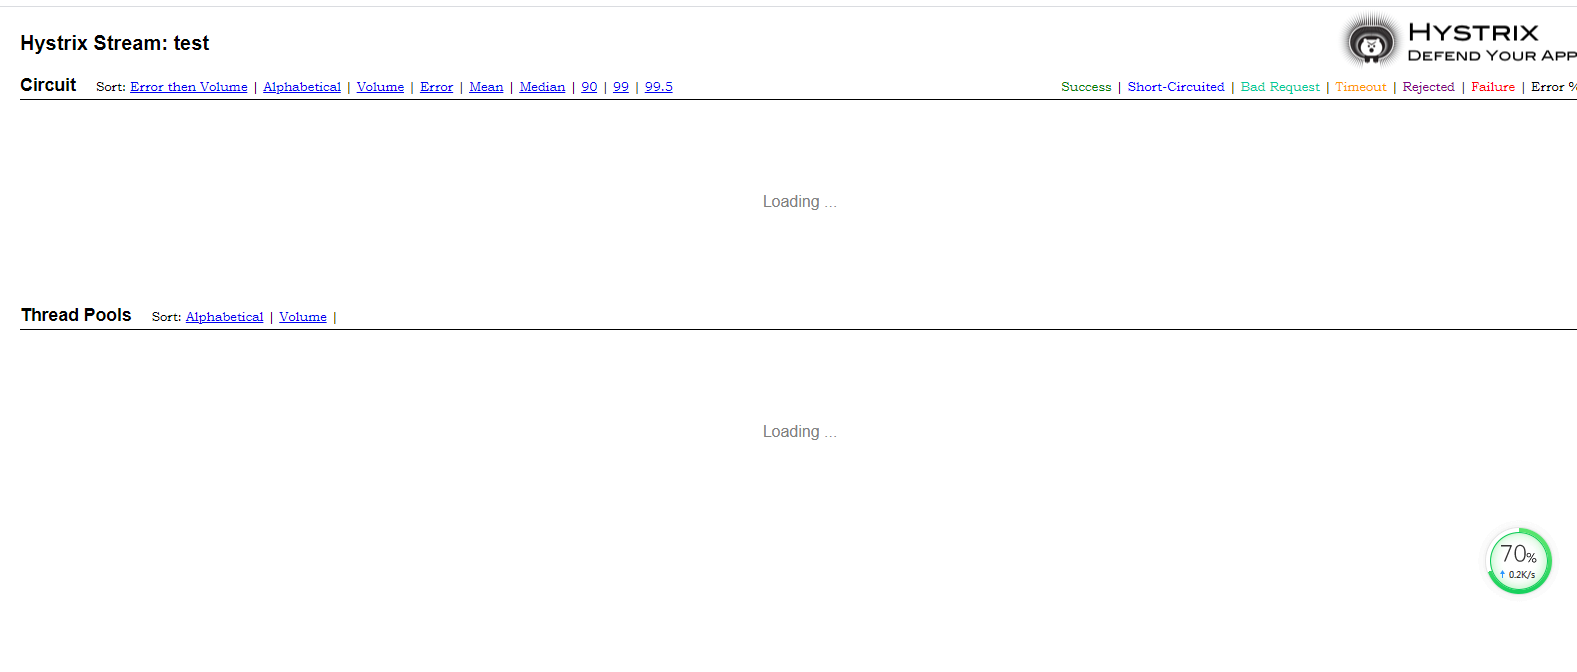
输入完成后就可以点击 Monitor Stream 按钮以图形化的方式查看监控的数据了,如图 所示。
8 Spring Cloud使用Turbine实现集群监控
前面我们实现了对单个服务实例的监控,当然在实际应用中,单个实例的监控数据没有多大的价值,我们更需要的是一个集群系统的监控信息,这时我们就需要 Turbine。
Turbine 是用来监控集群的,通过它来汇集监控信息,并将聚合后的信息提供给 Hystrix Dashboard 来集中展示和监控。
8.1 Turbine 使用
Turbine 是聚合服务器发送事件流数据的一个工具。Hystrix 只能监控单个节点,然后通过 dashboard 进行展示。实际生产中都为集群,这个时候我们可以通过 Turbine 来监控集群下 Hystrix 的 metrics 情况,通过 Eureka 来发现 Hystrix 服务。
本节在介绍 Turbine 的用法时就不再单独创建一个新项目了,在之前的 hystrix-dashboard 中进行修改来支持 Turbine 即可。
首先增加 Turbine 的依赖,代码如下所示。
<dependency>
    <groupId>org.springframework.cloud</groupId>
    <artifactId>spring-cloud-starter-netflix-turbine</artifactId>
</dependency>
在启动类上增加 @EnableTurbine 和 @EnableDiscoveryClient。在属性文件中配置如下内容:
   service-url:
      defaultZone: http://admin:admin@localhost:8080/eureka/,http://admin:admin@localhost:9000/eureka/
turbine:
  app-config: eureka-server
  aggregator:
    cluster-config: default
  cluster-name-expression: new String("default")
其中:
- turbine.appConfig:配置需要聚合的服务名称。
- turbine.aggregator.clusterConfig:Turbine 需要聚合的集群名称。
- turbine.clusterNameExpression:集群名表达式。
这里用默认的集群名称 default。
重启服务,就可以使用 http://localhost:8087/turbine.stream 来访问集群的监控数据了。Turbine 会通过在 Eureka 中查找服务的 homePageUrl 加上 hystrix.stream 来获取其他服务的监控数据,并将其汇总显示。
8.2 context-path 导致监控失败
如果被监控的服务中设置了 context-path,则会导致 Turbine 无法获取监控数据.
这个时候需要在 Turbine 中指定 turbine.instanceUrlSuffix 来解决这个问题:
turbine.instanceUrlSuffix=/sub/hystrix.stream
sub 用于监控服务的 context-path。上面这种方式是全局配置,会有一个问题,就是一般我们在使用中会用一个集群去监控多个服务,如果每个服务的 context-path 都不一样,这个时候有一些就会出问题,那么就需要对每个服务做一个集群,然后配置集群对应的 context-path:
turbine.instanceUrlSuffix. 集群名称 =/sub/hystrix.stream

 浙公网安备 33010602011771号