Feign源码解析
一、主线流程
先上一个Feign示例代码:
@FeignClient(value = "study-user",path = "/user",fallback =UserApiFallBack.class)
public interface UserApi {
    @RequestMapping(value = "/getUserById",method = RequestMethod.GET)
    User getUserById(@RequestParam(name = "id") Integer id);
}
先来个主线流程图:
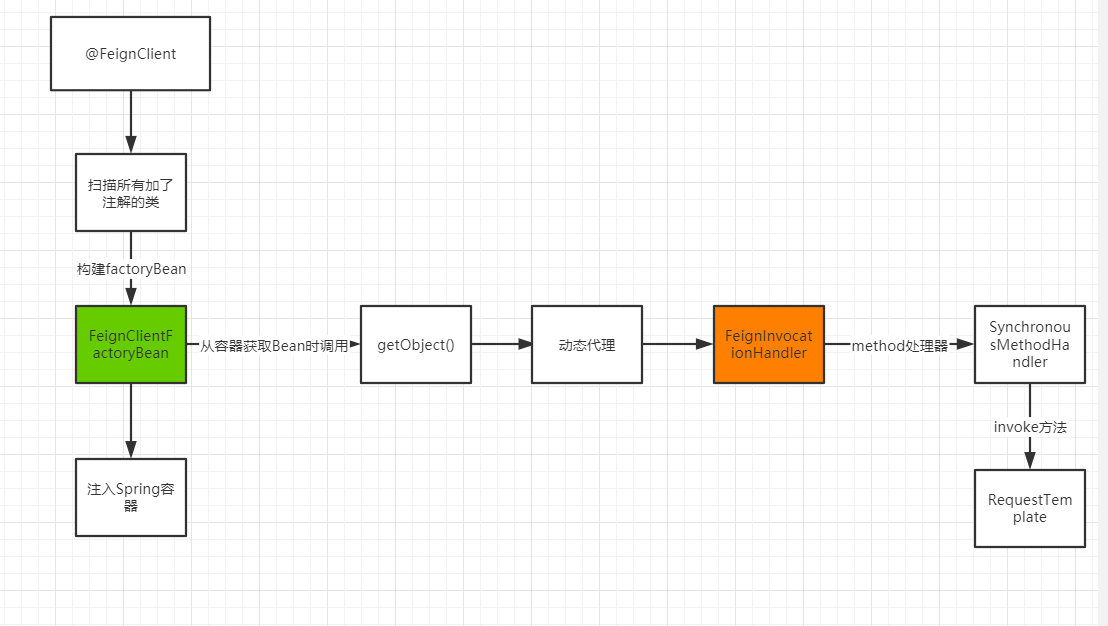
文字描述:FeignClientsRegistrar这个类会将加了@FeignClient注解的接口实例化一个对象注入到Spring容器中,这个对象是个代理对象,也就是FeignInvocationHandler,里面的每个我们写的方法会经过SynchronousMethodHandler这个处理器处理,将他转为使用http发送请求的方式来执行方法。对应上面的示例代码,它会将我们写的User getUserById(@RequestParam(name = "id") Integer id);方法转为http方式调用http://study-user/getUserById
二、代码细节
了解了大概流程后,再来看看具体的代码吧!!!
- 说起Feign的使用,我们得从他的启用注解说起,也就是@EnableFeignClients
@SpringBootApplication
@EnableFeignClients
public class UserApplication {

    public static void main(String[] args) {
        SpringApplication.run(UserApplication.class);
    }
}
- @EnableFeignClients注解的里面是如下注解
@Retention(RetentionPolicy.RUNTIME)
@Target(ElementType.TYPE)
@Documented
@Import(FeignClientsRegistrar.class)
public @interface EnableFeignClients {
- 所以我们需要分析FeignClientsRegistrar类,里面有一些重要的方法1如下:主要作用是扫描指定的包路径注册为FeignClient
public void registerFeignClients(AnnotationMetadata metadata,
			BeanDefinitionRegistry registry) {
		ClassPathScanningCandidateComponentProvider scanner = getScanner();
		scanner.setResourceLoader(this.resourceLoader);

		Set<String> basePackages;

		Map<String, Object> attrs = metadata
				.getAnnotationAttributes(EnableFeignClients.class.getName());
		AnnotationTypeFilter annotationTypeFilter = new AnnotationTypeFilter(
				FeignClient.class);
		final Class<?>[] clients = attrs == null ? null
				: (Class<?>[]) attrs.get("clients");
		if (clients == null || clients.length == 0) {
			scanner.addIncludeFilter(annotationTypeFilter);
			basePackages = getBasePackages(metadata);
		}
		else {
			final Set<String> clientClasses = new HashSet<>();
			basePackages = new HashSet<>();
			for (Class<?> clazz : clients) {
				basePackages.add(ClassUtils.getPackageName(clazz));
				clientClasses.add(clazz.getCanonicalName());
			}
			AbstractClassTestingTypeFilter filter = new AbstractClassTestingTypeFilter() {
				@Override
				protected boolean match(ClassMetadata metadata) {
					String cleaned = metadata.getClassName().replaceAll("\\$", ".");
					return clientClasses.contains(cleaned);
				}
			};
			scanner.addIncludeFilter(
					new AllTypeFilter(Arrays.asList(filter, annotationTypeFilter)));
		}

		for (String basePackage : basePackages) {
			Set<BeanDefinition> candidateComponents = scanner
					.findCandidateComponents(basePackage);
			for (BeanDefinition candidateComponent : candidateComponents) {
				if (candidateComponent instanceof AnnotatedBeanDefinition) {
					// verify annotated class is an interface
					AnnotatedBeanDefinition beanDefinition = (AnnotatedBeanDefinition) candidateComponent;
					AnnotationMetadata annotationMetadata = beanDefinition.getMetadata();
					Assert.isTrue(annotationMetadata.isInterface(),
							"@FeignClient can only be specified on an interface");
                    //获取注解的参数值
					Map<String, Object> attributes = annotationMetadata
							.getAnnotationAttributes(
									FeignClient.class.getCanonicalName());

					String name = getClientName(attributes);
					registerClientConfiguration(registry, name,
							attributes.get("configuration"));

					registerFeignClient(registry, annotationMetadata, attributes);
				}
			}
		}
	}
- 还有一个重要的方法registerFeignClient(),
private void registerFeignClient(BeanDefinitionRegistry registry,
			AnnotationMetadata annotationMetadata, Map<String, Object> attributes) {
			//重点,构建一个FeignClientFactoryBean对象,这是一个代理对象
		String className = annotationMetadata.getClassName();
		BeanDefinitionBuilder definition = BeanDefinitionBuilder
				.genericBeanDefinition(FeignClientFactoryBean.class);
		validate(attributes);
		//设置属性
		definition.addPropertyValue("url", getUrl(attributes));
		definition.addPropertyValue("path", getPath(attributes));
		String name = getName(attributes);
		definition.addPropertyValue("name", name);
		definition.addPropertyValue("type", className);
		definition.addPropertyValue("decode404", attributes.get("decode404"));
		definition.addPropertyValue("fallback", attributes.get("fallback"));
		definition.addPropertyValue("fallbackFactory", attributes.get("fallbackFactory"));
		definition.setAutowireMode(AbstractBeanDefinition.AUTOWIRE_BY_TYPE);

		String alias = name + "FeignClient";
		AbstractBeanDefinition beanDefinition = definition.getBeanDefinition();

		boolean primary = (Boolean)attributes.get("primary"); // has a default, won't be null

		beanDefinition.setPrimary(primary);

		String qualifier = getQualifier(attributes);
		if (StringUtils.hasText(qualifier)) {
			alias = qualifier;
		}

		BeanDefinitionHolder holder = new BeanDefinitionHolder(beanDefinition, className,
				new String[] { alias });
				//注册为bean放入spring中
		BeanDefinitionReaderUtils.registerBeanDefinition(holder, registry);
	}
- 上面两个方法的主要作用就是根据注解的属性值构建一个FeignClientFactoryBean对象,他是一个FactoryBean对象,所以在获取bean的时候会执行他的getObject()方法。这个方法如下:
@Override
	public Object getObject() throws Exception {
		return getTarget();
	}

	/**
	 * @param <T> the target type of the Feign client
	 * @return a {@link Feign} client created with the specified data and the context information
	 */
	<T> T getTarget() {
		FeignContext context = applicationContext.getBean(FeignContext.class);
		Feign.Builder builder = feign(context);

		if (!StringUtils.hasText(this.url)) {
			String url;
			//看到有http,说明Feign使用的http协议请求的
			if (!this.name.startsWith("http")) {
				url = "http://" + this.name;
			}
			else {
				url = this.name;
			}
			url += cleanPath();
			//所以Feign的底层也是使用loadBalance
			return (T) loadBalance(builder, context, new HardCodedTarget<>(this.type,
					this.name, url));
		}
		if (StringUtils.hasText(this.url) && !this.url.startsWith("http")) {
			this.url = "http://" + this.url;
		}
		String url = this.url + cleanPath();
		Client client = getOptional(context, Client.class);
		if (client != null) {
			if (client instanceof LoadBalancerFeignClient) {
				// not load balancing because we have a url,
				// but ribbon is on the classpath, so unwrap
				client = ((LoadBalancerFeignClient)client).getDelegate();
			}
			builder.client(client);
		}
		//组装targer参数
		Targeter targeter = get(context, Targeter.class);
		return (T) targeter.target(this, builder, context, new HardCodedTarget<>(
				this.type, this.name, url));
	}
- 使用了loadBalance()方法构建返回了一个Target对象,然后调用target()方法,target方法里面通过Feign的Builder方式来设置属性,然后使用newInstance创建一个代理对象
 @Override
  public <T> T newInstance(Target<T> target) {
    Map<String, MethodHandler> nameToHandler = targetToHandlersByName.apply(target);
    Map<Method, MethodHandler> methodToHandler = new LinkedHashMap<Method, MethodHandler>();
    List<DefaultMethodHandler> defaultMethodHandlers = new LinkedList<DefaultMethodHandler>();

    for (Method method : target.type().getMethods()) {
      if (method.getDeclaringClass() == Object.class) {
        continue;
      } else if(Util.isDefault(method)) {
        DefaultMethodHandler handler = new DefaultMethodHandler(method);
        defaultMethodHandlers.add(handler);
        //放入了方法处理器,handler类型为SynchronousMethodHandler
        methodToHandler.put(method, handler);
      } else {
        methodToHandler.put(method, nameToHandler.get(Feign.configKey(target.type(), method)));
      }
    }
    //使用了动态代理,代理类FeignInvocationHandler
    InvocationHandler handler = factory.create(target, methodToHandler);
    T proxy = (T) Proxy.newProxyInstance(target.type().getClassLoader(), new Class<?>[]{target.type()}, handler);

    for(DefaultMethodHandler defaultMethodHandler : defaultMethodHandlers) {
      defaultMethodHandler.bindTo(proxy);
    }
    return proxy;
  }
- 熟悉动态代理的都知道,它实际是执行的里面的invoke方法,我们来看FeignInvocationHandler的invoke方法做了什么?
@Override
    public Object invoke(Object proxy, Method method, Object[] args) throws Throwable {
      if ("equals".equals(method.getName())) {
        try {
          Object
              otherHandler =
              args.length > 0 && args[0] != null ? Proxy.getInvocationHandler(args[0]) : null;
          return equals(otherHandler);
        } catch (IllegalArgumentException e) {
          return false;
        }
      } else if ("hashCode".equals(method.getName())) {
        return hashCode();
      } else if ("toString".equals(method.getName())) {
        return toString();
      }
      //重点是这行,dispatch.get(method)获取到的就是之前放入的SynchronousMethodHandler方法,他会执行
      return dispatch.get(method).invoke(args);
    }
- 再看看SynchronousMethodHandler里的invoke方法
public Object invoke(Object[] argv) throws Throwable {
    RequestTemplate template = buildTemplateFromArgs.create(argv);
    Retryer retryer = this.retryer.clone();
    while (true) {
      try {
      //编解码并执行
        return executeAndDecode(template);
      } catch (RetryableException e) {
        retryer.continueOrPropagate(e);
        if (logLevel != Logger.Level.NONE) {
          logger.logRetry(metadata.configKey(), logLevel);
        }
        continue;
      }
    }
  }
- executeAndDecode()方法,看到这个方法就明白原理了。里面包含了日志,编解码,http请求
Object executeAndDecode(RequestTemplate template) throws Throwable {
    Request request = targetRequest(template);

    if (logLevel != Logger.Level.NONE) {
      logger.logRequest(metadata.configKey(), logLevel, request);
    }

    Response response;
    long start = System.nanoTime();
    try {
      response = client.execute(request, options);
      // ensure the request is set. TODO: remove in Feign 10
      response.toBuilder().request(request).build();
    } catch (IOException e) {
      if (logLevel != Logger.Level.NONE) {
        logger.logIOException(metadata.configKey(), logLevel, e, elapsedTime(start));
      }
      throw errorExecuting(request, e);
    }
    long elapsedTime = TimeUnit.NANOSECONDS.toMillis(System.nanoTime() - start);

    boolean shouldClose = true;
    try {
      if (logLevel != Logger.Level.NONE) {
        response =
            logger.logAndRebufferResponse(metadata.configKey(), logLevel, response, elapsedTime);
        // ensure the request is set. TODO: remove in Feign 10
        response.toBuilder().request(request).build();
      }
      if (Response.class == metadata.returnType()) {
        if (response.body() == null) {
          return response;
        }
        if (response.body().length() == null ||
                response.body().length() > MAX_RESPONSE_BUFFER_SIZE) {
          shouldClose = false;
          return response;
        }
        // Ensure the response body is disconnected
        byte[] bodyData = Util.toByteArray(response.body().asInputStream());
        return response.toBuilder().body(bodyData).build();
      }
      if (response.status() >= 200 && response.status() < 300) {
        if (void.class == metadata.returnType()) {
          return null;
        } else {
          Object result = decode(response);
          shouldClose = closeAfterDecode;
          return result;
        }
      } else if (decode404 && response.status() == 404 && void.class != metadata.returnType()) {
        Object result = decode(response);
        shouldClose = closeAfterDecode;
        return result;
      } else {
        throw errorDecoder.decode(metadata.configKey(), response);
      }
    } catch (IOException e) {
      if (logLevel != Logger.Level.NONE) {
        logger.logIOException(metadata.configKey(), logLevel, e, elapsedTime);
      }
      throw errorReading(request, response, e);
    } finally {
      if (shouldClose) {
        ensureClosed(response.body());
      }
    }
  }
- 最终再附一张网上描述流程的图来作为总结,从调用请求到返回结果的一个设计图

书山有路勤为径,学海无涯苦作舟

 浙公网安备 33010602011771号