谷粒商城分布式基础(八)—— 商品服务API—属性分组(父子组件 & 级联选择器)
一、基本概念
SPU:standard product unit(标准化产品单元):是商品信息聚合的最小单位,是一组可复用、易检索的标准化信息的集合,该集合描述了一个产品的特性。如iphoneX是SPU
SKU:stock keeping unit(库存量单位):库存进出计量的基本单元,可以是件/盒/托盘等单位。SKU是对于大型连锁超市DC配送中心物流管理的一个必要的方法。
现在已经被引申为产品统一编号的简称,每种产品对应有唯一的SKU号。如iphoneX 64G 黑色 是SKU 同一个SPU拥有的特性叫基本属性。如机身长度,这个是手机共用的属性。而每款手机的属性值不同 能决定库存量的叫销售属性。如颜色 基本属性[规格参数]与销售属性
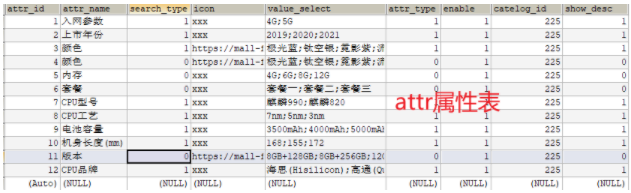
每个分类下的商品共享规格参数,与销售属性。只是有些商品不一定要用这个分类下全部的属性; 属性是以三级分类组织起来的 规格参数中有些是可以提供检索的 规格参数也是基本属性,他们具有自己的分组 属性的分组也是以三级分类组织起来的 属性名确定的,但是值是每一个商品不同来决定的
二、数据库设计
1、设计结构图
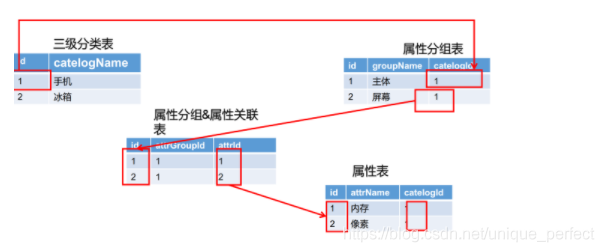
spu—sku属性表
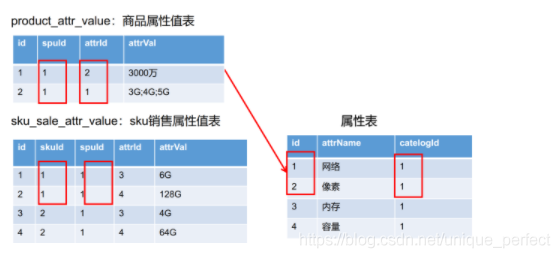
荣耀V20有两个属性,网络和像素,但是这两个属性的spu是同一个,代表是同款手机。
sku表里保存spu是同一手机,sku可能相同可能不同,相同代表是同一款,不同代表是不同款。
属性表说明每个属性的 枚举值
分类表有所有的分类,但有父子关系
2、sql脚本
为了方便后面开发,我们就不再一一创建菜单目录了,将已经创建好的sql脚本导入,gulimall_admin数据库运行sql脚本
/*
SQLyog Ultimate v11.25 (64 bit)
MySQL - 5.7.27 : Database - gulimall_admin
*********************************************************************
*/


/*!40101 SET NAMES utf8 */;

/*!40101 SET SQL_MODE=''*/;

/*!40014 SET @OLD_UNIQUE_CHECKS=@@UNIQUE_CHECKS, UNIQUE_CHECKS=0 */;
/*!40014 SET @OLD_FOREIGN_KEY_CHECKS=@@FOREIGN_KEY_CHECKS, FOREIGN_KEY_CHECKS=0 */;
/*!40101 SET @OLD_SQL_MODE=@@SQL_MODE, SQL_MODE='NO_AUTO_VALUE_ON_ZERO' */;
/*!40111 SET @OLD_SQL_NOTES=@@SQL_NOTES, SQL_NOTES=0 */;
CREATE DATABASE /*!32312 IF NOT EXISTS*/`mall_admin` /*!40100 DEFAULT CHARACTER SET utf8mb4 */;

USE `gulimall_admin`;

/*Table structure for table `sys_menu` */

DROP TABLE IF EXISTS `sys_menu`;

CREATE TABLE `sys_menu` (
  `menu_id` bigint(20) NOT NULL AUTO_INCREMENT,
  `parent_id` bigint(20) DEFAULT NULL COMMENT '父菜单ID,一级菜单为0',
  `name` varchar(50) DEFAULT NULL COMMENT '菜单名称',
  `url` varchar(200) DEFAULT NULL COMMENT '菜单URL',
  `perms` varchar(500) DEFAULT NULL COMMENT '授权(多个用逗号分隔,如:user:list,user:create)',
  `type` int(11) DEFAULT NULL COMMENT '类型   0:目录   1:菜单   2:按钮',
  `icon` varchar(50) DEFAULT NULL COMMENT '菜单图标',
  `order_num` int(11) DEFAULT NULL COMMENT '排序',
  PRIMARY KEY (`menu_id`)
) ENGINE=InnoDB AUTO_INCREMENT=76 DEFAULT CHARSET=utf8mb4 COMMENT='菜单管理';

/*Data for the table `sys_menu` */

insert  into `sys_menu`(`menu_id`,`parent_id`,`name`,`url`,`perms`,`type`,`icon`,`order_num`) values (1,0,'系统管理',NULL,NULL,0,'system',0),(2,1,'管理员列表','sys/user',NULL,1,'admin',1),(3,1,'角色管理','sys/role',NULL,1,'role',2),(4,1,'菜单管理','sys/menu',NULL,1,'menu',3),(5,1,'SQL监控','http://localhost:8080/renren-fast/druid/sql.html',NULL,1,'sql',4),(6,1,'定时任务','job/schedule',NULL,1,'job',5),(7,6,'查看',NULL,'sys:schedule:list,sys:schedule:info',2,NULL,0),(8,6,'新增',NULL,'sys:schedule:save',2,NULL,0),(9,6,'修改',NULL,'sys:schedule:update',2,NULL,0),(10,6,'删除',NULL,'sys:schedule:delete',2,NULL,0),(11,6,'暂停',NULL,'sys:schedule:pause',2,NULL,0),(12,6,'恢复',NULL,'sys:schedule:resume',2,NULL,0),(13,6,'立即执行',NULL,'sys:schedule:run',2,NULL,0),(14,6,'日志列表',NULL,'sys:schedule:log',2,NULL,0),(15,2,'查看',NULL,'sys:user:list,sys:user:info',2,NULL,0),(16,2,'新增',NULL,'sys:user:save,sys:role:select',2,NULL,0),(17,2,'修改',NULL,'sys:user:update,sys:role:select',2,NULL,0),(18,2,'删除',NULL,'sys:user:delete',2,NULL,0),(19,3,'查看',NULL,'sys:role:list,sys:role:info',2,NULL,0),(20,3,'新增',NULL,'sys:role:save,sys:menu:list',2,NULL,0),(21,3,'修改',NULL,'sys:role:update,sys:menu:list',2,NULL,0),(22,3,'删除',NULL,'sys:role:delete',2,NULL,0),(23,4,'查看',NULL,'sys:menu:list,sys:menu:info',2,NULL,0),(24,4,'新增',NULL,'sys:menu:save,sys:menu:select',2,NULL,0),(25,4,'修改',NULL,'sys:menu:update,sys:menu:select',2,NULL,0),(26,4,'删除',NULL,'sys:menu:delete',2,NULL,0),(27,1,'参数管理','sys/config','sys:config:list,sys:config:info,sys:config:save,sys:config:update,sys:config:delete',1,'config',6),(29,1,'系统日志','sys/log','sys:log:list',1,'log',7),(30,1,'文件上传','oss/oss','sys:oss:all',1,'oss',6),(31,0,'商品系统','','',0,'editor',0),(32,31,'分类维护','product/category','',1,'menu',0),(34,31,'品牌管理','product/brand','',1,'editor',0),(37,31,'平台属性','','',0,'system',0),(38,37,'属性分组','product/attrgroup','',1,'tubiao',0),(39,37,'规格参数','product/baseattr','',1,'log',0),(40,37,'销售属性','product/saleattr','',1,'zonghe',0),(41,31,'商品维护','product/spu','',0,'zonghe',0),(42,0,'优惠营销','','',0,'mudedi',0),(43,0,'库存系统','','',0,'shouye',0),(44,0,'订单系统','','',0,'config',0),(45,0,'用户系统','','',0,'admin',0),(46,0,'内容管理','','',0,'sousuo',0),(47,42,'优惠券管理','coupon/coupon','',1,'zhedie',0),(48,42,'发放记录','coupon/history','',1,'sql',0),(49,42,'专题活动','coupon/subject','',1,'tixing',0),(50,42,'秒杀活动','coupon/seckill','',1,'daohang',0),(51,42,'积分维护','coupon/bounds','',1,'geren',0),(52,42,'满减折扣','coupon/full','',1,'shoucang',0),(53,43,'仓库维护','ware/wareinfo','',1,'shouye',0),(54,43,'库存工作单','ware/task','',1,'log',0),(55,43,'商品库存','ware/sku','',1,'jiesuo',0),(56,44,'订单查询','order/order','',1,'zhedie',0),(57,44,'退货单处理','order/return','',1,'shanchu',0),(58,44,'等级规则','order/settings','',1,'system',0),(59,44,'支付流水查询','order/payment','',1,'job',0),(60,44,'退款流水查询','order/refund','',1,'mudedi',0),(61,45,'会员列表','member/member','',1,'geren',0),(62,45,'会员等级','member/level','',1,'tubiao',0),(63,45,'积分变化','member/growth','',1,'bianji',0),(64,45,'统计信息','member/statistics','',1,'sql',0),(65,46,'首页推荐','content/index','',1,'shouye',0),(66,46,'分类热门','content/category','',1,'zhedie',0),(67,46,'评论管理','content/comments','',1,'pinglun',0),(68,41,'spu管理','product/spu','',1,'config',0),(69,41,'发布商品','product/spuadd','',1,'bianji',0),(70,43,'采购单维护','','',0,'tubiao',0),(71,70,'采购需求','ware/purchaseitem','',1,'editor',0),(72,70,'采购单','ware/purchase','',1,'menu',0),(73,41,'商品管理','product/manager','',1,'zonghe',0),(74,42,'会员价格','coupon/memberprice','',1,'admin',0),(75,42,'每日秒杀','coupon/seckillsession','',1,'job',0);

/*!40101 SET SQL_MODE=@OLD_SQL_MODE */;
/*!40014 SET FOREIGN_KEY_CHECKS=@OLD_FOREIGN_KEY_CHECKS */;
/*!40014 SET UNIQUE_CHECKS=@OLD_UNIQUE_CHECKS */;
/*!40111 SET SQL_NOTES=@OLD_SQL_NOTES */;
导入完毕之后的效果
三、接口API文档
接口文档地址 https://easydoc.xyz/s/78237135
四、属性分组
1、前端组件抽取 & 父子组件交互
属性分组
现在想要实现点击菜单的左边,能够实现在右边展示数据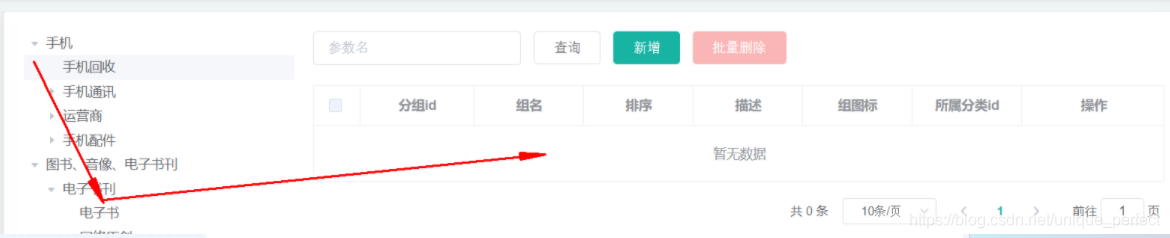
根据请求地址: http://localhost:8001/#/product-attrgroup
所以应该有product/attrgroup.vue。我们之前写过product/cateory.vue,现在我们 要抽象到common//cateory.vue
(1)左侧内容
  要在左面显示菜单,右面显示表格
  新建product/attrgroup,复制<el-row :gutter="20">,放到attrgroup.vue的<template>。20表示列间距
去element-ui文档里找到布局,
<el-row :gutter="20">
<el-col :span="6"><div class="grid-content bg-purple"></div></el-col>
<el-col :span="18"><div class="grid-content bg-purple"></div></el-col>
</el-row>
有了布局之后,要在里面放内容。接下来要抽象一个分类vue。新建 common/category,生成vue模板。把之前写的el-tree放到<template>
<el-tree :data="menus" :props="defaultProps" node-key="catId" ref="menuTree" @node-click="nodeClick" ></el-tree>
所以他把menus绑定到了菜单上, 所以我们应该在export default {中有menus的信息 该具体信息会随着点击等事件的发生会改变值(或比如created生命周期时), tree也就同步变化了
common/category写好后,就可以在attrgroup.vue中导入使用了
<script>
import Category from "../common/category";
export default {
//import引入的组件需要注入到对象中才能使用。组件名:自定义的名字,一致可以省略
components: { Category},
导入了之后,就可以在attrgroup.vue中找合适位置放好
<template>
<el-row :gutter="20">
<el-col :span="6">
<category @tree-node-click="treenodeclick"></category>
</el-col>
(2)右侧表格内容
  开始填写属性分组页面右侧的表格 复制gulimall-product\src\main\resources\src\views\modules\product\attrgroup.vue中的部分内 容div到attrgroup.vue
  批量删除是弹窗add-or-update
  导入data、结合components
(3)父子组件
  要实现功能:点击左侧,右侧表格对应内容显示。
  父子组件传递数据:category.vue点击时,引用它的attgroup.vue能感知到, 然后通知到add-or-update
  比如嵌套div,里层div有事件后冒泡到外层div(是指一次点击调用了两个div的点击函数)

  子组件(category)给父组件(attrgroup)传递数据,事件机制;
去element-ui的tree部分找event事件,看node-click()
在category中绑定node-click事件,
<el-tree :data="menus" :props="defaultProps" node-key="catId" ref="menuTree" @node-click="nodeClick" >
</el-tree>
this.$emit()
子组件给父组件发送一个事件,携带上数据;
nodeClick(data,Node,component){
console.log("子组件被点击",data,Node,component);
this.$emit("tree-node-click",data,Node,component);
},
第一个参数事件名字随便写, 后面可以写任意多的东西,事件发生时都会传出去:this.$emit(事件名,“携带的数据”);
父组件中的获取发送的事件:在attr-group中写 <category @tree-node-click="treeNodeClick"></category> 表明他的子组件可能会传递过来点击事件,用自定义的函数接收传递过来的参数
父组件中进行处理
//获取发送的事件数据
treeNodeClick(data,Node,component){
console.log("attgroup感知到的category的节点被点击",data,Node,component);
console.log("刚才被点击的菜单ID",data.catId);
},
/common/category.vue
<template>
  <el-tree :data="menus" :props="defaultProps" node-key="catId" ref="menuTree" @node-click="nodeClick">
  </el-tree>
</template>

<script>
//这里可以导入其他文件(比如:组件,工具 js,第三方插件 js,json 文件,图片文件等等)
//例如:import 《组件名称》 from '《组件路径》';

export default {
  //import 引入的组件需要注入到对象中才能使用
  components: {},
  props: {},
  data() {
    //这里存放数据
    return {
      menus: [],
      expandedKey: [],
      defaultProps: {
        children: "children",
        label: "name",
      },
    };
  },
  //计算属性 类似于 data 概念
  computed: {},
  //监控 data 中的数据变化
  watch: {},
  //方法集合
  methods: {
    getMenus() {
      this.$http({
        url: this.$http.adornUrl("/product/category/list/tree"),
        method: "get",
      }).then(({ data }) => {
        console.log("成功获取到菜单数据...", data.data);
        this.menus = data.data;
      });
    },
    nodeClick(data,node,component){
        console.log("子组件category的节点被点击",data,node,component);
        //向父组件发送事件;
        this.$emit("tree-node-click",data,node,component);
    }
  },
  //生命周期 - 创建完成(可以访问当前 this 实例)
  created() {
      this.getMenus();
  },
  //生命周期 - 挂载完成(可以访问 DOM 元素)
  mounted() {},
  beforeCreate() {}, //生命周期 - 创建之前
  beforeMount() {}, //生命周期 - 挂载之前
  beforeUpdate() {}, //生命周期 - 更新之前
  updated() {}, //生命周期 - 更新之后
  beforeDestroy() {}, //生命周期 - 销毁之前
  destroyed() {}, //生命周期 - 销毁完成
  activated() {}, //如果页面有 keep-alive 缓存功能,这个函数会触发
};
</script>
<style lang='scss' scoped>
//@import url(); 引入公共 css 类
</style>
/product/attrgroup.vue
<template>
  <el-row :gutter="20">
    <el-col :span="6"> <category @tree-node-click="treenodeclick"></category></el-col>
    <el-col :span="18"
      ><div class="mod-config">
        <el-form
          :inline="true"
          :model="dataForm"
          @keyup.enter.native="getDataList()"
        >
          <el-form-item>
            <el-input
              v-model="dataForm.key"
              placeholder="参数名"
              clearable
            ></el-input>
          </el-form-item>
          <el-form-item>
            <el-button @click="getDataList()">查询</el-button>
            <el-button
              v-if="isAuth('product:attrgroup:save')"
              type="primary"
              @click="addOrUpdateHandle()"
              >新增</el-button
            >
            <el-button
              v-if="isAuth('product:attrgroup:delete')"
              type="danger"
              @click="deleteHandle()"
              :disabled="dataListSelections.length <= 0"
              >批量删除</el-button
            >
          </el-form-item>
        </el-form>
        <el-table
          :data="dataList"
          border
          v-loading="dataListLoading"
          @selection-change="selectionChangeHandle"
          style="width: 100%"
        >
          <el-table-column
            type="selection"
            header-align="center"
            align="center"
            width="50"
          >
          </el-table-column>
          <el-table-column
            prop="attrGroupId"
            header-align="center"
            align="center"
            label="分组id"
          >
          </el-table-column>
          <el-table-column
            prop="attrGroupName"
            header-align="center"
            align="center"
            label="组名"
          >
          </el-table-column>
          <el-table-column
            prop="sort"
            header-align="center"
            align="center"
            label="排序"
          >
          </el-table-column>
          <el-table-column
            prop="descript"
            header-align="center"
            align="center"
            label="描述"
          >
          </el-table-column>
          <el-table-column
            prop="icon"
            header-align="center"
            align="center"
            label="组图标"
          >
          </el-table-column>
          <el-table-column
            prop="catelogId"
            header-align="center"
            align="center"
            label="所属分类id"
          >
          </el-table-column>
          <el-table-column
            fixed="right"
            header-align="center"
            align="center"
            width="150"
            label="操作"
          >
            <template slot-scope="scope">
              <el-button
                type="text"
                size="small"
                @click="addOrUpdateHandle(scope.row.attrGroupId)"
                >修改</el-button
              >
              <el-button
                type="text"
                size="small"
                @click="deleteHandle(scope.row.attrGroupId)"
                >删除</el-button
              >
            </template>
          </el-table-column>
        </el-table>
        <el-pagination
          @size-change="sizeChangeHandle"
          @current-change="currentChangeHandle"
          :current-page="pageIndex"
          :page-sizes="[10, 20, 50, 100]"
          :page-size="pageSize"
          :total="totalPage"
          layout="total, sizes, prev, pager, next, jumper"
        >
        </el-pagination>
        <!-- 弹窗, 新增 / 修改 -->
        <add-or-update
          v-if="addOrUpdateVisible"
          ref="addOrUpdate"
          @refreshDataList="getDataList"
        ></add-or-update></div
    ></el-col>
  </el-row>
</template>

<script>
/**
 * 父子组件传递数据
 * 1)子组件给父组件传递数据:事件机制;
 *   子组件给父组件发送一个事件,携带上数据
 *   this.$emit("事件名","携带的数据....")
 */
//这里可以导入其他文件(比如:组件,工具 js,第三方插件 js,json 文件,图片文件等等)
//例如:import 《组件名称》 from '《组件路径》';
import Category from "../common/category.vue";
import AddOrUpdate from './attrgroup-add-or-update'

export default {
  //import 引入的组件需要注入到对象中才能使用
  components: { Category,AddOrUpdate },
  props: {},
  data() {
    return {
      dataForm: {
        key: "",
      },
      dataList: [],
      pageIndex: 1,
      pageSize: 10,
      totalPage: 0,
      dataListLoading: false,
      dataListSelections: [],
      addOrUpdateVisible: false,
    };
  },
  activated() {
    this.getDataList();
  },
  methods: {
    //感知树节点被点击
    treenodeclick(data,node,component){
        console.log("attrgroup感知到category的节点被点击",data,node,component);
        console.log("刚才被点击的菜单id:",data.catId)
    },
    // 获取数据列表
    getDataList() {
      this.dataListLoading = true;
      this.$http({
        url: this.$http.adornUrl("/product/attrgroup/list"),
        method: "get",
        params: this.$http.adornParams({
          page: this.pageIndex,
          limit: this.pageSize,
          key: this.dataForm.key,
        }),
      }).then(({ data }) => {
        if (data && data.code === 0) {
          this.dataList = data.page.list;
          this.totalPage = data.page.totalCount;
        } else {
          this.dataList = [];
          this.totalPage = 0;
        }
        this.dataListLoading = false;
      });
    },
    // 每页数
    sizeChangeHandle(val) {
      this.pageSize = val;
      this.pageIndex = 1;
      this.getDataList();
    },
    // 当前页
    currentChangeHandle(val) {
      this.pageIndex = val;
      this.getDataList();
    },
    // 多选
    selectionChangeHandle(val) {
      this.dataListSelections = val;
    },
    // 新增 / 修改
    addOrUpdateHandle(id) {
      this.addOrUpdateVisible = true;
      this.$nextTick(() => {
        this.$refs.addOrUpdate.init(id);
      });
    },
    // 删除
    deleteHandle(id) {
      var ids = id
        ? [id]
        : this.dataListSelections.map((item) => {
            return item.attrGroupId;
          });
      this.$confirm(
        `确定对[id=${ids.join(",")}]进行[${id ? "删除" : "批量删除"}]操作?`,
        "提示",
        {
          confirmButtonText: "确定",
          cancelButtonText: "取消",
          type: "warning",
        }
      ).then(() => {
        this.$http({
          url: this.$http.adornUrl("/product/attrgroup/delete"),
          method: "post",
          data: this.$http.adornData(ids, false),
        }).then(({ data }) => {
          if (data && data.code === 0) {
            this.$message({
              message: "操作成功",
              type: "success",
              duration: 1500,
              onClose: () => {
                this.getDataList();
              },
            });
          } else {
            this.$message.error(data.msg);
          }
        });
      });
    },
  },
};
</script>
<style lang='scss' scoped>
//@import url(); 引入公共 css 类
</style>
/product/attrgroup-add-or-update.vue
<template>
  <el-dialog
    :title="!dataForm.attrGroupId ? '新增' : '修改'"
    :close-on-click-modal="false"
    :visible.sync="visible">
    <el-form :model="dataForm" :rules="dataRule" ref="dataForm" @keyup.enter.native="dataFormSubmit()" label-width="80px">
    <el-form-item label="组名" prop="attrGroupName">
      <el-input v-model="dataForm.attrGroupName" placeholder="组名"></el-input>
    </el-form-item>
    <el-form-item label="排序" prop="sort">
      <el-input v-model="dataForm.sort" placeholder="排序"></el-input>
    </el-form-item>
    <el-form-item label="描述" prop="descript">
      <el-input v-model="dataForm.descript" placeholder="描述"></el-input>
    </el-form-item>
    <el-form-item label="组图标" prop="icon">
      <el-input v-model="dataForm.icon" placeholder="组图标"></el-input>
    </el-form-item>
    <el-form-item label="所属分类id" prop="catelogId">
      <el-input v-model="dataForm.catelogId" placeholder="所属分类id"></el-input>
    </el-form-item>
    </el-form>
    <span slot="footer" class="dialog-footer">
      <el-button @click="visible = false">取消</el-button>
      <el-button type="primary" @click="dataFormSubmit()">确定</el-button>
    </span>
  </el-dialog>
</template>

<script>
  export default {
    data () {
      return {
        visible: false,
        dataForm: {
          attrGroupId: 0,
          attrGroupName: '',
          sort: '',
          descript: '',
          icon: '',
          catelogId: ''
        },
        dataRule: {
          attrGroupName: [
            { required: true, message: '组名不能为空', trigger: 'blur' }
          ],
          sort: [
            { required: true, message: '排序不能为空', trigger: 'blur' }
          ],
          descript: [
            { required: true, message: '描述不能为空', trigger: 'blur' }
          ],
          icon: [
            { required: true, message: '组图标不能为空', trigger: 'blur' }
          ],
          catelogId: [
            { required: true, message: '所属分类id不能为空', trigger: 'blur' }
          ]
        }
      }
    },
    methods: {
      init (id) {
        this.dataForm.attrGroupId = id || 0
        this.visible = true
        this.$nextTick(() => {
          this.$refs['dataForm'].resetFields()
          if (this.dataForm.attrGroupId) {
            this.$http({
              url: this.$http.adornUrl(`/product/attrgroup/info/${this.dataForm.attrGroupId}`),
              method: 'get',
              params: this.$http.adornParams()
            }).then(({data}) => {
              if (data && data.code === 0) {
                this.dataForm.attrGroupName = data.attrGroup.attrGroupName
                this.dataForm.sort = data.attrGroup.sort
                this.dataForm.descript = data.attrGroup.descript
                this.dataForm.icon = data.attrGroup.icon
                this.dataForm.catelogId = data.attrGroup.catelogId
              }
            })
          }
        })
      },
      // 表单提交
      dataFormSubmit () {
        this.$refs['dataForm'].validate((valid) => {
          if (valid) {
            this.$http({
              url: this.$http.adornUrl(`/product/attrgroup/${!this.dataForm.attrGroupId ? 'save' : 'update'}`),
              method: 'post',
              data: this.$http.adornData({
                'attrGroupId': this.dataForm.attrGroupId || undefined,
                'attrGroupName': this.dataForm.attrGroupName,
                'sort': this.dataForm.sort,
                'descript': this.dataForm.descript,
                'icon': this.dataForm.icon,
                'catelogId': this.dataForm.catelogId
              })
            }).then(({data}) => {
              if (data && data.code === 0) {
                this.$message({
                  message: '操作成功',
                  type: 'success',
                  duration: 1500,
                  onClose: () => {
                    this.visible = false
                    this.$emit('refreshDataList')
                  }
                })
              } else {
                this.$message.error(data.msg)
              }
            })
          }
        })
      }
    }
  }
</script>
2、获取分类属性分组
https://easydoc.xyz/s/78237135/ZUqEdvA4/OXTgKobR

查询功能:
GET /product/attrgroup/list/{catelogId}

(1)按照这个url,去gulimall-product项目下的com.atguigu.gulimall.product.controller.AttrGroupController里修改
/**
 * 分页查询分类属性分组
 */
@RequestMapping("/list/{catelogId}")
//@RequiresPermissions("product:attrgroup:list")
public R list(@RequestParam Map<String, Object> params, @PathVariable("catelogId")Long catelogId){
    //PageUtils page = attrGroupService.queryPage(params);
    PageUtils page = attrGroupService.queryPage(params,catelogId);
    return R.ok().put("page", page);
}
(2)增加接口与实现
/**
 * 分类查询分类属性分组
 * @param params
 * @param catelogId
 * @return
 */
@Override
public PageUtils queryPage(Map<String, Object> params, Long catelogId) {
    if(catelogId == 0){
        IPage<AttrGroupEntity> page = this.page(new Query<AttrGroupEntity>().getPage(params), new QueryWrapper<AttrGroupEntity>());
        return new PageUtils(page);
    }else{
        String key = (String) params.get("key");
        //select * from pms_attr_group where catelog_id=? and (attr_group_id=key or attr_group_name like %key%)
        QueryWrapper<AttrGroupEntity> wrapper = new QueryWrapper<AttrGroupEntity>().eq("catelog_id",catelogId);
        if(!StringUtils.isEmpty(key)){
            wrapper.and((obj)->{
                obj.eq("attr_group_id", key).or().like("attr_group_name",key);
            });
        }
        IPage<AttrGroupEntity> page = this.page(new Query<AttrGroupEntity>().getPage(params), wrapper);
        return new PageUtils(page);
    }
}
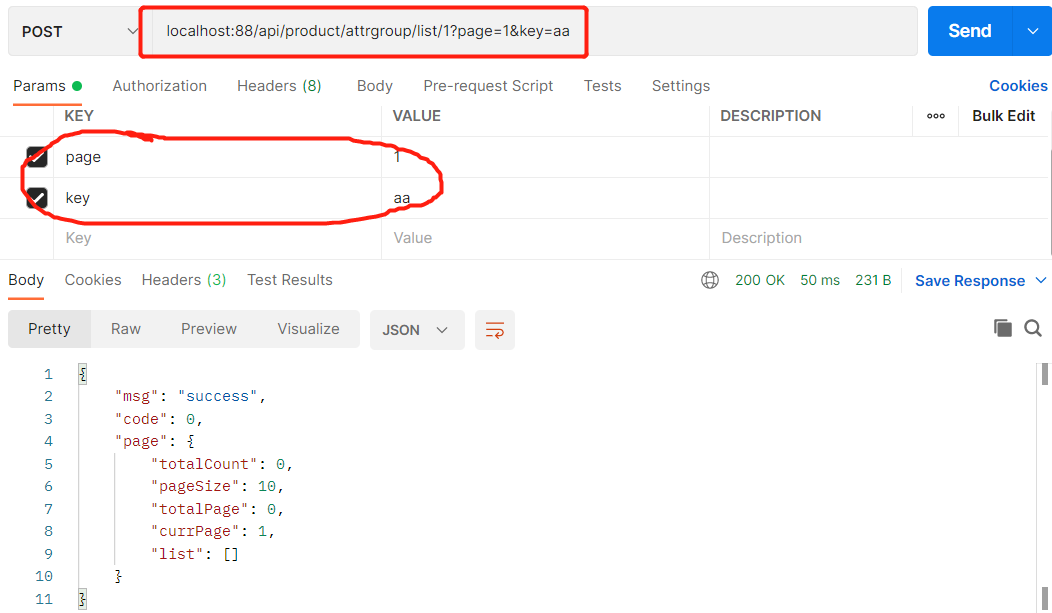
(3)测试
  localhost:88/api/product/attrgroup/list/1
(4)调整前端
发送请求时url携带id信息,${this.catId},get参数携带page信息
点击第3级分类时才查,修改attr-group.vue中的函数即可
3、分组新增 & 级联选择器
上面演示了查询功能,下面写insert分类
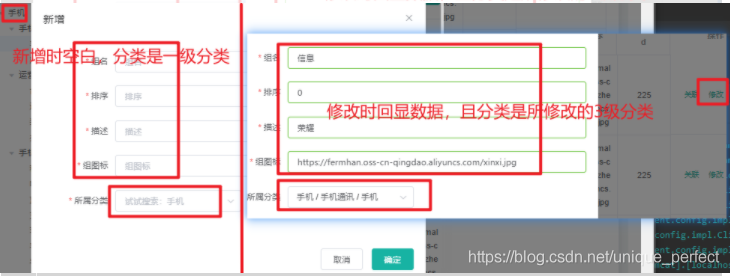
但是想要下面这个效果:
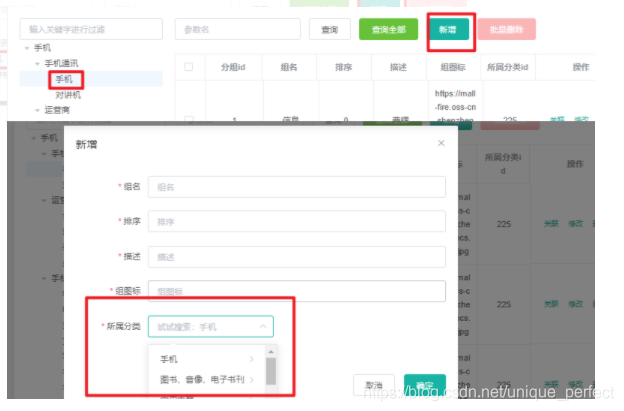
下拉菜单应该是手机一级分类,这个功能是级联选择器
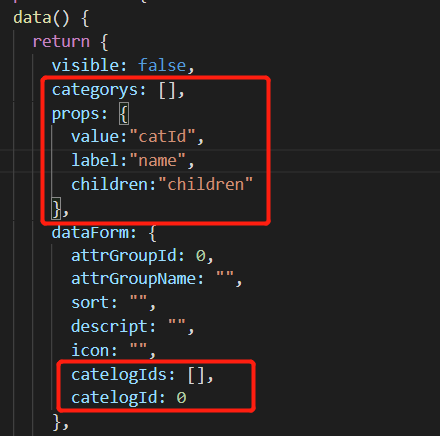
(1)级联选择器<el-cascader>
  级联选择的下拉同样是个options数组,多级的话用children属性即可
  只需为 Cascader 的options属性指定选项数组即可渲染出一个级联选择器。通过 props.expandTrigger 可以定义展开子级菜单的触发方式

  去vue里找src\views\modules\product\attrgroup-add-or-update.vue
  修改对应的位置为<el-cascader 。。。>
  把data()里的数组categorys绑定到options上即可,更详细的设置可以用props绑定


@JsonInclude去空字段
优化:没有下级菜单时不要有下一级空菜单,在java端把children属性空值去掉,空集合时去掉字段,
可以用@JsonInclude(Inlcude.NON_EMPTY)注解标注在实体类com.atguigu.gulimall.product.entity.BrandEntity的属性上,
@TableField(exist =false) @JsonInclude(JsonInclude.Include.NON_EMPTY) private List<CategoryEntity> children;
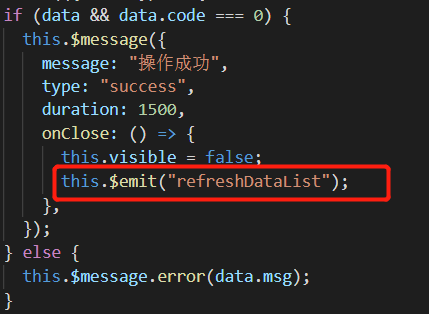
提交完后返回页面也刷新了,是用到了父子组件。在$message弹窗结束回调 $this.emit
4、分组修改 & 级联选择器回显
接下来要解决的问题是,修改了该vue后,新增是可以用,修改回显就有问题了,应该回显3级
在init方法里进行回显
但是分类的id还是不对,应该是用数组封装的路径
修改AttrGroupEntity
/**
 * 三级分类修改的时候回显路径
*/
@TableField(exist = false)
private Long[] catelogPath;
修改controller
/**
   * 信息
*/
@RequestMapping("/info/{attrGroupId}")
  //@RequiresPermissions("product:attrgroup:info")
public R info(@PathVariable("attrGroupId") Long attrGroupId){
   AttrGroupEntity attrGroup = attrGroupService.getById(attrGroupId);
   // 用当前当前分类id查询完整路径并写入 attrGroup
      attrGroup.setCatelogPath(categoryService.findCatelogPath(attrGroup.getCatelogId()));
      return R.ok().put("attrGroup", attrGroup);
  }
添加service
/**
 * 找到catelogId的完整路径
* @param catelogId
* @return
*/
@Override
public Long[] findCatelogPath(Long catelogId) {
    List<Long> paths = new ArrayList<>();
    List<Long> parentPath = findParentPath(catelogId, paths);
    Collections.reverse(parentPath);
    return (Long[])parentPath.toArray(new Long[parentPath.size()]);
}
/**
 * 递归收集所有父节点
* @param catelogId
* @param paths
* @return
*/
private List<Long> findParentPath(Long catelogId, List<Long> paths){
    //1、收集当前节点id
paths.add(catelogId);
    CategoryEntity byId = this.getById(catelogId);
    if(byId.getParentCid()!=0){
        findParentPath(byId.getParentCid(), paths);
    }
    return paths;
}
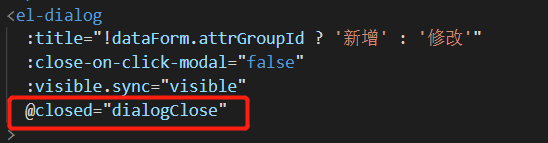
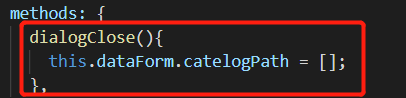
优化:会话关闭时清空内容,防止下次开启还遗留数据
5、品牌分类关联 与 级联更新
恢复分类原始数据
DROP TABLE IF EXISTS `pms_category`;

CREATE TABLE `pms_category` (
  `cat_id` bigint(20) NOT NULL AUTO_INCREMENT COMMENT '分类id',
  `name` char(50) DEFAULT NULL COMMENT '分类名称',
  `parent_cid` bigint(20) DEFAULT NULL COMMENT '父分类id',
  `cat_level` int(11) DEFAULT NULL COMMENT '层级',
  `show_status` tinyint(4) DEFAULT NULL COMMENT '是否显示[0-不显示,1显示]',
  `sort` int(11) DEFAULT NULL COMMENT '排序',
  `icon` char(255) DEFAULT NULL COMMENT '图标地址',
  `product_unit` char(50) DEFAULT NULL COMMENT '计量单位',
  `product_count` int(11) DEFAULT NULL COMMENT '商品数量',
  PRIMARY KEY (`cat_id`)
) ENGINE=InnoDB AUTO_INCREMENT=1433 DEFAULT CHARSET=utf8mb4 COMMENT='商品三级分类';

/*Data for the table `pms_category` */

insert  into `pms_category`(`cat_id`,`name`,`parent_cid`,`cat_level`,`show_status`,`sort`,`icon`,`product_unit`,`product_count`) values (1,'图书、音像、电子书刊',0,1,1,0,NULL,NULL,0),(2,'手机',0,1,1,0,NULL,NULL,0),(3,'家用电器',0,1,1,0,NULL,NULL,0),(4,'数码',0,1,1,0,NULL,NULL,0),(5,'家居家装',0,1,1,0,NULL,NULL,0),(6,'电脑办公',0,1,1,0,NULL,NULL,0),(7,'厨具',0,1,1,0,NULL,NULL,0),(8,'个护化妆',0,1,1,0,NULL,NULL,0),(9,'服饰内衣',0,1,1,0,NULL,NULL,0),(10,'钟表',0,1,1,0,NULL,NULL,0),(11,'鞋靴',0,1,1,0,NULL,NULL,0),(12,'母婴',0,1,1,0,NULL,NULL,0),(13,'礼品箱包',0,1,1,0,NULL,NULL,0),(14,'食品饮料、保健食品',0,1,1,0,NULL,NULL,0),(15,'珠宝',0,1,1,0,NULL,NULL,0),(16,'汽车用品',0,1,1,0,NULL,NULL,0),(17,'运动健康',0,1,1,0,NULL,NULL,0),(18,'玩具乐器',0,1,1,0,NULL,NULL,0),(19,'彩票、旅行、充值、票务',0,1,1,0,NULL,NULL,0),(20,'生鲜',0,1,1,0,NULL,NULL,0),(21,'整车',0,1,1,0,NULL,NULL,0),(22,'电子书刊',1,2,1,0,NULL,NULL,0),(23,'音像',1,2,1,0,NULL,NULL,0),(24,'英文原版',1,2,1,0,NULL,NULL,0),(25,'文艺',1,2,1,0,NULL,NULL,0),(26,'少儿',1,2,1,0,NULL,NULL,0),(27,'人文社科',1,2,1,0,NULL,NULL,0),(28,'经管励志',1,2,1,0,NULL,NULL,0),(29,'生活',1,2,1,0,NULL,NULL,0),(30,'科技',1,2,1,0,NULL,NULL,0),(31,'教育',1,2,1,0,NULL,NULL,0),(32,'港台图书',1,2,1,0,NULL,NULL,0),(33,'其他',1,2,1,0,NULL,NULL,0),(34,'手机通讯',2,2,1,0,NULL,NULL,0),(35,'运营商',2,2,1,0,NULL,NULL,0),(36,'手机配件',2,2,1,0,NULL,NULL,0),(37,'大 家 电',3,2,1,0,NULL,NULL,0),(38,'厨卫大电',3,2,1,0,NULL,NULL,0),(39,'厨房小电',3,2,1,0,NULL,NULL,0),(40,'生活电器',3,2,1,0,NULL,NULL,0),(41,'个护健康',3,2,1,0,NULL,NULL,0),(42,'五金家装',3,2,1,0,NULL,NULL,0),(43,'摄影摄像',4,2,1,0,NULL,NULL,0),(44,'数码配件',4,2,1,0,NULL,NULL,0),(45,'智能设备',4,2,1,0,NULL,NULL,0),(46,'影音娱乐',4,2,1,0,NULL,NULL,0),(47,'电子教育',4,2,1,0,NULL,NULL,0),(48,'虚拟商品',4,2,1,0,NULL,NULL,0),(49,'家纺',5,2,1,0,NULL,NULL,0),(50,'灯具',5,2,1,0,NULL,NULL,0),(51,'生活日用',5,2,1,0,NULL,NULL,0),(52,'家装软饰',5,2,1,0,NULL,NULL,0),(53,'宠物生活',5,2,1,0,NULL,NULL,0),(54,'电脑整机',6,2,1,0,NULL,NULL,0),(55,'电脑配件',6,2,1,0,NULL,NULL,0),(56,'外设产品',6,2,1,0,NULL,NULL,0),(57,'游戏设备',6,2,1,0,NULL,NULL,0),(58,'网络产品',6,2,1,0,NULL,NULL,0),(59,'办公设备',6,2,1,0,NULL,NULL,0),(60,'文具/耗材',6,2,1,0,NULL,NULL,0),(61,'服务产品',6,2,1,0,NULL,NULL,0),(62,'烹饪锅具',7,2,1,0,NULL,NULL,0),(63,'刀剪菜板',7,2,1,0,NULL,NULL,0),(64,'厨房配件',7,2,1,0,NULL,NULL,0),(65,'水具酒具',7,2,1,0,NULL,NULL,0),(66,'餐具',7,2,1,0,NULL,NULL,0),(67,'酒店用品',7,2,1,0,NULL,NULL,0),(68,'茶具/咖啡具',7,2,1,0,NULL,NULL,0),(69,'清洁用品',8,2,1,0,NULL,NULL,0),(70,'面部护肤',8,2,1,0,NULL,NULL,0),(71,'身体护理',8,2,1,0,NULL,NULL,0),(72,'口腔护理',8,2,1,0,NULL,NULL,0),(73,'女性护理',8,2,1,0,NULL,NULL,0),(74,'洗发护发',8,2,1,0,NULL,NULL,0),(75,'香水彩妆',8,2,1,0,NULL,NULL,0),(76,'女装',9,2,1,0,NULL,NULL,0),(77,'男装',9,2,1,0,NULL,NULL,0),(78,'内衣',9,2,1,0,NULL,NULL,0),(79,'洗衣服务',9,2,1,0,NULL,NULL,0),(80,'服饰配件',9,2,1,0,NULL,NULL,0),(81,'钟表',10,2,1,0,NULL,NULL,0),(82,'流行男鞋',11,2,1,0,NULL,NULL,0),(83,'时尚女鞋',11,2,1,0,NULL,NULL,0),(84,'奶粉',12,2,1,0,NULL,NULL,0),(85,'营养辅食',12,2,1,0,NULL,NULL,0),(86,'尿裤湿巾',12,2,1,0,NULL,NULL,0),(87,'喂养用品',12,2,1,0,NULL,NULL,0),(88,'洗护用品',12,2,1,0,NULL,NULL,0),(89,'童车童床',12,2,1,0,NULL,NULL,0),(90,'寝居服饰',12,2,1,0,NULL,NULL,0),(91,'妈妈专区',12,2,1,0,NULL,NULL,0),(92,'童装童鞋',12,2,1,0,NULL,NULL,0),(93,'安全座椅',12,2,1,0,NULL,NULL,0),(94,'潮流女包',13,2,1,0,NULL,NULL,0),(95,'精品男包',13,2,1,0,NULL,NULL,0),(96,'功能箱包',13,2,1,0,NULL,NULL,0),(97,'礼品',13,2,1,0,NULL,NULL,0),(98,'奢侈品',13,2,1,0,NULL,NULL,0),(99,'婚庆',13,2,1,0,NULL,NULL,0),(100,'进口食品',14,2,1,0,NULL,NULL,0),(101,'地方特产',14,2,1,0,NULL,NULL,0),(102,'休闲食品',14,2,1,0,NULL,NULL,0),(103,'粮油调味',14,2,1,0,NULL,NULL,0),(104,'饮料冲调',14,2,1,0,NULL,NULL,0),(105,'食品礼券',14,2,1,0,NULL,NULL,0),(106,'茗茶',14,2,1,0,NULL,NULL,0),(107,'时尚饰品',15,2,1,0,NULL,NULL,0),(108,'黄金',15,2,1,0,NULL,NULL,0),(109,'K金饰品',15,2,1,0,NULL,NULL,0),(110,'金银投资',15,2,1,0,NULL,NULL,0),(111,'银饰',15,2,1,0,NULL,NULL,0),(112,'钻石',15,2,1,0,NULL,NULL,0),(113,'翡翠玉石',15,2,1,0,NULL,NULL,0),(114,'水晶玛瑙',15,2,1,0,NULL,NULL,0),(115,'彩宝',15,2,1,0,NULL,NULL,0),(116,'铂金',15,2,1,0,NULL,NULL,0),(117,'木手串/把件',15,2,1,0,NULL,NULL,0),(118,'珍珠',15,2,1,0,NULL,NULL,0),(119,'维修保养',16,2,1,0,NULL,NULL,0),(120,'车载电器',16,2,1,0,NULL,NULL,0),(121,'美容清洗',16,2,1,0,NULL,NULL,0),(122,'汽车装饰',16,2,1,0,NULL,NULL,0),(123,'安全自驾',16,2,1,0,NULL,NULL,0),(124,'汽车服务',16,2,1,0,NULL,NULL,0),(125,'赛事改装',16,2,1,0,NULL,NULL,0),(126,'运动鞋包',17,2,1,0,NULL,NULL,0),(127,'运动服饰',17,2,1,0,NULL,NULL,0),(128,'骑行运动',17,2,1,0,NULL,NULL,0),(129,'垂钓用品',17,2,1,0,NULL,NULL,0),(130,'游泳用品',17,2,1,0,NULL,NULL,0),(131,'户外鞋服',17,2,1,0,NULL,NULL,0),(132,'户外装备',17,2,1,0,NULL,NULL,0),(133,'健身训练',17,2,1,0,NULL,NULL,0),(134,'体育用品',17,2,1,0,NULL,NULL,0),(135,'适用年龄',18,2,1,0,NULL,NULL,0),(136,'遥控/电动',18,2,1,0,NULL,NULL,0),(137,'毛绒布艺',18,2,1,0,NULL,NULL,0),(138,'娃娃玩具',18,2,1,0,NULL,NULL,0),(139,'模型玩具',18,2,1,0,NULL,NULL,0),(140,'健身玩具',18,2,1,0,NULL,NULL,0),(141,'动漫玩具',18,2,1,0,NULL,NULL,0),(142,'益智玩具',18,2,1,0,NULL,NULL,0),(143,'积木拼插',18,2,1,0,NULL,NULL,0),(144,'DIY玩具',18,2,1,0,NULL,NULL,0),(145,'创意减压',18,2,1,0,NULL,NULL,0),(146,'乐器',18,2,1,0,NULL,NULL,0),(147,'彩票',19,2,1,0,NULL,NULL,0),(148,'机票',19,2,1,0,NULL,NULL,0),(149,'酒店',19,2,1,0,NULL,NULL,0),(150,'旅行',19,2,1,0,NULL,NULL,0),(151,'充值',19,2,1,0,NULL,NULL,0),(152,'游戏',19,2,1,0,NULL,NULL,0),(153,'票务',19,2,1,0,NULL,NULL,0),(154,'产地直供',20,2,1,0,NULL,NULL,0),(155,'水果',20,2,1,0,NULL,NULL,0),(156,'猪牛羊肉',20,2,1,0,NULL,NULL,0),(157,'海鲜水产',20,2,1,0,NULL,NULL,0),(158,'禽肉蛋品',20,2,1,0,NULL,NULL,0),(159,'冷冻食品',20,2,1,0,NULL,NULL,0),(160,'熟食腊味',20,2,1,0,NULL,NULL,0),(161,'饮品甜品',20,2,1,0,NULL,NULL,0),(162,'蔬菜',20,2,1,0,NULL,NULL,0),(163,'全新整车',21,2,1,0,NULL,NULL,0),(164,'二手车',21,2,1,0,NULL,NULL,0),(165,'电子书',22,3,1,0,NULL,NULL,0),(166,'网络原创',22,3,1,0,NULL,NULL,0),(167,'数字杂志',22,3,1,0,NULL,NULL,0),(168,'多媒体图书',22,3,1,0,NULL,NULL,0),(169,'音乐',23,3,1,0,NULL,NULL,0),(170,'影视',23,3,1,0,NULL,NULL,0),(171,'教育音像',23,3,1,0,NULL,NULL,0),(172,'少儿',24,3,1,0,NULL,NULL,0),(173,'商务投资',24,3,1,0,NULL,NULL,0),(174,'英语学习与考试',24,3,1,0,NULL,NULL,0),(175,'文学',24,3,1,0,NULL,NULL,0),(176,'传记',24,3,1,0,NULL,NULL,0),(177,'励志',24,3,1,0,NULL,NULL,0),(178,'小说',25,3,1,0,NULL,NULL,0),(179,'文学',25,3,1,0,NULL,NULL,0),(180,'青春文学',25,3,1,0,NULL,NULL,0),(181,'传记',25,3,1,0,NULL,NULL,0),(182,'艺术',25,3,1,0,NULL,NULL,0),(183,'少儿',26,3,1,0,NULL,NULL,0),(184,'0-2岁',26,3,1,0,NULL,NULL,0),(185,'3-6岁',26,3,1,0,NULL,NULL,0),(186,'7-10岁',26,3,1,0,NULL,NULL,0),(187,'11-14岁',26,3,1,0,NULL,NULL,0),(188,'历史',27,3,1,0,NULL,NULL,0),(189,'哲学',27,3,1,0,NULL,NULL,0),(190,'国学',27,3,1,0,NULL,NULL,0),(191,'政治/军事',27,3,1,0,NULL,NULL,0),(192,'法律',27,3,1,0,NULL,NULL,0),(193,'人文社科',27,3,1,0,NULL,NULL,0),(194,'心理学',27,3,1,0,NULL,NULL,0),(195,'文化',27,3,1,0,NULL,NULL,0),(196,'社会科学',27,3,1,0,NULL,NULL,0),(197,'经济',28,3,1,0,NULL,NULL,0),(198,'金融与投资',28,3,1,0,NULL,NULL,0),(199,'管理',28,3,1,0,NULL,NULL,0),(200,'励志与成功',28,3,1,0,NULL,NULL,0),(201,'生活',29,3,1,0,NULL,NULL,0),(202,'健身与保健',29,3,1,0,NULL,NULL,0),(203,'家庭与育儿',29,3,1,0,NULL,NULL,0),(204,'旅游',29,3,1,0,NULL,NULL,0),(205,'烹饪美食',29,3,1,0,NULL,NULL,0),(206,'工业技术',30,3,1,0,NULL,NULL,0),(207,'科普读物',30,3,1,0,NULL,NULL,0),(208,'建筑',30,3,1,0,NULL,NULL,0),(209,'医学',30,3,1,0,NULL,NULL,0),(210,'科学与自然',30,3,1,0,NULL,NULL,0),(211,'计算机与互联网',30,3,1,0,NULL,NULL,0),(212,'电子通信',30,3,1,0,NULL,NULL,0),(213,'中小学教辅',31,3,1,0,NULL,NULL,0),(214,'教育与考试',31,3,1,0,NULL,NULL,0),(215,'外语学习',31,3,1,0,NULL,NULL,0),(216,'大中专教材',31,3,1,0,NULL,NULL,0),(217,'字典词典',31,3,1,0,NULL,NULL,0),(218,'艺术/设计/收藏',32,3,1,0,NULL,NULL,0),(219,'经济管理',32,3,1,0,NULL,NULL,0),(220,'文化/学术',32,3,1,0,NULL,NULL,0),(221,'少儿',32,3,1,0,NULL,NULL,0),(222,'工具书',33,3,1,0,NULL,NULL,0),(223,'杂志/期刊',33,3,1,0,NULL,NULL,0),(224,'套装书',33,3,1,0,NULL,NULL,0),(225,'手机',34,3,1,0,NULL,NULL,0),(226,'对讲机',34,3,1,0,NULL,NULL,0),(227,'合约机',35,3,1,0,NULL,NULL,0),(228,'选号中心',35,3,1,0,NULL,NULL,0),(229,'装宽带',35,3,1,0,NULL,NULL,0),(230,'办套餐',35,3,1,0,NULL,NULL,0),(231,'移动电源',36,3,1,0,NULL,NULL,0),(232,'电池/移动电源',36,3,1,0,NULL,NULL,0),(233,'蓝牙耳机',36,3,1,0,NULL,NULL,0),(234,'充电器/数据线',36,3,1,0,NULL,NULL,0),(235,'苹果周边',36,3,1,0,NULL,NULL,0),(236,'手机耳机',36,3,1,0,NULL,NULL,0),(237,'手机贴膜',36,3,1,0,NULL,NULL,0),(238,'手机存储卡',36,3,1,0,NULL,NULL,0),(239,'充电器',36,3,1,0,NULL,NULL,0),(240,'数据线',36,3,1,0,NULL,NULL,0),(241,'手机保护套',36,3,1,0,NULL,NULL,0),(242,'车载配件',36,3,1,0,NULL,NULL,0),(243,'iPhone 配件',36,3,1,0,NULL,NULL,0),(244,'手机电池',36,3,1,0,NULL,NULL,0),(245,'创意配件',36,3,1,0,NULL,NULL,0),(246,'便携/无线音响',36,3,1,0,NULL,NULL,0),(247,'手机饰品',36,3,1,0,NULL,NULL,0),(248,'拍照配件',36,3,1,0,NULL,NULL,0),(249,'手机支架',36,3,1,0,NULL,NULL,0),(250,'平板电视',37,3,1,0,NULL,NULL,0),(251,'空调',37,3,1,0,NULL,NULL,0),(252,'冰箱',37,3,1,0,NULL,NULL,0),(253,'洗衣机',37,3,1,0,NULL,NULL,0),(254,'家庭影院',37,3,1,0,NULL,NULL,0),(255,'DVD/电视盒子',37,3,1,0,NULL,NULL,0),(256,'迷你音响',37,3,1,0,NULL,NULL,0),(257,'冷柜/冰吧',37,3,1,0,NULL,NULL,0),(258,'家电配件',37,3,1,0,NULL,NULL,0),(259,'功放',37,3,1,0,NULL,NULL,0),(260,'回音壁/Soundbar',37,3,1,0,NULL,NULL,0),(261,'Hi-Fi专区',37,3,1,0,NULL,NULL,0),(262,'电视盒子',37,3,1,0,NULL,NULL,0),(263,'酒柜',37,3,1,0,NULL,NULL,0),(264,'燃气灶',38,3,1,0,NULL,NULL,0),(265,'油烟机',38,3,1,0,NULL,NULL,0),(266,'热水器',38,3,1,0,NULL,NULL,0),(267,'消毒柜',38,3,1,0,NULL,NULL,0),(268,'洗碗机',38,3,1,0,NULL,NULL,0),(269,'料理机',39,3,1,0,NULL,NULL,0),(270,'榨汁机',39,3,1,0,NULL,NULL,0),(271,'电饭煲',39,3,1,0,NULL,NULL,0),(272,'电压力锅',39,3,1,0,NULL,NULL,0),(273,'豆浆机',39,3,1,0,NULL,NULL,0),(274,'咖啡机',39,3,1,0,NULL,NULL,0),(275,'微波炉',39,3,1,0,NULL,NULL,0),(276,'电烤箱',39,3,1,0,NULL,NULL,0),(277,'电磁炉',39,3,1,0,NULL,NULL,0),(278,'面包机',39,3,1,0,NULL,NULL,0),(279,'煮蛋器',39,3,1,0,NULL,NULL,0),(280,'酸奶机',39,3,1,0,NULL,NULL,0),(281,'电炖锅',39,3,1,0,NULL,NULL,0),(282,'电水壶/热水瓶',39,3,1,0,NULL,NULL,0),(283,'电饼铛',39,3,1,0,NULL,NULL,0),(284,'多用途锅',39,3,1,0,NULL,NULL,0),(285,'电烧烤炉',39,3,1,0,NULL,NULL,0),(286,'果蔬解毒机',39,3,1,0,NULL,NULL,0),(287,'其它厨房电器',39,3,1,0,NULL,NULL,0),(288,'养生壶/煎药壶',39,3,1,0,NULL,NULL,0),(289,'电热饭盒',39,3,1,0,NULL,NULL,0),(290,'取暖电器',40,3,1,0,NULL,NULL,0),(291,'净化器',40,3,1,0,NULL,NULL,0),(292,'加湿器',40,3,1,0,NULL,NULL,0),(293,'扫地机器人',40,3,1,0,NULL,NULL,0),(294,'吸尘器',40,3,1,0,NULL,NULL,0),(295,'挂烫机/熨斗',40,3,1,0,NULL,NULL,0),(296,'插座',40,3,1,0,NULL,NULL,0),(297,'电话机',40,3,1,0,NULL,NULL,0),(298,'清洁机',40,3,1,0,NULL,NULL,0),(299,'除湿机',40,3,1,0,NULL,NULL,0),(300,'干衣机',40,3,1,0,NULL,NULL,0),(301,'收录/音机',40,3,1,0,NULL,NULL,0),(302,'电风扇',40,3,1,0,NULL,NULL,0),(303,'冷风扇',40,3,1,0,NULL,NULL,0),(304,'其它生活电器',40,3,1,0,NULL,NULL,0),(305,'生活电器配件',40,3,1,0,NULL,NULL,0),(306,'净水器',40,3,1,0,NULL,NULL,0),(307,'饮水机',40,3,1,0,NULL,NULL,0),(308,'剃须刀',41,3,1,0,NULL,NULL,0),(309,'剃/脱毛器',41,3,1,0,NULL,NULL,0),(310,'口腔护理',41,3,1,0,NULL,NULL,0),(311,'电吹风',41,3,1,0,NULL,NULL,0),(312,'美容器',41,3,1,0,NULL,NULL,0),(313,'理发器',41,3,1,0,NULL,NULL,0),(314,'卷/直发器',41,3,1,0,NULL,NULL,0),(315,'按摩椅',41,3,1,0,NULL,NULL,0),(316,'按摩器',41,3,1,0,NULL,NULL,0),(317,'足浴盆',41,3,1,0,NULL,NULL,0),(318,'血压计',41,3,1,0,NULL,NULL,0),(319,'电子秤/厨房秤',41,3,1,0,NULL,NULL,0),(320,'血糖仪',41,3,1,0,NULL,NULL,0),(321,'体温计',41,3,1,0,NULL,NULL,0),(322,'其它健康电器',41,3,1,0,NULL,NULL,0),(323,'计步器/脂肪检测仪',41,3,1,0,NULL,NULL,0),(324,'电动工具',42,3,1,0,NULL,NULL,0),(325,'手动工具',42,3,1,0,NULL,NULL,0),(326,'仪器仪表',42,3,1,0,NULL,NULL,0),(327,'浴霸/排气扇',42,3,1,0,NULL,NULL,0),(328,'灯具',42,3,1,0,NULL,NULL,0),(329,'LED灯',42,3,1,0,NULL,NULL,0),(330,'洁身器',42,3,1,0,NULL,NULL,0),(331,'水槽',42,3,1,0,NULL,NULL,0),(332,'龙头',42,3,1,0,NULL,NULL,0),(333,'淋浴花洒',42,3,1,0,NULL,NULL,0),(334,'厨卫五金',42,3,1,0,NULL,NULL,0),(335,'家具五金',42,3,1,0,NULL,NULL,0),(336,'门铃',42,3,1,0,NULL,NULL,0),(337,'电气开关',42,3,1,0,NULL,NULL,0),(338,'插座',42,3,1,0,NULL,NULL,0),(339,'电工电料',42,3,1,0,NULL,NULL,0),(340,'监控安防',42,3,1,0,NULL,NULL,0),(341,'电线/线缆',42,3,1,0,NULL,NULL,0),(342,'数码相机',43,3,1,0,NULL,NULL,0),(343,'单电/微单相机',43,3,1,0,NULL,NULL,0),(344,'单反相机',43,3,1,0,NULL,NULL,0),(345,'摄像机',43,3,1,0,NULL,NULL,0),(346,'拍立得',43,3,1,0,NULL,NULL,0),(347,'运动相机',43,3,1,0,NULL,NULL,0),(348,'镜头',43,3,1,0,NULL,NULL,0),(349,'户外器材',43,3,1,0,NULL,NULL,0),(350,'影棚器材',43,3,1,0,NULL,NULL,0),(351,'冲印服务',43,3,1,0,NULL,NULL,0),(352,'数码相框',43,3,1,0,NULL,NULL,0),(353,'存储卡',44,3,1,0,NULL,NULL,0),(354,'读卡器',44,3,1,0,NULL,NULL,0),(355,'滤镜',44,3,1,0,NULL,NULL,0),(356,'闪光灯/手柄',44,3,1,0,NULL,NULL,0),(357,'相机包',44,3,1,0,NULL,NULL,0),(358,'三脚架/云台',44,3,1,0,NULL,NULL,0),(359,'相机清洁/贴膜',44,3,1,0,NULL,NULL,0),(360,'机身附件',44,3,1,0,NULL,NULL,0),(361,'镜头附件',44,3,1,0,NULL,NULL,0),(362,'电池/充电器',44,3,1,0,NULL,NULL,0),(363,'移动电源',44,3,1,0,NULL,NULL,0),(364,'数码支架',44,3,1,0,NULL,NULL,0),(365,'智能手环',45,3,1,0,NULL,NULL,0),(366,'智能手表',45,3,1,0,NULL,NULL,0),(367,'智能眼镜',45,3,1,0,NULL,NULL,0),(368,'运动跟踪器',45,3,1,0,NULL,NULL,0),(369,'健康监测',45,3,1,0,NULL,NULL,0),(370,'智能配饰',45,3,1,0,NULL,NULL,0),(371,'智能家居',45,3,1,0,NULL,NULL,0),(372,'体感车',45,3,1,0,NULL,NULL,0),(373,'其他配件',45,3,1,0,NULL,NULL,0),(374,'智能机器人',45,3,1,0,NULL,NULL,0),(375,'无人机',45,3,1,0,NULL,NULL,0),(376,'MP3/MP4',46,3,1,0,NULL,NULL,0),(377,'智能设备',46,3,1,0,NULL,NULL,0),(378,'耳机/耳麦',46,3,1,0,NULL,NULL,0),(379,'便携/无线音箱',46,3,1,0,NULL,NULL,0),(380,'音箱/音响',46,3,1,0,NULL,NULL,0),(381,'高清播放器',46,3,1,0,NULL,NULL,0),(382,'收音机',46,3,1,0,NULL,NULL,0),(383,'MP3/MP4配件',46,3,1,0,NULL,NULL,0),(384,'麦克风',46,3,1,0,NULL,NULL,0),(385,'专业音频',46,3,1,0,NULL,NULL,0),(386,'苹果配件',46,3,1,0,NULL,NULL,0),(387,'学生平板',47,3,1,0,NULL,NULL,0),(388,'点读机/笔',47,3,1,0,NULL,NULL,0),(389,'早教益智',47,3,1,0,NULL,NULL,0),(390,'录音笔',47,3,1,0,NULL,NULL,0),(391,'电纸书',47,3,1,0,NULL,NULL,0),(392,'电子词典',47,3,1,0,NULL,NULL,0),(393,'复读机',47,3,1,0,NULL,NULL,0),(394,'延保服务',48,3,1,0,NULL,NULL,0),(395,'杀毒软件',48,3,1,0,NULL,NULL,0),(396,'积分商品',48,3,1,0,NULL,NULL,0),(397,'桌布/罩件',49,3,1,0,NULL,NULL,0),(398,'地毯地垫',49,3,1,0,NULL,NULL,0),(399,'沙发垫套/椅垫',49,3,1,0,NULL,NULL,0),(400,'床品套件',49,3,1,0,NULL,NULL,0),(401,'被子',49,3,1,0,NULL,NULL,0),(402,'枕芯',49,3,1,0,NULL,NULL,0),(403,'床单被罩',49,3,1,0,NULL,NULL,0),(404,'毯子',49,3,1,0,NULL,NULL,0),(405,'床垫/床褥',49,3,1,0,NULL,NULL,0),(406,'蚊帐',49,3,1,0,NULL,NULL,0),(407,'抱枕靠垫',49,3,1,0,NULL,NULL,0),(408,'毛巾浴巾',49,3,1,0,NULL,NULL,0),(409,'电热毯',49,3,1,0,NULL,NULL,0),(410,'窗帘/窗纱',49,3,1,0,NULL,NULL,0),(411,'布艺软饰',49,3,1,0,NULL,NULL,0),(412,'凉席',49,3,1,0,NULL,NULL,0),(413,'台灯',50,3,1,0,NULL,NULL,0),(414,'节能灯',50,3,1,0,NULL,NULL,0),(415,'装饰灯',50,3,1,0,NULL,NULL,0),(416,'落地灯',50,3,1,0,NULL,NULL,0),(417,'应急灯/手电',50,3,1,0,NULL,NULL,0),(418,'LED灯',50,3,1,0,NULL,NULL,0),(419,'吸顶灯',50,3,1,0,NULL,NULL,0),(420,'五金电器',50,3,1,0,NULL,NULL,0),(421,'筒灯射灯',50,3,1,0,NULL,NULL,0),(422,'吊灯',50,3,1,0,NULL,NULL,0),(423,'氛围照明',50,3,1,0,NULL,NULL,0),(424,'保暖防护',51,3,1,0,NULL,NULL,0),(425,'收纳用品',51,3,1,0,NULL,NULL,0),(426,'雨伞雨具',51,3,1,0,NULL,NULL,0),(427,'浴室用品',51,3,1,0,NULL,NULL,0),(428,'缝纫/针织用品',51,3,1,0,NULL,NULL,0),(429,'洗晒/熨烫',51,3,1,0,NULL,NULL,0),(430,'净化除味',51,3,1,0,NULL,NULL,0),(431,'相框/照片墙',52,3,1,0,NULL,NULL,0),(432,'装饰字画',52,3,1,0,NULL,NULL,0),(433,'节庆饰品',52,3,1,0,NULL,NULL,0),(434,'手工/十字绣',52,3,1,0,NULL,NULL,0),(435,'装饰摆件',52,3,1,0,NULL,NULL,0),(436,'帘艺隔断',52,3,1,0,NULL,NULL,0),(437,'墙贴/装饰贴',52,3,1,0,NULL,NULL,0),(438,'钟饰',52,3,1,0,NULL,NULL,0),(439,'花瓶花艺',52,3,1,0,NULL,NULL,0),(440,'香薰蜡烛',52,3,1,0,NULL,NULL,0),(441,'创意家居',52,3,1,0,NULL,NULL,0),(442,'宠物主粮',53,3,1,0,NULL,NULL,0),(443,'宠物零食',53,3,1,0,NULL,NULL,0),(444,'医疗保健',53,3,1,0,NULL,NULL,0),(445,'家居日用',53,3,1,0,NULL,NULL,0),(446,'宠物玩具',53,3,1,0,NULL,NULL,0),(447,'出行装备',53,3,1,0,NULL,NULL,0),(448,'洗护美容',53,3,1,0,NULL,NULL,0),(449,'笔记本',54,3,1,0,NULL,NULL,0),(450,'超极本',54,3,1,0,NULL,NULL,0),(451,'游戏本',54,3,1,0,NULL,NULL,0),(452,'平板电脑',54,3,1,0,NULL,NULL,0),(453,'平板电脑配件',54,3,1,0,NULL,NULL,0),(454,'台式机',54,3,1,0,NULL,NULL,0),(455,'服务器/工作站',54,3,1,0,NULL,NULL,0),(456,'笔记本配件',54,3,1,0,NULL,NULL,0),(457,'一体机',54,3,1,0,NULL,NULL,0),(458,'CPU',55,3,1,0,NULL,NULL,0),(459,'主板',55,3,1,0,NULL,NULL,0),(460,'显卡',55,3,1,0,NULL,NULL,0),(461,'硬盘',55,3,1,0,NULL,NULL,0),(462,'SSD固态硬盘',55,3,1,0,NULL,NULL,0),(463,'内存',55,3,1,0,NULL,NULL,0),(464,'机箱',55,3,1,0,NULL,NULL,0),(465,'电源',55,3,1,0,NULL,NULL,0),(466,'显示器',55,3,1,0,NULL,NULL,0),(467,'刻录机/光驱',55,3,1,0,NULL,NULL,0),(468,'散热器',55,3,1,0,NULL,NULL,0),(469,'声卡/扩展卡',55,3,1,0,NULL,NULL,0),(470,'装机配件',55,3,1,0,NULL,NULL,0),(471,'组装电脑',55,3,1,0,NULL,NULL,0),(472,'移动硬盘',56,3,1,0,NULL,NULL,0),(473,'U盘',56,3,1,0,NULL,NULL,0),(474,'鼠标',56,3,1,0,NULL,NULL,0),(475,'键盘',56,3,1,0,NULL,NULL,0),(476,'鼠标垫',56,3,1,0,NULL,NULL,0),(477,'摄像头',56,3,1,0,NULL,NULL,0),(478,'手写板',56,3,1,0,NULL,NULL,0),(479,'硬盘盒',56,3,1,0,NULL,NULL,0),(480,'插座',56,3,1,0,NULL,NULL,0),(481,'线缆',56,3,1,0,NULL,NULL,0),(482,'UPS电源',56,3,1,0,NULL,NULL,0),(483,'电脑工具',56,3,1,0,NULL,NULL,0),(484,'游戏设备',56,3,1,0,NULL,NULL,0),(485,'电玩',56,3,1,0,NULL,NULL,0),(486,'电脑清洁',56,3,1,0,NULL,NULL,0),(487,'网络仪表仪器',56,3,1,0,NULL,NULL,0),(488,'游戏机',57,3,1,0,NULL,NULL,0),(489,'游戏耳机',57,3,1,0,NULL,NULL,0),(490,'手柄/方向盘',57,3,1,0,NULL,NULL,0),(491,'游戏软件',57,3,1,0,NULL,NULL,0),(492,'游戏周边',57,3,1,0,NULL,NULL,0),(493,'路由器',58,3,1,0,NULL,NULL,0),(494,'网卡',58,3,1,0,NULL,NULL,0),(495,'交换机',58,3,1,0,NULL,NULL,0),(496,'网络存储',58,3,1,0,NULL,NULL,0),(497,'4G/3G上网',58,3,1,0,NULL,NULL,0),(498,'网络盒子',58,3,1,0,NULL,NULL,0),(499,'网络配件',58,3,1,0,NULL,NULL,0),(500,'投影机',59,3,1,0,NULL,NULL,0),(501,'投影配件',59,3,1,0,NULL,NULL,0),(502,'多功能一体机',59,3,1,0,NULL,NULL,0),(503,'打印机',59,3,1,0,NULL,NULL,0),(504,'传真设备',59,3,1,0,NULL,NULL,0),(505,'验钞/点钞机',59,3,1,0,NULL,NULL,0),(506,'扫描设备',59,3,1,0,NULL,NULL,0),(507,'复合机',59,3,1,0,NULL,NULL,0),(508,'碎纸机',59,3,1,0,NULL,NULL,0),(509,'考勤机',59,3,1,0,NULL,NULL,0),(510,'收款/POS机',59,3,1,0,NULL,NULL,0),(511,'会议音频视频',59,3,1,0,NULL,NULL,0),(512,'保险柜',59,3,1,0,NULL,NULL,0),(513,'装订/封装机',59,3,1,0,NULL,NULL,0),(514,'安防监控',59,3,1,0,NULL,NULL,0),(515,'办公家具',59,3,1,0,NULL,NULL,0),(516,'白板',59,3,1,0,NULL,NULL,0),(517,'硒鼓/墨粉',60,3,1,0,NULL,NULL,0),(518,'墨盒',60,3,1,0,NULL,NULL,0),(519,'色带',60,3,1,0,NULL,NULL,0),(520,'纸类',60,3,1,0,NULL,NULL,0),(521,'办公文具',60,3,1,0,NULL,NULL,0),(522,'学生文具',60,3,1,0,NULL,NULL,0),(523,'财会用品',60,3,1,0,NULL,NULL,0),(524,'文件管理',60,3,1,0,NULL,NULL,0),(525,'本册/便签',60,3,1,0,NULL,NULL,0),(526,'计算器',60,3,1,0,NULL,NULL,0),(527,'笔类',60,3,1,0,NULL,NULL,0),(528,'画具画材',60,3,1,0,NULL,NULL,0),(529,'刻录碟片/附件',60,3,1,0,NULL,NULL,0),(530,'上门安装',61,3,1,0,NULL,NULL,0),(531,'延保服务',61,3,1,0,NULL,NULL,0),(532,'维修保养',61,3,1,0,NULL,NULL,0),(533,'电脑软件',61,3,1,0,NULL,NULL,0),(534,'京东服务',61,3,1,0,NULL,NULL,0),(535,'炒锅',62,3,1,0,NULL,NULL,0),(536,'煎锅',62,3,1,0,NULL,NULL,0),(537,'压力锅',62,3,1,0,NULL,NULL,0),(538,'蒸锅',62,3,1,0,NULL,NULL,0),(539,'汤锅',62,3,1,0,NULL,NULL,0),(540,'奶锅',62,3,1,0,NULL,NULL,0),(541,'锅具套装',62,3,1,0,NULL,NULL,0),(542,'煲类',62,3,1,0,NULL,NULL,0),(543,'水壶',62,3,1,0,NULL,NULL,0),(544,'火锅',62,3,1,0,NULL,NULL,0),(545,'菜刀',63,3,1,0,NULL,NULL,0),(546,'剪刀',63,3,1,0,NULL,NULL,0),(547,'刀具套装',63,3,1,0,NULL,NULL,0),(548,'砧板',63,3,1,0,NULL,NULL,0),(549,'瓜果刀/刨',63,3,1,0,NULL,NULL,0),(550,'多功能刀',63,3,1,0,NULL,NULL,0),(551,'保鲜盒',64,3,1,0,NULL,NULL,0),(552,'烘焙/烧烤',64,3,1,0,NULL,NULL,0),(553,'饭盒/提锅',64,3,1,0,NULL,NULL,0),(554,'储物/置物架',64,3,1,0,NULL,NULL,0),(555,'厨房DIY/小工具',64,3,1,0,NULL,NULL,0),(556,'塑料杯',65,3,1,0,NULL,NULL,0),(557,'运动水壶',65,3,1,0,NULL,NULL,0),(558,'玻璃杯',65,3,1,0,NULL,NULL,0),(559,'陶瓷/马克杯',65,3,1,0,NULL,NULL,0),(560,'保温杯',65,3,1,0,NULL,NULL,0),(561,'保温壶',65,3,1,0,NULL,NULL,0),(562,'酒杯/酒具',65,3,1,0,NULL,NULL,0),(563,'杯具套装',65,3,1,0,NULL,NULL,0),(564,'餐具套装',66,3,1,0,NULL,NULL,0),(565,'碗/碟/盘',66,3,1,0,NULL,NULL,0),(566,'筷勺/刀叉',66,3,1,0,NULL,NULL,0),(567,'一次性用品',66,3,1,0,NULL,NULL,0),(568,'果盘/果篮',66,3,1,0,NULL,NULL,0),(569,'自助餐炉',67,3,1,0,NULL,NULL,0),(570,'酒店餐具',67,3,1,0,NULL,NULL,0),(571,'酒店水具',67,3,1,0,NULL,NULL,0),(572,'整套茶具',68,3,1,0,NULL,NULL,0),(573,'茶杯',68,3,1,0,NULL,NULL,0),(574,'茶壶',68,3,1,0,NULL,NULL,0),(575,'茶盘茶托',68,3,1,0,NULL,NULL,0),(576,'茶叶罐',68,3,1,0,NULL,NULL,0),(577,'茶具配件',68,3,1,0,NULL,NULL,0),(578,'茶宠摆件',68,3,1,0,NULL,NULL,0),(579,'咖啡具',68,3,1,0,NULL,NULL,0),(580,'其他',68,3,1,0,NULL,NULL,0),(581,'纸品湿巾',69,3,1,0,NULL,NULL,0),(582,'衣物清洁',69,3,1,0,NULL,NULL,0),(583,'清洁工具',69,3,1,0,NULL,NULL,0),(584,'驱虫用品',69,3,1,0,NULL,NULL,0),(585,'家庭清洁',69,3,1,0,NULL,NULL,0),(586,'皮具护理',69,3,1,0,NULL,NULL,0),(587,'一次性用品',69,3,1,0,NULL,NULL,0),(588,'洁面',70,3,1,0,NULL,NULL,0),(589,'乳液面霜',70,3,1,0,NULL,NULL,0),(590,'面膜',70,3,1,0,NULL,NULL,0),(591,'剃须',70,3,1,0,NULL,NULL,0),(592,'套装',70,3,1,0,NULL,NULL,0),(593,'精华',70,3,1,0,NULL,NULL,0),(594,'眼霜',70,3,1,0,NULL,NULL,0),(595,'卸妆',70,3,1,0,NULL,NULL,0),(596,'防晒',70,3,1,0,NULL,NULL,0),(597,'防晒隔离',70,3,1,0,NULL,NULL,0),(598,'T区护理',70,3,1,0,NULL,NULL,0),(599,'眼部护理',70,3,1,0,NULL,NULL,0),(600,'精华露',70,3,1,0,NULL,NULL,0),(601,'爽肤水',70,3,1,0,NULL,NULL,0),(602,'沐浴',71,3,1,0,NULL,NULL,0),(603,'润肤',71,3,1,0,NULL,NULL,0),(604,'颈部',71,3,1,0,NULL,NULL,0),(605,'手足',71,3,1,0,NULL,NULL,0),(606,'纤体塑形',71,3,1,0,NULL,NULL,0),(607,'美胸',71,3,1,0,NULL,NULL,0),(608,'套装',71,3,1,0,NULL,NULL,0),(609,'精油',71,3,1,0,NULL,NULL,0),(610,'洗发护发',71,3,1,0,NULL,NULL,0),(611,'染发/造型',71,3,1,0,NULL,NULL,0),(612,'香薰精油',71,3,1,0,NULL,NULL,0),(613,'磨砂/浴盐',71,3,1,0,NULL,NULL,0),(614,'手工/香皂',71,3,1,0,NULL,NULL,0),(615,'洗发',71,3,1,0,NULL,NULL,0),(616,'护发',71,3,1,0,NULL,NULL,0),(617,'染发',71,3,1,0,NULL,NULL,0),(618,'磨砂膏',71,3,1,0,NULL,NULL,0),(619,'香皂',71,3,1,0,NULL,NULL,0),(620,'牙膏/牙粉',72,3,1,0,NULL,NULL,0),(621,'牙刷/牙线',72,3,1,0,NULL,NULL,0),(622,'漱口水',72,3,1,0,NULL,NULL,0),(623,'套装',72,3,1,0,NULL,NULL,0),(624,'卫生巾',73,3,1,0,NULL,NULL,0),(625,'卫生护垫',73,3,1,0,NULL,NULL,0),(626,'私密护理',73,3,1,0,NULL,NULL,0),(627,'脱毛膏',73,3,1,0,NULL,NULL,0),(628,'其他',73,3,1,0,NULL,NULL,0),(629,'洗发',74,3,1,0,NULL,NULL,0),(630,'护发',74,3,1,0,NULL,NULL,0),(631,'染发',74,3,1,0,NULL,NULL,0),(632,'造型',74,3,1,0,NULL,NULL,0),(633,'假发',74,3,1,0,NULL,NULL,0),(634,'套装',74,3,1,0,NULL,NULL,0),(635,'美发工具',74,3,1,0,NULL,NULL,0),(636,'脸部护理',74,3,1,0,NULL,NULL,0),(637,'香水',75,3,1,0,NULL,NULL,0),(638,'底妆',75,3,1,0,NULL,NULL,0),(639,'腮红',75,3,1,0,NULL,NULL,0),(640,'眼影',75,3,1,0,NULL,NULL,0),(641,'唇部',75,3,1,0,NULL,NULL,0),(642,'美甲',75,3,1,0,NULL,NULL,0),(643,'眼线',75,3,1,0,NULL,NULL,0),(644,'美妆工具',75,3,1,0,NULL,NULL,0),(645,'套装',75,3,1,0,NULL,NULL,0),(646,'防晒隔离',75,3,1,0,NULL,NULL,0),(647,'卸妆',75,3,1,0,NULL,NULL,0),(648,'眉笔',75,3,1,0,NULL,NULL,0),(649,'睫毛膏',75,3,1,0,NULL,NULL,0),(650,'T恤',76,3,1,0,NULL,NULL,0),(651,'衬衫',76,3,1,0,NULL,NULL,0),(652,'针织衫',76,3,1,0,NULL,NULL,0),(653,'雪纺衫',76,3,1,0,NULL,NULL,0),(654,'卫衣',76,3,1,0,NULL,NULL,0),(655,'马甲',76,3,1,0,NULL,NULL,0),(656,'连衣裙',76,3,1,0,NULL,NULL,0),(657,'半身裙',76,3,1,0,NULL,NULL,0),(658,'牛仔裤',76,3,1,0,NULL,NULL,0),(659,'休闲裤',76,3,1,0,NULL,NULL,0),(660,'打底裤',76,3,1,0,NULL,NULL,0),(661,'正装裤',76,3,1,0,NULL,NULL,0),(662,'小西装',76,3,1,0,NULL,NULL,0),(663,'短外套',76,3,1,0,NULL,NULL,0),(664,'风衣',76,3,1,0,NULL,NULL,0),(665,'毛呢大衣',76,3,1,0,NULL,NULL,0),(666,'真皮皮衣',76,3,1,0,NULL,NULL,0),(667,'棉服',76,3,1,0,NULL,NULL,0),(668,'羽绒服',76,3,1,0,NULL,NULL,0),(669,'大码女装',76,3,1,0,NULL,NULL,0),(670,'中老年女装',76,3,1,0,NULL,NULL,0),(671,'婚纱',76,3,1,0,NULL,NULL,0),(672,'打底衫',76,3,1,0,NULL,NULL,0),(673,'旗袍/唐装',76,3,1,0,NULL,NULL,0),(674,'加绒裤',76,3,1,0,NULL,NULL,0),(675,'吊带/背心',76,3,1,0,NULL,NULL,0),(676,'羊绒衫',76,3,1,0,NULL,NULL,0),(677,'短裤',76,3,1,0,NULL,NULL,0),(678,'皮草',76,3,1,0,NULL,NULL,0),(679,'礼服',76,3,1,0,NULL,NULL,0),(680,'仿皮皮衣',76,3,1,0,NULL,NULL,0),(681,'羊毛衫',76,3,1,0,NULL,NULL,0),(682,'设计师/潮牌',76,3,1,0,NULL,NULL,0),(683,'衬衫',77,3,1,0,NULL,NULL,0),(684,'T恤',77,3,1,0,NULL,NULL,0),(685,'POLO衫',77,3,1,0,NULL,NULL,0),(686,'针织衫',77,3,1,0,NULL,NULL,0),(687,'羊绒衫',77,3,1,0,NULL,NULL,0),(688,'卫衣',77,3,1,0,NULL,NULL,0),(689,'马甲/背心',77,3,1,0,NULL,NULL,0),(690,'夹克',77,3,1,0,NULL,NULL,0),(691,'风衣',77,3,1,0,NULL,NULL,0),(692,'毛呢大衣',77,3,1,0,NULL,NULL,0),(693,'仿皮皮衣',77,3,1,0,NULL,NULL,0),(694,'西服',77,3,1,0,NULL,NULL,0),(695,'棉服',77,3,1,0,NULL,NULL,0),(696,'羽绒服',77,3,1,0,NULL,NULL,0),(697,'牛仔裤',77,3,1,0,NULL,NULL,0),(698,'休闲裤',77,3,1,0,NULL,NULL,0),(699,'西裤',77,3,1,0,NULL,NULL,0),(700,'西服套装',77,3,1,0,NULL,NULL,0),(701,'大码男装',77,3,1,0,NULL,NULL,0),(702,'中老年男装',77,3,1,0,NULL,NULL,0),(703,'唐装/中山装',77,3,1,0,NULL,NULL,0),(704,'工装',77,3,1,0,NULL,NULL,0),(705,'真皮皮衣',77,3,1,0,NULL,NULL,0),(706,'加绒裤',77,3,1,0,NULL,NULL,0),(707,'卫裤/运动裤',77,3,1,0,NULL,NULL,0),(708,'短裤',77,3,1,0,NULL,NULL,0),(709,'设计师/潮牌',77,3,1,0,NULL,NULL,0),(710,'羊毛衫',77,3,1,0,NULL,NULL,0),(711,'文胸',78,3,1,0,NULL,NULL,0),(712,'女式内裤',78,3,1,0,NULL,NULL,0),(713,'男式内裤',78,3,1,0,NULL,NULL,0),(714,'睡衣/家居服',78,3,1,0,NULL,NULL,0),(715,'塑身美体',78,3,1,0,NULL,NULL,0),(716,'泳衣',78,3,1,0,NULL,NULL,0),(717,'吊带/背心',78,3,1,0,NULL,NULL,0),(718,'抹胸',78,3,1,0,NULL,NULL,0),(719,'连裤袜/丝袜',78,3,1,0,NULL,NULL,0),(720,'美腿袜',78,3,1,0,NULL,NULL,0),(721,'商务男袜',78,3,1,0,NULL,NULL,0),(722,'保暖内衣',78,3,1,0,NULL,NULL,0),(723,'情侣睡衣',78,3,1,0,NULL,NULL,0),(724,'文胸套装',78,3,1,0,NULL,NULL,0),(725,'少女文胸',78,3,1,0,NULL,NULL,0),(726,'休闲棉袜',78,3,1,0,NULL,NULL,0),(727,'大码内衣',78,3,1,0,NULL,NULL,0),(728,'内衣配件',78,3,1,0,NULL,NULL,0),(729,'打底裤袜',78,3,1,0,NULL,NULL,0),(730,'打底衫',78,3,1,0,NULL,NULL,0),(731,'秋衣秋裤',78,3,1,0,NULL,NULL,0),(732,'情趣内衣',78,3,1,0,NULL,NULL,0),(733,'服装洗护',79,3,1,0,NULL,NULL,0),(734,'太阳镜',80,3,1,0,NULL,NULL,0),(735,'光学镜架/镜片',80,3,1,0,NULL,NULL,0),(736,'围巾/手套/帽子套装',80,3,1,0,NULL,NULL,0),(737,'袖扣',80,3,1,0,NULL,NULL,0),(738,'棒球帽',80,3,1,0,NULL,NULL,0),(739,'毛线帽',80,3,1,0,NULL,NULL,0),(740,'遮阳帽',80,3,1,0,NULL,NULL,0),(741,'老花镜',80,3,1,0,NULL,NULL,0),(742,'装饰眼镜',80,3,1,0,NULL,NULL,0),(743,'防辐射眼镜',80,3,1,0,NULL,NULL,0),(744,'游泳镜',80,3,1,0,NULL,NULL,0),(745,'女士丝巾/围巾/披肩',80,3,1,0,NULL,NULL,0),(746,'男士丝巾/围巾',80,3,1,0,NULL,NULL,0),(747,'鸭舌帽',80,3,1,0,NULL,NULL,0),(748,'贝雷帽',80,3,1,0,NULL,NULL,0),(749,'礼帽',80,3,1,0,NULL,NULL,0),(750,'真皮手套',80,3,1,0,NULL,NULL,0),(751,'毛线手套',80,3,1,0,NULL,NULL,0),(752,'防晒手套',80,3,1,0,NULL,NULL,0),(753,'男士腰带/礼盒',80,3,1,0,NULL,NULL,0),(754,'女士腰带/礼盒',80,3,1,0,NULL,NULL,0),(755,'钥匙扣',80,3,1,0,NULL,NULL,0),(756,'遮阳伞/雨伞',80,3,1,0,NULL,NULL,0),(757,'口罩',80,3,1,0,NULL,NULL,0),(758,'耳罩/耳包',80,3,1,0,NULL,NULL,0),(759,'假领',80,3,1,0,NULL,NULL,0),(760,'毛线/布面料',80,3,1,0,NULL,NULL,0),(761,'领带/领结/领带夹',80,3,1,0,NULL,NULL,0),(762,'男表',81,3,1,0,NULL,NULL,0),(763,'瑞表',81,3,1,0,NULL,NULL,0),(764,'女表',81,3,1,0,NULL,NULL,0),(765,'国表',81,3,1,0,NULL,NULL,0),(766,'日韩表',81,3,1,0,NULL,NULL,0),(767,'欧美表',81,3,1,0,NULL,NULL,0),(768,'德表',81,3,1,0,NULL,NULL,0),(769,'儿童手表',81,3,1,0,NULL,NULL,0),(770,'智能手表',81,3,1,0,NULL,NULL,0),(771,'闹钟',81,3,1,0,NULL,NULL,0),(772,'座钟挂钟',81,3,1,0,NULL,NULL,0),(773,'钟表配件',81,3,1,0,NULL,NULL,0),(774,'商务休闲鞋',82,3,1,0,NULL,NULL,0),(775,'正装鞋',82,3,1,0,NULL,NULL,0),(776,'休闲鞋',82,3,1,0,NULL,NULL,0),(777,'凉鞋/沙滩鞋',82,3,1,0,NULL,NULL,0),(778,'男靴',82,3,1,0,NULL,NULL,0),(779,'功能鞋',82,3,1,0,NULL,NULL,0),(780,'拖鞋/人字拖',82,3,1,0,NULL,NULL,0),(781,'雨鞋/雨靴',82,3,1,0,NULL,NULL,0),(782,'传统布鞋',82,3,1,0,NULL,NULL,0),(783,'鞋配件',82,3,1,0,NULL,NULL,0),(784,'帆布鞋',82,3,1,0,NULL,NULL,0),(785,'增高鞋',82,3,1,0,NULL,NULL,0),(786,'工装鞋',82,3,1,0,NULL,NULL,0),(787,'定制鞋',82,3,1,0,NULL,NULL,0),(788,'高跟鞋',83,3,1,0,NULL,NULL,0),(789,'单鞋',83,3,1,0,NULL,NULL,0),(790,'休闲鞋',83,3,1,0,NULL,NULL,0),(791,'凉鞋',83,3,1,0,NULL,NULL,0),(792,'女靴',83,3,1,0,NULL,NULL,0),(793,'雪地靴',83,3,1,0,NULL,NULL,0),(794,'拖鞋/人字拖',83,3,1,0,NULL,NULL,0),(795,'踝靴',83,3,1,0,NULL,NULL,0),(796,'筒靴',83,3,1,0,NULL,NULL,0),(797,'帆布鞋',83,3,1,0,NULL,NULL,0),(798,'雨鞋/雨靴',83,3,1,0,NULL,NULL,0),(799,'妈妈鞋',83,3,1,0,NULL,NULL,0),(800,'鞋配件',83,3,1,0,NULL,NULL,0),(801,'特色鞋',83,3,1,0,NULL,NULL,0),(802,'鱼嘴鞋',83,3,1,0,NULL,NULL,0),(803,'布鞋/绣花鞋',83,3,1,0,NULL,NULL,0),(804,'马丁靴',83,3,1,0,NULL,NULL,0),(805,'坡跟鞋',83,3,1,0,NULL,NULL,0),(806,'松糕鞋',83,3,1,0,NULL,NULL,0),(807,'内增高',83,3,1,0,NULL,NULL,0),(808,'防水台',83,3,1,0,NULL,NULL,0),(809,'婴幼奶粉',84,3,1,0,NULL,NULL,0),(810,'孕妈奶粉',84,3,1,0,NULL,NULL,0),(811,'益生菌/初乳',85,3,1,0,NULL,NULL,0),(812,'米粉/菜粉',85,3,1,0,NULL,NULL,0),(813,'果泥/果汁',85,3,1,0,NULL,NULL,0),(814,'DHA',85,3,1,0,NULL,NULL,0),(815,'宝宝零食',85,3,1,0,NULL,NULL,0),(816,'钙铁锌/维生素',85,3,1,0,NULL,NULL,0),(817,'清火/开胃',85,3,1,0,NULL,NULL,0),(818,'面条/粥',85,3,1,0,NULL,NULL,0),(819,'婴儿尿裤',86,3,1,0,NULL,NULL,0),(820,'拉拉裤',86,3,1,0,NULL,NULL,0),(821,'婴儿湿巾',86,3,1,0,NULL,NULL,0),(822,'成人尿裤',86,3,1,0,NULL,NULL,0),(823,'奶瓶奶嘴',87,3,1,0,NULL,NULL,0),(824,'吸奶器',87,3,1,0,NULL,NULL,0),(825,'暖奶消毒',87,3,1,0,NULL,NULL,0),(826,'儿童餐具',87,3,1,0,NULL,NULL,0),(827,'水壶/水杯',87,3,1,0,NULL,NULL,0),(828,'牙胶安抚',87,3,1,0,NULL,NULL,0),(829,'围兜/防溅衣',87,3,1,0,NULL,NULL,0),(830,'辅食料理机',87,3,1,0,NULL,NULL,0),(831,'食物存储',87,3,1,0,NULL,NULL,0),(832,'宝宝护肤',88,3,1,0,NULL,NULL,0),(833,'洗发沐浴',88,3,1,0,NULL,NULL,0),(834,'奶瓶清洗',88,3,1,0,NULL,NULL,0),(835,'驱蚊防晒',88,3,1,0,NULL,NULL,0),(836,'理发器',88,3,1,0,NULL,NULL,0),(837,'洗澡用具',88,3,1,0,NULL,NULL,0),(838,'婴儿口腔清洁',88,3,1,0,NULL,NULL,0),(839,'洗衣液/皂',88,3,1,0,NULL,NULL,0),(840,'日常护理',88,3,1,0,NULL,NULL,0),(841,'座便器',88,3,1,0,NULL,NULL,0),(842,'婴儿推车',89,3,1,0,NULL,NULL,0),(843,'餐椅摇椅',89,3,1,0,NULL,NULL,0),(844,'婴儿床',89,3,1,0,NULL,NULL,0),(845,'学步车',89,3,1,0,NULL,NULL,0),(846,'三轮车',89,3,1,0,NULL,NULL,0),(847,'自行车',89,3,1,0,NULL,NULL,0),(848,'电动车',89,3,1,0,NULL,NULL,0),(849,'扭扭车',89,3,1,0,NULL,NULL,0),(850,'滑板车',89,3,1,0,NULL,NULL,0),(851,'婴儿床垫',89,3,1,0,NULL,NULL,0),(852,'婴儿外出服',90,3,1,0,NULL,NULL,0),(853,'婴儿内衣',90,3,1,0,NULL,NULL,0),(854,'婴儿礼盒',90,3,1,0,NULL,NULL,0),(855,'婴儿鞋帽袜',90,3,1,0,NULL,NULL,0),(856,'安全防护',90,3,1,0,NULL,NULL,0),(857,'家居床品',90,3,1,0,NULL,NULL,0),(858,'睡袋/抱被',90,3,1,0,NULL,NULL,0),(859,'爬行垫',90,3,1,0,NULL,NULL,0),(860,'妈咪包/背婴带',91,3,1,0,NULL,NULL,0),(861,'产后塑身',91,3,1,0,NULL,NULL,0),(862,'文胸/内裤',91,3,1,0,NULL,NULL,0),(863,'防辐射服',91,3,1,0,NULL,NULL,0),(864,'孕妈装',91,3,1,0,NULL,NULL,0),(865,'孕期营养',91,3,1,0,NULL,NULL,0),(866,'孕妇护肤',91,3,1,0,NULL,NULL,0),(867,'待产护理',91,3,1,0,NULL,NULL,0),(868,'月子装',91,3,1,0,NULL,NULL,0),(869,'防溢乳垫',91,3,1,0,NULL,NULL,0),(870,'套装',92,3,1,0,NULL,NULL,0),(871,'上衣',92,3,1,0,NULL,NULL,0),(872,'裤子',92,3,1,0,NULL,NULL,0),(873,'裙子',92,3,1,0,NULL,NULL,0),(874,'内衣/家居服',92,3,1,0,NULL,NULL,0),(875,'羽绒服/棉服',92,3,1,0,NULL,NULL,0),(876,'亲子装',92,3,1,0,NULL,NULL,0),(877,'儿童配饰',92,3,1,0,NULL,NULL,0),(878,'礼服/演出服',92,3,1,0,NULL,NULL,0),(879,'运动鞋',92,3,1,0,NULL,NULL,0),(880,'皮鞋/帆布鞋',92,3,1,0,NULL,NULL,0),(881,'靴子',92,3,1,0,NULL,NULL,0),(882,'凉鞋',92,3,1,0,NULL,NULL,0),(883,'功能鞋',92,3,1,0,NULL,NULL,0),(884,'户外/运动服',92,3,1,0,NULL,NULL,0),(885,'提篮式',93,3,1,0,NULL,NULL,0),(886,'安全座椅',93,3,1,0,NULL,NULL,0),(887,'增高垫',93,3,1,0,NULL,NULL,0),(888,'钱包',94,3,1,0,NULL,NULL,0),(889,'手拿包',94,3,1,0,NULL,NULL,0),(890,'单肩包',94,3,1,0,NULL,NULL,0),(891,'双肩包',94,3,1,0,NULL,NULL,0),(892,'手提包',94,3,1,0,NULL,NULL,0),(893,'斜挎包',94,3,1,0,NULL,NULL,0),(894,'钥匙包',94,3,1,0,NULL,NULL,0),(895,'卡包/零钱包',94,3,1,0,NULL,NULL,0),(896,'男士钱包',95,3,1,0,NULL,NULL,0),(897,'男士手包',95,3,1,0,NULL,NULL,0),(898,'卡包名片夹',95,3,1,0,NULL,NULL,0),(899,'商务公文包',95,3,1,0,NULL,NULL,0),(900,'双肩包',95,3,1,0,NULL,NULL,0),(901,'单肩/斜挎包',95,3,1,0,NULL,NULL,0),(902,'钥匙包',95,3,1,0,NULL,NULL,0),(903,'电脑包',96,3,1,0,NULL,NULL,0),(904,'拉杆箱',96,3,1,0,NULL,NULL,0),(905,'旅行包',96,3,1,0,NULL,NULL,0),(906,'旅行配件',96,3,1,0,NULL,NULL,0),(907,'休闲运动包',96,3,1,0,NULL,NULL,0),(908,'拉杆包',96,3,1,0,NULL,NULL,0),(909,'登山包',96,3,1,0,NULL,NULL,0),(910,'妈咪包',96,3,1,0,NULL,NULL,0),(911,'书包',96,3,1,0,NULL,NULL,0),(912,'相机包',96,3,1,0,NULL,NULL,0),(913,'腰包/胸包',96,3,1,0,NULL,NULL,0),(914,'火机烟具',97,3,1,0,NULL,NULL,0),(915,'礼品文具',97,3,1,0,NULL,NULL,0),(916,'军刀军具',97,3,1,0,NULL,NULL,0),(917,'收藏品',97,3,1,0,NULL,NULL,0),(918,'工艺礼品',97,3,1,0,NULL,NULL,0),(919,'创意礼品',97,3,1,0,NULL,NULL,0),(920,'礼盒礼券',97,3,1,0,NULL,NULL,0),(921,'鲜花绿植',97,3,1,0,NULL,NULL,0),(922,'婚庆节庆',97,3,1,0,NULL,NULL,0),(923,'京东卡',97,3,1,0,NULL,NULL,0),(924,'美妆礼品',97,3,1,0,NULL,NULL,0),(925,'礼品定制',97,3,1,0,NULL,NULL,0),(926,'京东福卡',97,3,1,0,NULL,NULL,0),(927,'古董文玩',97,3,1,0,NULL,NULL,0),(928,'箱包',98,3,1,0,NULL,NULL,0),(929,'钱包',98,3,1,0,NULL,NULL,0),(930,'服饰',98,3,1,0,NULL,NULL,0),(931,'腰带',98,3,1,0,NULL,NULL,0),(932,'太阳镜/眼镜框',98,3,1,0,NULL,NULL,0),(933,'配件',98,3,1,0,NULL,NULL,0),(934,'鞋靴',98,3,1,0,NULL,NULL,0),(935,'饰品',98,3,1,0,NULL,NULL,0),(936,'名品腕表',98,3,1,0,NULL,NULL,0),(937,'高档化妆品',98,3,1,0,NULL,NULL,0),(938,'婚嫁首饰',99,3,1,0,NULL,NULL,0),(939,'婚纱摄影',99,3,1,0,NULL,NULL,0),(940,'婚纱礼服',99,3,1,0,NULL,NULL,0),(941,'婚庆服务',99,3,1,0,NULL,NULL,0),(942,'婚庆礼品/用品',99,3,1,0,NULL,NULL,0),(943,'婚宴',99,3,1,0,NULL,NULL,0),(944,'饼干蛋糕',100,3,1,0,NULL,NULL,0),(945,'糖果/巧克力',100,3,1,0,NULL,NULL,0),(946,'休闲零食',100,3,1,0,NULL,NULL,0),(947,'冲调饮品',100,3,1,0,NULL,NULL,0),(948,'粮油调味',100,3,1,0,NULL,NULL,0),(949,'牛奶',100,3,1,0,NULL,NULL,0),(950,'其他特产',101,3,1,0,NULL,NULL,0),(951,'新疆',101,3,1,0,NULL,NULL,0),(952,'北京',101,3,1,0,NULL,NULL,0),(953,'山西',101,3,1,0,NULL,NULL,0),(954,'内蒙古',101,3,1,0,NULL,NULL,0),(955,'福建',101,3,1,0,NULL,NULL,0),(956,'湖南',101,3,1,0,NULL,NULL,0),(957,'四川',101,3,1,0,NULL,NULL,0),(958,'云南',101,3,1,0,NULL,NULL,0),(959,'东北',101,3,1,0,NULL,NULL,0),(960,'休闲零食',102,3,1,0,NULL,NULL,0),(961,'坚果炒货',102,3,1,0,NULL,NULL,0),(962,'肉干肉脯',102,3,1,0,NULL,NULL,0),(963,'蜜饯果干',102,3,1,0,NULL,NULL,0),(964,'糖果/巧克力',102,3,1,0,NULL,NULL,0),(965,'饼干蛋糕',102,3,1,0,NULL,NULL,0),(966,'无糖食品',102,3,1,0,NULL,NULL,0),(967,'米面杂粮',103,3,1,0,NULL,NULL,0),(968,'食用油',103,3,1,0,NULL,NULL,0),(969,'调味品',103,3,1,0,NULL,NULL,0),(970,'南北干货',103,3,1,0,NULL,NULL,0),(971,'方便食品',103,3,1,0,NULL,NULL,0),(972,'有机食品',103,3,1,0,NULL,NULL,0),(973,'饮用水',104,3,1,0,NULL,NULL,0),(974,'饮料',104,3,1,0,NULL,NULL,0),(975,'牛奶乳品',104,3,1,0,NULL,NULL,0),(976,'咖啡/奶茶',104,3,1,0,NULL,NULL,0),(977,'冲饮谷物',104,3,1,0,NULL,NULL,0),(978,'蜂蜜/柚子茶',104,3,1,0,NULL,NULL,0),(979,'成人奶粉',104,3,1,0,NULL,NULL,0),(980,'月饼',105,3,1,0,NULL,NULL,0),(981,'大闸蟹',105,3,1,0,NULL,NULL,0),(982,'粽子',105,3,1,0,NULL,NULL,0),(983,'卡券',105,3,1,0,NULL,NULL,0),(984,'铁观音',106,3,1,0,NULL,NULL,0),(985,'普洱',106,3,1,0,NULL,NULL,0),(986,'龙井',106,3,1,0,NULL,NULL,0),(987,'绿茶',106,3,1,0,NULL,NULL,0),(988,'红茶',106,3,1,0,NULL,NULL,0),(989,'乌龙茶',106,3,1,0,NULL,NULL,0),(990,'花草茶',106,3,1,0,NULL,NULL,0),(991,'花果茶',106,3,1,0,NULL,NULL,0),(992,'养生茶',106,3,1,0,NULL,NULL,0),(993,'黑茶',106,3,1,0,NULL,NULL,0),(994,'白茶',106,3,1,0,NULL,NULL,0),(995,'其它茶',106,3,1,0,NULL,NULL,0),(996,'项链',107,3,1,0,NULL,NULL,0),(997,'手链/脚链',107,3,1,0,NULL,NULL,0),(998,'戒指',107,3,1,0,NULL,NULL,0),(999,'耳饰',107,3,1,0,NULL,NULL,0),(1000,'毛衣链',107,3,1,0,NULL,NULL,0),(1001,'发饰/发卡',107,3,1,0,NULL,NULL,0),(1002,'胸针',107,3,1,0,NULL,NULL,0),(1003,'饰品配件',107,3,1,0,NULL,NULL,0),(1004,'婚庆饰品',107,3,1,0,NULL,NULL,0),(1005,'黄金吊坠',108,3,1,0,NULL,NULL,0),(1006,'黄金项链',108,3,1,0,NULL,NULL,0),(1007,'黄金转运珠',108,3,1,0,NULL,NULL,0),(1008,'黄金手镯/手链/脚链',108,3,1,0,NULL,NULL,0),(1009,'黄金耳饰',108,3,1,0,NULL,NULL,0),(1010,'黄金戒指',108,3,1,0,NULL,NULL,0),(1011,'K金吊坠',109,3,1,0,NULL,NULL,0),(1012,'K金项链',109,3,1,0,NULL,NULL,0),(1013,'K金手镯/手链/脚链',109,3,1,0,NULL,NULL,0),(1014,'K金戒指',109,3,1,0,NULL,NULL,0),(1015,'K金耳饰',109,3,1,0,NULL,NULL,0),(1016,'投资金',110,3,1,0,NULL,NULL,0),(1017,'投资银',110,3,1,0,NULL,NULL,0),(1018,'投资收藏',110,3,1,0,NULL,NULL,0),(1019,'银吊坠/项链',111,3,1,0,NULL,NULL,0),(1020,'银手镯/手链/脚链',111,3,1,0,NULL,NULL,0),(1021,'银戒指',111,3,1,0,NULL,NULL,0),(1022,'银耳饰',111,3,1,0,NULL,NULL,0),(1023,'足银手镯',111,3,1,0,NULL,NULL,0),(1024,'宝宝银饰',111,3,1,0,NULL,NULL,0),(1025,'裸钻',112,3,1,0,NULL,NULL,0),(1026,'钻戒',112,3,1,0,NULL,NULL,0),(1027,'钻石项链/吊坠',112,3,1,0,NULL,NULL,0),(1028,'钻石耳饰',112,3,1,0,NULL,NULL,0),(1029,'钻石手镯/手链',112,3,1,0,NULL,NULL,0),(1030,'项链/吊坠',113,3,1,0,NULL,NULL,0),(1031,'手镯/手串',113,3,1,0,NULL,NULL,0),(1032,'戒指',113,3,1,0,NULL,NULL,0),(1033,'耳饰',113,3,1,0,NULL,NULL,0),(1034,'挂件/摆件/把件',113,3,1,0,NULL,NULL,0),(1035,'玉石孤品',113,3,1,0,NULL,NULL,0),(1036,'项链/吊坠',114,3,1,0,NULL,NULL,0),(1037,'耳饰',114,3,1,0,NULL,NULL,0),(1038,'手镯/手链/脚链',114,3,1,0,NULL,NULL,0),(1039,'戒指',114,3,1,0,NULL,NULL,0),(1040,'头饰/胸针',114,3,1,0,NULL,NULL,0),(1041,'摆件/挂件',114,3,1,0,NULL,NULL,0),(1042,'琥珀/蜜蜡',115,3,1,0,NULL,NULL,0),(1043,'碧玺',115,3,1,0,NULL,NULL,0),(1044,'红宝石/蓝宝石',115,3,1,0,NULL,NULL,0),(1045,'坦桑石',115,3,1,0,NULL,NULL,0),(1046,'珊瑚',115,3,1,0,NULL,NULL,0),(1047,'祖母绿',115,3,1,0,NULL,NULL,0),(1048,'葡萄石',115,3,1,0,NULL,NULL,0),(1049,'其他天然宝石',115,3,1,0,NULL,NULL,0),(1050,'项链/吊坠',115,3,1,0,NULL,NULL,0),(1051,'耳饰',115,3,1,0,NULL,NULL,0),(1052,'手镯/手链',115,3,1,0,NULL,NULL,0),(1053,'戒指',115,3,1,0,NULL,NULL,0),(1054,'铂金项链/吊坠',116,3,1,0,NULL,NULL,0),(1055,'铂金手镯/手链/脚链',116,3,1,0,NULL,NULL,0),(1056,'铂金戒指',116,3,1,0,NULL,NULL,0),(1057,'铂金耳饰',116,3,1,0,NULL,NULL,0),(1058,'小叶紫檀',117,3,1,0,NULL,NULL,0),(1059,'黄花梨',117,3,1,0,NULL,NULL,0),(1060,'沉香木',117,3,1,0,NULL,NULL,0),(1061,'金丝楠',117,3,1,0,NULL,NULL,0),(1062,'菩提',117,3,1,0,NULL,NULL,0),(1063,'其他',117,3,1,0,NULL,NULL,0),(1064,'橄榄核/核桃',117,3,1,0,NULL,NULL,0),(1065,'檀香',117,3,1,0,NULL,NULL,0),(1066,'珍珠项链',118,3,1,0,NULL,NULL,0),(1067,'珍珠吊坠',118,3,1,0,NULL,NULL,0),(1068,'珍珠耳饰',118,3,1,0,NULL,NULL,0),(1069,'珍珠手链',118,3,1,0,NULL,NULL,0),(1070,'珍珠戒指',118,3,1,0,NULL,NULL,0),(1071,'珍珠胸针',118,3,1,0,NULL,NULL,0),(1072,'机油',119,3,1,0,NULL,NULL,0),(1073,'正时皮带',119,3,1,0,NULL,NULL,0),(1074,'添加剂',119,3,1,0,NULL,NULL,0),(1075,'汽车喇叭',119,3,1,0,NULL,NULL,0),(1076,'防冻液',119,3,1,0,NULL,NULL,0),(1077,'汽车玻璃',119,3,1,0,NULL,NULL,0),(1078,'滤清器',119,3,1,0,NULL,NULL,0),(1079,'火花塞',119,3,1,0,NULL,NULL,0),(1080,'减震器',119,3,1,0,NULL,NULL,0),(1081,'柴机油/辅助油',119,3,1,0,NULL,NULL,0),(1082,'雨刷',119,3,1,0,NULL,NULL,0),(1083,'车灯',119,3,1,0,NULL,NULL,0),(1084,'后视镜',119,3,1,0,NULL,NULL,0),(1085,'轮胎',119,3,1,0,NULL,NULL,0),(1086,'轮毂',119,3,1,0,NULL,NULL,0),(1087,'刹车片/盘',119,3,1,0,NULL,NULL,0),(1088,'维修配件',119,3,1,0,NULL,NULL,0),(1089,'蓄电池',119,3,1,0,NULL,NULL,0),(1090,'底盘装甲/护板',119,3,1,0,NULL,NULL,0),(1091,'贴膜',119,3,1,0,NULL,NULL,0),(1092,'汽修工具',119,3,1,0,NULL,NULL,0),(1093,'改装配件',119,3,1,0,NULL,NULL,0),(1094,'导航仪',120,3,1,0,NULL,NULL,0),(1095,'安全预警仪',120,3,1,0,NULL,NULL,0),(1096,'行车记录仪',120,3,1,0,NULL,NULL,0),(1097,'倒车雷达',120,3,1,0,NULL,NULL,0),(1098,'蓝牙设备',120,3,1,0,NULL,NULL,0),(1099,'车载影音',120,3,1,0,NULL,NULL,0),(1100,'净化器',120,3,1,0,NULL,NULL,0),(1101,'电源',120,3,1,0,NULL,NULL,0),(1102,'智能驾驶',120,3,1,0,NULL,NULL,0),(1103,'车载电台',120,3,1,0,NULL,NULL,0),(1104,'车载电器配件',120,3,1,0,NULL,NULL,0),(1105,'吸尘器',120,3,1,0,NULL,NULL,0),(1106,'智能车机',120,3,1,0,NULL,NULL,0),(1107,'冰箱',120,3,1,0,NULL,NULL,0),(1108,'汽车音响',120,3,1,0,NULL,NULL,0),(1109,'车载生活电器',120,3,1,0,NULL,NULL,0),(1110,'车蜡',121,3,1,0,NULL,NULL,0),(1111,'补漆笔',121,3,1,0,NULL,NULL,0),(1112,'玻璃水',121,3,1,0,NULL,NULL,0),(1113,'清洁剂',121,3,1,0,NULL,NULL,0),(1114,'洗车工具',121,3,1,0,NULL,NULL,0),(1115,'镀晶镀膜',121,3,1,0,NULL,NULL,0),(1116,'打蜡机',121,3,1,0,NULL,NULL,0),(1117,'洗车配件',121,3,1,0,NULL,NULL,0),(1118,'洗车机',121,3,1,0,NULL,NULL,0),(1119,'洗车水枪',121,3,1,0,NULL,NULL,0),(1120,'毛巾掸子',121,3,1,0,NULL,NULL,0),(1121,'脚垫',122,3,1,0,NULL,NULL,0),(1122,'座垫',122,3,1,0,NULL,NULL,0),(1123,'座套',122,3,1,0,NULL,NULL,0),(1124,'后备箱垫',122,3,1,0,NULL,NULL,0),(1125,'头枕腰靠',122,3,1,0,NULL,NULL,0),(1126,'方向盘套',122,3,1,0,NULL,NULL,0),(1127,'香水',122,3,1,0,NULL,NULL,0),(1128,'空气净化',122,3,1,0,NULL,NULL,0),(1129,'挂件摆件',122,3,1,0,NULL,NULL,0),(1130,'功能小件',122,3,1,0,NULL,NULL,0),(1131,'车身装饰件',122,3,1,0,NULL,NULL,0),(1132,'车衣',122,3,1,0,NULL,NULL,0),(1133,'安全座椅',123,3,1,0,NULL,NULL,0),(1134,'胎压监测',123,3,1,0,NULL,NULL,0),(1135,'防盗设备',123,3,1,0,NULL,NULL,0),(1136,'应急救援',123,3,1,0,NULL,NULL,0),(1137,'保温箱',123,3,1,0,NULL,NULL,0),(1138,'地锁',123,3,1,0,NULL,NULL,0),(1139,'摩托车',123,3,1,0,NULL,NULL,0),(1140,'充气泵',123,3,1,0,NULL,NULL,0),(1141,'储物箱',123,3,1,0,NULL,NULL,0),(1142,'自驾野营',123,3,1,0,NULL,NULL,0),(1143,'摩托车装备',123,3,1,0,NULL,NULL,0),(1144,'清洗美容',124,3,1,0,NULL,NULL,0),(1145,'功能升级',124,3,1,0,NULL,NULL,0),(1146,'保养维修',124,3,1,0,NULL,NULL,0),(1147,'油卡充值',124,3,1,0,NULL,NULL,0),(1148,'车险',124,3,1,0,NULL,NULL,0),(1149,'加油卡',124,3,1,0,NULL,NULL,0),(1150,'ETC',124,3,1,0,NULL,NULL,0),(1151,'驾驶培训',124,3,1,0,NULL,NULL,0),(1152,'赛事服装',125,3,1,0,NULL,NULL,0),(1153,'赛事用品',125,3,1,0,NULL,NULL,0),(1154,'制动系统',125,3,1,0,NULL,NULL,0),(1155,'悬挂系统',125,3,1,0,NULL,NULL,0),(1156,'进气系统',125,3,1,0,NULL,NULL,0),(1157,'排气系统',125,3,1,0,NULL,NULL,0),(1158,'电子管理',125,3,1,0,NULL,NULL,0),(1159,'车身强化',125,3,1,0,NULL,NULL,0),(1160,'赛事座椅',125,3,1,0,NULL,NULL,0),(1161,'跑步鞋',126,3,1,0,NULL,NULL,0),(1162,'休闲鞋',126,3,1,0,NULL,NULL,0),(1163,'篮球鞋',126,3,1,0,NULL,NULL,0),(1164,'板鞋',126,3,1,0,NULL,NULL,0),(1165,'帆布鞋',126,3,1,0,NULL,NULL,0),(1166,'足球鞋',126,3,1,0,NULL,NULL,0),(1167,'乒羽网鞋',126,3,1,0,NULL,NULL,0),(1168,'专项运动鞋',126,3,1,0,NULL,NULL,0),(1169,'训练鞋',126,3,1,0,NULL,NULL,0),(1170,'拖鞋',126,3,1,0,NULL,NULL,0),(1171,'运动包',126,3,1,0,NULL,NULL,0),(1172,'羽绒服',127,3,1,0,NULL,NULL,0),(1173,'棉服',127,3,1,0,NULL,NULL,0),(1174,'运动裤',127,3,1,0,NULL,NULL,0),(1175,'夹克/风衣',127,3,1,0,NULL,NULL,0),(1176,'卫衣/套头衫',127,3,1,0,NULL,NULL,0),(1177,'T恤',127,3,1,0,NULL,NULL,0),(1178,'套装',127,3,1,0,NULL,NULL,0),(1179,'乒羽网服',127,3,1,0,NULL,NULL,0),(1180,'健身服',127,3,1,0,NULL,NULL,0),(1181,'运动背心',127,3,1,0,NULL,NULL,0),(1182,'毛衫/线衫',127,3,1,0,NULL,NULL,0),(1183,'运动配饰',127,3,1,0,NULL,NULL,0),(1184,'折叠车',128,3,1,0,NULL,NULL,0),(1185,'山地车/公路车',128,3,1,0,NULL,NULL,0),(1186,'电动车',128,3,1,0,NULL,NULL,0),(1187,'其他整车',128,3,1,0,NULL,NULL,0),(1188,'骑行服',128,3,1,0,NULL,NULL,0),(1189,'骑行装备',128,3,1,0,NULL,NULL,0),(1190,'平衡车',128,3,1,0,NULL,NULL,0),(1191,'鱼竿鱼线',129,3,1,0,NULL,NULL,0),(1192,'浮漂鱼饵',129,3,1,0,NULL,NULL,0),(1193,'钓鱼桌椅',129,3,1,0,NULL,NULL,0),(1194,'钓鱼配件',129,3,1,0,NULL,NULL,0),(1195,'钓箱鱼包',129,3,1,0,NULL,NULL,0),(1196,'其它',129,3,1,0,NULL,NULL,0),(1197,'泳镜',130,3,1,0,NULL,NULL,0),(1198,'泳帽',130,3,1,0,NULL,NULL,0),(1199,'游泳包防水包',130,3,1,0,NULL,NULL,0),(1200,'女士泳衣',130,3,1,0,NULL,NULL,0),(1201,'男士泳衣',130,3,1,0,NULL,NULL,0),(1202,'比基尼',130,3,1,0,NULL,NULL,0),(1203,'其它',130,3,1,0,NULL,NULL,0),(1204,'冲锋衣裤',131,3,1,0,NULL,NULL,0),(1205,'速干衣裤',131,3,1,0,NULL,NULL,0),(1206,'滑雪服',131,3,1,0,NULL,NULL,0),(1207,'羽绒服/棉服',131,3,1,0,NULL,NULL,0),(1208,'休闲衣裤',131,3,1,0,NULL,NULL,0),(1209,'抓绒衣裤',131,3,1,0,NULL,NULL,0),(1210,'软壳衣裤',131,3,1,0,NULL,NULL,0),(1211,'T恤',131,3,1,0,NULL,NULL,0),(1212,'户外风衣',131,3,1,0,NULL,NULL,0),(1213,'功能内衣',131,3,1,0,NULL,NULL,0),(1214,'军迷服饰',131,3,1,0,NULL,NULL,0),(1215,'登山鞋',131,3,1,0,NULL,NULL,0),(1216,'雪地靴',131,3,1,0,NULL,NULL,0),(1217,'徒步鞋',131,3,1,0,NULL,NULL,0),(1218,'越野跑鞋',131,3,1,0,NULL,NULL,0),(1219,'休闲鞋',131,3,1,0,NULL,NULL,0),(1220,'工装鞋',131,3,1,0,NULL,NULL,0),(1221,'溯溪鞋',131,3,1,0,NULL,NULL,0),(1222,'沙滩/凉拖',131,3,1,0,NULL,NULL,0),(1223,'户外袜',131,3,1,0,NULL,NULL,0),(1224,'帐篷/垫子',132,3,1,0,NULL,NULL,0),(1225,'睡袋/吊床',132,3,1,0,NULL,NULL,0),(1226,'登山攀岩',132,3,1,0,NULL,NULL,0),(1227,'户外配饰',132,3,1,0,NULL,NULL,0),(1228,'背包',132,3,1,0,NULL,NULL,0),(1229,'户外照明',132,3,1,0,NULL,NULL,0),(1230,'户外仪表',132,3,1,0,NULL,NULL,0),(1231,'户外工具',132,3,1,0,NULL,NULL,0),(1232,'望远镜',132,3,1,0,NULL,NULL,0),(1233,'旅游用品',132,3,1,0,NULL,NULL,0),(1234,'便携桌椅床',132,3,1,0,NULL,NULL,0),(1235,'野餐烧烤',132,3,1,0,NULL,NULL,0),(1236,'军迷用品',132,3,1,0,NULL,NULL,0),(1237,'救援装备',132,3,1,0,NULL,NULL,0),(1238,'滑雪装备',132,3,1,0,NULL,NULL,0),(1239,'极限户外',132,3,1,0,NULL,NULL,0),(1240,'冲浪潜水',132,3,1,0,NULL,NULL,0),(1241,'综合训练器',133,3,1,0,NULL,NULL,0),(1242,'其他大型器械',133,3,1,0,NULL,NULL,0),(1243,'哑铃',133,3,1,0,NULL,NULL,0),(1244,'仰卧板/收腹机',133,3,1,0,NULL,NULL,0),(1245,'其他中小型器材',133,3,1,0,NULL,NULL,0),(1246,'瑜伽舞蹈',133,3,1,0,NULL,NULL,0),(1247,'甩脂机',133,3,1,0,NULL,NULL,0),(1248,'踏步机',133,3,1,0,NULL,NULL,0),(1249,'武术搏击',133,3,1,0,NULL,NULL,0),(1250,'健身车/动感单车',133,3,1,0,NULL,NULL,0),(1251,'跑步机',133,3,1,0,NULL,NULL,0),(1252,'运动护具',133,3,1,0,NULL,NULL,0),(1253,'羽毛球',134,3,1,0,NULL,NULL,0),(1254,'乒乓球',134,3,1,0,NULL,NULL,0),(1255,'篮球',134,3,1,0,NULL,NULL,0),(1256,'足球',134,3,1,0,NULL,NULL,0),(1257,'网球',134,3,1,0,NULL,NULL,0),(1258,'排球',134,3,1,0,NULL,NULL,0),(1259,'高尔夫',134,3,1,0,NULL,NULL,0),(1260,'台球',134,3,1,0,NULL,NULL,0),(1261,'棋牌麻将',134,3,1,0,NULL,NULL,0),(1262,'轮滑滑板',134,3,1,0,NULL,NULL,0),(1263,'其他',134,3,1,0,NULL,NULL,0),(1264,'0-6个月',135,3,1,0,NULL,NULL,0),(1265,'6-12个月',135,3,1,0,NULL,NULL,0),(1266,'1-3岁',135,3,1,0,NULL,NULL,0),(1267,'3-6岁',135,3,1,0,NULL,NULL,0),(1268,'6-14岁',135,3,1,0,NULL,NULL,0),(1269,'14岁以上',135,3,1,0,NULL,NULL,0),(1270,'遥控车',136,3,1,0,NULL,NULL,0),(1271,'遥控飞机',136,3,1,0,NULL,NULL,0),(1272,'遥控船',136,3,1,0,NULL,NULL,0),(1273,'机器人',136,3,1,0,NULL,NULL,0),(1274,'轨道/助力',136,3,1,0,NULL,NULL,0),(1275,'毛绒/布艺',137,3,1,0,NULL,NULL,0),(1276,'靠垫/抱枕',137,3,1,0,NULL,NULL,0),(1277,'芭比娃娃',138,3,1,0,NULL,NULL,0),(1278,'卡通娃娃',138,3,1,0,NULL,NULL,0),(1279,'智能娃娃',138,3,1,0,NULL,NULL,0),(1280,'仿真模型',139,3,1,0,NULL,NULL,0),(1281,'拼插模型',139,3,1,0,NULL,NULL,0),(1282,'收藏爱好',139,3,1,0,NULL,NULL,0),(1283,'炫舞毯',140,3,1,0,NULL,NULL,0),(1284,'爬行垫/毯',140,3,1,0,NULL,NULL,0),(1285,'户外玩具',140,3,1,0,NULL,NULL,0),(1286,'戏水玩具',140,3,1,0,NULL,NULL,0),(1287,'电影周边',141,3,1,0,NULL,NULL,0),(1288,'卡通周边',141,3,1,0,NULL,NULL,0),(1289,'网游周边',141,3,1,0,NULL,NULL,0),(1290,'摇铃/床铃',142,3,1,0,NULL,NULL,0),(1291,'健身架',142,3,1,0,NULL,NULL,0),(1292,'早教启智',142,3,1,0,NULL,NULL,0),(1293,'拖拉玩具',142,3,1,0,NULL,NULL,0),(1294,'积木',143,3,1,0,NULL,NULL,0),(1295,'拼图',143,3,1,0,NULL,NULL,0),(1296,'磁力棒',143,3,1,0,NULL,NULL,0),(1297,'立体拼插',143,3,1,0,NULL,NULL,0),(1298,'手工彩泥',144,3,1,0,NULL,NULL,0),(1299,'绘画工具',144,3,1,0,NULL,NULL,0),(1300,'情景玩具',144,3,1,0,NULL,NULL,0),(1301,'减压玩具',145,3,1,0,NULL,NULL,0),(1302,'创意玩具',145,3,1,0,NULL,NULL,0),(1303,'钢琴',146,3,1,0,NULL,NULL,0),(1304,'电子琴/电钢琴',146,3,1,0,NULL,NULL,0),(1305,'吉他/尤克里里',146,3,1,0,NULL,NULL,0),(1306,'打击乐器',146,3,1,0,NULL,NULL,0),(1307,'西洋管弦',146,3,1,0,NULL,NULL,0),(1308,'民族管弦乐器',146,3,1,0,NULL,NULL,0),(1309,'乐器配件',146,3,1,0,NULL,NULL,0),(1310,'电脑音乐',146,3,1,0,NULL,NULL,0),(1311,'工艺礼品乐器',146,3,1,0,NULL,NULL,0),(1312,'口琴/口风琴/竖笛',146,3,1,0,NULL,NULL,0),(1313,'手风琴',146,3,1,0,NULL,NULL,0),(1314,'双色球',147,3,1,0,NULL,NULL,0),(1315,'大乐透',147,3,1,0,NULL,NULL,0),(1316,'福彩3D',147,3,1,0,NULL,NULL,0),(1317,'排列三',147,3,1,0,NULL,NULL,0),(1318,'排列五',147,3,1,0,NULL,NULL,0),(1319,'七星彩',147,3,1,0,NULL,NULL,0),(1320,'七乐彩',147,3,1,0,NULL,NULL,0),(1321,'竞彩足球',147,3,1,0,NULL,NULL,0),(1322,'竞彩篮球',147,3,1,0,NULL,NULL,0),(1323,'新时时彩',147,3,1,0,NULL,NULL,0),(1324,'国内机票',148,3,1,0,NULL,NULL,0),(1325,'国内酒店',149,3,1,0,NULL,NULL,0),(1326,'酒店团购',149,3,1,0,NULL,NULL,0),(1327,'度假',150,3,1,0,NULL,NULL,0),(1328,'景点',150,3,1,0,NULL,NULL,0),(1329,'租车',150,3,1,0,NULL,NULL,0),(1330,'火车票',150,3,1,0,NULL,NULL,0),(1331,'旅游团购',150,3,1,0,NULL,NULL,0),(1332,'手机充值',151,3,1,0,NULL,NULL,0),(1333,'游戏点卡',152,3,1,0,NULL,NULL,0),(1334,'QQ充值',152,3,1,0,NULL,NULL,0),(1335,'电影票',153,3,1,0,NULL,NULL,0),(1336,'演唱会',153,3,1,0,NULL,NULL,0),(1337,'话剧歌剧',153,3,1,0,NULL,NULL,0),(1338,'音乐会',153,3,1,0,NULL,NULL,0),(1339,'体育赛事',153,3,1,0,NULL,NULL,0),(1340,'舞蹈芭蕾',153,3,1,0,NULL,NULL,0),(1341,'戏曲综艺',153,3,1,0,NULL,NULL,0),(1342,'东北',154,3,1,0,NULL,NULL,0),(1343,'华北',154,3,1,0,NULL,NULL,0),(1344,'西北',154,3,1,0,NULL,NULL,0),(1345,'华中',154,3,1,0,NULL,NULL,0),(1346,'华东',154,3,1,0,NULL,NULL,0),(1347,'华南',154,3,1,0,NULL,NULL,0),(1348,'西南',154,3,1,0,NULL,NULL,0),(1349,'苹果',155,3,1,0,NULL,NULL,0),(1350,'橙子',155,3,1,0,NULL,NULL,0),(1351,'奇异果/猕猴桃',155,3,1,0,NULL,NULL,0),(1352,'车厘子/樱桃',155,3,1,0,NULL,NULL,0),(1353,'芒果',155,3,1,0,NULL,NULL,0),(1354,'蓝莓',155,3,1,0,NULL,NULL,0),(1355,'火龙果',155,3,1,0,NULL,NULL,0),(1356,'葡萄/提子',155,3,1,0,NULL,NULL,0),(1357,'柚子',155,3,1,0,NULL,NULL,0),(1358,'香蕉',155,3,1,0,NULL,NULL,0),(1359,'牛油果',155,3,1,0,NULL,NULL,0),(1360,'梨',155,3,1,0,NULL,NULL,0),(1361,'菠萝/凤梨',155,3,1,0,NULL,NULL,0),(1362,'桔/橘',155,3,1,0,NULL,NULL,0),(1363,'柠檬',155,3,1,0,NULL,NULL,0),(1364,'草莓',155,3,1,0,NULL,NULL,0),(1365,'桃/李/杏',155,3,1,0,NULL,NULL,0),(1366,'更多水果',155,3,1,0,NULL,NULL,0),(1367,'水果礼盒/券',155,3,1,0,NULL,NULL,0),(1368,'牛肉',156,3,1,0,NULL,NULL,0),(1369,'羊肉',156,3,1,0,NULL,NULL,0),(1370,'猪肉',156,3,1,0,NULL,NULL,0),(1371,'内脏类',156,3,1,0,NULL,NULL,0),(1372,'鱼类',157,3,1,0,NULL,NULL,0),(1373,'虾类',157,3,1,0,NULL,NULL,0),(1374,'蟹类',157,3,1,0,NULL,NULL,0),(1375,'贝类',157,3,1,0,NULL,NULL,0),(1376,'海参',157,3,1,0,NULL,NULL,0),(1377,'海产干货',157,3,1,0,NULL,NULL,0),(1378,'其他水产',157,3,1,0,NULL,NULL,0),(1379,'海产礼盒',157,3,1,0,NULL,NULL,0),(1380,'鸡肉',158,3,1,0,NULL,NULL,0),(1381,'鸭肉',158,3,1,0,NULL,NULL,0),(1382,'蛋类',158,3,1,0,NULL,NULL,0),(1383,'其他禽类',158,3,1,0,NULL,NULL,0),(1384,'水饺/馄饨',159,3,1,0,NULL,NULL,0),(1385,'汤圆/元宵',159,3,1,0,NULL,NULL,0),(1386,'面点',159,3,1,0,NULL,NULL,0),(1387,'火锅丸串',159,3,1,0,NULL,NULL,0),(1388,'速冻半成品',159,3,1,0,NULL,NULL,0),(1389,'奶酪黄油',159,3,1,0,NULL,NULL,0),(1390,'熟食',160,3,1,0,NULL,NULL,0),(1391,'腊肠/腊肉',160,3,1,0,NULL,NULL,0),(1392,'火腿',160,3,1,0,NULL,NULL,0),(1393,'糕点',160,3,1,0,NULL,NULL,0),(1394,'礼品卡券',160,3,1,0,NULL,NULL,0),(1395,'冷藏果蔬汁',161,3,1,0,NULL,NULL,0),(1396,'冰激凌',161,3,1,0,NULL,NULL,0),(1397,'其他',161,3,1,0,NULL,NULL,0),(1398,'叶菜类',162,3,1,0,NULL,NULL,0),(1399,'茄果瓜类',162,3,1,0,NULL,NULL,0),(1400,'根茎类',162,3,1,0,NULL,NULL,0),(1401,'鲜菌菇',162,3,1,0,NULL,NULL,0),(1402,'葱姜蒜椒',162,3,1,0,NULL,NULL,0),(1403,'半加工蔬菜',162,3,1,0,NULL,NULL,0),(1404,'微型车',163,3,1,0,NULL,NULL,0),(1405,'小型车',163,3,1,0,NULL,NULL,0),(1406,'紧凑型车',163,3,1,0,NULL,NULL,0),(1407,'中型车',163,3,1,0,NULL,NULL,0),(1408,'中大型车',163,3,1,0,NULL,NULL,0),(1409,'豪华车',163,3,1,0,NULL,NULL,0),(1410,'MPV',163,3,1,0,NULL,NULL,0),(1411,'SUV',163,3,1,0,NULL,NULL,0),(1412,'跑车',163,3,1,0,NULL,NULL,0),(1413,'微型车(二手)',164,3,1,0,NULL,NULL,0),(1414,'小型车(二手)',164,3,1,0,NULL,NULL,0),(1415,'紧凑型车(二手)',164,3,1,0,NULL,NULL,0),(1416,'中型车(二手)',164,3,1,0,NULL,NULL,0),(1417,'中大型车(二手)',164,3,1,0,NULL,NULL,0),(1418,'豪华车(二手)',164,3,1,0,NULL,NULL,0),(1419,'MPV(二手)',164,3,1,0,NULL,NULL,0),(1420,'SUV(二手)',164,3,1,0,NULL,NULL,0),(1421,'跑车(二手)',164,3,1,0,NULL,NULL,0),(1422,'皮卡(二手)',164,3,1,0,NULL,NULL,0),(1423,'面包车(二手)',164,3,1,0,NULL,NULL,0),(1431,'dsa323',1,2,1,NULL,NULL,NULL,NULL),(1432,'fdsffdsadddd大萨达',1431,3,1,NULL,NULL,NULL,NULL);
(1)处理分页问题
  分页统计数据出错,因为我们使用 mybatis-plus,要分页需要使用分页插件
  https://baomidou.com/guide/page.html

解决办法:创建 mybatis 的配置
package com.atguigu.gulimall.product.config;

import com.baomidou.mybatisplus.annotation.DbType;
import com.baomidou.mybatisplus.extension.plugins.PaginationInterceptor;
import com.baomidou.mybatisplus.extension.plugins.pagination.optimize.JsqlParserCountOptimize;
import org.apache.ibatis.annotations.Mapper;
import org.mybatis.spring.annotation.MapperScan;
import org.springframework.context.annotation.Bean;
import org.springframework.context.annotation.Configuration;
import org.springframework.transaction.annotation.EnableTransactionManagement;

@Configuration
@EnableTransactionManagement
@MapperScan("com.atguigu.gulimall.product.dao")
public class MyBatisConfig {

    @Bean
public PaginationInterceptor paginationInterceptor() {
        PaginationInterceptor paginationInterceptor = new PaginationInterceptor();
        // 设置请求的页面大于最大页后操作, true调回到首页,false 继续请求  默认false
paginationInterceptor.setOverflow(true);
        // 设置最大单页限制数量,默认 500 条,-1 不受限制
paginationInterceptor.setLimit(1000);
        // 开启 count 的 join 优化,只针对部分 left join
paginationInterceptor.setCountSqlParser(new JsqlParserCountOptimize(true));
        return paginationInterceptor;
    }
}
效果:
(2)处理模糊查询问题

修改com.atguigu.gulimall.product.service.impl.BrandServiceImpl的queryPage方法
@Override
public PageUtils queryPage(Map<String, Object> params) {
    //1、获取key
String key = (String) params.get("key");
    log.info("key的值:"+key);
    //2、检索条件
QueryWrapper<BrandEntity> queryWrapper = new QueryWrapper<>();
    if(!StringUtils.isEmpty(key)){
        queryWrapper.eq("brand_id",key).or().like("name",key);
    }
    IPage<BrandEntity> page = this.page(
            new Query<BrandEntity>().getPage(params),
            queryWrapper
    );
    return new PageUtils(page);
}
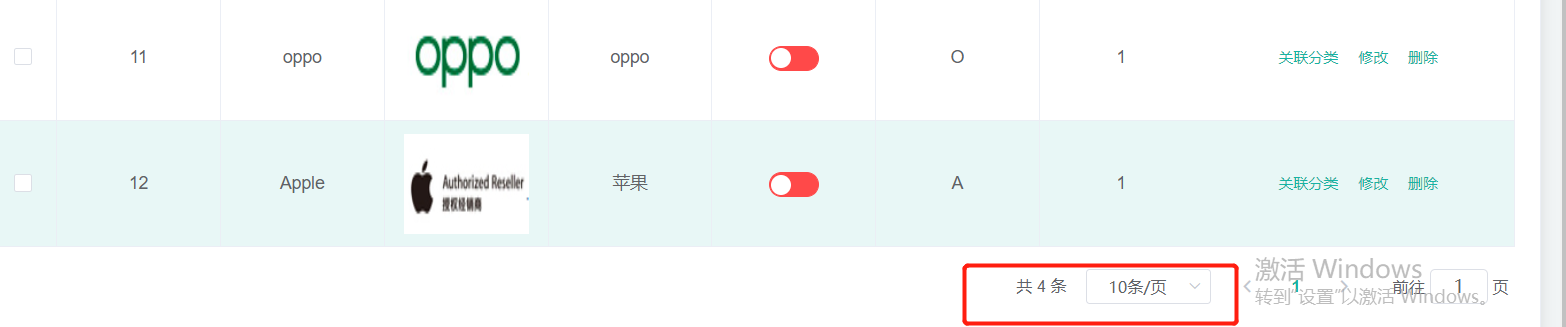
测试结果:

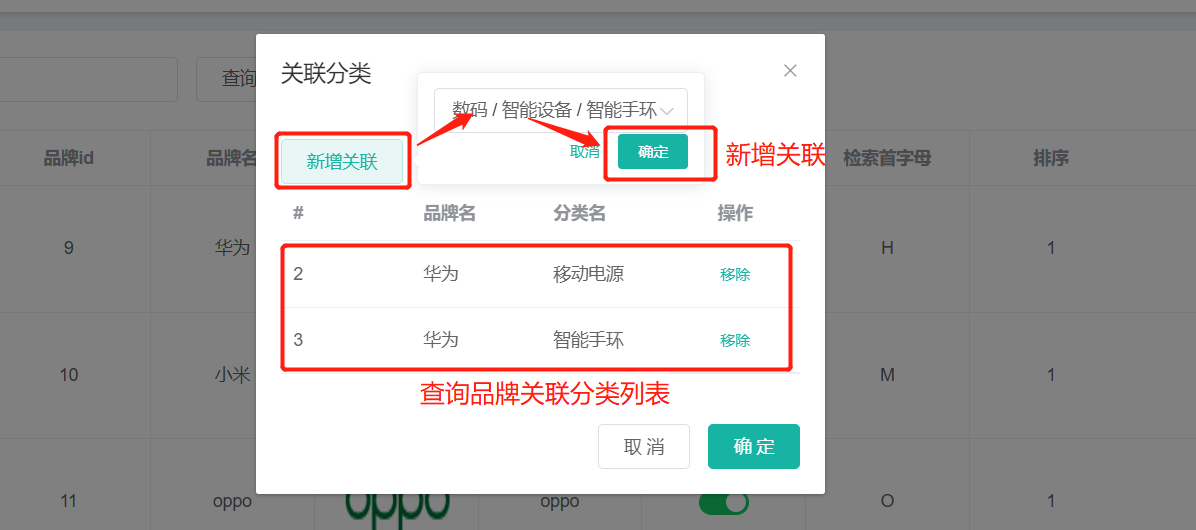
(3)获取品牌关联的分类
com.atguigu.gulimall.product.controller.CategoryBrandRelationController 新增方法:
/**
 * 获取当前品牌关联的所有分类列表
* @param brandId
* @return
*/
//@RequestMapping(value = "/catelog/list", method = RequestMethod.GET)
@GetMapping("/catelog/list")
//@RequiresPermissions("product:categorybrandrelation:list")
public R categorylist(@RequestParam("brandId")Long brandId){
    List<CategoryBrandRelationEntity> data = categoryBrandRelationService.list(
            new QueryWrapper<CategoryBrandRelationEntity>().eq("brand_id", brandId)
    );
    return R.ok().put("data", data);
}
(4)新增品牌与分类关联关系
  修改com.atguigu.gulimall.product.controller.CategoryBrandRelationController的save方法
/**
   * 新增品牌与分类关联关系
* @param categoryBrandRelation
* @return
*/
@RequestMapping("/save")
  //@RequiresPermissions("product:categorybrandrelation:save")
public R save(@RequestBody CategoryBrandRelationEntity categoryBrandRelation){
      categoryBrandRelationService.saveDetail(categoryBrandRelation);
//categoryBrandRelationService.save(categoryBrandRelation);
return R.ok();
  }
新增接口和实现类
/**
 * 新增品牌与分类关联关系
* @param categoryBrandRelation
*/
@Override
public void saveDetail(CategoryBrandRelationEntity categoryBrandRelation) {
    Long brandId = categoryBrandRelation.getBrandId();
    Long catelogId = categoryBrandRelation.getCatelogId();
    //1、查询详细名字
BrandEntity brandEntity = brandDao.selectById(brandId);
    CategoryEntity categoryEntity = categoryDao.selectById(catelogId);

    categoryBrandRelation.setBrandName(brandEntity.getName());
    categoryBrandRelation.setCatelogName(categoryEntity.getName());

    this.save(categoryBrandRelation);
}
效果
(5)解决数据存储冗余问题
  我们把品牌名称和分类名存储到了 品牌-分类关联表(pms_category_brand_relation)中,在数据设计中用冗余换效率
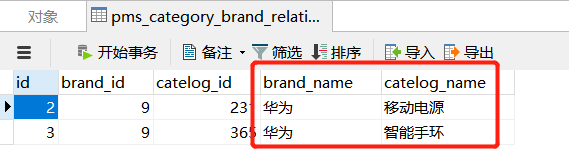
存在问题:修改品牌和分类的时候,应该把关联表也修改
(a)修改品牌名称冗余问题
com.atguigu.gulimall.product.controller.BrandController 修改 update 方法
/**
 * 修改
 */
@RequestMapping("/update")
//@RequiresPermissions("product:brand:update")
public R update(@Validated(UpdateGroup.class) @RequestBody BrandEntity brand){
    brandService.updateDetail(brand);
    //brandService.updateById(brand);
    return R.ok();
}
com.atguigu.gulimall.product.service.impl.BrandServiceImpl 新增接口和实现类
/**
 * 更新品牌信息
 * @param brand
 */
@Override
@Transactional
public void updateDetail(BrandEntity brand) {
    //保证冗余字段的数据一致
    this.updateById(brand);
    if(!StringUtils.isEmpty(brand.getName())){
        //同步更新其他关联表中的数据
        categoryBrandRelationService.updateBrand(brand.getBrandId(), brand.getName());

        //TODO 更新其他关联
    }
}
com.atguigu.gulimall.product.service.impl.CategoryBrandRelationServiceImpl 新增接口和实现类
/**
 * 更新品牌关联信息
* @param brandId
* @param name
*/
@Override
public void updateBrand(Long brandId, String name) {
    CategoryBrandRelationEntity relationEntity = new CategoryBrandRelationEntity();
    relationEntity.setBrandId(brandId);
    relationEntity.setBrandName(name);
    this.update(relationEntity, new UpdateWrapper<CategoryBrandRelationEntity>().eq("brand_id",brandId));
}
(b)修改分类名称冗余问题
com.atguigu.gulimall.product.controller.CategoryController 修改 update 方法
  /**
   * 修改
   */
  @RequestMapping("/update")
  //@RequiresPermissions("product:category:update")
  public R update(@RequestBody CategoryEntity category){
      categoryService.updateCascade(category);
    //categoryService.updateById(category);
      return R.ok();
  }

 com.atguigu.gulimall.product.service.impl.CategoryServiceImpl 新增接口和实现类
/**
 * 级联更新所有关联的数据
 * @param category
 */
@Override
@Transactional
public void updateCascade(CategoryEntity category) {
    this.updateById(category);
    categoryBrandRelationService.updateCategory(category.getCatId(), category.getName());
}

 com.atguigu.gulimall.product.service.impl.CategoryBrandRelationServiceImpl 新增接口和实现类
/**
 * 更新关联表的分类名称
* @param catId
* @param name
*/
@Override
public void updateCategory(Long catId, String name) {
    this.baseMapper.updateCategory(catId, name);
}
 com.atguigu.gulimall.product.dao.CategoryBrandRelationDao 新增接口方法
 /**
 * 更新分类名称
* @param catId
* @param name
*/
void updateCategory(@Param("catId") Long catId, @Param("name") String name);
CategoryBrandRelationDao.xml 新增对应xml方法
<!--更新关联分类的名称-->
<update id="updateCategory">
    update pms_category_brand_relation set catelog_name=#{name} WHERE catelog_id=#{catId}
</update>

 浙公网安备 33010602011771号