GitLab搭建详细过程
一、前提
- 系统:Centos 6.5
- 软件版本:gitlab-7.8.4
- Selinux:关闭
- 防火墙规则:先清空(搭建好了后续自己添加相关放行规则)
二、yum源配置和相关依赖包
1.添加epel源和PUIAS_6_computational源
|
1
|
# yum -y install epel-release |
创建该文件并添加以下内容:
|
1
2
3
4
5
6
7
|
# vim /etc/yum.repos.d/PUIAS_6_computational.repo[PUIAS_6_computational]name=PUIAS computational Base $releasever - $basearchmirrorlist=http://puias.math.ias.edu/data/puias/computational/$releasever/$basearch/mirrorlist#baseurl=http://puias.math.ias.edu/data/puias/computational/$releasever/$basearchgpgcheck=1gpgkey=file:///etc/pki/rpm-gpg/RPM-GPG-KEY-puias |
获取和导入相关验证文件
|
1
2
3
|
# wget -O /etc/pki/rpm-gpg/RPM-GPG-KEY-puias http://springdale.math.ias.edu/data/puias/6/x86_64/os/RPM-GPG-KEY-puias# rpm --import /etc/pki/rpm-gpg/RPM-GPG-KEY-puias# yum repolist |
2.安装依赖包
|
1
2
3
4
5
6
7
|
# yum install -y vim lrzsz wget gcc gcc-c++ make makeconf cmake# yum -y update# yum -y groupinstall 'Development Tools'# yum -y install readline readline-devel ncurses-devel gdbm-devel glibc-devel tcl-devel openssl-devel curl-devel expat-devel db4-devel byacc sqlite-devel libyaml libyaml-devel libffi libffi-devel libxml2 libxml2-devel libxslt libxslt-devel libicu libicu-devel system-config-firewall-tui redis sudo wget crontabs logwatch logrotate perl-Time-HiRes git cmake libcom_err-devel.i686 libcom_err-devel.x86_64 nodejs cmake libicu-devel libicu openssl openssl-devel查看安装的git版本,需要1.7.12以上,有PUIAS源会装1.8# git --version |
三、安装Ruby
1.查看是否安装有Ruby
|
1
|
# rpm -qa | grep ruby |
2.安装Ruby
|
1
2
3
4
5
6
|
# mkdir /tmp/ruby && cd /tmp/ruby# curl --progress ftp://ftp.ruby-lang.org/pub/ruby/2.1/ruby-2.1.2.tar.gz | tar xz# cd ruby-2.1.2# ./configure --disable-install-rdoc# make# make prefix=/usr/local install |
3.安装Bundler Gem
|
1
|
# gem install bundler --no-doc |
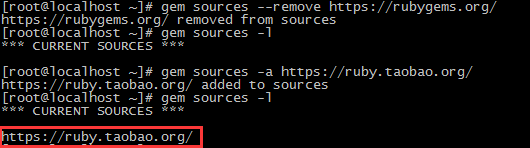
可能会报以下错误,这是因为国内网络导致rubygems.org存放在Amazon S3上面的资源文件间接性链接失败,用国内的RubyGems镜像(参见http://ruby.taobao.org/)替换官方镜像

更换镜像地址:
|
1
2
|
# gem sources --remove https://rubygems.org/ # 删除原镜像地址# gem sources -a https://ruby.taobao.org/ # 添加新镜像地址 |
查看是否更换成功:
再次安装:

四、创建系统用户git
|
1
2
3
4
5
6
7
8
9
10
11
|
# adduser --system --shell /bin/bash --comment 'GitLab' --create-home --home-dir /home/git/ git让git用户可以找到/usr/local/bin命令,并可以使用sudo# visudo找到这一行:Defaults secure_path = /sbin:/bin:/usr/sbin:/usr/bin在后面添加 /usr/local/bin :Defaults secure_path = /sbin:/bin:/usr/sbin:/usr/bin:/usr/local/bin再找到这一行:root ALL=(ALL) ALL在下一行添加:git ALL=(ALL) ALL |
五、安装MySQL
1.前提
这里的数据库需要安装Mysql 5.5以上的版本,而epel源默认只有5.1,所以需要添加有Mysql 5.5的源
|
1
2
3
4
5
|
# rpm -qa | grep mysql # 查看是否安装比较低版本的mysql,然后卸载# yum remove -y mysql*# yum install -y mysql55-server mysql55-devel mysql55 postfix # 安装5.5版本# chkconfig mysqld on # 设置开机启动# service mysqld start |
要求是InnoDB引擎,登陆查看是否为InnoDB引擎
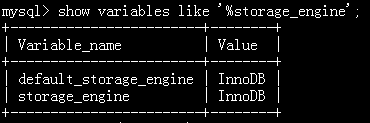
如果不是可以用SET storage_engine=INNODB设置,或者修改my.cnf文件后重启mysql
2.配置GitLab使用的数据库
|
1
2
3
4
5
|
> CREATE DATABASE IF NOT EXISTS `gitlabhq_production` DEFAULT CHARACTER SET `utf8` COLLATE `utf8_unicode_ci`;> GRANT SELECT, LOCK TABLES, INSERT, UPDATE, DELETE, CREATE, DROP, INDEX, ALTER ON `gitlabhq_production`.* TO 'git'@'localhost' identified by 'git';> GRANT SELECT, LOCK TABLES, INSERT, UPDATE, DELETE, CREATE, DROP, INDEX, ALTER ON `gitlabhq_production`.* TO 'git'@'127.0.0.1' identified by 'git';> flush privileges;> exit; |
六、安装Redis
安装Reids
|
1
2
3
|
# yum -y install redis# chkconfig redis on# cp /etc/redis.conf /etc/redis.conf.orig |
下面这条命令会把redis.conf的端口设置为0,而redis.conf.orig不变
|
1
2
3
|
# sed 's/^port .*/port 0/' /etc/redis.conf.orig | sudo tee /etc/redis.conf# echo 'unixsocket /var/run/redis/redis.sock' | sudo tee -a /etc/redis.conf# echo -e 'unixsocketperm 0770' | sudo tee -a /etc/redis.conf |
授权/var/run/redis给redis权限
|
1
2
3
|
# mkdir -p /var/run/redis/# chown redis:redis /var/run/redis# chmod 755 /var/run/redis |
将git加入redis组,并启动Redis
|
1
2
|
# usermod -aG redis git# service redis start |
七、安装GitLab
1.克隆GitLab
|
1
2
3
|
# su - git# cd /home/git# git clone https://gitlab.com/larryli/gitlab.git -b 7-8-zh gitlab |
2.配置
切换至GitLab目录下面,复制一份配置文件
|
1
2
|
# cd gitlab# cp config/gitlab.yml.example config/gitlab.yml |
确保GitLab可以对 log 和 tmp 目录有写入权限
|
1
2
3
4
|
# chown -R git log/# chown -R git tmp/# chmod -R u+rwX log/# chmod -R u+rwX tmp/ |
为satelites创建目录
|
1
2
|
# mkdir /home/git/gitlab-satellites# chmod u+rwx,g=rx,o-rwx /home/git/gitlab-satellites |
确保GitLab可以对 tmp/pids、tmp/sockets、public/uploads目录有写入权限
|
1
2
3
|
# chmod -R u+rwX tmp/pids/# chmod -R u+rwX tmp/sockets/# chmod -R u+rwX public/uploads |
从配置案例复制一份unicorn配置文件,并修改配置文件中的timeout选项的值为600(防止仓库文件太大,拉取时间过长出现超时)
|
1
2
3
4
5
|
# su -# cd /home/git/gitlab# sudo -u git -H cp config/unicorn.rb.example config/unicorn.rb# vim gitlab/config/unicorn.rb修改timeout 600 |
从配置案例复制一份rack attack配置文件
|
1
|
# sudo -u git -H cp config/initializers/rack_attack.rb.example config/initializers/rack_attack.rb |
为git用户配置git全局配置
|
1
2
3
|
# sudo -u git -H git config --global user.name "GitLab"# sudo -u git -H git config --global user.email "xxxxxx@qq.com"# sudo -u git -H git config --global core.autocrlf input |
配置redis连接
|
1
|
# sudo -u git -H cp config/resque.yml.example config/resque.yml |
配置GitLab数据库设置
|
1
2
|
# sudo -u git cp config/database.yml.mysql config/database.yml# vim config/database.yml |
只需配置生产的部分(第一部分),用户名和密码
配置好以后运行该命令
|
1
|
# sudo -u git -H chmod o-rwx config/database.yml |
配置GitLab绑定的域名或者IP
|
1
2
3
|
# vim config/gitlab.yml修改host为gitlab的域名为你主机的IP地址(有两项,test一项应该没有影响,不过也修改吧)host:主机IP |
安装Gems
|
1
|
# sudo -u git -H bundle install --deployment --without development test postgres aws |
可能会报错,还是大陆访问官网的问题,替换成https://ruby.taobao.org,然后再安装

替换命令:
|
1
|
# sed -i '/^source/s/https\:\/\/rubygems\.org/https\:\/\/ruby\.taobao\.org/' Gemfile |
安装GitLab shell
|
1
|
# sudo -u git -H bundle exec rake gitlab:shell:install[v2.5.4] REDIS_URL=unix:/var/run/redis/redis.sock RAILS_ENV=production |
初始化数据库
|
1
|
# sudo -u git -H bundle exec rake gitlab:setup RAILS_ENV=production |
如果想要自己设置GitLab的root默认登陆密码则运行以下命令:
|
1
|
# sudo -u git -H bundle exec rake gitlab:setup RAILS_ENV=production GITLAB_ROOT_PASSWORD=yourpassword |
默认登陆账号密码
|
1
2
|
login.........rootpassword......5iveL!fe |
配置启动脚本
|
1
|
# cp lib/support/init.d/gitlab /etc/init.d/ |
配置日志切割
|
1
|
# cp lib/support/logrotate/gitlab /etc/logrotate.d/gitlab |
运行命令检测GitLab和它的环境是否正确
|
1
|
# sudo -u git -H bundle exec rake gitlab:env:info RAILS_ENV=production |
运行命令结果截图如下:
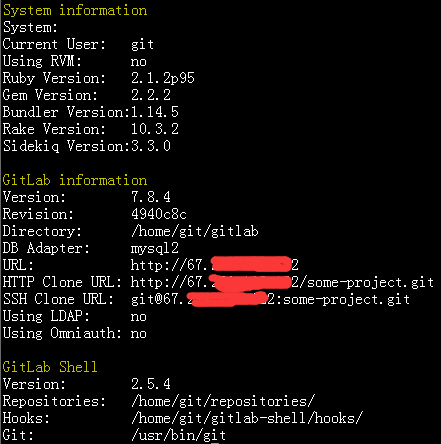
拉取GitLab静态资源文件
|
1
|
# sudo -u git -H bundle exec rake assets:precompile RAILS_ENV=production |
修改配置文件的gitlab_url为主机IP或者域名
|
1
|
# vim /home/git/gitlab-shell/config.yml |
启动GitLab实例
|
1
|
# service gitlab start |
八、配置Nginx
安装和配置开机启动(这里用yum安装,也可以自己编译安装)
|
1
2
|
# yum install -y nginx# chkconfig nginx on |
下载Nginx配置文件,并命名为gitlab.conf
|
1
|
# wget -O /etc/nginx/conf.d/gitlab.conf https://gitlab.com/gitlab-org/gitlab-ce/raw/master/lib/support/nginx/gitlab |
把nginx加入到git组
|
1
2
|
# usermod -a -G git nginx# chmod g+rx /home/git/ |
修改gitlab.conf文件
|
1
2
3
4
5
|
# vim /etc/nginx/conf.d/gitlab.confserver unix:/home/git/gitlab/tmp/sockets/gitlab-workhorse.socket fail_timeout=0; 修改为 server unix:/home/git/gitlab/tmp/sockets/gitlab.socket fail_timeout=0;listen 0.0.0.0:80 default_server; 修改为 listen 80;listen [::]:80 default_server; 该行删除server_name YOUR_SERVER_FQDN; 修改为 server_name 主机IP |
启动Nginx
|
1
|
# service nginx start |
九、访问
访问地址,http://主机IP或者域名,第一次登陆后就需要修改root用户的密码,然后再去掉GitLab的用户注册功能。到此GitLab搭建完毕!
centos 6.5安装GitLab全过程和问题记录
GitLab,是一个使用 Ruby on Rails 开发的开源应用程序,与Github类似,能够浏览源代码,管理缺陷和注释,非常适合在团队内部使用。
官方只提供了Debian/Ubuntu系统下的安装说明文档,如果需要在centos下安装,可以参考这篇:https://github.com/gitlabhq/gitlab-recipes/tree/master/install/centos,笔者依照这篇文章的说明,成功的在centos系统上安装了gitlab,分享一下自己的安装过程和碰到的问题。
安装的英文文档:centos-6-5-install-gitlab.zip
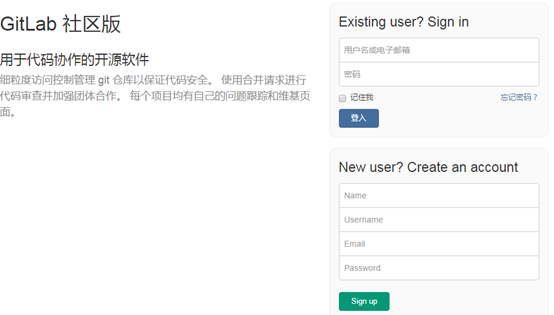
先秀下安装完成后的成果。

centos安装gitlab成果
开始之前
在开始之前请先查看官方的刚需文档: https://github.com/gitlabhq/gitlabhq/blob/master/doc/install/requirements.md ,该文档说明了系统,软件和硬件等各方面的需求。详细的了解这些,可以避免碰到很多怪异的问题。
安装步骤总览
- 基础操作系统(CentOS 6.4 Minimal,升级后为6.5)
- Ruby (版本: 2.0.0p353)
- 创建项目运行用户(创建git账号,方便权限管理)
- GitLab Shell(版本:1.8.0)
- 数据库(可以支持mysql和PostgreSQL,这里使用mysql,版本:5.1.17)
- GitLab(版本:6.3.1)
- Web服务器(可支持nginx和apache,这里使用nginx,版本:1.0.15)
- 防火墙(iptables)
1、安装操作系统
这个比较简单,安装完成之后记的配置下网络,使其可以在启动时自动连接。而后需要升级系统和安装一些相应的软件和依赖包,以下逐一说明。
Tips:如果不能连接国外的网络,经常出现网络错误或者couldn’t not resolve host这样的错误,建议修改dns服务器为8.8.8.8和8.8.4.4。
a、升级操作系统和安装wget
$ sudo yum -y update
$ sudo yum -y install wget
升级完成后,系统版本是6.5。
笔者注:和英文文档不同,笔者这里是先升级系统和安装wget,不然后面的操作会提示wget命令找到。
b、增加EPEL安装源
EPEL,即Extra Packages for Enterprise Linux,这个软件仓库里有很多非常常用的软件,而且是专门针对RHEL设计的,对RHEL标准yum源是一个很好的补充,完全免费使用,由Fedora项目维护,所以如果你使用的是RHEL,或者CentOS,Scientific等RHEL系的linux,可以非常放心的使用EPEL的yum源。
下载并安装GPG key
$ sudo wget -O /etc/pki/rpm-gpg/RPM-GPG-KEY-EPEL-6 https://www.fedoraproject.org/static/0608B895.txt
$ sudo rpm --import /etc/pki/rpm-gpg/RPM-GPG-KEY-EPEL-6
检验下是否安装成功
$ sudo rpm -qa gpg*
安装epel-release-6-8.noarch包
$ sudo rpm -Uvh http://dl.fedoraproject.org/pub/epel/6/x86_64/epel-release-6-8.noarch.rpm
提示:不要在意x86_64,在i686的机器上一样能使用。
c、增加PUIAS安装源
PUIAS Linux是面向桌面和服务器的完整的操作系统,它靠编译Red Hat Enterprise Linux的源代码包来创建。除了这些上游的软件包外,该项目还提供一些其他的软件仓库:“Addons”包含了通常的Red Hat发行中未收入的额外软件包,“Computational”提供专门针对科学计算的软件,“Unsupported”则收入各种各样的测试性软件 包。该发行由美国普林斯顿 大学的高等研究所维护。
创建/etc/yum.repos.d/PUIAS_6_computational.repo,并添加如下内容:
[PUIAS_6_computational]
name=PUIAS computational Base $releasever - $basearch
mirrorlist=http://puias.math.ias.edu/data/puias/computational/$releasever/$basearch/mirrorlist
#baseurl=http://puias.math.ias.edu/data/puias/computational/$releasever/$basearch
gpgcheck=1
gpgkey=file:///etc/pki/rpm-gpg/RPM-GPG-KEY-puias
下载并安装GPG key
$ sudo wget -O /etc/pki/rpm-gpg/RPM-GPG-KEY-puias http://springdale.math.ias.edu/data/puias/6/x86_64/os/RPM-GPG-KEY-puias
$ sudo rpm --import /etc/pki/rpm-gpg/RPM-GPG-KEY-puias
检验下是否安装成功
$ sudo rpm -qa gpg*
Tips:安装完EPEL和PUIAS两个源后,可以检测下:
$ sudo yum repolist
d、安装GitLab的所需依赖包和工具
$ su -
$ yum -y groupinstall 'Development Tools'
$ yum -y install vim-enhanced readline readline-devel ncurses-devel gdbm-devel glibc-devel tcl-devel openssl-devel curl-devel expat-devel db4-devel byacc sqlite-devel gcc-c++ libyaml libyaml-devel libffi libffi-devel libxml2 libxml2-devel libxslt libxslt-devel libicu libicu-devel system-config-firewall-tui python-devel redis sudo wget crontabs logwatch logrotate perl-Time-HiRes git
RHEL提示
如果部分包不能安装,例如: eg. gdbm-devel, libffi-devel and libicu-devel,那么增加rhel6的安装源。
$ yum-config-manager --enable rhel-6-server-optional-rpms
e、配置redis
配置redis使其在开机时启动:
$ sudo chkconfig redis on
$ sudo service redis start
f、配置邮件服务器
笔者注:这个过程笔者没有配置,请参考英文文档。
2、安装Ruby
下载并编译:
$ su -
$ mkdir /tmp/ruby && cd /tmp/ruby
$ curl --progress ftp://ftp.ruby-lang.org/pub/ruby/2.0/ruby-2.0.0-p353.tar.gz | tar xz
$ cd ruby-2.0.0-p353
$ ./configure --prefix=/usr/local/
$ make && make install
安装完成后,重新登录终端确保$PATH生效,检测ruby的安装成功与否:
$ which ruby
/usr/local/bin/ruby
$ ruby -v
ruby 2.0.0p353 (2013-11-22 revision 43784) [x86_64-linux]
安装bundle:
$ sudo gem install bundler --no-ri --no-rdoc
如果提示sudo: gem: command not found,使用root账号登录执行该命令即可。
3、系统用户
创建用户git
$ su -
$ adduser --system --shell /bin/bash --comment 'GitLab' --create-home --home-dir /home/git/ git
因为git用户不需要登录,所以这里不需要设置git的密码。
转发所有邮件
笔者注:因为上面没有配置发送邮件,这里也省略。
4、配置GitLab shell
GitLab shell是专门为GitLab开发的提供ssh访问和版本管理的软件。
先使用root登录,而后切换成git
$ su -
$ su - git
克隆gitlab shell
$ git clone https://github.com/gitlabhq/gitlab-shell.git
$ cd gitlab-shell
切换成1.8.0版本,并编辑配置
$ git checkout v1.8.0
$ cp config.yml.example config.yml
这里最重要的是将gitlab_url修改成gitlab的访问域名。形如:http://test.gitlab.com/
笔者注:如果gitlab是使用https访问,则需将http替换成https,配置文件中的self_signed_cert要修改成true,否则gitlab shell在通过api和gitlab进行通信的时候就会出现错误,导致项目push出错。因为后面配置web服务器的时候是使用ssl,所以这里要按照ssl的方式配置。
Tips: 另外如果使用的域名是测试域名,不要忘记在系统的/etc/hosts做域名映射。
安装一些需要的目录和文件
$ ./bin/install
5、安装数据库
笔者这里使用的是msyql,关于PostgreSQL的安装请参考原文档。
安装mysql并设置开机启动:
$ su -
$ yum install -y mysql-server mysql-devel
$ chkconfig mysqld on
$ service mysqld start
设置mysql root账号的密码:
$ /usr/bin/mysql_secure_installation
创建新用户和数据库给gitlab使用
# 登录数据库
$ mysql -u root -p
# 输入root密码
# 为gitlab创建使用用户
CREATE USER 'gitlab'@'localhost' IDENTIFIED BY 'gitlab账号的密码';

# 创建gitlaba使用的数据库
CREATE DATABASE IF NOT EXISTS `gitlabhq_production` DEFAULT CHARACTER SET `utf8` COLLATE `utf8_unicode_ci`;

# 给予gitlab用户权限
GRANT SELECT, LOCK TABLES, INSERT, UPDATE, DELETE, CREATE, DROP, INDEX, ALTER ON `gitlabhq_production`.* TO 'gitlab'@'localhost';

# 登出数据库
\q
6、安装GitLab
将GitLab安装在git的家目录下:
$ su -
$ su - git
a、克隆GitLab并切换分支到6-3-stable
# 克隆GitLab
$ git clone https://github.com/gitlabhq/gitlabhq.git gitlab
# 进入gitlab目录
$ cd /home/git/gitlab
# 切换到6-3-stable分支
$ git checkout 6-3-stable
b、配置项目
# 复制配置文件
$ cp config/gitlab.yml.example config/gitlab.yml

# 修改配置文件中的访问域名
(your_domain_name为项目的访问域名)
$ sed -i 's|localhost|your_domain_name|g' config/gitlab.yml

# 设定log和tmp目录所有者和权限
$ chown -R git log/
$ chown -R git tmp/
$ chmod -R u+rwX log/
$ chmod -R u+rwX tmp/

# 创建gitlab-satellites目录
$ mkdir /home/git/gitlab-satellites

# 创建tmp/pids/和tmp/sockets/目录,确保gitlab有相应的权限
$ mkdir tmp/pids/
$ mkdir tmp/sockets/
$ chmod -R u+rwX tmp/pids/
$ chmod -R u+rwX tmp/sockets/

# 创建public/uploads目录
$ mkdir public/uploads
$ chmod -R u+rwX public/uploads

# 复制unicorn配置
$ cp config/unicorn.rb.example config/unicorn.rb

# 编辑unicorn配置
(笔者这里采用默认配置)
$ vim config/unicorn.rb

# 配置git的用户和邮件
$ git config --global user.name "GitLab"
$ git config --global user.email "gitlab@your_domain_name"
$ git config --global core.autocrlf input
这边的配置比较复杂,细心些就行了。
c、配置数据库访问文件
$ cp config/database.yml.mysql config/database.yml
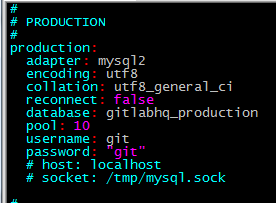
编辑config/database.yml,设置其中连接数据库的账号密码,笔者的配置部分如下:
#
# PRODUCTION
#
production:
  adapter: mysql2
  encoding: utf8
  reconnect: false
  database: gitlabhq_production
  pool: 10
  username: gitlab
  password: "gitlab"
  # host: localhost
  # socket: /tmp/mysql.sock
修改其中username和password就可以了,其中密码就是上面数据库步骤中创建gitlab用户的密码。
确保该文件只有git账号有权限读取。
$ chmod o-rwx config/database.yml
d、安装Gems
$ su -
$ gem install charlock_holmes --version '0.6.9.4'
$ exit
安装mysql包
$ cd /home/git/gitlab/
$ bundle install --deployment --without development test postgres puma aws
e、初始化数据和激活高级功能
$ cd /home/git/gitlab
$ bundle exec rake gitlab:setup RAILS_ENV=production
这步完成后,会生一个默认的管理员账号:
admin@local.host
5iveL!fe
f、安装启动脚本
$ su -
$ wget -O /etc/init.d/gitlab https://raw.github.com/gitlabhq/gitlab-recipes/master/init/sysvinit/centos/gitlab-unicorn
$ chmod +x /etc/init.d/gitlab
$ chkconfig --add gitlab
开机时启动
$ chkconfig gitlab on
g、检测应用程序状态
$ su - git
$ cd gitlab/
$ bundle exec rake gitlab:env:info RAILS_ENV=production
$ exit
可以查看到系统、Ruby、GitLab和GitLab Shell的版本和其他信息。
启动GitLab实例
$ service gitlab start
h、查看应用更加详细的信息
$ su - git
$ cd gitlab/
$ bundle exec rake gitlab:check RAILS_ENV=production
这里会提示一个Init script up-to-date的错误,如下:
Init script up-to-date? ... no
Try fixing it:
Redownload the init script
For more information see:
doc/install/installation.md in section "Install Init Script"
Please fix the error above and rerun the checks.
原文说明不用介意这个问题。
7、安装web服务器
笔者选择的是nginx,关于apache方面的请参考原文档
$ su -
$ yum -y install nginx
$ chkconfig nginx on
$ mkdir /etc/nginx/sites-available
$ mkdir /etc/nginx/sites-enabled
$ wget -O /etc/nginx/sites-available/gitlab https://raw.github.com/gitlabhq/gitlab-recipes/master/web-server/nginx/gitlab-ssl
$ ln -sf /etc/nginx/sites-available/gitlab /etc/nginx/sites-enabled/gitlab
编辑/etc/nginx/nginx.conf,将 include /etc/nginx/conf.d/*.conf; 替换成 include /etc/nginx/sites-enabled/*;,就是修改额外加载的配置文件目录。
编辑/etc/nginx/sites-available/gitlab,将配置中server_name替换成实际访问的域名。
将nginx加入git用户组
$ usermod -a -G git nginx
$ chmod g+rx /home/git/
添加ssl证书或者自己生成一个
$ cd /etc/nginx
$ openssl req -new -x509 -nodes -days 3560 -out gitlab.crt -keyout gitlab.key
启动nginx
$ service nginx start
8、配置防火墙
配置iptables,使用户可以访问http、https和ssh的端口。
$ lokkit -s http -s https -s ssh
重新启动防火墙
$ service iptables restart
至此就算安装完成了。默认的账号密码:
admin@local.host
5iveL!fe
问题记录
a、网站不能添加用户和创建项目问题?
查了下日志,发现是权限的问题:
Errno::EACCES (Permission denied – /home/git/gitlab/log/application.log):
修改用户和所属用户组为git就可以了。
b、无法push?
在上面安装GitLab shell步骤时,一开始笔者是将配置中的gitlab_url设置成http://test.gitlab.com/,结果在push的时候出错了,后来查看GitLab项目日志,才发现GitLab shell和GitLab通信的时候产生了一个301跳转。这点通过GitLab的nginx配置也能看的出来。后来将http替换成https,self_signed_cert设置成true就OK了。
总结
安装的过程比较长,其中大部分时间花在了包的下载上。笔者以前没有接触过ruby,安装的过程中也了解了下Ruby、Gem、Bundle等软件,受益匪浅。一般来讲,照着上面的步骤安装,如果系统,软件等版本都一致的话,应该能成功安装。如果出现问题,可以多查查日志。GitLab项目的日志在该项目的log目录内。GitLab shell的日志在GitLab shell项目中的gitlab-shell.log
感谢
在安装的过程中多亏了朋友雷志伟的帮忙,少走了不少弯路。此外他现在正在汉化GitLab,英文不好的朋友有福了,有兴趣的朋友也可以参与进来,也可以直接使用已经汉化好的文件,地址:http://git.oschina.net/linxuix/Git-Lab-Zh。
posted on 2018-05-06 17:30 David_Deng 阅读(1265) 评论(0) 收藏 举报


 浙公网安备 33010602011771号