FastDFS磁盘扩容
1 新增磁盘挂载点,在新磁盘新建文件存储目录
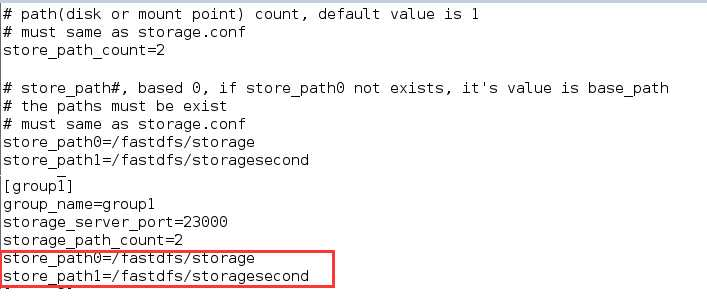
2 修改/etc/fdfs/Storage.conf配置,store_path_count = 2,store_path0=/data/push/fastdfs,store_path1=/newdata/push/fastdfs
3 查看/etc/fdfs/tracker.conf配置的store_path是否等于2,应该采用负载均衡策略,令新文件存储在新磁盘下。
4 修改/etc/fdfs/mod_fastdfs.conf配置, store_path_count = 2,store_path0=/data/push/fastdfs,store_path1=/newdata/push/fastdfs
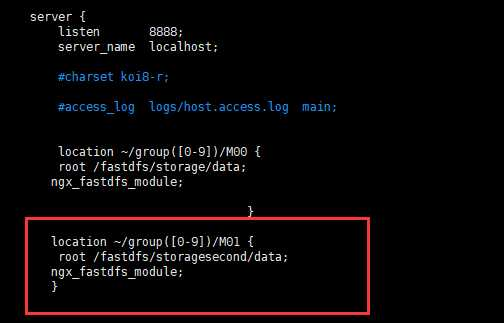
5 修改/usr/local/nginx/conf/fastdfs.conf
location /group[0~9]/M00 {
alias /data/push/fastdfs/data;
ngx_fastdfs_module;
}
location /group[0~9]/M01 {
alias /newdata/push/fastdfs/data;
ngx_fastdfs_module;
}
6 重启tracker,storage,Nginx服务
---##############################################################################
基于group模式的文件存储扩容(添加磁盘)
group模式扩容是通过给group的机器添加硬盘的方式,实现某个group的扩容。fastdfs在一台服务器支持多个store_path,每个store_path指向一个存储路径。如:url “M00/3F/E1/oYYBAFXfyuOABOf5AAAHoDwhqE0491.txt”中M00表示使用store_path0,如果没有配置store_path,就使用base_path的路径。添加了硬盘后,通过把新的store_path指向新硬盘的挂载点,再修改配置文件,就能实现group的扩容。扩容后的地址如:url “M01/3F/E3/oYYBAFXfyuOABOf5AAAHoDwhqE0591.txt”中M01表示使用store_path1。group模式扩容主要步骤如下:
- 1.停止现有的tracker服务,storage服务,操作指令如:/etc/init.d/fdfs_trackerd stop ,/etc/init.d/fdfs_storaged stop ;
- 2.修改/etc/fdfs/storage.conf配置文件,修改字段store_path_count,新增store_path1文件存储路径,新建store_path1的文件目录;

3.修改/etc/fdfs/storage.conf/mod_fastdfs.conf配置文件,修改字段store_path_count,新增store_path1文件存储路径,设置group1的配置信息;

4.修改/application/nginx/conf/nginx.conf配置文件,增加store_path1的访问代理;

5.重新启动tracker,storage,nginx服务,通过命令 /usr/bin/fdfs_monitor /etc/fdfs/storage.conf( /usr/bin/fdfs_monitor为f调用astdfs的命令,根据安装目录而定)可查看文件服务器的运行状态和配置信息。

结果展示:调用文件clent.conf配置文件,通过文件上传命令上传文件,查看文件的存储地址信息如下:


