
BlockingQueue
BlockingQueue
在所有的并发容器中,BlockingQueue是最常见的一种。BlockingQueue是一个带阻塞功能的队 列,当入队列时,若队列已满,则阻塞调用者;当出队列时,若队列为空,则阻塞调用者
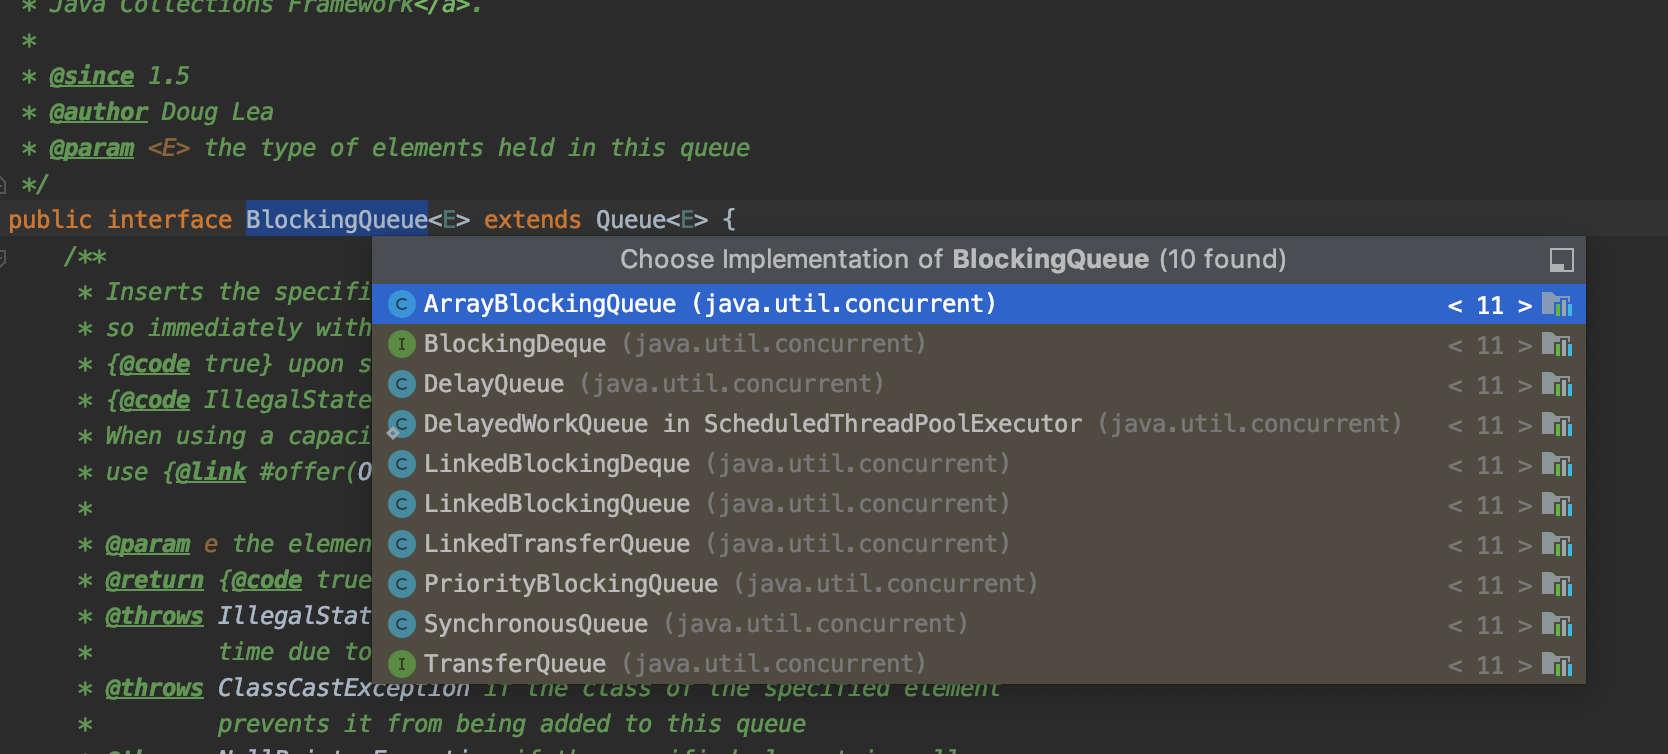
在Concurrent包中,BlockingQueue是一个接口,有许多个不同的实现类,如图所示
接口包含方法
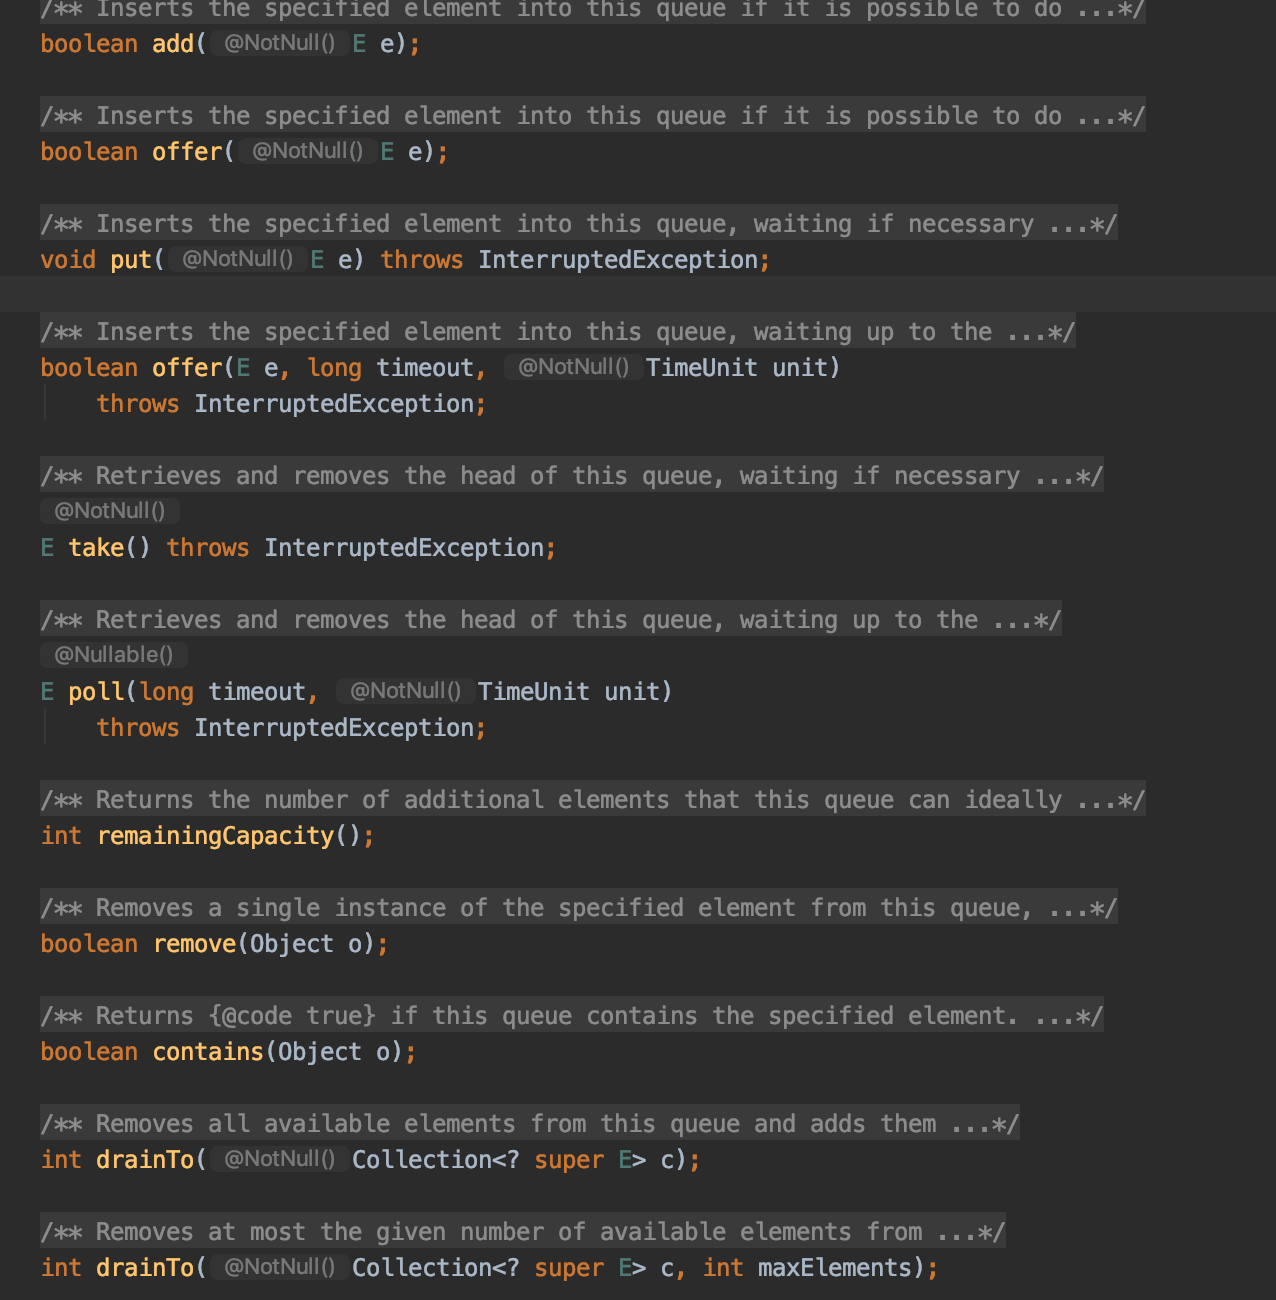
该接口和JDK集合包中的Queue接口是兼容的,同时在其基础上增加了阻塞功能,在这里,入队提 供了add(...)、offer(..)、put(...)3个方法,有什么区别呢?从上面的定义可以看到,add(...)和offer(..)的 返回值是布尔类型,而put无返回值,还会抛出中断异常,所以add(...)和offer(..)是无阻塞的,也是 Queue本身定义的接口,而put(..)是阻塞的。add(...)和offer(..)的区别不大,当队列为满的时候,前者会 抛出异常,后者则直接返回false。出队列与之类似,提供了remove()、poll()、take()等方法,remove()是非阻塞式的,take()和poll() 是阻塞式的
常见面试题:在BlockingQueue中poll()和remove()有什么区别?
接下来,我们看一下实现接口的几个实现类
一、ArrayBlockingQueue
ArrayBlockingQueue是一个用数组实现的环形队列,在构造方法中,会要求传入数组的容量。

- 第一个参数是容量
- 第二个参数是是否公平
- 第三种是可以赋值一个collection
它的核心数据结构如下图:
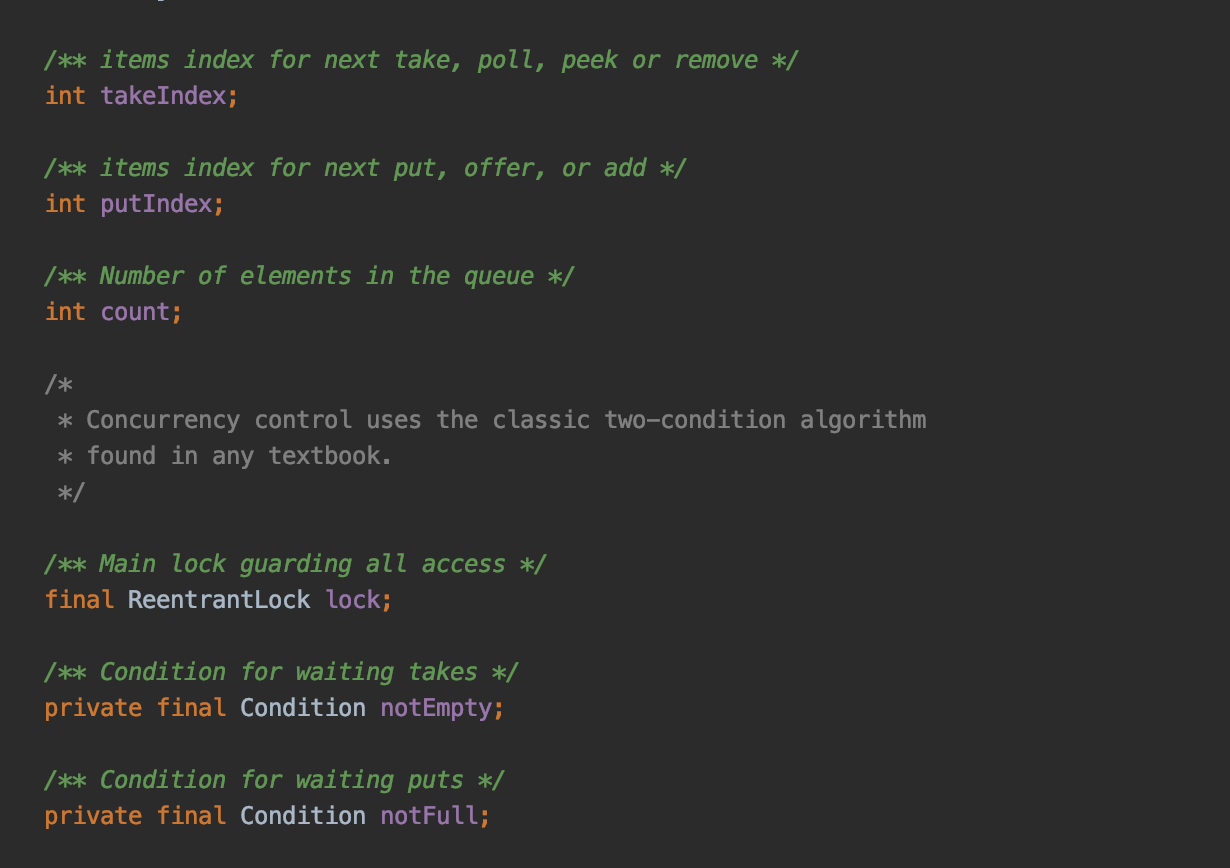
- takeIndex:队头指针
- putIndex:队尾指针
- count队列中的元素个数
- lock:重入锁
- notEmpty(队列空)、notFull(队列满):条件阻塞
put方法源码:
/**
     * Inserts the specified element at the tail of this queue, waiting
     * for space to become available if the queue is full.
     *
     * @throws InterruptedException {@inheritDoc}
     * @throws NullPointerException {@inheritDoc}
     */
    public void put(E e) throws InterruptedException {
        Objects.requireNonNull(e);
        final ReentrantLock lock = this.lock;
        lock.lockInterruptibly();//可中断锁
        try {
            while (count == items.length)
                notFull.await(); //队列满则阻塞
            enqueue(e); //元素加入队列
        } finally {
            lock.unlock();  //释放锁
        }
    }
- 先获取锁lock
- 后加上可中断锁lockInterruptibly
- 判断若队列中元素个数和队列长度一致,则队列满了,需要调用生产者条件阻塞
- 若条件不满足,则调用方法enqueue()将数据放入队列中去
/**
     * Inserts element at current put position, advances, and signals.
     * Call only when holding lock.
     */
    private void enqueue(E e) {
        // assert lock.isHeldByCurrentThread();
        // assert lock.getHoldCount() == 1;
        // assert items[putIndex] == null;
        final Object[] items = this.items;
        items[putIndex] = e;
        if (++putIndex == items.length) putIndex = 0;//队列满了则从头开始
        count++;
        notEmpty.signal();//当将数据put到队列中后,通知分空条件
    }
- 获得当前队列数组,put下标数组中放入元素
- 判断队头指针加1与队列长度比较,若相等,则从头开始(环形队列)
- 队列数据count+1,当数据加入队列后,还需要通知消费者分空,可以消费数据了
take方法源码:
public E take() throws InterruptedException {
        final ReentrantLock lock = this.lock;
        lock.lockInterruptibly();
        try {
            while (count == 0)
                notEmpty.await();//队列为空,则阻塞
            return dequeue();
        } finally {
            lock.unlock();
        }
    }
- 先获取锁,加一个可中断锁
- 判断队列长度个数,若为0,则调用消费者条件阻塞
- 若不为空,则调用dequeue()从队列中拿取数据
/**
     * Extracts element at current take position, advances, and signals.
     * Call only when holding lock.
     */
    private E dequeue() {
        // assert lock.isHeldByCurrentThread();
        // assert lock.getHoldCount() == 1;
        // assert items[takeIndex] != null;
        final Object[] items = this.items;
        @SuppressWarnings("unchecked")
        E e = (E) items[takeIndex];
        items[takeIndex] = null;
        if (++takeIndex == items.length) takeIndex = 0;
        count--;
        if (itrs != null)
            itrs.elementDequeued();
        notFull.signal();//take结束,通知非满条件
        return e;
    }
- 拿取队列数组,依据takeIndex下标获取元素
- 设置数组当前下标为null
- 判断队尾指针加1与队列长度比较,若相等,则下标设置为0(环形队列)
- 队列元素个数减1
- take结束,通知非满条件
二、LinkedBlockingQueue
LinkedBlockingQueue是一种基于单向链表的阻塞队列。因为队头和队尾是2个指针分开操作的, 所以用了2把锁+2个条件,同时有1个AtomicInteger的原子变量记录count数
// ...
private final int capacity;
// 原子变量
private final AtomicInteger count = new AtomicInteger(0);
// 单向链表的头部
private transient Node<E> head;
// 单向链表的尾部
private transient Node<E> last;
// 两把锁,两个条件
 /** Lock held by take, poll, etc */
 private final ReentrantLock takeLock = new ReentrantLock();

/** Wait queue for waiting takes */
private final Condition notEmpty = takeLock.newCondition();//阻塞消费者

 /** Lock held by put, offer, etc */
 private final ReentrantLock putLock = new ReentrantLock();

/** Wait queue for waiting puts */
private final Condition notFull = putLock.newCondition();//阻塞生产者
在其构造方法中,也可以指定队列的总容量。如果不指定,默认为Integer.MAX_VALUE
/**
     * Creates a {@code LinkedBlockingQueue} with a capacity of
     * {@link Integer#MAX_VALUE}.
     */
    public LinkedBlockingQueue() {
        this(Integer.MAX_VALUE);
    }

    /**
     * Creates a {@code LinkedBlockingQueue} with the given (fixed) capacity.
     *
     * @param capacity the capacity of this queue
     * @throws IllegalArgumentException if {@code capacity} is not greater
     *         than zero
     */
    public LinkedBlockingQueue(int capacity) {
        if (capacity <= 0) throw new IllegalArgumentException();
        this.capacity = capacity;
        last = head = new Node<E>(null);
    }
put方法源码:
/**
     * 在该队列的尾部插入指定的元素,如果空间变得可用的必要条件。
     *
     * @throws InterruptedException {@inheritDoc}
     * @throws NullPointerException {@inheritDoc}
     */
    public void put(E e) throws InterruptedException {
        if (e == null) throw new NullPointerException();
        final int c;
        final Node<E> node = new Node<E>(e);
        final ReentrantLock putLock = this.putLock;
        final AtomicInteger count = this.count;
        putLock.lockInterruptibly();
        try {
            /*
             * Note that count is used in wait guard even though it is
             * not protected by lock. This works because count can
             * only decrease at this point (all other puts are shut
             * out by lock), and we (or some other waiting put) are
             * signalled if it ever changes from capacity. Similarly
             * for all other uses of count in other wait guards.
             */
            while (count.get() == capacity) {
                notFull.await();
            }
            enqueue(node);
            c = count.getAndIncrement();
            if (c + 1 < capacity)
                notFull.signal();
        } finally {
            putLock.unlock();
        }
        if (c == 0)
            signalNotEmpty();
    }
- 获取put锁,加上可中断锁
- 判断count等于容量,若等于,则生产者阻塞
- 若不等于,则将元素加入队列中
- 获取count加一,获取值c(c是原子操作加1之前的值:比如,count值为1,count.getAndIncrement()的值为2,c的值为1)
- c+1小于容量,则唤醒其他的生产者线程
- 若c等于0,现在加了一个元素,则唤醒消费者线程
- 仅当队列消费者阻塞时,加入第一个元素时唤醒消费者线程
private void signalNotEmpty() {
        final ReentrantLock takeLock = this.takeLock;
        takeLock.lock();
        try {
            notEmpty.signal();
        } finally {
            takeLock.unlock();
        }
    }
- 获取take锁,加锁
- 唤醒消费者线程
take方法源码:
public E take() throws InterruptedException {
        final E x;
        final int c;
        final AtomicInteger count = this.count;
        final ReentrantLock takeLock = this.takeLock;
        takeLock.lockInterruptibly();
        try {
            while (count.get() == 0) {
                notEmpty.await();
            }
            x = dequeue();
            c = count.getAndDecrement();
            if (c > 1)
                notEmpty.signal();
        } finally {
            takeLock.unlock();
        }
        if (c == capacity)
            signalNotFull();
        return x;
    }
- 先用take锁加上可中断锁
- 判断count是否为0,若为0,则代表队列中无元素,则消费者等待
- 若队列中有元素,获取元素,且将count减1
- 若count大于1,说明队列中还有元素,则通知其他消费则接着消费
- 若c等于容量,这时候我拿出了一个,说明队列中还有空间,调用唤醒生产者方法signalNotFull()
- 仅当生产者线程阻塞时,消费第一个元素时,唤醒生产者线程
/**
     * Signals a waiting put. Called only from take/poll.
     */
    private void signalNotFull() {
        final ReentrantLock putLock = this.putLock;
        putLock.lock();
        try {
            notFull.signal();
        } finally {
            putLock.unlock();
        }
    }
- 获取生产者锁,加锁
- 调用生产者条件,唤醒生产者线程
LinkedBlockingQueue和ArrayBlockingQueue的差异:
- 为了提高并发度,用2把锁,分别控制队头、队尾的操作。意味着在put(...)和put(...)之间、 take()与take()之间是互斥的,put(...)和take()之间并不互斥。但对于count变量,双方都需要 操作,所以必须是原子类型
- 因为各自拿了一把锁,所以当需要调用对方的condition的signal时,还必须再加上对方的锁, 就是signalNotEmpty()和signalNotFull()方法
- 不仅put会通知 take,take 也会通知 put。当put 发现非满的时候,也会通知其他 put线程; 当take发现非空的时候,也会通知其他take线程
三、PriorityBlockingQueue
队列通常是先进先出的,而PriorityQueue是按照元素的优先级从小到大出队列的。正因为如此, PriorityQueue中的2个元素之间需要可以比较大小,并实现Comparable接口
核心数据结构如下:
// 用数组实现的二插小根堆
private transient Object[] queue;
private transient int size;//元素个数
private transient Comparator<? super E> comparator;  //元素排序
// 1个锁+一个条件,没有非满条件
private final ReentrantLock lock;
private final Condition notEmpty;
其构造方法如下所示,如果不指定初始大小,内部会设定一个默认值11,当元素个数超过这个大小 之后,会自动扩容
/**
     * Default array capacity.
     */
    private static final int DEFAULT_INITIAL_CAPACITY = 11;
/**
     * Creates a {@code PriorityBlockingQueue} with the default
     * initial capacity (11) that orders its elements according to
     * their {@linkplain Comparable natural ordering}.
     */
    public PriorityBlockingQueue() {
        this(DEFAULT_INITIAL_CAPACITY, null);
    }

    /**
     * Creates a {@code PriorityBlockingQueue} with the specified
     * initial capacity that orders its elements according to their
     * {@linkplain Comparable natural ordering}.
     *
     * @param initialCapacity the initial capacity for this priority queue
     * @throws IllegalArgumentException if {@code initialCapacity} is less
     *         than 1
     */
    public PriorityBlockingQueue(int initialCapacity) {
        this(initialCapacity, null);
    }

    /**
     * Creates a {@code PriorityBlockingQueue} with the specified initial
     * capacity that orders its elements according to the specified
     * comparator.
     *
     * @param initialCapacity the initial capacity for this priority queue
     * @param  comparator the comparator that will be used to order this
     *         priority queue.  If {@code null}, the {@linkplain Comparable
     *         natural ordering} of the elements will be used.
     * @throws IllegalArgumentException if {@code initialCapacity} is less
     *         than 1
     */
    public PriorityBlockingQueue(int initialCapacity,
                                 Comparator<? super E> comparator) {
        if (initialCapacity < 1)
            throw new IllegalArgumentException();
        this.comparator = comparator;
        this.queue = new Object[Math.max(1, initialCapacity)];
    }
put方法源码实现:
 public void put(E e) {
        offer(e); // never need to block
    }
public boolean offer(E e) {
        if (e == null)
            throw new NullPointerException();
        final ReentrantLock lock = this.lock;
        lock.lock();
        int n, cap;
        Object[] es;
        while ((n = size) >= (cap = (es = queue).length))
            tryGrow(es, cap);
        try {
            final Comparator<? super E> cmp;
            if ((cmp = comparator) == null)
                siftUpComparable(n, e, es);
            else
                siftUpUsingComparator(n, e, es, cmp);
            size = n + 1;
            notEmpty.signal();
        } finally {
            lock.unlock();
        }
        return true;
    }
- 调用offer方法
- 判断入参为null抛出异常
- 获取锁,加锁
- 判断元素与队列容量,若元素超过了队列的长度,则扩容tryGrow()
- 若没有定义比较操作,则使用元素自带的比较功能
- 元素入堆,就是调用siftUpComparable方法
- 队列元素个数+1
- 唤醒消费者线程
take方法源码:
public E take() throws InterruptedException {
        final ReentrantLock lock = this.lock;
        lock.lockInterruptibly();
        E result;
        try {
            while ( (result = dequeue()) == null)
                notEmpty.await();
        } finally {
            lock.unlock();
        }
        return result;
    }
- 获取锁,加可中断锁
- 调用dequeue()获取元素,若获取元素为null,则代表队列无数据,则需等待
private E dequeue() {
        // assert lock.isHeldByCurrentThread();
        final Object[] es;
        final E result;

        if ((result = (E) ((es = queue)[0])) != null) {
            final int n;
            final E x = (E) es[(n = --size)];
            es[n] = null;
            if (n > 0) {
                final Comparator<? super E> cmp;
                if ((cmp = comparator) == null)
                    siftDownComparable(0, x, es, n);
                else
                    siftDownUsingComparator(0, x, es, n, cmp);
            }
        }
        return result;
    }
- 出队列采用的是最小二叉堆来实现的,堆顶是要出队的元素queue)[0]
- 接下来看Comparator排序是否指定,若没有则siftDownComparable操作
从上面可以看到,在阻塞的实现方面,和ArrayBlockingQueue的机制相似,主要区别是用数组实现 了一个二叉堆,从而实现按优先级从小到大出队列。另一个区别是没有notFull条件,当元素个数超出数 组长度时,执行扩容操作
四、DelayQueue
DelayQueue即延迟队列,也就是一个按延迟时间从小到大出队的PriorityQueue。所谓延迟时间, 就是“未来将要执行的时间”减去“当前时间”。为此,放入DelayQueue中的元素,必须实现Delayed接 口,如下所示
public class DelayQueue<E extends Delayed> extends AbstractQueue<E>
    implements BlockingQueue<E> {
public interface Delayed extends Comparable<Delayed> {

    /**
     * Returns the remaining delay associated with this object, in the
     * given time unit.
     *
     * @param unit the time unit
     * @return the remaining delay; zero or negative values indicate
     * that the delay has already elapsed
     */
    long getDelay(TimeUnit unit);//获取延迟的时间,这个时间越小就越往前排
}
关于该接口:
- 如果getDelay的返回值小于或等于0,则说明该元素到期,需要从队列中拿出来执行
- 该接口首先继承了 Comparable 接口,所以要实现该接口,必须实现 Comparable 接口。具 体来说,就是基于getDelay()的返回值比较两个元素的大小
DelayQueue的核心数据结构
// ...
// 一把锁和一个非空条件
private final transient ReentrantLock lock = new ReentrantLock(); private final Condition available = lock.newCondition();
// 优先级队列
private final PriorityQueue<E> q = new PriorityQueue<E>();
put/take的实现,先从take说起,因为这样更能看出DelayQueue的特性
public E take() throws InterruptedException {
        final ReentrantLock lock = this.lock;
        lock.lockInterruptibly();
        try {
            for (;;) {
                E first = q.peek();
                if (first == null)
                    available.await();
                else {
                    long delay = first.getDelay(NANOSECONDS);
                    if (delay <= 0L)
                        return q.poll();
                    first = null; // don't retain ref while waiting
                    if (leader != null)//若有其他线程也在等待该元素,则无限期等待
                        available.await();
                    else {
                        Thread thisThread = Thread.currentThread();
                        leader = thisThread;//leader为当前线程
                        try {
                            available.awaitNanos(delay);
                        } finally {
                            if (leader == thisThread)
                                leader = null;
                        }
                    }
                }
            }
        } finally {
            if (leader == null && q.peek() != null)
                available.signal();//当前线程为leader,已经获取来堆顶元素,则唤醒其他线程
            lock.unlock();
        }
    }
- 先获取锁,可中断
- for循环遍历,取出二叉堆的堆顶元素(延迟时间最小的)
- 判断取出来的元素是否为null,也就是说队列没有元素,则take线程阻塞
- 若有元素,获取第一个元素的延迟时间
- 若时间到期(delay <= 0L),掉用poll方法出队列
- 若堆顶元素还没到期,先设置这个元素为null
- 若有其他线程也在等待该元素,则无限期等待(leader代表当前需要获取的线程)
- leader等于null,则赋值当前取元素的线程,调用awaitNanos方法阻塞有限的时间
- 当前线程为leader,已经获取来堆顶元素,则唤醒其他线程
生产和消费只有一个线程,要么消费要么生产
关于take()方法:
- 不同于一般的阻塞队列,只在队列为空的时候,才阻塞。如果堆顶元素的延迟时间没到,也会 阻塞
- 在上面的代码中使用了一个优化技术,用一个Thread leader变量记录了等待堆顶元素的第1个 线程。为什么这样做呢?通过 getDelay(..)可以知道堆顶元素何时到期,不必无限期等待,可 以使用condition.awaitNanos()等待一个有限的时间;只有当发现还有其他线程也在等待堆顶 元素(leader!=NULL)时,才需要无限期等待
put实现
public void put(E e) {
        offer(e);
    }
public boolean offer(E e) {
        final ReentrantLock lock = this.lock;
        lock.lock();
        try {
            q.offer(e);
            if (q.peek() == e) {
                leader = null;
                available.signal();
            }
            return true;
        } finally {
            lock.unlock();
        }
    }
- 先获取锁,加锁
- 元素放入二叉堆
- 如果放进去的元素刚好在堆顶,说明放入的元素延迟时间最小,需要通知等待的线程
- 若放入的元素不再堆顶,没有必要通知等待的线程
注意:不是每放入一个元素,都需要通知等待的线程。放入的元素,如果其延迟时间大于当前堆顶 的元素延迟时间,就没必要通知等待的线程;只有当延迟时间是最小的,在堆顶时,才有必要通知等待 的线程,也就是上面代码中的 if (q.peek() == e)部分。
五、SynchronousQueue
SynchronousQueue是一种特殊的BlockingQueue,它本身没有容量。先调put(...),线程会阻塞; 直到另外一个线程调用了take(),两个线程才同时解锁,反之亦然。对于多个线程而言,例如3个线程, 调用3次put(...),3个线程都会阻塞;直到另外的线程调用3次take(),6个线程才同时解锁,反之亦然
SynchronousQueue是以链表的方式来实现的
/**
     * The transferer. Set only in constructor, but cannot be declared
     * as final without further complicating serialization.  Since
     * this is accessed only at most once per public method, there
     * isn't a noticeable performance penalty for using volatile
     * instead of final here.
     */
    private transient volatile Transferer<E> transferer;

    /**
     * Creates a {@code SynchronousQueue} with nonfair access policy.
     */
    public SynchronousQueue() {
        this(false);
    }

    /**
     * Creates a {@code SynchronousQueue} with the specified fairness policy.
     *
     * @param fair if true, waiting threads contend in FIFO order for
     *        access; otherwise the order is unspecified.
     */
    public SynchronousQueue(boolean fair) {//是否公平
        transferer = fair ? new TransferQueue<E>() : new TransferStack<E>();
    }
和锁一样,也有公平和非公平模式。如果是公平模式,则用TransferQueue实现;如果是非公平模 式,则用TransferStack实现。这两个类分别是什么呢
put方法源码:
public void put(E e) throws InterruptedException {
        if (e == null) throw new NullPointerException();
        if (transferer.transfer(e, false, 0) == null) {
            Thread.interrupted();
            throw new InterruptedException();
        }
    }
take方法源码:
public E take() throws InterruptedException {
        E e = transferer.transfer(null, false, 0);
        if (e != null)
            return e;
        Thread.interrupted();
        throw new InterruptedException();
    }
看者俩个方法都没有加锁,阻塞,说明具体的实现在transferer.transfer方法中
E transfer(E e, boolean timed, long nanos) //e:对应的元素,后2个参数分别为是否设置超时和对应的超时时间
接下来主要看公平模式和非公平模式如何实现的
1、TransferQueue
public class SynchronousQueue<E> extends AbstractQueue<E> implements
BlockingQueue<E>, java.io.Serializable {
  //```
  static final class TransferQueue<E> extends Transferer<E> {
    static final class QNode {
            volatile QNode next;          // next node in queue
            volatile Object item;         // CAS'ed to or from null
            volatile Thread waiter;       // to control park/unpark
            final boolean isData;
    }
    /** Head of queue */
        transient volatile QNode head;
        /** Tail of queue */
        transient volatile QNode tail;
        /**
         * Reference to a cancelled node that might not yet have been
         * unlinked from queue because it was the last inserted node
         * when it was cancelled.
         */
        transient volatile QNode cleanMe;
  }
}
从上面的代码可以看出,TransferQueue是一个基于单向链表而实现的队列,通过head和tail 2个 指针记录头部和尾部。初始的时候,head和tail会指向一个空节点,构造方法如下所示
 TransferQueue() {
            QNode h = new QNode(null, false); // initialize to dummy node.
            head = h;
            tail = h;
        }
阶段(a):队列中是一个空的节点,head/tail都指向这个空节点。
阶段(b):3个线程分别调用put,生成3个QNode,进入队列。
阶段(c):来了一个线程调用take,会和队列头部的第1个QNode进行配对。
阶段(d):第1个QNode出队列。
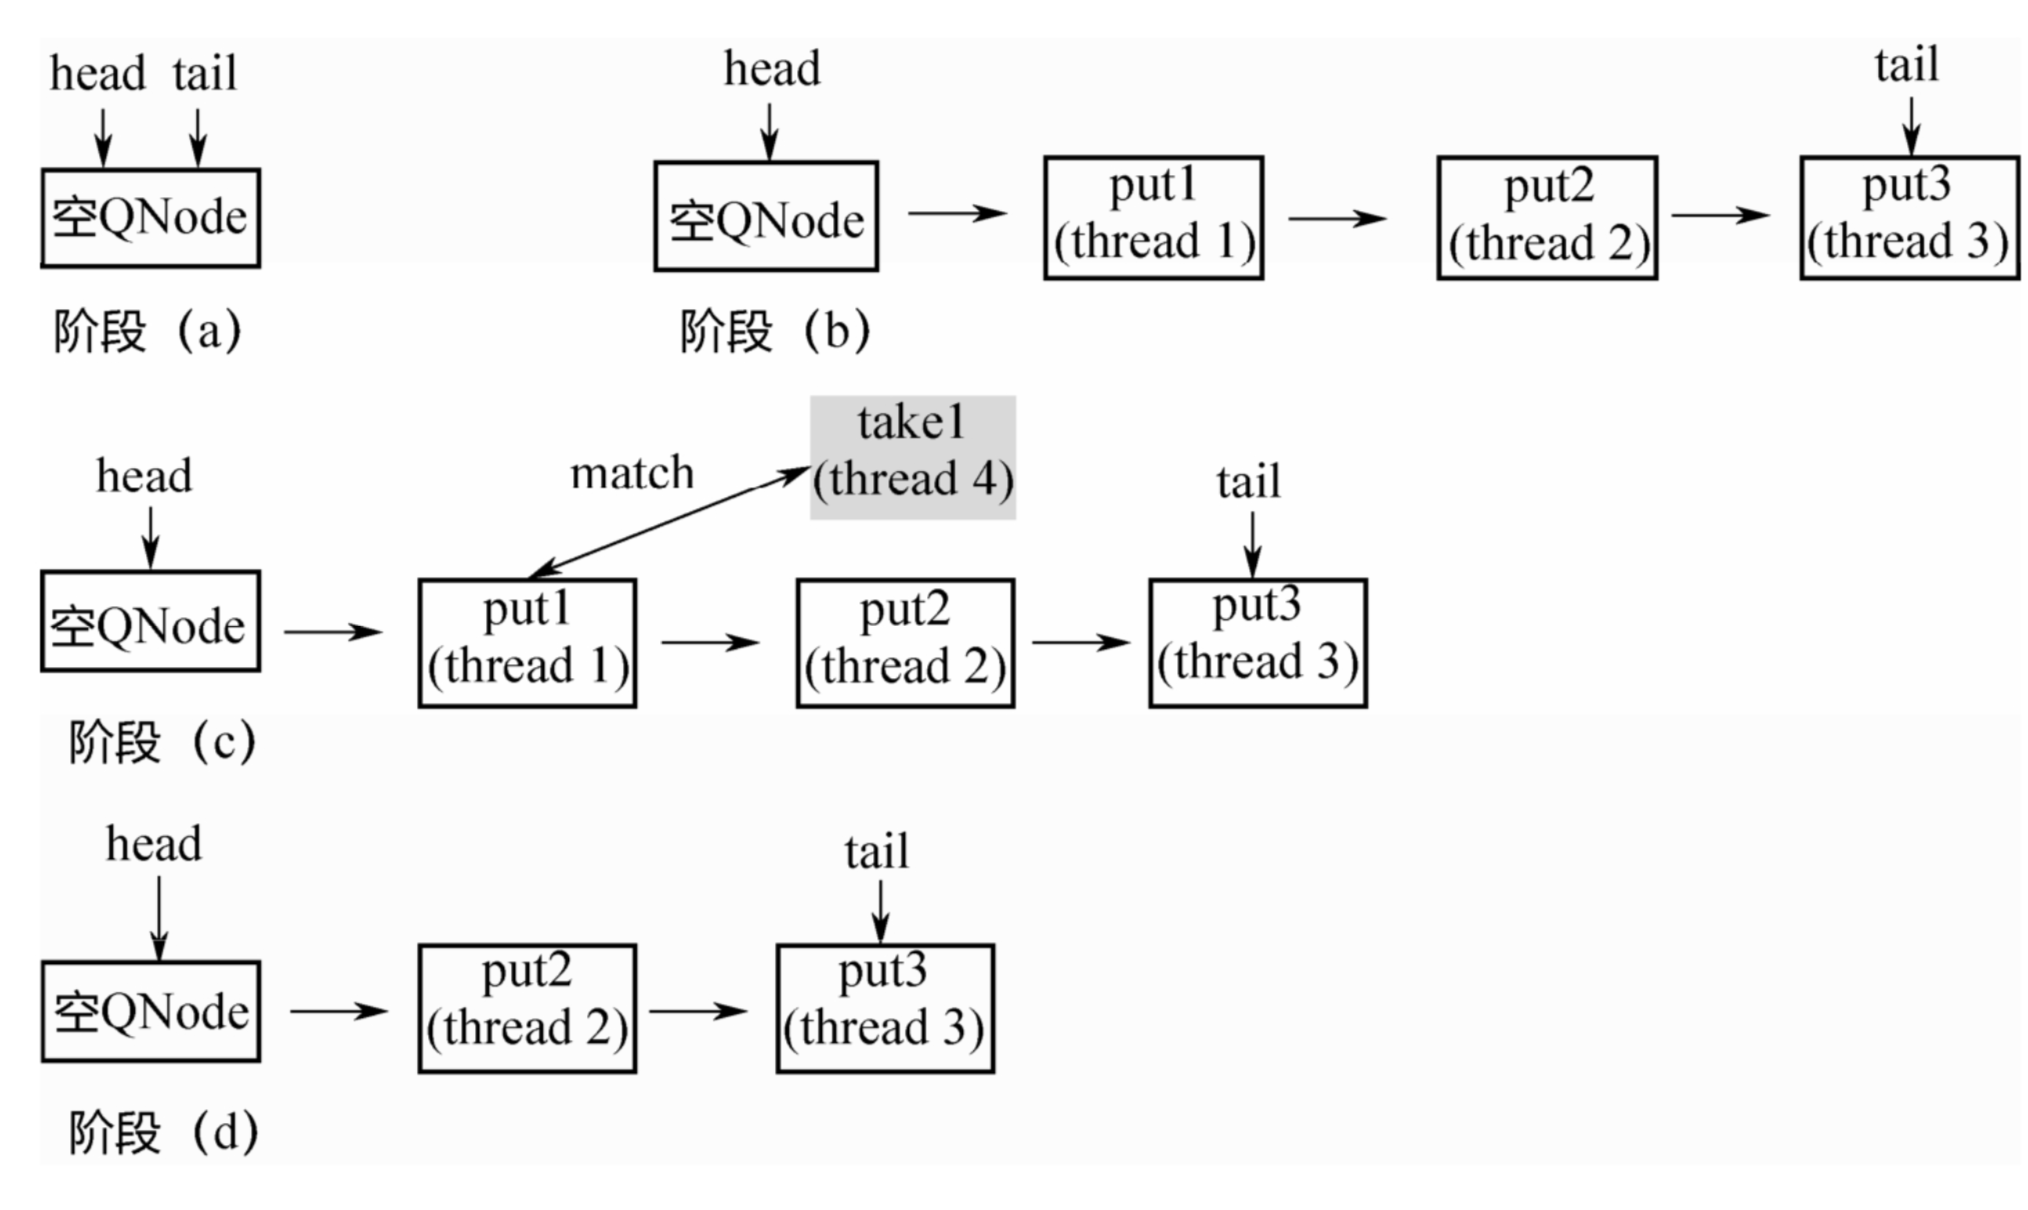
这里有一个关键点:put节点和take节点一旦相遇,就会配对出队列,所以在队列中不可能同时存在 put节点和take节点,要么所有节点都是put节点,要么所有节点都是take节点
TransferQueue的源码:
E transfer(E e, boolean timed, long nanos) {
            QNode s = null; // constructed/reused as needed
            boolean isData = (e != null);

            for (;;) {
                QNode t = tail;
                QNode h = head;
                if (t == null || h == null)         // saw uninitialized value
                    continue;                       // spin

                if (h == t || t.isData == isData) { // empty or same-mode
                    QNode tn = t.next;
                    if (t != tail)                  // inconsistent read
                        continue;
                    if (tn != null) {               // lagging tail
                        advanceTail(t, tn);
                        continue;
                    }
                    if (timed && nanos <= 0L)       // can't wait
                        return null;
                    if (s == null)
                        s = new QNode(e, isData);//新建节点
                    if (!t.casNext(null, s))        // failed to link in:加入尾部
                        continue;

                    advanceTail(t, s);              // swing tail and wait
                    Object x = awaitFulfill(s, e, timed, nanos);
                    if (x == s) {                   // wait was cancelled
                        clean(t, s);
                        return null;
                    }

                    if (!s.isOffList()) {           // not already unlinked
                        advanceHead(t, s);          // unlink if head
                        if (x != null)              // and forget fields
                            s.item = s;
                        s.waiter = null;
                    }
                    return (x != null) ? (E)x : e;

                } else {                            // complementary-mode
                    QNode m = h.next;               // node to fulfill
                    if (t != tail || m == null || h != head)
                        continue;                   // inconsistent read

                    Object x = m.item;//进行配对
                    if (isData == (x != null) ||    // m already fulfilled
                        x == m ||                   // m cancelled
                        !m.casItem(x, e)) {         // lost CAS  尝试配对
                        advanceHead(h, m);          // dequeue and retry 已经配对,直接出队列
                        continue;
                    }

                    advanceHead(h, m);              // successfully fulfilled 配对成功
                    LockSupport.unpark(m.waiter);   //唤醒队列中与第一个线程对应的线程
                    return (x != null) ? (E)x : e;
                }
            }
        }
- 先判断isDate是tree,则说明是生产者,反之为消费者
- for循环,判断若t|h有一个为null,则说明队列还未初始化,自旋等待
- 若h==t(同步和尾部指向同一个节点:队列为null)或t.isData == isData(当前节点与需要获取节点都是同一种模式:生产者|消费者)
- t.next表示同一种模式向后排
- t != tail说明有问题,需要重新循环
- tn != null,说明它不是最后一个节点,接着向后排
- 若s等于null,则新建一个节点,加入尾部,接着循环
- 若前面都未进,那么就后移tail指针,进入阻塞状态,等待消费来唤醒
- 判断是否唤醒,确定是否处于队列中的第一个元素,返回元素
- 若上述条件不成立
- 取队列中第一个元素h.next
- 判断t != tail || m == null || h != head,不一致读,重新执行for循环
- 接下来进行尝试配对,若可以配对,直接出队列
- 唤醒队列中与第一个线程对应的线程
整个 for 循环有两个大的 if-else 分支,如果当前线程和队列中的元素是同一种模式(都是put节点 或者take节点),则与当前线程对应的节点被加入队列尾部并且阻塞;如果不是同一种模式,则选取队 列头部的第1个元素进行配对。
这里的配对就是m.casItem(x,e),把自己的item x换成对方的item e,如果CAS操作成功,则配 对成功。如果是put节点,则isData=true,item!=null;如果是take节点,则isData=false, item=null。如果CAS操作不成功,则isData和item之间将不一致,也就是isData!=(x!=null),通过 这个条件可以判断节点是否已经被匹配过了
TransferStack源码:
TransferStack的定义如下所示,首先,它也是一个单向链表。不同于队列,只需要head指针就能 实现入栈和出栈操作
static final class TransferStack extends Transferer {
    static final int REQUEST = 0;
    static final int DATA = 1;
    static final int FULFILLING = 2;
static final class SNode {
		volatile SNode next; // 单向链表
  	volatile SNode match; // 配对的节点
  	volatile Thread waiter; // 对应的阻塞线程
  	Object item;
		int mode;       //三种模式
//...
}
    volatile SNode head;
}
链表中的节点有三种状态,REQUEST对应take节点,DATA对应put节点,二者配对之后,会生成一 个FULFILLING节点,入栈,然后FULLING节点和被配对的节点一起出栈。
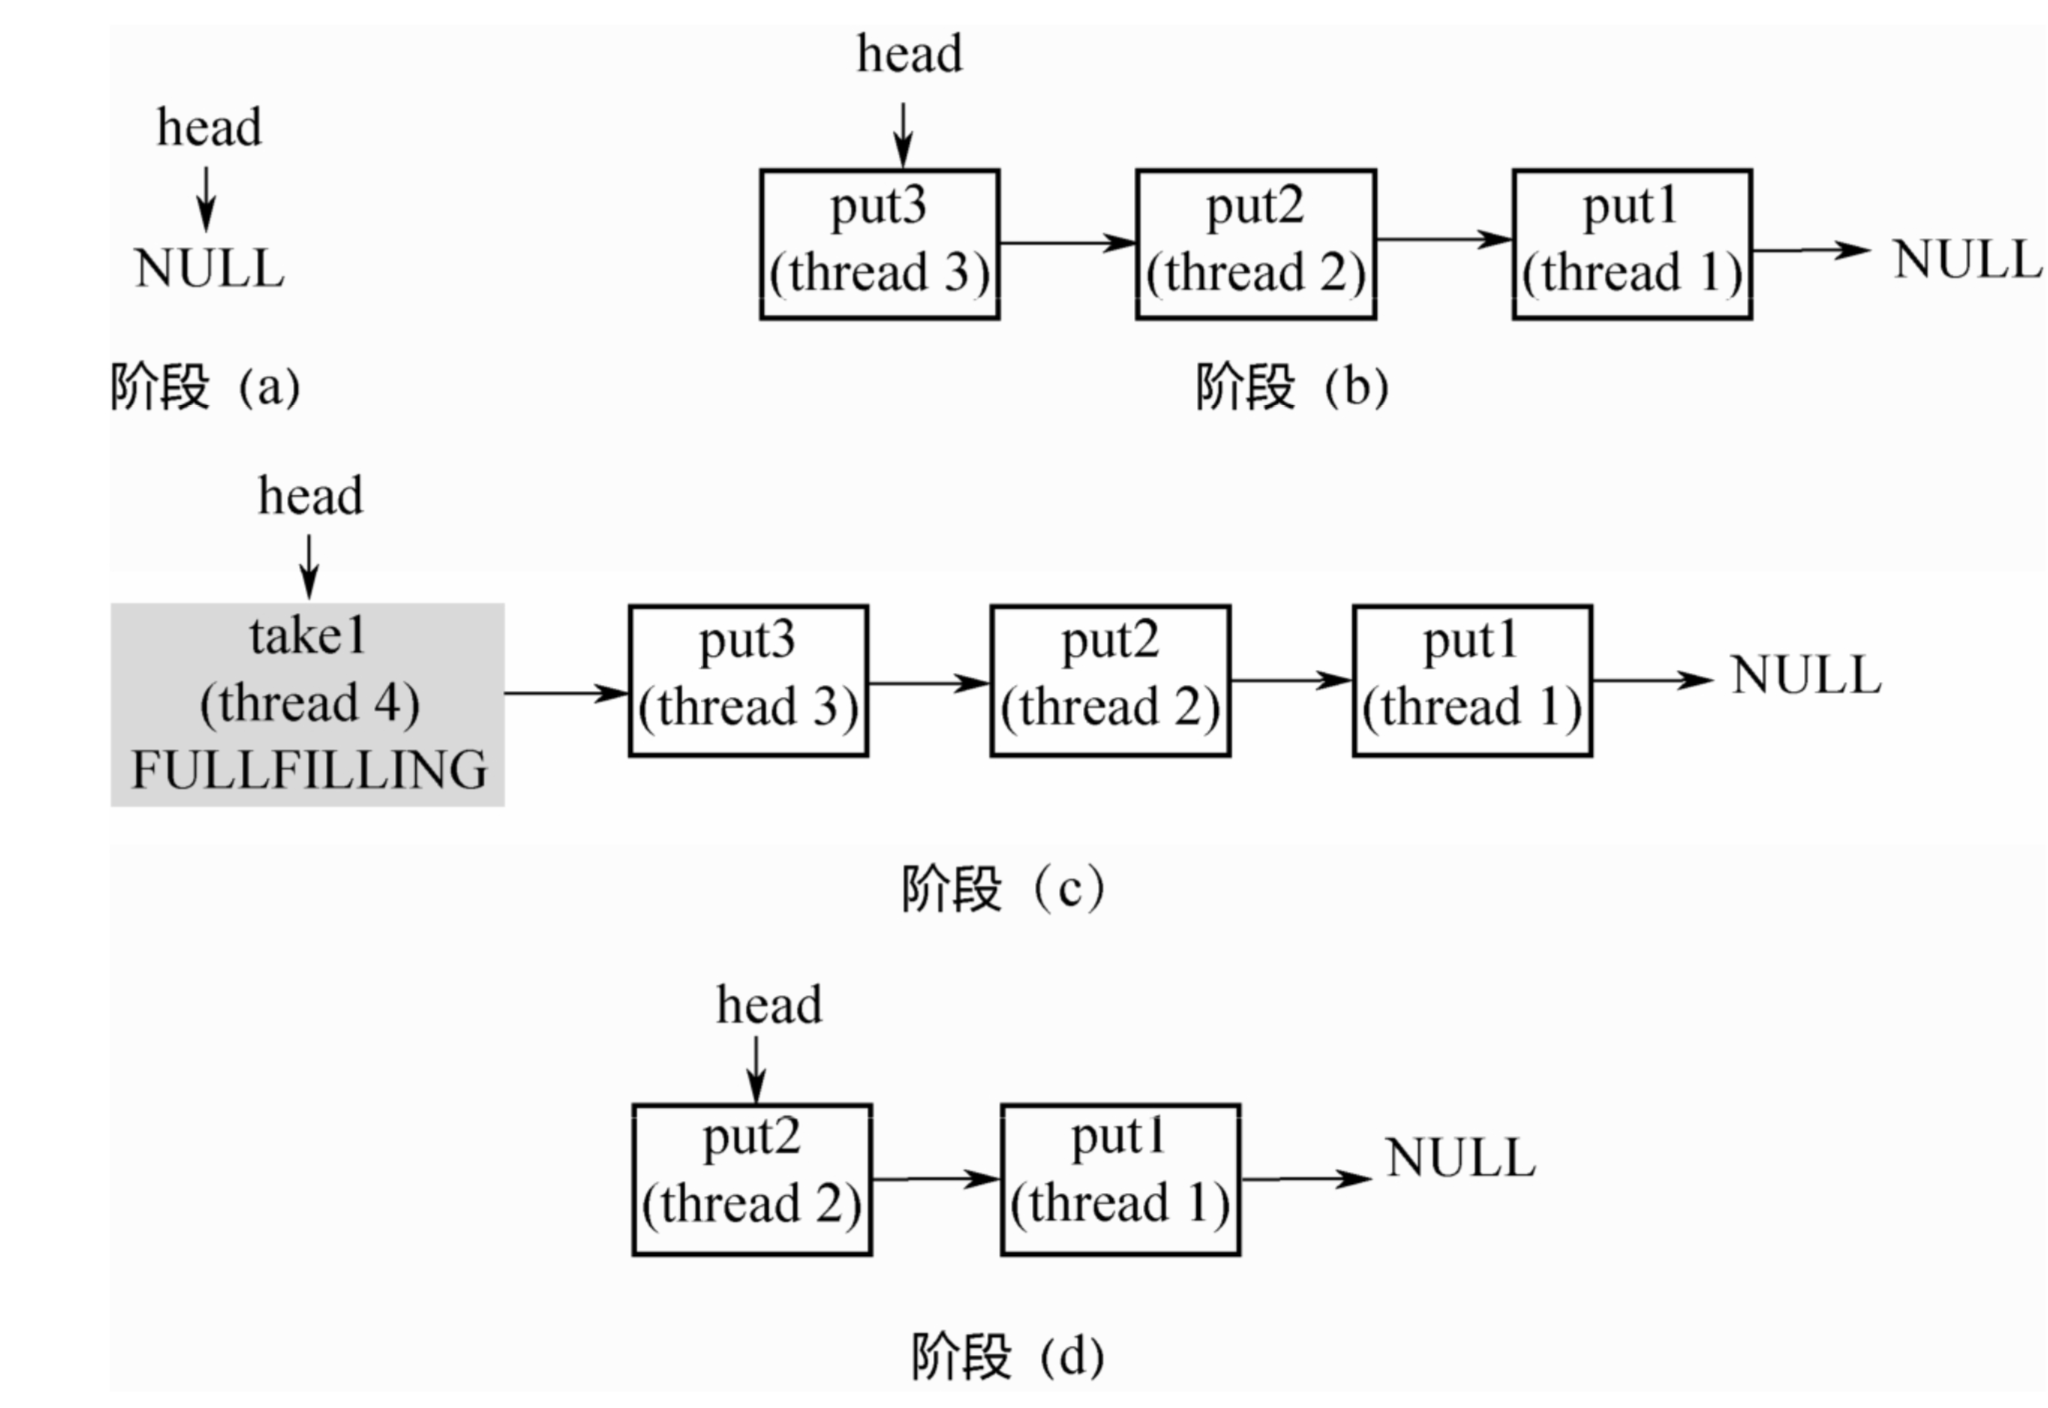
阶段(a):head指向NULL。不同于TransferQueue,这里没有空的头节点。
阶段(b):3个线程调用3次put,依次入栈。
阶段(c):线程4调用take,和栈顶的第1个元素配对,生成FULLFILLING节点,入栈。
阶段(d):栈顶的2个元素同时入栈。
具体代码如下:
E transfer(E e, boolean timed, long nanos) {
            SNode s = null; // constructed/reused as needed
            int mode = (e == null) ? REQUEST : DATA;

            for (;;) {
                SNode h = head;
                if (h == null || h.mode == mode) {  // 同一种模式
                    if (timed && nanos <= 0L) {     // 入栈
                        if (h != null && h.isCancelled())
                            casHead(h, h.next);     // pop cancelled node
                        else
                            return null;
                    } else if (casHead(h, s = snode(s, e, h, mode))) {//非同一种模式,待匹配
                        SNode m = awaitFulfill(s, timed, nanos);//阻塞等待
                        if (m == s) {               // wait was cancelled
                            clean(s);
                            return null;
                        }
                        if ((h = head) != null && h.next == s)
                            casHead(h, s.next);     // help s's fulfiller
                        return (E) ((mode == REQUEST) ? m.item : s.item);
                    }
                } else if (!isFulfilling(h.mode)) { // try to fulfill
                    if (h.isCancelled())            // already cancelled
                        casHead(h, h.next);         // pop and retry
                    else if (casHead(h, s=snode(s, e, h, FULFILLING|mode))) {//生成一个FULFILLING节点,入栈
                        for (;;) { // loop until matched or waiters disappear
                            SNode m = s.next;       // m is s's match
                            if (m == null) {        // all waiters are gone
                                casHead(s, null);   // pop fulfill node
                                s = null;           // use new node next time
                                break;              // restart main loop
                            }
                            SNode mn = m.next;
                            if (m.tryMatch(s)) {
                                casHead(s, mn);     // 俩个节点一起出栈
                                return (E) ((mode == REQUEST) ? m.item : s.item);
                            } else                  // lost match
                                s.casNext(m, mn);   // help unlink
                        }
                    }
                } else {                            // 已经匹配
                    SNode m = h.next;               // m is h's match
                    if (m == null)                  // waiter is gone
                        casHead(h, null);           // pop fulfilling node
                    else {
                        SNode mn = m.next;
                        if (m.tryMatch(h))          // help match
                            casHead(h, mn);         // 匹配,一起出栈
                        else                        // lost match
                            h.casNext(m, mn);       // help unlink
                    }
                }
            }
        }
和公平模式类似,公平是先入先出,非公平是先入后出,源码对应注释已标注在上述代码中

 浙公网安备 33010602011771号