CentOS7 安装 Nginx,设置自启动及站点配置
一、下载、编译和安装
编译准备工作,升级版本库
yum -y install gcc-c++
yum -y install pcre
yum -y install pcre-devel
yum -y install zlib
yum -y install zlib-devel
yum -y install openssl openssl-devel
下载最新的文档版本包:nginx-1.22.1.tar.gz 上传到服务器 /usr/local 目录,解压缩重命名:nginx_src
cd /usr/local/
tar -xzvf nginx-1.22.1.tar.gz
mv nginx-1.22.1 nginx_src
进入源文件目录,安装相关组件,并进行编译和安装:
cd nginx_src
[配置SSL参数]
./configure --with-http_ssl_module

[编译和安装]
make
make install
二、系统自启动及服务化脚本
编写服务脚本:
cd /etc/systemd/system
vim nginx.service
内容如下:
[Unit]
Description=Nginx
After=nginx.service
[Service]
Type=forking
ExecStart=/usr/local/nginx/sbin/nginx -c /usr/local/nginx/conf/nginx.conf
ExecStop=/usr/local/nginx/sbin/nginx -s stop
ExecReload=/usr/local/nginx/sbin/nginx -s reload
[Install]
WantedBy=multi-user.target
注:其中Exec部分内容,更换成实际的nginx运行目录。
执行命令:
#重新加载服务列表
systemctl daemon-reload
# 开启自启
systemctl enable nginx.service
# 启动、重启、停止
systemctl start|reload|stop nginx
三、参数配置文件
Nginx的参数文件默认路径在运行目录下的conf目录中,文件名为:nginx.conf
大致配置如下:
worker_processes  auto;

events {
    worker_connections  1024;
}

http {
    include       mime.types;
    default_type  application/octet-stream;

    sendfile        on;
    keepalive_timeout  65;
    server_tokens off;
    proxy_hide_header X-Powered-By;
    proxy_hide_header Server;

#APP Router===============
     server {
        listen  9000 ssl;
        server_name  localhost;

        ssl_certificate /usr/local/nginx/conf/yinwq.crt;
        ssl_certificate_key /usr/local/nginx/conf/yinwq.key;
        ssl_session_timeout 5m;
        ssl_protocols SSLv2 TLSv1 TLSv1.1 TLSv1.2;
        ssl_ciphers ECDHE-RSA-AES128-GCM-SHA256:ECDHE:ECDH:AES:HIGH:!NULL:!aNULL:!MD5:!ADH:!RC4:!DH:!DHE;
        ssl_prefer_server_ciphers on;
        error_page 497 301 https://$http_host$request_uri;

        location /ccc/ {
            proxy_pass   http://cccserver/ccc/;
            client_max_body_size  1000m;
        }

        location /test/ {

#            default_type application/json;
#            return 200 '{"msg":"系统升级维护中,请稍后重试!","code":"2000","status":0}';

            proxy_pass   http://127.0.0.1:9100/test/;
            client_max_body_size  1000m;
        }
    }

    upstream cccserver{
        server api.yinwq.com:8100;
        server api.yinwq.com:8101;
    }
}
http 开头部分就不多说了,对应了HTTP协议的Head部分的信息,主要说server 部分内容:
listen 9000 ssl
表示监听 9000 端口,并开启SSL验证(https协议),默认 https 是 443 端口。
如果配置了 443 端口,则在 https 的域名后,无需指定端口号了。
ssl_certificate /usr/local/nginx/conf/yinwq.crt;
ssl_certificate_key /usr/local/nginx/conf/yinwq.key;
ssl_session_timeout 5m;
ssl_protocols SSLv2 TLSv1 TLSv1.1 TLSv1.2;
ssl_ciphers ECDHE-RSA-AES128-GCM-SHA256:ECDHE:ECDH:AES:HIGH:!NULL:!aNULL:!MD5:!ADH:!RC4:!DH:!DHE;
ssl_prefer_server_ciphers on;
SSL证书对应的物理路径(crt 和 key 两个文件),超时时间,支持的协议,支持的加密方式,服务端控制加密模式。
error_page 497 301 https://$http_host$request_uri;
URL转发控制
location /ccc/ {
        proxy_pass   http://cccserver/ccc/;
        client_max_body_size  1000m;
    }
路径中含有 /cdc/ 后的转发控制内容:转到 cdcserver 负载均衡服务组,追加加 /cdc/ 路径:
location /test/ {
#        default_type application/json;
#        return 200 '{"msg":"系统升级维护中,请稍后重试!","code":"2000","status":0}';

        proxy_pass   http://127.0.0.1:9100/test/;
        client_max_body_size  1000m;
    }
路径中含有 /test/ 后的转发到本机9100端口 /wear/ 应用中。
如果把上两行注释更换下面的两行上,则直接返回设定好的 JSON 格式的提示内容,用于子应用升级、更新等。
upstream cdcserver{
        server 192.168.100.100:8100;
        server 192.168.100.100:8101;
}
此部分就是上面 /ccc/ 转发中定义的 负载均衡服务组的内容,结合上面的全部内容组合起来看,实际上是转发到了 http://192.168.100.100 服务器上的 8100 和 8101 端口。
这里也只有两个服务做了负载均衡,可以按需要设置更多。
三、错误汇总
Starting nginx (via systemctl): Job for nginx.service failed because the control process exited with error code. See "systemctl status nginx.service" and "journalctl -xe" for details.
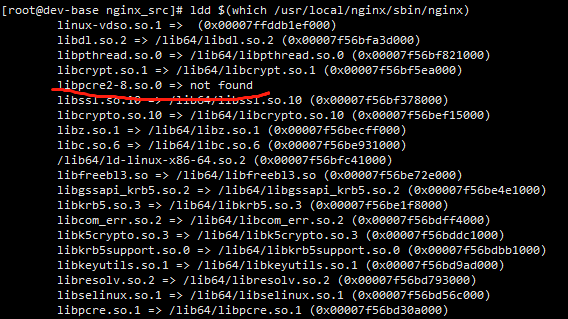
输入 systemctl status nginx.service 查看详情,发现有库文件找不到:

输入 ldd $(which /usr/local/nginx/sbin/nginx) 跟踪库文件详情:

果然在系统库文件目录 /lib64/ 里有对应的库文件未找到,再次找类似同名库文件:find / -name libpcre2-8*

发现文件是有的,只是目录对不上。那就是一个软链就搞定了。

果然,启动成功了。
有类似库文件问题的,都一样处理。


 浙公网安备 33010602011771号