Redis5.0集群安装(主/从节点添加以及删除)以及Springboot整合
安装redis单机版
第一步:安装 C 语言需要的 GCC 环境
yum install -y gcc-c++
yum install -y wget
第二步:下载并解压缩 Redis 源码压缩包
cd /root/redis
wget http://download.redis.io/releases/redis-5.0.5.tar.gz
tar -zxf redis-5.0.5.tar.gz
第三步:编译 Redis 源码,进入 redis-5.0.5 目录,执行编译命令
cd redis-5.0.5/src
make
第四步:安装 Redis ,需要通过 PREFIX 指定安装路径
mkdir /root/redis -p
make install PREFIX=/root/redis
第五步:复制配置文件
cp /root/redis/redis-5.0.5/redis.conf /root/redis/bin/

# 修改配置文件
port 6379
# 将`daemonize`由`no`改为`yes`
daemonize yes
# 默认绑定的是回环地址,默认不能被其他机器访问
# bind 127.0.0.1
# 是否开启保护模式,由yes该为no
protected-mode no
安装Redis集群
如果设置了密码,执行命令的时候加上 -a password就行了
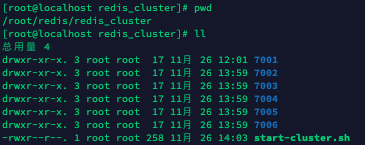
第一步:创建文件夹
mkdir -p /root/redis/redis_cluster
cd /root/redis/redis_cluster
mkdir 700{1..6}
第二步:拷贝redis单机版的安装目录bin到7001:
cp -r /root/redis/bin/ 7001/第三步:修改配置文件
vim 7001/bin/redis.conf
port 7001
cluster-enabled yes   开启集群,把注释#去掉即可
第四步:复制7001,到7002~7006,注意端口修改。
cp -r 7001/* 7002
cp -r 7001/* 7003
cp -r 7001/* 7004
cp -r 7001/* 7005
cp -r 7001/* 7006
第五步:创建start-cluster.sh,启动所有的实例
# 脚本内容如下
cd 7001/bin
./redis-server redis.conf
cd ../../7002/bin
./redis-server redis.conf
cd ../../7003/bin
./redis-server redis.conf
cd ../../7004/bin
./redis-server redis.conf
cd ../../7005/bin
./redis-server redis.conf
cd ../../7006/bin
./redis-server redis.conf

# 给脚本赋予写和执行的权限
chmod u+x start-cluster.sh
# 启动脚本
./start-cluster.sh
查看运行情况
ps -ef | grep redis结果如下

第六步:创建Redis集群(创建时Redis里不要有数据)
cd 7001/bin/
# create:创建集群
# --cluster-replicas 1:每一台主机至少有一台从机。
./redis-cli --cluster create --cluster-replicas 1 192.168.77.100:7001 192.168.77.100:7002 192.168.77.100:7003 192.168.77.100:7004 192.168.77.100:7005 192.168.77.100:7006
结果如下:
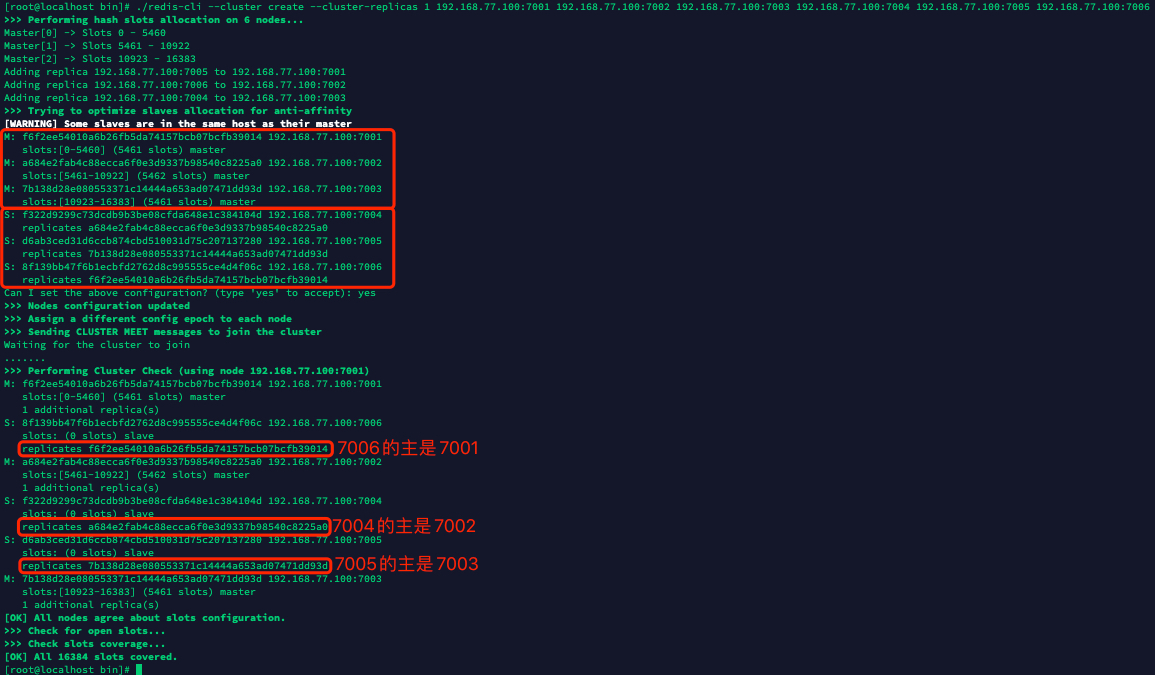
连接集群
# -c 表示是以redis集群方式进行连接
./redis-cli -h 127.0.0.1 -p 7001 -c
查看集群信息
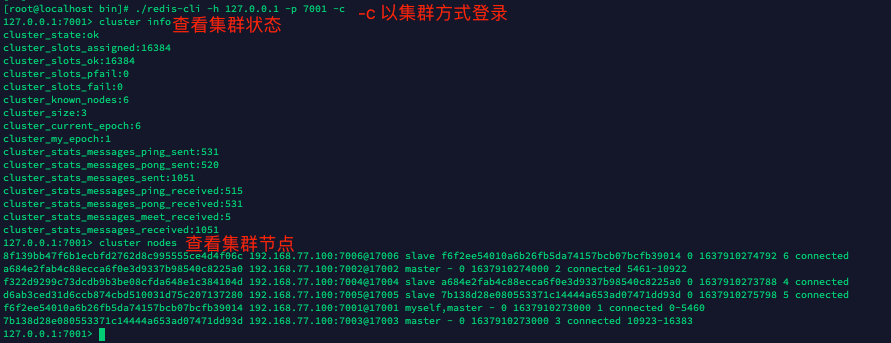
向Redis集群添加新的主节点和从节点
cd /root/redis/redis_cluster
mkdir 7007 7008
# 复制前须要保证最初安装的那个单机版redis(没有存放数据)
cp -r /root/redis/bin 7007/
cp -r /root/redis/bin 7008/
修改配置
vim 7007/bin/redis.conf
port 7007
cluster-enabled yes   开启集群,把注释#去掉即可
然后启动7007和7008
./redis-server redis.conf添加主节点
cd 7001/bin/
./redis-cli --cluster add-node 192.168.77.100:7007 192.168.77.100:7001
# 192.168.77.100:7007 要向集群添加的新的主节点
# 192.168.77.100:7001 原集群中任意节点
结果如下:

查看集群节点
./redis-cli -p 7001 -c
127.0.0.1:7001> cluster nodes
结果如下:当前还没有分配槽位

给新节点分配slot槽位,ip:port 为当前集群中的某一任意节点
./redis-cli --cluster reshard 192.168.77.100:7001

# 分配多少槽位?根据情况填写:4000
# node ID?7007的ID:3d9e59debe81b17eeeeee0c82fbe50a4295941c1
# Source node #1:all
# 是否继续执行reshard plan:yes
是否继续执行reshard plan:yes
结果如下:
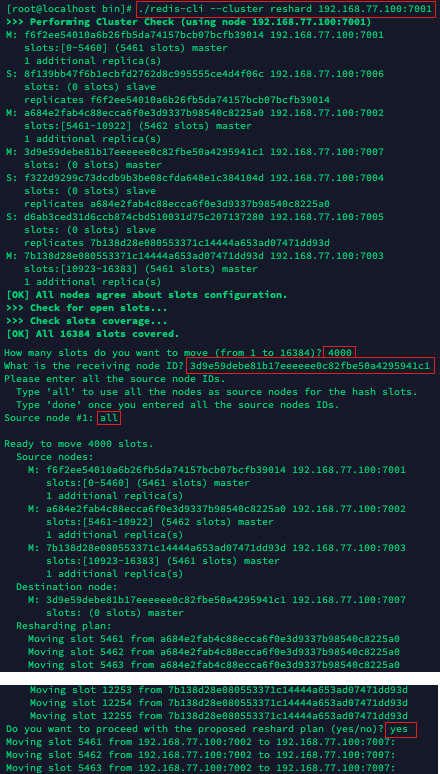
再次查看集群节点,7007已经分配了槽位

添加从节点
./redis-cli --cluster add-node 192.168.77.100:7008 192.168.77.100:7007结果如下
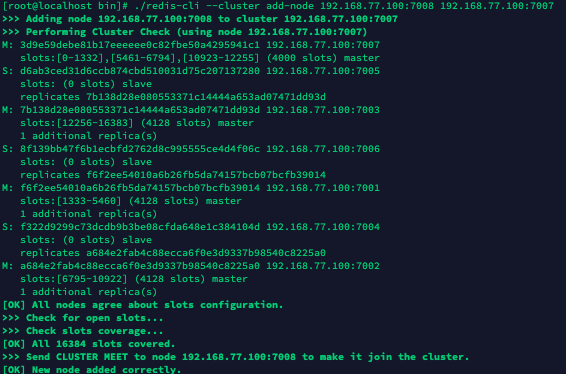
查看集群节点
./redis-cli -p 7001 -c
127.0.0.1:7001> cluster nodes
结果如下:

连接新节点(7008)的客户端
./redis-cli -p 7008 -c指定为192.168.77.100:7007节点的从节点
cluster replicate 3d9e59debe81b17eeeeee0c82fbe50a4295941c1结果如下:

删除从节点
./redis-cli --cluster del-node 192.168.77.100:7008 6aae16dd69d4c7cfb0cfae03c4f0170ca1836ec4结果如下:

删除主节点
要删除主节点,首先要把该主节点上的槽位分配到某一个主节点上,这里放到192.168.77.100:7001主节点。
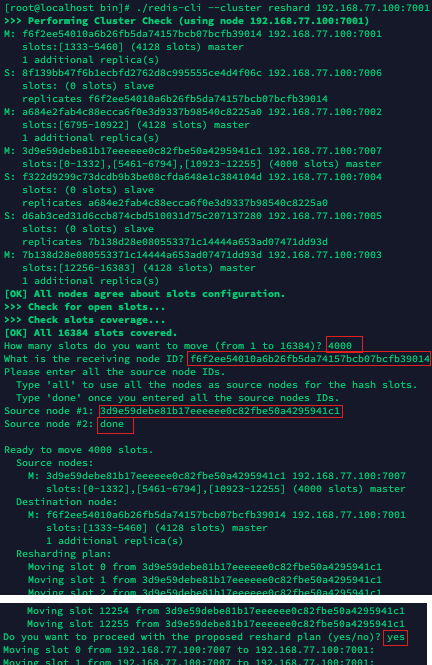
./redis-cli --cluster reshard 192.168.77.100:7001
# 需要移除多少槽位,这里的槽位=所需要删除的节点的所占槽位:4000
# 分配到哪个节点,值为节点id:7001的节点id
# Source node #1:7007的节点id
# Source node #2:输入done执行生成计划
# 是否继续执行reshard plan:yes
结果如下:
最后安全删除
./redis-cli --cluster del-node 192.168.77.100:7007 3d9e59debe81b17eeeeee0c82fbe50a4295941c1结果如下:

删除完节点后,查看redis进程,会发现7007和7008已经停了

SpringBoot整合RedisCluster
导入依赖
    <dependencies>
        <dependency>
            <groupId>org.springframework.boot</groupId>
            <artifactId>spring-boot-starter-test</artifactId>
            <scope>test</scope>
        </dependency>
        <dependency>
            <groupId>redis.clients</groupId>
            <artifactId>jedis</artifactId>
            <version>3.3.0</version>
        </dependency>
        <dependency>
            <groupId>org.springframework.boot</groupId>
            <artifactId>spring-boot-starter-data-redis</artifactId>
        </dependency>
    </dependencies>
添加配置
server:
  port: 8888
spring:
  redis:
    cluster:
      nodes: 192.168.77.100:7001,192.168.77.100:7002,192.168.77.100:7003,192.168.77.100:7004,192.168.77.100:7005,192.168.77.100:7006,192.168.77.100:7007,192.168.77.100:7008
    password:
    jedis:
      pool:
        max-active: 20
        max-wait: -1
        max-idle: 200
        min-idle: 20
    timeout: 10000
Jedis配置
package com.lagou.config;

import org.springframework.beans.factory.annotation.Value;
import org.springframework.context.annotation.Bean;
import org.springframework.context.annotation.Configuration;
import redis.clients.jedis.HostAndPort;
import redis.clients.jedis.JedisCluster;
import redis.clients.jedis.JedisPoolConfig;

import java.util.HashSet;
import java.util.Set;

/**
 * @ClassName: RedisClusterConfig
 * @Description:
 * @Author: qjc
 * @Date: 2021/11/26 3:41 下午
 */
@Configuration
public class RedisClusterConfig {

    @Value("${spring.redis.cluster.nodes}")
    private String clusterNodes;

    @Value("${spring.redis.timeout}")
    private int timeout;

    @Value("${spring.redis.jedis.pool.max-idle}")
    private int maxIdle;

    @Value("${spring.redis.jedis.pool.min-idle}")
    private int minIdle;

    @Value("${spring.redis.jedis.pool.max-active}")
    private int maxActive;

    @Value("${spring.redis.jedis.pool.max-wait}")
    private long maxWait;

    @Bean
    public JedisCluster getJedisCluster() {
        return new JedisCluster(getNodes(), timeout, poolConfig());
    }

    private JedisPoolConfig poolConfig() {
        JedisPoolConfig config = new JedisPoolConfig();
        config.setMaxIdle(maxIdle);
        config.setMinIdle(minIdle);
        config.setMaxTotal(maxActive);
        config.setMaxWaitMillis(maxWait);
        return config;
    }

    private Set<HostAndPort> getNodes() {
        String[] cNodes = clusterNodes.split(",");
        Set<HostAndPort> nodes = new HashSet<HostAndPort>();
        // 分割出集群节点
        String[] hp;
        for (String node : cNodes) {
            hp = node.split(":");
            nodes.add(new HostAndPort(hp[0], Integer.parseInt(hp[1])));
        }
        return nodes;
    }
}
测试
package com.lagou;

import org.junit.Test;
import org.junit.runner.RunWith;
import org.springframework.beans.factory.annotation.Autowired;
import org.springframework.boot.test.context.SpringBootTest;
import org.springframework.test.context.junit4.SpringRunner;
import redis.clients.jedis.JedisCluster;

/**
 * @ClassName: RedisClusterWorkApplicationTest
 * @Description:
 * @Author: qjc
 * @Date: 2021/11/26 3:44 下午
 */
@RunWith(SpringRunner.class)
@SpringBootTest(classes = RedisClusterWorkApplication.class)
public class RedisClusterWorkApplicationTest {

    @Autowired
    private JedisCluster jedisCluster;

    @Test
    public void testRedisCluster() {
        String result = jedisCluster.set("name", "zhangfei");
        System.out.println("插入结果:" + result);
        String name = jedisCluster.get("name");
        System.out.println("查询结果:" + name);
    }

}
劈天造陆,开辟属于自己的天地!!!与君共勉


 浙公网安备 33010602011771号