
Android开发----EditText&ImageView&第三方库的加载
EditText组件
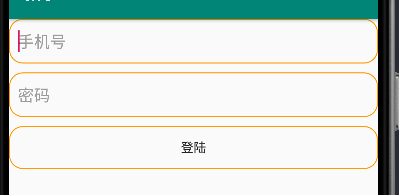
一个实例描述该组件的全部属性(虚假的登录界面)
在activity.xml中
<?xml version="1.0" encoding="utf-8"?>
<RelativeLayout xmlns:android="http://schemas.android.com/apk/res/android"
    android:layout_width="match_parent"
    android:layout_height="match_parent">

    <EditText
        android:id="@+id/et_1"
        android:layout_width="match_parent"
        android:layout_height="50dp"
        android:hint="手机号"
        android:inputType="number"
        android:background="@drawable/btn_3"
        android:paddingLeft="10dp"/>
    <EditText
        android:id="@+id/et_2"
        android:layout_width="match_parent"
        android:layout_height="50dp"
        android:layout_below="@+id/et_1"
        android:layout_marginTop="10dp"
        android:inputType="textPassword"
        android:background="@drawable/btn_3"
        android:paddingLeft="10dp"
        android:hint="密码"/>
    <Button
        android:id="@+id/btt"
        android:layout_width="match_parent"
        android:layout_height="wrap_content"
        android:layout_marginTop="10dp"
        android:background="@drawable/btn_3"
        android:layout_below="@id/et_2"
        android:text="登陆"/>

</RelativeLayout>
效果显示为:
ImageView组件
同样,一个例子理解即可
<?xml version="1.0" encoding="utf-8"?>
<RelativeLayout xmlns:android="http://schemas.android.com/apk/res/android"
    xmlns:app="http://schemas.android.com/apk/res-auto"
    xmlns:tools="http://schemas.android.com/tools"
    android:layout_width="match_parent"
    android:layout_height="match_parent"
    tools:context=".ImageViewActivity"
    android:padding="10dp">

    <ImageView
        android:id="@+id/iv_0"
        android:layout_width="300dp"
        android:layout_height="200dp"
        android:background="@drawable/btn_4"
        android:scaleType="fitXY"/>

</RelativeLayout>
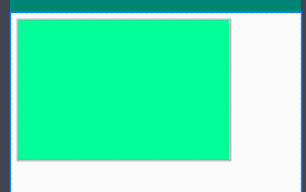
效果展示:
感悟:对于UI组件的属性组对应的值,可以将常用的整理成一遍,而不是去看视频只学习组件,那样做太浪费时间了。
使用第三方库
以使用glide为例
学会阅读文件手册
在github上搜索glide,选择使用java写的,在这里可以选择下载zip源代码与jar包,或者添加依赖,让IDE自动下载
Or use Gradle:
repositories {
  google()
  mavenCentral()
}

dependencies {
  implementation 'com.github.bumptech.glide:glide:4.12.0'
  annotationProcessor 'com.github.bumptech.glide:compiler:4.12.0'
}
Or Maven:
<dependency>
  <groupId>com.github.bumptech.glide</groupId>
  <artifactId>glide</artifactId>
  <version>4.12.0</version>
</dependency>
<dependency>
  <groupId>com.github.bumptech.glide</groupId>
  <artifactId>compiler</artifactId>
  <version>4.12.0</version>
  <optional>true</optional>
</dependency>
这里我使用在gradle中配置,目的让app可以使用网络上的图片
- 在bulid.gradle中添加配置(注意是第一个bulid.gradle)
- 在AndroidManifest.xml中配置上网权限
<uses-permission android:name="android.permission.INTERNET"/> - 在activity.java文件中引入图片
public class ImageViewActivity extends AppCompatActivity {

    private ImageView miv_1;

    @Override
    protected void onCreate(Bundle savedInstanceState) {
        super.onCreate(savedInstanceState);
        setContentView(R.layout.activity_image_view);
        miv_1 = findViewById(R.id.iv_0);
        Glide.with(this).load("https://www.baidu.com/img/PCtm_d9c8750bed0b3c7d089fa7d55720d6cf.png").into(miv_1);
    }
}
效果展示:


 浙公网安备 33010602011771号