
SpringBoot整合swagger2接口实体类可视化(附源码)
1、源码链接:
springboot-swagger2(实体类的模型展示,controller接口的展示): https://files.cnblogs.com/files/blogs/721495/springboot-swagger2.zip?t=1648827391
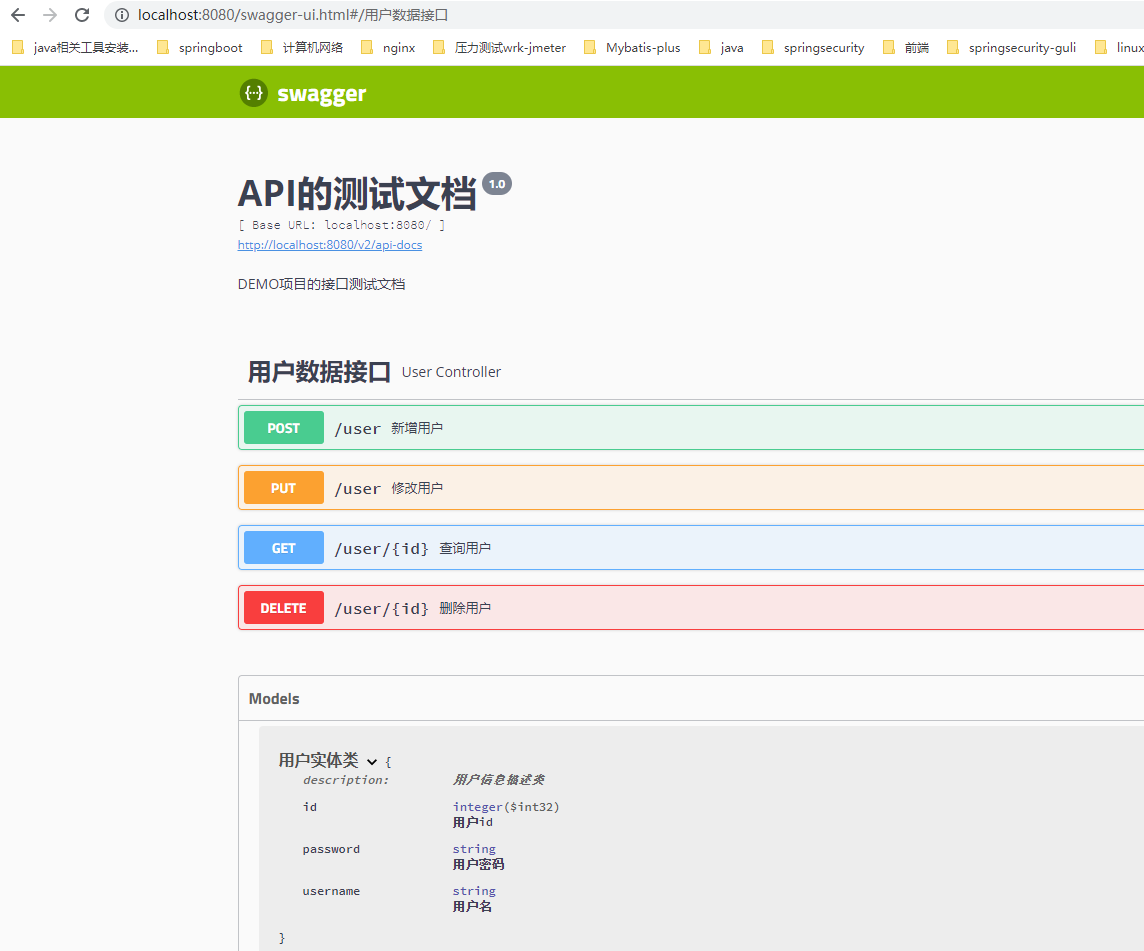
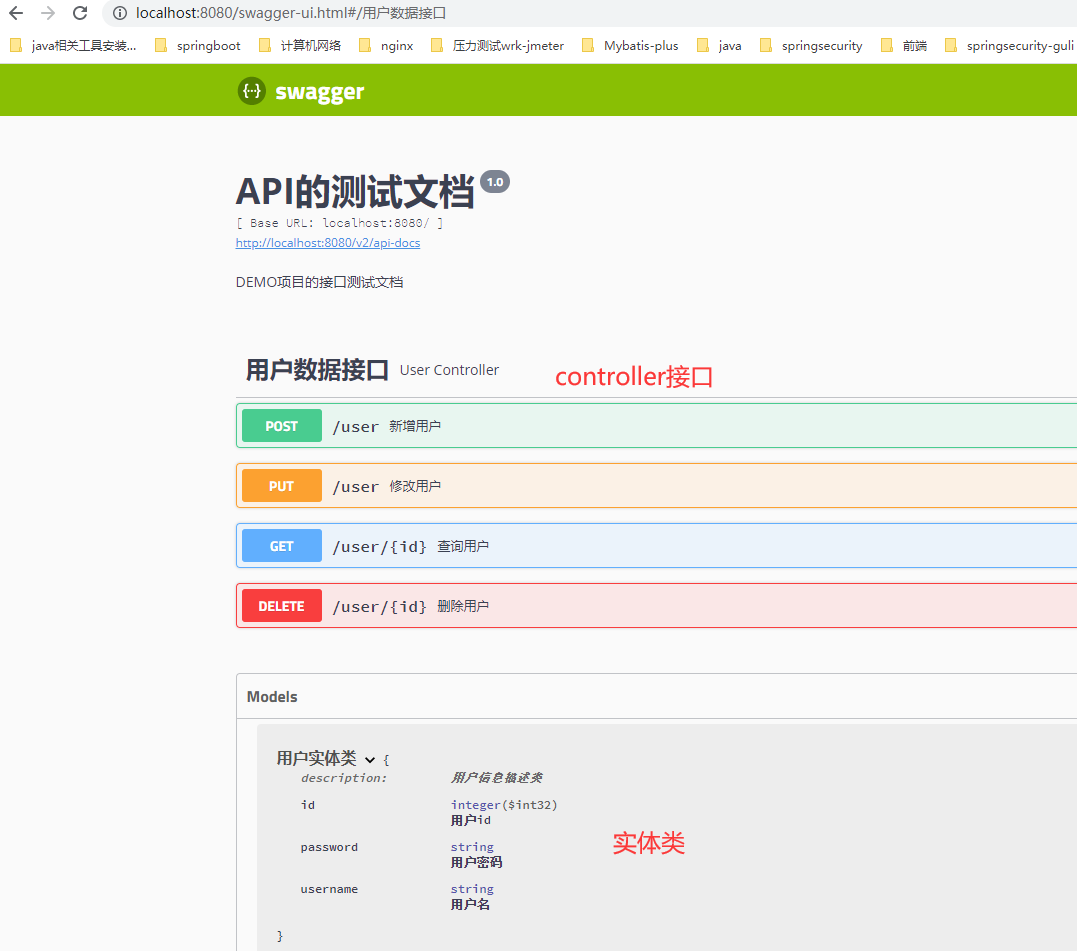
2、接口可视化展示
实际开发过程中,你不会还在controller层去一个个找你想要的接口嘛,去了公司我也才学会,为了更加的方便,可视化界面去展示项目的接口。我也是个菜鸡。
http://localhost:8080/swagger-ui.html
3、源码部分(可直接下载源码)
3.1 导入依赖
<dependency>
    <groupId>io.springfox</groupId>
    <artifactId>springfox-swagger2</artifactId>
    <version>2.9.2</version>
</dependency>
<dependency>
    <groupId>io.springfox</groupId>
    <artifactId>springfox-swagger-ui</artifactId>
    <version>2.9.2</version>
</dependency>
3.2 定义实体类
import io.swagger.annotations.ApiModel;
import io.swagger.annotations.ApiModelProperty;
import lombok.Getter;
import lombok.Setter;
import lombok.ToString;

@Getter
@Setter
@ToString
@ApiModel(value = "用户实体类", description = "用户信息描述类")
public class User {

@ApiModelProperty(value = "用户id")
private Integer id;

@ApiModelProperty(value = "用户名")
private String username;

@ApiModelProperty(value = "用户密码")
private String password;
}
3.3 编写controller层
import com.yzu.swagger2.entity.User;
import io.swagger.annotations.*;
import org.springframework.web.bind.annotation.*;
import springfox.documentation.annotations.ApiIgnore;

@RestController
@Api(tags = "用户数据接口")
public class UserController {

    @ApiOperation(value ="查询用户", notes = "根据 id 查询用户")
    @ApiImplicitParam(paramType = "path", name = "id", value = "用户 id", required = true)
    @GetMapping("/user/{id}")
    public String getUserById(@PathVariable Integer id){
        return "查找的用户id是:" + id;
    }

    @ApiOperation(value = "新增用户", notes = "根据传入的用户名和密码添加一个新用户")
    @ApiImplicitParams({
            @ApiImplicitParam(paramType = "query", name = "username",
                    value = "用户名", required = true, defaultValue = "test"),
            @ApiImplicitParam(paramType = "query", name = "password",
                    value = "密码", required = true, defaultValue = "123")
    })
    @PostMapping("/user")
    public String addUser(@RequestParam String username, @RequestParam String password) {
        return "新增用户:" + username + " " + password;
    }

    @ApiOperation(value = "删除用户", notes = "根据 id 删除用户")
    @ApiResponses({
            @ApiResponse(code = 200, message = "删除成功!"),
            @ApiResponse(code = 500, message = "删除失败!")
    })
    @DeleteMapping("/user/{id}")
    public Integer deleteUserById(@PathVariable Integer id) {
        return id;
    }

    @ApiOperation(value = "修改用户", notes = "传入用户信息进行更新修改")
    @PutMapping("/user")
    public String updateUser(@RequestBody User user){
        return user.toString();
    }

    @ApiIgnore
    @GetMapping("/user/test")
    public String test() {
        return "这是一个测试接口,不需要在api文档中显示。";
    }
}
3.4 编写配置类
import org.springframework.context.annotation.Bean;
import org.springframework.context.annotation.Configuration;

import springfox.documentation.builders.ApiInfoBuilder;
import springfox.documentation.builders.PathSelectors;
import springfox.documentation.builders.RequestHandlerSelectors;
import springfox.documentation.service.ApiInfo;
import springfox.documentation.service.Contact;
import springfox.documentation.spi.DocumentationType;
import springfox.documentation.spring.web.plugins.Docket;
import springfox.documentation.swagger2.annotations.EnableSwagger2;

@Configuration
@EnableSwagger2
//@EnableSwaggerBootstrapUI
public class SwaggerConfig {

    @Bean
    Docket docket() {
        return new Docket(DocumentationType.SWAGGER_2)
                .apiInfo(apiInfo())
                .select()
                .apis(RequestHandlerSelectors.basePackage("com.yzu.swagger2.controller"))
                .paths(PathSelectors.any())
                .build();
    }

  //这边主要是网页界面中展示内容
    private ApiInfo apiInfo() {
        return new ApiInfoBuilder()
                .title("API的测试文档")
                .description("DEMO项目的接口测试文档")
                .version("1.0")
                .build();
    }

}
3.5 网页展示
4 总结
觉得有帮助的话可以关注下公众号哈,欢迎关注微信公众号<彭晓琪>,Java交流qq群(百人):608827101
少年的志向,不应该是房子,他们应该伏案疾书,或为心中的梦想而挥洒汗水,畅想着自己未来光明的人生,少年的梦想,也不应该是生活,他们应该想要集齐七颗龙珠,或者幻想着拥有一颗皮卡丘。欢迎关注微信公众号<彭晓琪>


 浙公网安备 33010602011771号