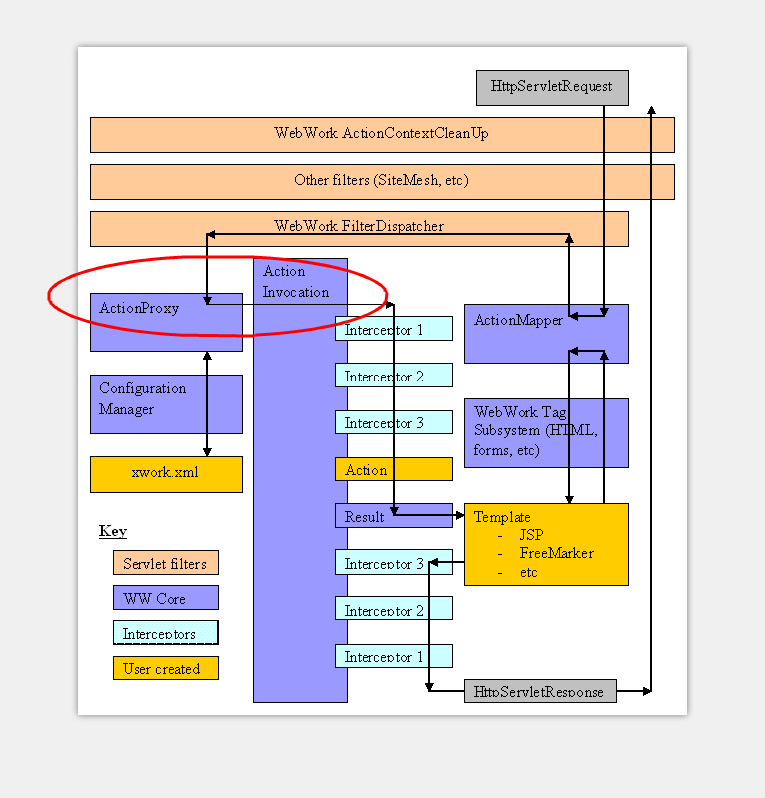
Webwork【06】Action 调用
一路走来,终于要开始 webwork 核心业务类的总结,webwork 通过对客户端传递的 web 参数重新包装,进行执行业务 Action 类,并反馈执行结果,本篇源码分析对应下图 WebWork 框架流转图中红色框的地方。

1.这部分框架类关系

2.Webwork 获取和包装 web 参数
- 每个Web 框架或多或少的对 Web 请求参数的包装,用来拿来方便自己使用,当然webwork 也不例外。
- Webwork 每次响应请求的入口方法:
 1     public void service(HttpServletRequest request, HttpServletResponse response) throws ServletException {
 2         try {
 3             if (encoding != null) {
 4                 try {
 5                     request.setCharacterEncoding(encoding);
 6                 } catch (Exception localException) {
 7                 }
 8             }
 9             if (locale != null) {
10                 response.setLocale(locale);
11             }
12             if (this.paramsWorkaroundEnabled) {
13                 request.getParameter("foo");
14             }
15             request = wrapRequest(request); //封装 request请求
16             serviceAction(request, response, getNameSpace(request), getActionName(request), getRequestMap(request), getParameterMap(request), getSessionMap(request), getApplicationMap());
17         } catch (IOException e) {
18             String message = "Could not wrap servlet request with MultipartRequestWrapper!";
19             log.error(message, e);
20             sendError(request, response, 500, new ServletException(message, e));
21         }
22     }
- 接受 request 、response 参数,并对 request 参数进行封装,这次封装主要是针对多媒体请求进行的特殊处理,例如项目中的文件上传请求,导出各种类型文件等...
- 包装完 request 之后,service 方法调用 ServletDispatche.serviceAction() 方法,并调用 getApplicationMap、getSessionMap、getRequestMap、 getParameterMap、getActionName、getNameSpace 6 个方法开始了Action 业务逻辑调用前的前戏。
- getNameSpace 方法用来获得一个Action所属的名称空间,例如 : "/my/MyAction.action"则返回"/my",具体实现如下:
1 protected String getNameSpace(HttpServletRequest request){
2     String servletPath = request.getServletPath();
3     return getNamespaceFromServletPath(servletPath);
4   }
5
6 public static String getNamespaceFromServletPath(String servletPath){
7    servletPath = servletPath.substring(0, servletPath.lastIndexOf("/"));
8     return servletPath;
9   }
- getActionName 返回请求的Action的名字,例如:"MyAction.action"则返回"MyAction",具体实现如下:
 1 protected String getActionName(HttpServletRequest request){
 2     String servletPath = (String)request.getAttribute("javax.servlet.include.servlet_path");
 3     if (servletPath == null) {
 4       servletPath = request.getServletPath();
 5     }
 6     return getActionName(servletPath);
 7   }
 8
 9   protected String getActionName(String name){
10     int beginIdx = name.lastIndexOf("/");
11     int endIdx = name.lastIndexOf(".");
12     return name.substring(beginIdx == -1 ? 0 : beginIdx + 1, endIdx == -1 ? name.length() : endIdx);
13   }
- getRequestMap 方法返回一个包含请求中所有属性的Map,具体实现类是 RequestMap,具体代码如下:
 protected Map getRequestMap(HttpServletRequest request){
    return new RequestMap(request);
  }
- getParameterMap 方法返回一个包含请求中所有参数的Map,具体代码如下:
  protected Map getParameterMap(HttpServletRequest request) throws IOException{
    return request.getParameterMap();
  }
- getSessionMap 方法返回一个包含 session 中所有属性的 Map,具体实现类是 SessionMap,具体代码如下:
 protected Map getSessionMap(HttpServletRequest request){
    return new SessionMap(request);
  }
- getApplicationMap 方法返回一个包含 Application 中所有属性的Map,具体实现类 是ApplicationMap,具体代码如下:
  protected Map getApplicationMap(){
    return new ApplicationMap(getServletContext());
  }
- WebWork之所以要把request 的属性、参数,session 中的属性,Application 中的属性封装成 Map,仅仅是为了自己使用方便。
public void serviceAction(HttpServletRequest request, HttpServletResponse response, String namespace, String actionName, Map requestMap, Map parameterMap, Map sessionMap, Map applicationMap) {
        HashMap extraContext = createContextMap(requestMap, parameterMap, sessionMap, applicationMap, request, response, getServletConfig());
        extraContext.put("com.opensymphony.xwork.dispatcher.ServletDispatcher", this);

        OgnlValueStack stack = (OgnlValueStack) request.getAttribute("webwork.valueStack");
        if (stack != null) {
            extraContext.put("com.opensymphony.xwork.util.OgnlValueStack.ValueStack", new OgnlValueStack(stack));
        }
        try {
            ActionProxy proxy = ActionProxyFactory.getFactory().createActionProxy(namespace, actionName, extraContext);
            request.setAttribute("webwork.valueStack", proxy.getInvocation().getStack());
            proxy.execute();
            if (stack != null) {
                request.setAttribute("webwork.valueStack", stack);
            }
        } catch (ConfigurationException e) {
            log.error("Could not find action", e);
            sendError(request, response, 404, e);
        } catch (Exception e) {
            log.error("Could not execute action", e);
            sendError(request, response, 500, e);
        }
    }
- 首先 ServiceAction 调用了createContextMap 创建Action 上下文(extraContext)。 它将JavaServlet 相关的对象进行包装,放入extraContext Map对象里。
- 接着检查 上一个请求中是否有可用的值堆栈,如果有就放入extraContext 这个Map 对象里,供本次请求使用 。
- ActionContext(com.opensymphony.xwork.ActionContext)是Action执行时的上下文,上下文 可以看作是一个容器(其实我们这里的容器就是一个Map 而已),它存放的是Action 在执行时需要用到的对象。
- ServletActionContext ( com.opensymphony.webwork. ServletActionContext),这个类直接继承了ActionContext,它提供了直接与JavaServlet 相关象访问的功能。
- OgnlValueStack主要的功能是通过表达式语言来存取对象的属性。
3.DefaultActionProxyFactory、DefaultActionProxy、DefaultActionInvocation
前戏终于做完了,Action 调用的三兄弟要登场进行最重要的操作了,就是下面这三句代码,与Webwork 学习之路(五)请求跳转前 xwork.xml 的读取代码有非常相似的写法和设计:
  ActionProxy proxy = ActionProxyFactory.getFactory().createActionProxy(namespace, actionName, extraContext);

  request.setAttribute("webwork.valueStack", proxy.getInvocation().getStack());

  proxy.execute();
- 通过由前面获得的namespace、actionName、extraContext 创建调用代理 ActonProxy 实例,这里也就是 DefaultActionProxy,之后调用 了 ActionProxy.execute 方法来执行我们逻辑Action.execute。
- ActionProxy是一个接口,ActionProxyFactory则是一个抽象类,默认情况下它们是通过 DefaultActionProxy和DefaultActionProxyFactory来完成操作的。
- 在 ActionProxyFactory 中有一个静态变量 factory ,它指向的是一个 DefaultActionProxyFactory 实例,代码如下:
  static ActionProxyFactory factory = new DefaultActionProxyFactory();

  public static void setFactory(ActionProxyFactory factory){
    factory = factory;
  }

  public static ActionProxyFactory getFactory(){
    return factory;
  }
- DefaultActionProxyFactory 的 createActionProxy 方法返回了 DefaultActionProxy 实例。
public ActionProxy createActionProxy(String namespace, String actionName, Map extraContext)throws Exception {
    setupConfigIfActionIsCommand(namespace, actionName);

    return new DefaultActionProxy(namespace, actionName, extraContext, true);
  }
- DefaultActionProxy的构造函数
 protected DefaultActionProxy(String namespace, String actionName, Map extraContext, boolean executeResult) throws Exception{
    if (LOG.isDebugEnabled()) {
      LOG.debug("Creating an DefaultActionProxy for namespace " + namespace + " and action name " + actionName);
    }
    this.actionName = actionName;
    this.namespace = namespace;
    this.executeResult = executeResult;
    this.extraContext = extraContext;

    this.config = ConfigurationManager.getConfiguration().getRuntimeConfiguration().getActionConfig(namespace, actionName);
    if (this.config == null)
    {
      String message;
      String message;
      if ((namespace != null) && (namespace.trim().length() > 0)) {
        message = LocalizedTextUtil.findDefaultText("xwork.exception.missing-package-action", Locale.getDefault(), new String[] {
          namespace, actionName });
      } else {
        message = LocalizedTextUtil.findDefaultText("xwork.exception.missing-action", Locale.getDefault(), new String[] {
          actionName });
      }
      throw new ConfigurationException(message);
    }
    prepare();
  }
- 将传入的名称空间、 Action 的名字等参数赋予本地变量,接着通过 ConfigurationManager 获得当前请求的 Action 的配置信息[这里在5中已经描述过]。接着调用自身的 prepare 方法创建一个 ActionInvocation 对象赋予自身变量 invocation。在之后的 execute 方法中通过操纵invocation 来实现我们自己写的Action 的调用。
 protected void prepare()  throws Exception {
    this.invocation = ActionProxyFactory.getFactory().createActionInvocation(this, this.extraContext);
  }
作者:Orson
出处:http://www.cnblogs.com/java-class/
如果,您认为阅读这篇博客让您有些收获,不妨点击一下右下角的【推荐】
如果,您希望更容易地发现我的新博客,不妨点击一下左下角的【关注我】
如果,您对我的博客内容感兴趣,请继续关注我的后续博客,我是【Orson】
本文版权归作者和博客园共有,欢迎转载,但未经作者同意必须保留此段
声明,且在文章页面明显位置给出原文连接,否则保留追究法律责任的权利。


 浙公网安备 33010602011771号