Linux3.5—视屏模块学习与分析
插入USB摄像头后,我看到了识别出的一些信息,在内核源码中搜到了相关信息:

搜索之后,在uvc_driver.c
帮助文档:linux-3.5/Documentation/video4linux/v4l2-framework.txt
分析驱动程序最好的方法就是跟踪应用程序对他的调用过程。
开始分析 /linux-3.5/drivers/media/video/uvc/uvc_driver.c

usb_register(&uvc_driver.driver);

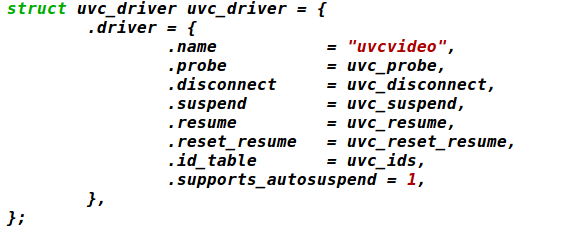
uvc_ids 指所能支持的设备。
下面查看probe函数:
/* USB探针、断开连接、挂起和恢复*/

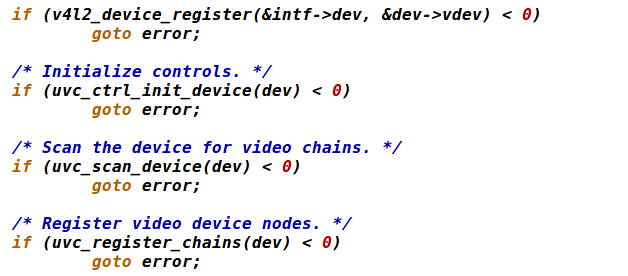
(uvc_register_chains(dev)

 1 static int uvc_register_video(struct uvc_device *dev,
 2                 struct uvc_streaming *stream)
 3 {
 4         struct video_device *vdev;
 5         int ret;
 6
 7         /* Initialize the streaming interface with default streaming
 8          * parameters.
 9          */
10         ret = uvc_video_init(stream);
11         if (ret < 0) {
12                 uvc_printk(KERN_ERR, "Failed to initialize the device "
13                         "(%d).\n", ret);
14                 return ret;
15         }
16
17         uvc_debugfs_init_stream(stream);

18 ////////////////////////////标记/////////////////////////////
19         /* Register the device with V4L. */
20         vdev = video_device_alloc();
21         if (vdev == NULL) {
22                 uvc_printk(KERN_ERR, "Failed to allocate video device (%d).\n",
23                            ret);
24                 return -ENOMEM;
25         }
26
27         /* We already hold a reference to dev->udev. The video device will be
28          * unregistered before the reference is released, so we don't need to
29          * get another one.
30          */
31         vdev->v4l2_dev = &dev->vdev;
///////////////////////标记/////////////////////////////////
32         vdev->fops = &uvc_fops;
33
34         vdev->release = uvc_release;
35         strlcpy(vdev->name, dev->name, sizeof vdev->name);
36
37         /* Set the driver data before calling video_register_device, otherwise
38          * uvc_v4l2_open might race us.
39          */
40         stream->vdev = vdev;
41         video_set_drvdata(vdev, stream);
42
/////////////////////////////////标记/////////////////////////////////////////////////
43         ret = video_register_device(vdev, VFL_TYPE_GRABBER, -1);
44         if (ret < 0) {
45                 uvc_printk(KERN_ERR, "Failed to register video device (%d).\n",
46                            ret);
47                 stream->vdev = NULL;
48                 video_device_release(vdev);
49                 return ret;
50         }
51
52         atomic_inc(&dev->nstreams);
53         return 0;
54 }
通过 ubuntu 摄像头测试,测试软件使用 xawtv
执行xawtv 就能查看到USB摄像头的数据,
测试虚拟摄像头:vivi
下载 ubuntn 相关版本的内核源码,复制整个 /media/video 整个目录复制出来。
编译最后生成vivi.ko,安装时候会出现错误,可以使用dmesg查看打印信息,安装依赖项。
 通过xawtv查看虚拟出来的摄像头模块。
安装时候还可以用:sudo modprobe vivi 安装ubuntu自带的vivi,这样所有依赖项都会被装上
然后,rmmod vivi
安装自己的vivi.ko 这样可以修改自己的模块,用于调试。
用 strace 可以获得应用所涉及的系统调用。
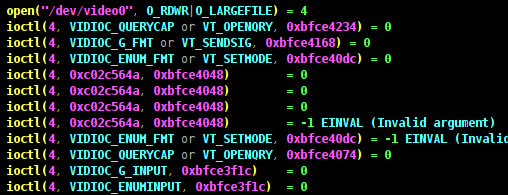
获得系统调用信息。
先了解USB摄像头内部框架:uvc specification
参考: USB_Video_Example 1.5.pdf
UVC 1.5Class specification.pdf
下载地址 https://github.com/Jason543716996/USB_class.git
分析UVC驱动调用过程:
const struct v4l2_file_operations uvc_fops = {
.owner = THIS_MODULE,
.open = uvc_v4l2_open,
.release = uvc_v4l2_release,
.ioctl = uvc_v4l2_ioctl,
.read = uvc_v4l2_read,
.mmap = uvc_v4l2_mmap,
.poll = uvc_v4l2_poll,
};
1. open:
uvc_v4l2_open
2. VIDIOC_QUERYCAP // video->streaming->type 应该是在设备被枚举时分析描述符时设置的
if (video->streaming->type == V4L2_BUF_TYPE_VIDEO_CAPTURE)
cap->capabilities = V4L2_CAP_VIDEO_CAPTURE | V4L2_CAP_STREAMING;
else
cap->capabilities = V4L2_CAP_VIDEO_OUTPUT | V4L2_CAP_STREAMING;
3. VIDIOC_ENUM_FMT // format数组应是在设备被枚举时设置的
format = &video->streaming->format[fmt->index];
4. VIDIOC_G_FMT
uvc_v4l2_get_format // USB摄像头支持多种格式fromat, 每种格式下有多种frame(比如分辨率)
struct uvc_format *format = video->streaming->cur_format;
struct uvc_frame *frame = video->streaming->cur_frame;
5. VIDIOC_TRY_FMT
uvc_v4l2_try_format
/* Check if the hardware supports the requested format. */
/* Find the closest image size. The distance between image sizes is
* the size in pixels of the non-overlapping regions between the
* requested size and the frame-specified size.
*/
6. VIDIOC_S_FMT // 只是把参数保存起来,还没有发给USB摄像头
uvc_v4l2_set_format
uvc_v4l2_try_format
video->streaming->cur_format = format;
video->streaming->cur_frame = frame;
7. VIDIOC_REQBUFS
uvc_alloc_buffers
for (; nbuffers > 0; --nbuffers) {
mem = vmalloc_32(nbuffers * bufsize);
if (mem != NULL)
break;
}
8. VIDIOC_QUERYBUF
uvc_query_buffer
__uvc_query_buffer
memcpy(v4l2_buf, &buf->buf, sizeof *v4l2_buf); // 复制参数
9. mmap
uvc_v4l2_mmap
10. VIDIOC_QBUF
uvc_queue_buffer
list_add_tail(&buf->stream, &queue->mainqueue);
list_add_tail(&buf->queue, &queue->irqqueue);
11. VIDIOC_STREAMON
uvc_video_enable(video, 1) // 把所设置的参数发给硬件,然后启动摄像头
/* Commit the streaming parameters. */
uvc_commit_video
uvc_set_video_ctrl /* 设置格式fromat, frame */
ret = __uvc_query_ctrl(video->dev /* 哪一个USB设备 */, SET_CUR, 0,
video->streaming->intfnum /* 哪一个接口: VS */,
probe ? VS_PROBE_CONTROL : VS_COMMIT_CONTROL, data, size,
uvc_timeout_param);
/* 启动:Initialize isochronous/bulk URBs and allocate transfer buffers. */
uvc_init_video(video, GFP_KERNEL);
uvc_init_video_isoc / uvc_init_video_bulk
urb->complete = uvc_video_complete; (收到数据后此函数被调用,它又调用video->decode(urb, video, buf); ==> uvc_video_decode_isoc/uvc_video_encode_bulk => uvc_queue_next_buffer => wake_up(&buf->wait);)
usb_submit_urb
12. poll
uvc_v4l2_poll
uvc_queue_poll
poll_wait(file, &buf->wait, wait); // 休眠等待有数据
13. VIDIOC_DQBUF
uvc_dequeue_buffer
list_del(&buf->stream);
14. VIDIOC_STREAMOFF
uvc_video_enable(video, 0);
usb_kill_urb(urb);
usb_free_urb(urb);
分析设置亮度过程:
ioctl: VIDIOC_S_CTRL
uvc_ctrl_set
uvc_ctrl_commit
__uvc_ctrl_commit(video, 0);
uvc_ctrl_commit_entity(video->dev, entity, rollback);
ret = uvc_query_ctrl(dev /* 哪一个USB设备 */, SET_CUR, ctrl->entity->id /* 哪一个unit/terminal */,
dev->intfnum /* 哪一个接口: VC interface */, ctrl->info->selector,
uvc_ctrl_data(ctrl, UVC_CTRL_DATA_CURRENT),
ctrl->info->size);
总结:
1. UVC设备有2个interface: VideoControl Interface, VideoStreaming Interface
2. VideoControl Interface用于控制,比如设置亮度。它内部有多个Unit/Terminal(在程序里Unit/Terminal都称为entity)
可以通过类似的函数来访问:
ret = uvc_query_ctrl(dev /* 哪一个USB设备 */, SET_CUR, ctrl->entity->id /* 哪一个unit/terminal */,
dev->intfnum /* 哪一个接口: VC interface */, ctrl->info->selector,
uvc_ctrl_data(ctrl, UVC_CTRL_DATA_CURRENT),
ctrl->info->size);
3. VideoStreaming Interface用于获得视频数据,也可以用来选择fromat/frame(VS可能有多种format, 一个format支持多种frame, frame用来表示分辨率等信息)可以通过类似的函数来访问:
ret = __uvc_query_ctrl(video->dev /* 哪一个USB设备 */, SET_CUR, 0,
video->streaming->intfnum /* 哪一个接口: VS */,
probe ? VS_PROBE_CONTROL : VS_COMMIT_CONTROL, data, size,
uvc_timeout_param);
4. 我们在设置FORMAT时只是简单的使用video->streaming->format[fmt->index]等数据,
这些数据哪来的?
应是设备被枚举时设置的,也就是分析它的描述符时设置的。
5. UVC驱动的重点在于:
描述符的分析
属性的控制: 通过VideoControl Interface来设置
格式的选择:通过VideoStreaming Interface来设置
数据的获得:通过VideoStreaming Interface的URB来获得
未完。。。

 浙公网安备 33010602011771号