linux下BIND DNS服务器的应用和部署(bind-dlz+智能dns+子域dns+缓存转发dns)
BIND DNS服务器的应用和部署
相关术语简介
智能DNS (Bind-view):
智能DNS的原理很简单:在用户解析一个域名的时候,判断一下用户的 IP ,然后跟 DNS服务器内部的IP 表匹配一下,看看用户是电信还是网通用户,然后给用户返回对应的IP 地址。目前的域名服务运营商不提供智能DNS服务,所以必须自行架设DNS服务或者使用网上免费的智能DNS 服务,如DNSPOD.
Bind-DLZ
Bind-DLZ主页:http://bind-dlz.sourceforge.net/
DLZ(Dynamically Loadable Zones)与传统的BIND9 不同,BIND 的不足之处:
* BIND从文本文件中获取数据,这样容易因为编辑错误出现问题。
* BIND需要将数据加载到内存中,如果域或者记录较多,会消耗大量的内存。
* BIND启动时解析Zone文件,对于一个记录较多的DNS来说,会耽误更多的时间。
* 如果近修改一条记录,那么要重新加载或者重启 BIND 才能生效,那么需要时间,可能会影响客户端查询。 而Bind-dlz 即将帮你解决这些问题, 对Zone文件操作也更方便了,直接对数据库操作, 可以很方 便扩充及开发管理程序。
BIND递归查询:
默认 Resolver 发出的是递归查询,而且默认 BIND name server 也处理所有的递归请求
递归查询的工作方式
递归查询是最常见的查询方式,域名服务器将代替提出请求的客户机(下级DNS服务器)进行域名查询,若域名服务器不能直接回答,则域名服务器会在域各树中的各分支的上下进行递归查询,最终将返回查询结果给客户机,在域名服务器查询期间,客户机将完全处于等待状态。
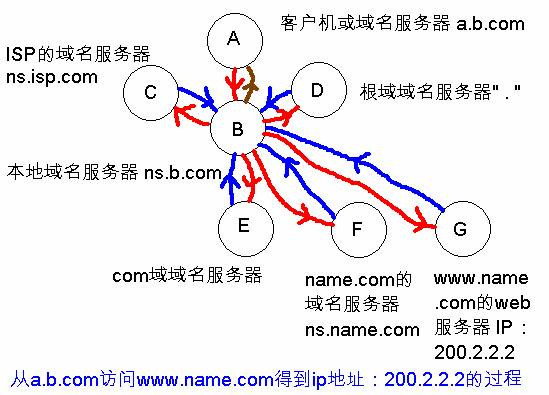
示例: (红色为查询,蓝色为迭代查询返回的提示信息,棕色为递归查询返回的IP信息)
示例说明:A向B发送递归查询请求,B向C发送迭代查询请求(下一节将介绍迭代查询),得到C给出的提示后,B向D发送迭代查询请求,得到D给出的提示后,B向E发出迭代请求,得到E给出的提示后,B向F发出迭代查询请求,得到F给出的提示后,B得到了F返回G的IP地址,B向A返回G的IP地址,整个查询结束。
迭代查询的工作方式
迭代查询又称重指引,当服务器使用迭代查询时能够使其他服务器返回一个最佳的查询点提示或主机地址,若此最佳的查询点中包含需要查询的主机地址,则返回主机地址信息,若此时服务器不能够直接查询到主机地址,则是按照提示的指引依次查询,直到服务器给出的提示中包含所需要查询的主机地址为止,一般的,每次指引都会更靠近根服务器(向上),查寻到根域名服务器后,则会再次根据提示向下查找。从上节的图中可以知道,B访问C、D、E、F、G,都是迭代查询,首先B访问C,得到了提示访问D的提示信息后,开始访问D,这时因为是迭代查询,D又返回给B提示信息,告诉B应该访问E,依次类推。
说明:假设你要寻找一家你从未去过的公司,你会有2种解决方案,1是找一个人替你问路,那可能是你的助手,2是自己问路,每走过一个路口,就问一个人,这就好比递归查询和迭代查询,递归查询在这里代表你的第1种解决方案,而迭代则是第2种解决方案。
但某些情况下,服务器应该被配置为不接受递归请求,例如根域服务器。根域服务器不接受递归请求的原因 :
一、因为根域服务器太忙了,它们没有精力来回答递归查询。
二、接受递归请求将会建立缓存,如此根域服务器的缓存将会变得十分巨大
关于递归/非递归方面的配置语句有 recursion no和 allow-recursion 语句。两者都只能放在 options 或者 view 语句中
recursion no 只对外部域名有效,如果查询的是本地zone域名(仅限于该 name server 上所定义的 zone,不包括下级子域)则可以回答。因为解析外部域名需要查询外部 name server ,这才是 recursion no 控制和关心的部分,如果查询的是本地 zone 的数据,当然不需要担心本地 name server 被诱导,可以直接返回答案。
要注意以下几点;
一、保证该非递归服务器不出现在客户机的 /etc/resolv.conf 的
二、保证该非递归服务器不被其他 name server 当成转发器 (forwarder)
三、推荐使用 allow-recursion 而不是 recursion
四、该非递归服务器可以出现在 zone data file 的 NS 记录中。它可以正常的接收其他 name server 发来的查询
五、外部 name server 是通过上级域的 Referral 消息找到该非递归服务器的
六、外部 name server 在得到上级域的 Referral 消息后,向该非递归服务器发送的查询是 iterative query ,而不是 recusive query ,所以该非递归服务器仍然可以回答那些它所权威的 zone 的查询。但不能用于查询外部域名了。
域名转发
forward first| only;
forward指令用于设置DNS转发的工作方式:
forward first设置优先使用forwarders DNS服务器做域名解析,如果查询不到再使用本地DNS服务器做域名解析。
forward only设置只使用forwarders DNS服务器做域名解析,如果查询不到则返回DNS客户端查询失败。
某些网络连接不鼓励向本地以外发送很大的数据流量,这要么是因为网络连接是按流量计费的,或网络连接本身是带宽不足。在这样的情况下,如果想将发往外部的 DNS 流量限制到尽可能的小,就需要使用 BIND 的转发机制。或者你的网络中只有一台机器能连接到 Internet ,而你在这台机器上运行了 BIND ,那么你可以将这台 BIND 作为内部网络中的其他 BIND 的转发器,使得其他 DNS 也能查找 Internet 域名。
转发机制的这样的:当你设置了转发器后,所有非本域的和在缓存中无法找到的域名查询都将转发到设置的 DNS 转发器上,由这台 DNS 来完成解析工作并做缓存,因此这台转发器的缓存中记录了丰富的域名信息。因而对非本域的查询,很可能转发器就可以在缓存中找到答案,避免了再次向外部发送查询,减少了流量。
转发器的配置格式是:
options {
forwarders { 192.168.24.3; };
};
这里要注意,转发器本身不用做任何设置,而是对需要转发器的其他 DNS server 做以上配置。还有,如果该 DNS Server 无法联系到转发器,那么 BIND 会自己尝试解析。
options {
forwarders {192.168.24.3; };
forward only;
};
forward zone
在 BIND 8.2 以后引入了一个新的特性:转发区( forward zone ),它允许你把 DNS 配置成只有查找特定域名的时候才使用转发器。( BIND 9 从9.1.0 才开始有转发区功能 )例如,你可以使你的服务器将所有对 google2.com 结尾的域名查询都转发给 google2.com 的nds服务器:
zone "google2.com" {
type forward;
forwarders { 192.168.10.102; };
};
这样的功能有什么用呢?假设 google2.com 和你的网络有一个私有的连接,而 google2.com 又没有连接上 Internet ,那么你从 Internet 是无法查到 google2.com 后缀的域名的,这时你就要使用转发区的功能了。
如果你要禁止 BIND 在无法联系到转发器时不做任何操作,那么你还可以使用 forward only 命令,这样 BIND 只能使用区的权威数据和缓存来响应查询了( 在连接不到转发器的情况下 )。
还有一种转发区设置和刚才的设置刚好相反,它允许你设置什么样的查询将不被转发,当然这只适用于在 options 语句中指定了转发器的 DNS 。配置如下:
options {
directory "/var/named";
forwarders { 192.168.10.103; };
};
zone " google2.com" {
type master;
file "zone. google2.com";
forwarders {192.168.10.102;};
};
这样写你可能会问为什么你要在自己的权威区里禁止转发?难道不是自己回答查询而不使用转发器吗?
有这样一种情况,在 google2.com 这个区中,你授权了几个子域,例如:play.google2.com、tech.google2.com 等,那么在 google2.com 的权威服务器上设置转发后,因为对 play. google2.com、tech. google2.com 这几个子域不是权威,那么如果有对 www. play. google2.com 这样的子域的域名查询,服务器也将转发。这完全是没有必要的,因为服务器上就有 play. google2.com 子域的 NS 记录,何须再转发。
DNS子域授权
子域授权就相当于是划片管理,是由上至下的授权。由根开始"."。
例如:.com .net 就是由根授权名称空间,其实就是由.决定要划分什么的名称空间,由它委派子名称空间。
DNS中最重要的就是NS记录,其中每个NS里面的负责人就是SOA,在父域上定义一条NS记录和一条A记录就可以完成子域授权了。
.com IN NS google1.com.
google1.com IN A 192.168.10.100
这就表示在.com这个片里面有一台主机叫google1。以后这个.com这一片就归这个google1这台主机来管理了,哪谁是这台主机呢?下面的A记录就给予很明确的答案,10.10.10.1就是管理.com这个片的这台主机
在正向区域文件里面google1.com.zone
play.google1.com. IN NS ns1. play.google1.com.
ns1. play.google1.com. IN A 192.168.10.101
我们这里是授权到子域里面的一个主的服务器,如果,我这里子域里面的服务器要想还有个从的服务器,那这个从的服务器是否在互联网上能使用呢?
答案是肯定的不能,因为当用户在查询www.tech.magedu.com.的时候.这里的服务器看到后,发现这个不是归自己这里解析的,它会把这个条目提交给跟"."根。根发现这个是.com那个片的,于是会把这个任务交给.com,之后.com发现这个又是它下面的.tech域名服务器。而.tech这里发现具体的负责人就只有172.16.17.1
如果我们想要使用这个子域当中的有多台从服务器,那么就需要给每台从服务器添加NS记录以及对应的A记录。例如ns2是从服务器
play.google1.com. IN NS ns1. play.google1.com.
ns1. play.google1.com. IN A 192.168.10.101
play.google1.com. IN NS ns2. play.google1.com.
ns2. play.google1.com. IN A 192.168.10.102
对于远程的查询时没有主从之分的,主从服务器只是本地管理区域传送的时候有意义,当用户查询的时候,服务器这里是轮循返回信息,这种方式实现负载均衡。
注:在建立的时候这个从服务器ns2可不是随便写的。如果没有的话切忌不要写上去,因为服务器这里是轮循的,第一次查询的时候是有ns1负责,第二次查询的时候是由ns2负责,当然第三次又有ns1复制查询,如果没有ns2那么用户就不能够查询信息了。
安装Bind及基本环境
编译安装MySQL
../configure --prefix=/usr/local/mysql
make
make install
2.增加用户
adduser -s /bin/false mysql
3.初始化并设置目录权限
/usr/local/mysql/bin/mysql_install_db
chown -R root /usr/local/mysql/
chown -R mysql /usr/local/mysql/var
chgrp -R mysql /usr/local/mysql/
4.加入库
echo /usr/local/mysql/lib/mysql/lib >>/etc/ld.so.conf
ldconfig
5.使之启动时自动运行
echo "/usr/local/mysql/bin/mysqld_safe &" >>/etc/rc.d/rc.local
6.启动MySQL
/usr/local//mysql/bin/mysqld_safe &
7.安全性设定
修改MySQL的root密码:
/usr/local/mysql/bin/mysqladmin -uroot password abcdefg
8.测试
[root@terry bin]# /usr/local/mysql/bin/mysql -u root -p
Enter password:
Welcome to the MySQL monitor. Commands end with ; or \g.
Your MySQL connection id is 3 to server version: 4.0.15
Type 'help;' or '\h' for help. Type '\c' to clear the buffer.
mysql> use mysql;
Reading table information for completion of table and column names
You can turn off this feature to get a quicker startup with -A
Database changed
mysql> delete from user where user=''; (删除所有用户名为空的用户,可以提高安全性)
Query OK, 2 rows affected (0.00 sec)
mysql> quit
Bye
编译安装Bind
mkdir /usr/local/src/bind-dlz
cd /usr/local/src/bind-dlz
wget http://ftp.isc.org/isc/bind9/9.6.0-P1/bind-9.6.0-P1.tar.gz
tar zxvf bind-9.6.0-P1.tar.gz
cd bind-9.6.0-P1
./configure --with-dlz-mysql --enable-largefile --enable-threads=no --prefix=/usr/local/bind
--with-openssl=/usr/local/openssl/
注:禁掉线程;--with-openssl= 你的 openssl安装的相关目录有可能是/usr
make && make install
创建相关配置文件
cd /usr/local/bind/etc
../sbin/rndc-confgen >rndc.conf
tail -n10 rndc.conf | head -n9 | sed -e s/#\//g >named.conf
启动bind 服务.
/usr/local/bind/sbin/named -uroot -g -d 9 // 调试状态,如果没有报错说明环境配置正确。
做成启动服务. Debug 的时候多用此模式启动bind.
/usr/local/bind/sbin/rndc reload //重载named.conf 相关配置文件. /usr/local/bind/sbin/named -uroot -c /usr/local/bind/etc/named.conf //启动bind 服务.
基于Bind-DLZ 的php管理程序
编译安装apache 2.4.3 (released 2012-08-21)
可到http://httpd.apache.org/下载安装最新版本apache
mkdir /usr/local/src/httpd
cd /usr/local/src/httpd
wget http://mirrors.tuna.tsinghua.edu.cn/apache//httpd/httpd-2.4.3.tar.gz
tar zxvf httpd-2.4.3.tar.gz
cd httpd-2.4.3
./configure --prefix=/usr/local/httpd --enable-so
make && make install
出现依赖包的错误
configure: error: APR not found. Please read the documentation.
下载apr源码包
./configure --prefix=/usr/local/APR
make && make install
configure: error: APR-util not found. Please read the documentation
下载APR-util源码包
./configure --prefix=/usr/local/APR-util
make && make install
configure: error: pcre-config for libpcre not found. PCRE is required and available from http://pcre.org/
下载pcre源码包
./configure --prefix=/usr/local/pcre
make && make install
./configure --prefix=/usr/local/ httpd --with-apr=/usr/local/apr --with-apr-util=/usr/local/apr-util --with-pcre=/usr/local/pcre
现在已经将Apache 2.0.47安装到 /usr/local/httpd目录中,安装好的Apache支持可装载模块和标准的MPM prefork。如果安装过程中没有出现错误,便可以使用如下命令启动Apache服务:
/usr/local/httpd/bin/apachectl start
如果启动成功,将启动命令加入rc.local,使之在系统启动时自动运行:
echo "/usr/local/httpd/bin/apachectl start &" >>/etc/rc.d/rc.local
停止Apache服务,并继续安装PHP:
/usr/local/httpd/bin/apachectl stop
编译安装PHP
mkdir /usr/local/src/php
cd /usr/local/src/php
wget http://cn2.php.net/get/php-5.4.10.tar.gz/from/this/mirror
tar zxvf php-5.4.10.tar.gz
cd php-5.4.10
./configure --with-apxs2=/usr/local/httpd/bin/apxs --with-mysql=/usr/local/mysql
make && make install
cp php.ini-dist /usr/local/lib/php.ini
这种安装方式是将PHP作为Apache的SAPI模块来进行安装,它仅是其中的一种安装方式,更多的方法请参阅相关文档。
PHP和Apache安装后的基本配置
1.Apache的配置
Apache的配置文件是/usr/local/httpd/conf/httpd.conf,编辑httpd.conf 文件,在文件结尾加上以下两行:
LoadModule php4_module modules/libphp4.so
AddType application/x-httpd-php .php .php3
同时修改DirectoryIndex为:
DirectoryIndex index.html index.php index.php3
ServerName 127.0.0.1
AddType application/x-httpd-php .php
AddType application/x-httpd-php-source .phps
Apache的配置内容比较丰富,其它Apache相关配置请参考Apache的相关文档。
编辑/etc/hosts文件
127.0.0.1 localhost.localdomain TonyHost
2.PHP的配置
Apache的配置文件是/usr/local/lib/php.ini,编辑php.ini文件来配置PHP的选项。特别注意的是,安装完成后register_globals变量默认设置为Off,需要将它改成On。否则会出现PHP读不到post的数据的现象。
register_globals=On
其它PHP的选项请参考相关文档。
3.测试
可以写一个简单的PHP文件来测试安装,文件包含下列一行:
<? phpinfo();?>
将其保存为/usr/local/httpd/htdocs/info.php,启动Apache,然后在浏览器中浏览。
bind dns的web管理界面dns_web
导入mysql数据脚本
DROP TABLE IF EXISTS `dns_records`;
CREATE TABLE `dns_records` (
`id` int(10) unsigned NOT NULL auto_increment,
`zone` varchar(255) NOT NULL,
`host` varchar(255) NOT NULL default '@',
`type` enum('MX','CNAME','NS','SOA','A','PTR') NOT NULL,
`data` varchar(255) default NULL,
`ttl` int(11) NOT NULL default '800',
`view` char(20) default 'DF',
`mx_priority` int(11) default NULL,
`refresh` int(11) NOT NULL default '3600',
`retry` int(11) NOT NULL default '3600',
`expire` int(11) NOT NULL default '86400',
`minimum` int(11) NOT NULL default '3600',
`serial` bigint(20) NOT NULL default '2008082700',
`resp_person` varchar(64) NOT NULL default 'root.domain.com.',
`primary_ns` varchar(64) NOT NULL default 'ns1.domain.com.',
`data_count` int(11) NOT NULL default '0',
`time` datetime default NULL,
`opuser` varchar(20) default NULL,
`status` tinyint(1) default '1',
PRIMARY KEY (`id`),
KEY `type` (`type`),
KEY `host` (`host`),
KEY `zone` (`zone`)
) ENGINE=MyISAM DEFAULT CHARSET=gbk;
DROP TABLE IF EXISTS `p_admin`;
CREATE TABLE `p_admin` (
`uid` int(3) NOT NULL auto_increment,
`m_id` int(2) NOT NULL,
`username` varchar(25) NOT NULL,
`password` varchar(50) NOT NULL,
`name` varchar(50) NOT NULL,
PRIMARY KEY (`uid`)
) ENGINE=MyISAM DEFAULT CHARSET=utf8;
LOCK TABLES `p_admin` WRITE;
INSERT INTO `p_admin` VALUES (22,1,'admin1','e00cf25ad42683b3df678c61f42c6bda','管理员');
UNLOCK TABLES;
放置dns_web到/usr/local/httpd/htdocs中,浏览器中浏览http://localhost/dns_web即可进入dns的web管理界面。

服务规划:
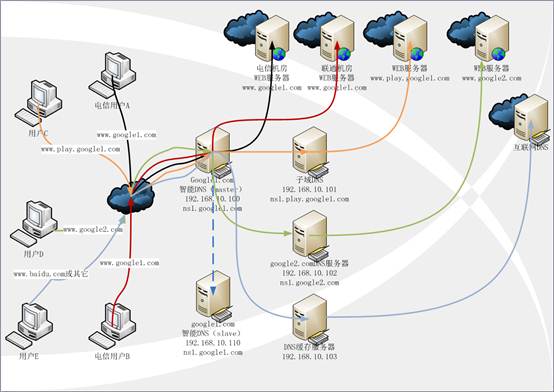
应用网络拓扑图
环境配置
192.168.10.100为主dns服务器,主机名ns1.google1.com,管理google1.com域。
192.168.10.110为从dns服务器,主机名ns1.google1.com,管理google1.com域。
192.168.10.101为google.com子域服务器,主机名ns1.play.google1.com,管理play.google1.com域。
192.168.10.102为google2.com域服务器,主机名ns1.google1.com。
192.168.10.103为转发缓存服务器,指向互联网或其它域的dns服务器。
相关DNS规划
|
域名 |
作用 |
Dns |
IP |
|
google1.com |
主DNS |
ns1.google1.com |
192.168.10.100 |
|
从DNS |
ns2. google1.com |
192.168.10.110 |
|
|
子域DNS |
ns1.play.google1.com |
192.168.10.101 |
|
|
google2.com |
主DNS |
ns1.google2.com |
192.168.10.102 |
|
|
缓存dns |
|
192.168.10.103 |
相关WEB服务器规划
|
访问途径 |
网址 |
WEB主机IP |
|
cnc |
www. google1.com |
192.168.10.10 |
|
telecom |
www. google1.com |
192.168.10.11 |
|
edu |
www. google1.com |
192.168.10.12 |
|
其他 |
www. google1.com |
192.168.10.11 |
Bind-acl规划
|
|
|
|
|
网通 |
CNC |
include "/usr/local/bind/etc/view/cnc_acl.conf"; |
|
电信 |
TELECOM |
include "/usr/local/bind/etc/view/tele_acl.conf"; |
|
教育 |
EDU |
include "/usr/local/bind/etc/view/edu_acl.conf"; |
|
其他 |
ANY |
include "/usr/local/bind/etc/view/any_acl.conf"; |
注:当一个网通用户向本地DNS发www. google1.com的请求时,本地DNS会递归查询,最后把请求发给ns1.google1.com这台DNS服务器上,ns1. google1.com会根据请求的用户IP所属的范围来择优选择,将www. google1.com在网通的ip返回给本地DNS。
配置DNS TSIG
主dns服务器192.168.10.100
根据之前提供方法分别安装mysql、bind、apache、php及整合dns_web管理系统。这里主dns配置智能dns,划分四个访问来路:网通、电信、教育和其它。
使用dnssec-keygen function 产生加密密钥,一个为public key, 另一个为private key
产生加密金钥
cd /usr/local/bind/sbin
./dnssec-keygen -a hmac-md5 -b 128 -n HOST cnc
./dnssec-keygen -a hmac-md5 -b 128 -n HOST telecom
./dnssec-keygen -a hmac-md5 -b 128 -n HOST edu
./dnssec-keygen -a hmac-md5 -b 128 -n HOST any
查看生成的密钥文件
cat Kcnc.+157+24406.private
Private-key-format: v1.2
Algorithm: 157 (HMAC_MD5)
Key: YTjTOw00PzeEaasA16/Rvw==
Bits: AAA=
配置named.conf
vim /usr/local/bind/etc/named.conf 注:vi或者vim编辑named配置文件
key "rndc-key" {
algorithm hmac-md5;
secret "srtEZG/uJHD2nGeb42Ir6g==";
};
controls {
inet 127.0.0.1 port 953
allow { 127.0.0.1; } keys { "rndc-key"; };
};
options {
directory "/usr/local/bind/etc";
pid-file "named.pid";
allow-query { any; };
forward only;
forwarders {
192.168.10.101;//子域服务器,没有配置会找不到子域服务器
192.168.10.103;//缓存服务器
};
};
#TSIG-key
key "cnc" {
algorithm hmac-md5;
secret "LbIyflTY/N3EELqktaFSRw==";
};
key "telecom" {
algorithm hmac-md5;
secret "oLLqtgn2UF4hsW0YXug0sA==";
};
key "edu" {
algorithm hmac-md5;
secret "FeMlTjiGbqBlYG0TRlbokg==";
};
key "any" {
algorithm hmac-md5;
secret "sdEGmt20BBwcpSfqTn7P/Q==";
};
acl "dns-ip-list"{
192.168.10.100;
192.168.10.111;
};
acl "telecom-dns-ip-list"{
192.168.1.0/24;
};
include "/usr/local/bind/etc/cnc_acl.conf"; //
include "/usr/local/bind/etc/telecom_acl.conf"; //
include "/usr/local/bind/etc/edu_acl.conf"; //
include "/usr/local/bind/etc/view.conf";
include "/usr/local/bind/etc/forwardzone.conf";
acl.conf
以telecom_acl.conf为例
acl TELECOM{
192.168.1.162;//访问ip字典,以我的电脑ip192.168.1.162为例,这个可判断为电信网 //络访问dns服务器。ip字典越多,分析越准确。
};
forwardzone.conf
添加域名转发,即定义某域名指定其他DNS服务器,这里以google2.com为例。
zone "google2.com" IN {
type forward;
forwarders {
192.168.10.102;//权威域为google2的dns服务器
};
};
配置Bind-view-DLZ-MySQL
vim /usr/local/bind/etc/ view.conf
view "cnc_view" {
match-clients {key cnc;dns-ip-list;CNC;};
allow-query-cache {none;};
allow-recursion {none;};
allow-transfer {192.168.10.111;};
recursion yes;
dlz "Mysql zone" {
database "mysql
{ host=127.0.0.1 dbname=cdn_view ssl=false port=3306 user=root pass= }
{select zone from dns_records where zone = '%zone%' and view='CNC' limit 1}
{select ttl, type, mx_priority, case when lower(type)='txt' then concat( '\"', data, '\"') when lower(type) = 'soa' then concat_ws(' ', data, resp_person, serial, refresh , retry, expire, minimum) else data end as mydata from dns_records where zone = '%zone%' and host = '%record%' and (view = 'CNC' or view = 'DF') and status='1'}
{select ttl, type, host, mx_priority, case when lower(type)='txt' then concat( '\"', data, '\"' ) else data end as mydata, resp_person, serial, refresh, retry, expire, minimum from dns_records where zone = '%zone%' and (view='CNC' or view='ALL' or view='DF') and status='1'}";
};
};
view "telecom_view" {
match-clients {key telecom;telecom-dns-ip-list;TELECOM;};
#allow-query-cache {none;};
#allow-recursion {none;};
allow-transfer {192.168.10.111;};
recursion yes;
dlz "Mysql zone" {
database "mysql
{ host=127.0.0.1 dbname=cdn_view ssl=false port=3306 user=root pass= }
{select zone from dns_records where zone = '%zone%' and view='TELCOM' limit 1}
{select ttl, type, mx_priority, case when lower(type)='txt' then concat( '\"', data, '\"') when lower(type) = 'soa' then concat_ws(' ', data, resp_person, serial, refresh , retry, expire, minimum) else data end as mydata from dns_records where zone = '%zone%' and host = '%record%' and (view = 'TELCOM' or view = 'DF') and status = '1'}
{select ttl, type, host, mx_priority, case when lower(type)='txt' then concat( '\"', data, '\"' ) else data end as mydata, resp_person, serial, refresh, retry, expire, minimum from dns_records where zone = '%zone%' and (view='TELCOM' or view = 'ALL' or view = 'DF') and status = '1'}";
};
include "/usr/local/bind/etc/transferzone.conf";
};
view "edu_view" {
match-clients {key edu;dns-ip-list;EDU;};
allow-query-cache {none;};
allow-recursion {none;};
allow-transfer {192.168.10.111;};
recursion yes;
dlz "Mysql zone" {
database "mysql
{ host=127.0.0.1 dbname=cdn_view ssl=false port=3306 user=root pass= }
{select zone from dns_records where zone = '%zone%' and view='EDU' limit 1}
{select ttl, type, mx_priority, case when lower(type)='txt' then concat( '\"', data, '\"') when lower(type) = 'soa' then concat_ws(' ', data, resp_person, serial, refresh , retry, expire, minimum) else data end as mydata from dns_records where zone = '%zone%' and host = '%record%' and (view = 'EDU' or view = 'DF') and status = '1'}
{select ttl, type, host, mx_priority, case when lower(type)='txt' then concat( '\"', data, '\"' ) else data end as mydata, resp_person, serial, refresh, retry, expire, minimum from dns_records where zone = '%zone%' and ( view='EDU' or view = 'ALL' or view = 'DF') and status = '1'}";
};
};
view "any_view" {
match-clients {key any;dns-ip-list;ANY;};
allow-query-cache {none;};
allow-recursion {none;};
allow-transfer {192.168.10.111;};
recursion yes;
dlz "Mysql zone" {
database "mysql
{ host=127.0.0.1 dbname=cdn_view ssl=false port=3306 user=root pass= }
{select zone from dns_records where zone = '%zone%' and view='ANY' limit 1}
{select ttl, type, mx_priority, case when lower(type)='txt' then concat( '\"', data, '\"') when lower(type) = 'soa' then concat_ws(' ', data, resp_person, serial, refresh , retry, expire, minimum) else data end as mydata from dns_records where zone = '%zone%' and host = '%record%' and (view = 'ANY' or view = 'DF')}
{select ttl, type, host, mx_priority, case when lower(type)='txt' then concat( '\"', data, '\"' ) else data end as mydata, resp_person, serial, refresh, retry, expire, minimum from dns_records where zone = '%zone%' and view='ANY'}";
};
};
mysql脚本
LOCK TABLES `dns_records` WRITE;
INSERT INTO `dns_records` VALUES (15,'google1.com','@','SOA','dns',86400,'DF',NULL,4800,3600,604800,600,1357785600,'root','',0,'2012-12-28 01:10:53','22',1),(2,'google1.com','@','NS','ns1.google1.com.',800,'TELCOM',NULL,3600,3600,86400,3600,2008082700,'root.domain.com.','ns1.domain.com.',0,'2013-01-09 18:38:29','22',1),(4,'google1.com','ns1','A','192.168.10.100',800,'TELCOM',NULL,3600,3600,86400,3600,2008082700,'root.domain.com.','ns1.domain.com.',0,'2013-01-09 18:40:00','22',1),(9,'google1.com','www','A','192.168.1.107',3600,'TELCOM',NULL,3600,3600,86400,3600,2008082700,'root.domain.com.','ns1.domain.com.',0,'2013-01-04 00:42:04','22',1),(10,'google1.com','bbs','A','210.51.36.116',3600,'CNC',NULL,3600,3600,86400,3600,2008082700,'root.domain.com.','ns1.domain.com.',0,NULL,NULL,1),(11,'google1.com','bbs','A','221.238.249.178',3600,'TELCOM',NULL,3600,3600,86400,3600,2008082700,'root.domain.com.','ns1.domain.com.',0,'2013-01-04 00:39:23','22',1),(13,'google1.com','bbs','A','192.168.1.108',3600,'ALL',NULL,3600,3600,86400,3600,2008082700,'root.domain.com.','ns1.domain.com.',0,'2012-12-28 19:46:42','22',1),(20,'google1.com','play','NS','ns1.play.google1.com.',86400,'TELCOM',NULL,3600,3600,86400,3600,2008082700,'root.domain.com.','ns1.domain.com.',0,'2013-01-05 00:13:02','22',1),(21,'google1.com','ns1.play','A','192.168.10.102',86400,'TELCOM',NULL,3600,3600,86400,3600,2008082700,'root.domain.com.','ns1.domain.com.',0,'2013-01-05 00:13:29','22',1);
UNLOCK TABLES;
dns_web管理界面

从dns服务器192.168.10.110
主从dns之间实现mysql主从数据库同步:
1、安装mysql(略)
2、安装bind配置和主的一样,可以通过rsync同步过来。
3、Mysql主从复制:
1)Master 配置
创建同步用户
mysql -u root
mysql>UNLOCK TABLES;
mysql>GRANT ALL PRIVILEGES ON *. TO 'larry'@'%' IDENTIFIED BY 'larrypasswd' WITH
GRANT OPTION;
mysql>exit
修改配置文件,并打包var文件到Slave 端
vim /etc/my.cnf
[mysqld] 在mysqld 里添加如下几项
long_query_time = 5
expire_logs_days= 3
binlog-do-db=cdn_view ==>要同步的数据库
binlog-ignore-db=mysql ==>不同步的数据库
binlog_format=mixed
server-id = 12760 ==>同一个网络唯一
mysqladmin -u root -S /tmp/mysql.sock shutdown 重启mysql
/usr/local/mysql/bin/mysqld_safe --defaults-file=/etc/my.cnf &
2)Slave配置:
将my.cnf 中的server-id=1 改成12761
#log-bin=mysql-bin //注释掉这两行。
#binlog_format=mixed //修改成如下内容
server-id = 12761
replicate-do-db=cdn_view
replicate-ignore-db=mysql
log-slave-updates
slave-skip-errors=all
slave-net-timeout=60
mysqladmin -u root -S /tmp/mysql.sock shutdown //重启Mysql
/usr/local/mysql/bin/mysqld_safe --defaults-file=/etc/my.cnf &
msql -u root
mysql>CHANGE MASTER TO
MASTER_HOST='192.168.10.100', //Master IP
MASTER_USER=root, //用户
MASTER_PASSWORD=, //密码
MASTER_LOG_FILE='mysql-bin.000002',
MASTER_LOG_POS=2272;
以上两行必须按照Master 端的master 状态写show master status;
3)验证:
dig @192.168.10.100 www.google1.com
dig @192.168.10.110 www. google1.com
在Master端修改A记录的IP地址,看从是否有变化,如果变化一致说明mysql主从复制成功。
子域服务器192.168.10.101
根据之前提供方法分别安装mysql、bind、apache、php及整合dns_web管理系统。
配置named.conf
key "rndc-key" {
algorithm hmac-md5;
secret "srtEZG/uJHD2nGeb42Ir6g==";
};
controls {
inet 127.0.0.1 port 953
allow { 127.0.0.1; } keys { "rndc-key"; };
};
options {
directory "/usr/local/bind/etc";
pid-file "named.pid";
allow-query { 192.168.10.100; };
};
include "/usr/local/bind/etc/view.conf";
配置Bind-view-DLZ-MySQL
view "any_view" {
match-clients {key rndc-key;any;};
allow-query-cache {none;};
allow-recursion {none;};
allow-transfer {none;};
recursion no;
dlz "Mysql zone" {
database "mysql
{ host=127.0.0.1 dbname=cdn_view ssl=false port=3306 user=root pass= }
{select zone from dns_records where zone = '%zone%' and (view = 'ALL' or view='DF') limit 1}
{select ttl, type, mx_priority, case when lower(type)='txt' then concat( '\"', data, '\"') when lower(type) = 'soa' then concat_ws(' ', data, resp_person, serial, refresh , retry, expire, minimum) else data end as mydata from dns_records where zone = '%zone%' and host = '%record%' and (view = 'ALL' or view = 'DF') and status = '1'}
{select ttl, type, host, mx_priority, case when lower(type)='txt' then concat( '\"', data, '\"' ) else data end as mydata, resp_person, serial, refresh, retry, expire, minimum from dns_records where zone = '%zone%' and (view = 'ALL' or view = 'DF') and status = '1'}";
};
};
mysql脚本
LOCK TABLES `dns_records` WRITE;
INSERT INTO `dns_records` VALUES (36,'play.google1.com','@','NS','ns1.play.google1.com.',86400,'TELCOM',NULL,3600,3600,86400,3600,2008082700,'root.domain.com.','ns1.domain.com.',0,'2013-01-05 01:36:11','22',1),(38,'play.google1.com','www','A','192.168.1.108',86400,'TELCOM',NULL,3600,3600,86400,3600,2008082700,'root.domain.com.','ns1.domain.com.',0,'2013-01-09 18:55:12','22',1),(37,'play.google1.com','pic1','A','192.168.1.108',86400,'TELCOM',NULL,3600,3600,86400,3600,2008082700,'root.domain.com.','ns1.domain.com.',0,'2013-01-05 02:24:52','22',1),(35,'play.google1.com','@','SOA','dns',86400,'DF',NULL,4800,3600,604800,600,1357786512,'root','',0,'2013-01-05 01:35:06','22',1);
UNLOCK TABLES;
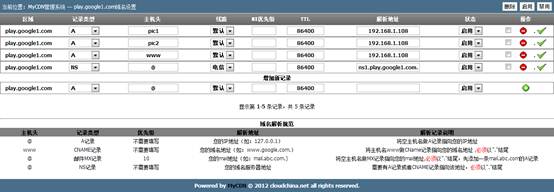
dns_web管理界面
google2.com区域dns服务器192.168.10.102
根据之前提供方法分别安装mysql、bind、apache、php及整合dns_web管理系统。
配置named.conf
key "rndc-key" {
algorithm hmac-md5;
secret "srtEZG/uJHD2nGeb42Ir6g==";
};
controls {
inet 127.0.0.1 port 953
allow { 127.0.0.1; } keys { "rndc-key"; };
};
options {
directory "/usr/local/bind/etc";
pid-file "named.pid";
allow-query { 192.168.10.100; };
};
include "/usr/local/bind/etc/view.conf";
配置Bind-view-DLZ-MySQL
view "any_view" {
match-clients {key rndc-key;any;};
allow-query-cache {none;};
allow-recursion {none;};
allow-transfer {none;};
recursion no;
dlz "Mysql zone" {
database "mysql
{ host=127.0.0.1 dbname=cdn_view ssl=false port=3306 user=root pass= }
{select zone from dns_records where zone = '%zone%' and (view = 'ALL' or view='DF') limit 1}
{select ttl, type, mx_priority, case when lower(type)='txt' then concat( '\"', data, '\"') when lower(type) = 'soa' then concat_ws(' ', data, resp_person, serial, refresh , retry, expire, minimum) else data end as mydata from dns_records where zone = '%zone%' and host = '%record%' and (view = 'ALL' or view = 'DF') and status = '1'}
{select ttl, type, host, mx_priority, case when lower(type)='txt' then concat( '\"', data, '\"' ) else data end as mydata, resp_person, serial, refresh, retry, expire, minimum from dns_records where zone = '%zone%' and (view = 'ALL' or view = 'DF') and status = '1'}";
};
};
mysql脚本
LOCK TABLES `dns_records` WRITE;
INSERT INTO `dns_records` VALUES (38,'google2.com','@','SOA','dns',86400,'DF',NULL,4800,3600,604800,600,1357802143,'root','',0,'2013-01-05 21:58:58','22',1),(39,'google2.com','@','NS','ns1.google2.com.',86400,'DF',NULL,3600,3600,86400,3600,2008082700,'root.domain.com.','ns1.domain.com.',0,'2013-01-09 23:15:43','22',1),(40,'google2.com','www','A','192.168.1.108',86400,'DF',NULL,3600,3600,86400,3600,2008082700,'root.domain.com.','ns1.domain.com.',0,'2013-01-09 23:15:37','22',1);
UNLOCK TABLES;
dns_web管理界面

dns缓存服务器192.168.10.103
而作为缓存dns服务器,需要连接外部互联网或者其它网络就不需要用到bind-dlz功能,这样可以提高缓存dns服务器性能。
l 编译安装bind时就不需要带-with-dlz-mysql;使用bind安装包配置时方法。
l 首先我们来看下RHEL5预装了哪些与bind相关的包。
rpm -qa|grep bind
ypbind-1.19-8.el5
bind-utils-9.3.3-10.el5
bind-libs-9.3.3-10.el5
- 安装bind-9.3.3-10.el5(这里可以安装最新的bind安装包或者光盘自带的bind安装包)
rpm -ivh /bind安装包所在目录/bind-9.3.3-10.el5.i386.rpm
- 安装CHROOT设置包,CHROOT技术,又叫虚拟根目录技术,是对付黑客利用漏洞入侵BIND系统的一种手段。
rpm -ivh /bind安装包所在目录/bind-chroot-9.3.3-10.el5.i386.rpm
- 安装唯高速缓存服务器设置包,有了这个包就可以构建DNS唯高速缓存服务器
rpm -ivh/caching-nameserver安装包所在目录/caching-nameserver-9.3.3-10.el5.i386.rpm
- 配置named.caching-nameserver.conf
vim /var/named/chroot/etc/named.caching-nameserver.conf
- options {
listen-on port 53 { 127.0.0.1;192.168.10.103; };
listen-on-v6 port 53 { ::1; };
directory "/var/named";
dump-file "/var/named/data/cache_dump.db";
statistics-file "/var/named/data/named_stats.txt";
memstatistics-file "/var/named/data/named_mem_stats.txt";
query-source port 53;
query-source-v6 port 53;
allow-query { any; };
};
logging {
channel default_debug {
file "data/named.run";
severity dynamic;
};
};
view localhost_resolver {
match-clients { localhost; };
match-destinations { localhost; };
recursion yes;
include "/etc/named.rfc1912.zones";
};
view wan {
match-clients {any;};
forward first;
forwarders {
192.168.0.3;
8.8.8.8;
8.8.4.4;
};
recursion yes;
zone "." IN {
type hint;
file "named.ca";
};
zone "0.0.127.in-addr.arpa" {
type master;
file "named.broadcast";
};
};
查询测试
l 模拟电信用户请求www.google1.com,解析到电信主机,说明智能解析正确。
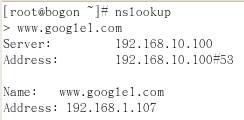
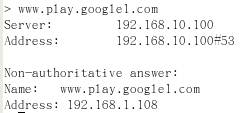
l 请求www.play.google1.com子域dns能够返回正确主机地址,说明子域dns服务器配置解析正确。
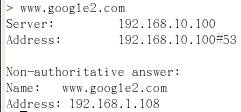
l 请求www.google2.com,解析到正确主机地址,说明google2.com的dns配置解析正确。
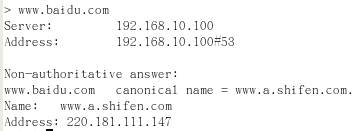
l 请求www.baidu.com,解析到正确主机地址,说明缓存转发的dns配置解析正确。
推荐资料
l 鳥哥的 Linux 私房菜第十九章、主機名稱控制者: DNS 伺服器
l Linux系列实验之DNS与BIND


