android -- service
Service 是android的四大组件之一(Activity、Service、ContentProvider、BroadcastReceiver),Service没有界面,后台运行执行任务并且可以与其他组件经行交互,只能通过其他方式启动
local service 依附在主线程上,主线程被kill,service也会被kill
remote service 独立线程,能提供更灵活的服务,需要配置AIDL接口,这种服务多用于系统服务;
启动方式有两种:
Context.startService(Intent service) //不需要进行数据交互
bindService(Intent service, ServiceConnection conn, int flags) //需要进行数据交互
Intent intent = new Intent(this, MyService.class);
Context.startService(service);
启动流程:
第三中启动方式:
既startService又bindService,那么onCreate – onStart – bindService – running – onUnbind – onDestroy
重点:关闭的时候,既要stopService也要unBind一下;或者Context.bindService的Context已经销毁了,就不用在去unbind了;
无论启动多少次service ,却只需关闭掉一次service即可,实质是service的实例只有一个,多次启动都是启动同一个,关闭也只灌一次而已
四 、 bindService使用方法
启动和结束不多说了,主要讲一下,启动时参数问题,
public abstract boolean bindService(Intent service,ServiceConnection conn,int flags) 第三个是 0 or BIND_AUTO_CREATE. 0是调试用的 一般都选择 后面的那个
ServiceConnection是一个监控service服务的类,在它里面有两个方法:
void onServiceConnected(ComponentName name, IBinder service)
当一个service连接建立好的时候调用,我们可以使用参数Ibinder去获取service里面的数据;所以这个需要实现在
Service里面Ibinder的内部类,通过里Service的onBind方法返回这个内部类实例;这样这个方法的参数IBinder
就是返回的这个实例

如果OnBind返回null的话,用Context.bindService也能开启Service,但建立不了连接,也就不能调用上面的onServiceConnected方法
void onServiceDisconnected(ComponentName name)
这个方法是在连接service的断掉的时候调用,正常关闭不会调用;在Service 被破坏了或者被杀死的时候调用.
例如, 系统资源不足, 要关闭一些Services,刚好连接绑定的 Service 是被关闭者之一,  这个时候
onServiceDisconnected() 就会被调用。
bindService如果调用多次,服务端执行onBind方法,返回binder对象,只有第一次才会执行onBind方法,并且回调客户端的onServiceConnect方法;如果第二次调用bindService或者其他App调用,服务端的onBind方法也不会执行了,如果其他App是第一次调用,则会返回onServiceConnect方法
为什么会这样?
原因是,大致原因是服务端通过onBind方法返回了binder对象,AMS将其保存下来了,其他App再次bind时发现bind已经有了就直接从AMS返回了
service和Thread的问题
service和Thread有什么关系吗?
答案是否定的,他们之间没有任何关系,service是运行在主线程中的,通常用于Activity结束后还继续的完成一些后台任务,所以你也不能在service执行耗时操作,当我们需要执行耗时操作则需要在service里面开启一个线程执行操作,那么疑问来了,为什么不直接在Activity里面执行呢?如果在Activity里面执行线程操作的话,结束Activity还需要去结束Thread,并且其他的Activity想要与线程联系则不行,而Service则不会,Activity可以通过绑定Bind Service,获取IBinder实例,与之通信,并且service可以当你下次开启Activity的时候重新建立连接
Service类onStartCommand()返回值讲解
https://my.oschina.net/dsm/blog/126407
IntentService
public class MyService extends IntentService {
    public MyService() {
        super(TAG);
        // TODO Auto-generated constructor stub
    }

	//子线程执行
    @Override
    protected void onHandleIntent(Intent intent) {
        // TODO Auto-generated method stub
    }
}
IntentService同样继承与Service,不同的是onHandleIntent在子线程运行,并且执行完后自动结束;如果有次启动startService,则串行执行万所有任务后自动结束
IntentService逻辑展示
IntentService有以下三个关键成员:
-
ServiceHandler
IntentService的内部类,用于发送handler消息和执行onHandleIntent函数 -
mServiceLooper
子线程的Looper,在创建上面的Handler时传递此Looper进入,这样handler执行就会在子线程中运行了
看看内部类,也就是数据的处理端:
public abstract class IntentService extends Service {
    private final class ServiceHandler extends Handler {
        传递Looper为子线程Looper
        public ServiceHandler(Looper looper) {
            super(looper);
        }
        @Override
        public void handleMessage(Message msg) {
            执行onHandleIntent方法
            onHandleIntent((Intent)msg.obj);
            执行完后结束
            stopSelf(msg.arg1);
        }
    }

}
onCreate,数据的初始化端:
    public void onCreate() {
        super.onCreate();
        创建HandlerThread
        HandlerThread thread = new HandlerThread("IntentService[" + mName + "]");
        start会执行HandlerThread的run方法
        thread.start();
		获取HandlerThread的looper
        mServiceLooper = thread.getLooper();
        将looper传递给ServiceHandler
        mServiceHandler = new ServiceHandler(mServiceLooper);
    }
初始化过程,HandlerThread创建,他就是一个运行在子线程的Handler,其继承于Thread,在其run方法里面,会依次调用
创建Looper对象
looer.prepare()
子线程开启循环队列
looper.loop()
需要注意的是,每个线程Looper.prepare()方法只能调用一次;在prepare方法中会创建Looper对象,这也是为什么上面代码start必须在getLooper之前
startCommand,数据发送端:
public int onStartCommand(@Nullable Intent intent, int flags, int startId) {
    onStart(intent, startId);
    return mRedelivery ? START_REDELIVER_INTENT : START_NOT_STICKY;
}

public void onStart(@Nullable Intent intent, int startId) {
    Message msg = mServiceHandler.obtainMessage();
    msg.arg1 = startId;
    msg.obj = intent;
    发送消息
    mServiceHandler.sendMessage(msg);
}
因为IntentService本质也是集成Service,所以也可以多次调用startService传递数据请求,但是最终都会跑到onHandleIntent子线程中执行
为什么HandlerIntent中的stopSelf(id)不会立即结束Service?
看了上面onHandeIntent你也许会有疑问,为什么stopSelf不会结束Service?以前学的知识不是说只需要调用一遍StopSelf就可以结束吗,这又不能,为啥呢?
经过查看源码,发现这个stopSelf方法传了一个参数startId;并且此方法逻辑会依次走到:
stopSelf(startId) -->> ActivityManagerService.stopServiceToken -->> ActiveServices.stopServiceTokenLocked;
最后一个方法大致如下:
 boolean stopServiceTokenLocked(ComponentName className, IBinder token,
            int startId) {

通过token查找对应的Service服务
ServiceRecord r = findServiceLocked(className, token, UserHandle.getCallingUserId());
成功找到服务
if (r != null) {
        if (startId >= 0) {
        查找到当前传入startId对应的记录项
         ServiceRecord.StartItem si = r.findDeliveredStart(startId, false);
                if (si != null) {
                    查找此项startId在记录中是否存在
                    while (r.deliveredStarts.size() > 0) {
                        ServiceRecord.StartItem cur = r.deliveredStarts.remove(0);
                        cur.removeUriPermissionsLocked();
                        if (cur == si) {
                            break;
                        }
                    }
                }
  				如果r服务中最后一项启动id不等于startId,说明还有任务没执行,这里就直接返回,
  				不结束任务
                if (r.getLastStartId() != startId) {
                    return false;
                }
			}
            这里会结束任务
			synchronized (r.stats.getBatteryStats()) {
                r.stats.stopRunningLocked();
            }
.....
	}
}
上面源码大致意思就是: AMS的ActiveServices类记录了每个Service的所有请求ID,如果stopSelf传递过来的id不是所有请求ID的最后一项,说明就还有请求任务存在,还需要继续执行
而不带参数的StopSelf()其内部封装的startId为-1,对应上面的源码就不会走>=0的逻辑了,直接结束了
扩展阅读 — bindService原理
在Activity中,使用bindService,会传入ServiceConnection参数,成功绑定后由服务端拉起,bindService是ContextWrapper的方法,如下:
----------ContextWrapper--------------------
public boolean bindService(Intent service, ServiceConnection conn,
        int flags) {
    这个mBase是ContextImpl实例,在ActivityThread的attache时传入的
    return mBase.bindService(service, conn, flags);
}

----------ContextImpl----------------------
private boolean bindServiceCommon(Intent service, ServiceConnection conn, int flags, Handler
        handler, UserHandle user) {
    aidl回调类IServiceConnection
    IServiceConnection sd;
     mPackageInfo是LoadedApk类型
    if (mPackageInfo != null) {
        只是获取了LoadApk内部创建的一个InnerConnection内部类,还没有拿到远端服务接口
        sd = mPackageInfo.getServiceDispatcher(conn, getOuterContext(), handler, flags);
    } else {
        throw new RuntimeException("Not supported in system context");
    }
    validateServiceIntent(service);
    try {

		........
		与AMS交互,传入sd回调,成功后,会回调sd的connected方法
        int res = ActivityManager.getService().bindService(
            mMainThread.getApplicationThread(), getActivityToken(), service,
            service.resolveTypeIfNeeded(getContentResolver()),
            sd, flags, getOpPackageName(), user.getIdentifier());
        ........
    } catch (RemoteException e) {
        throw e.rethrowFromSystemServer();
    }
}
上述代码很简单,就是将ServiceConnection封装到ServiceDispatcher里面,并返回一个IServiceConnection接口,这个接口是一个aidl接口,将会注册到AMS上去,成功后会回调此接口!
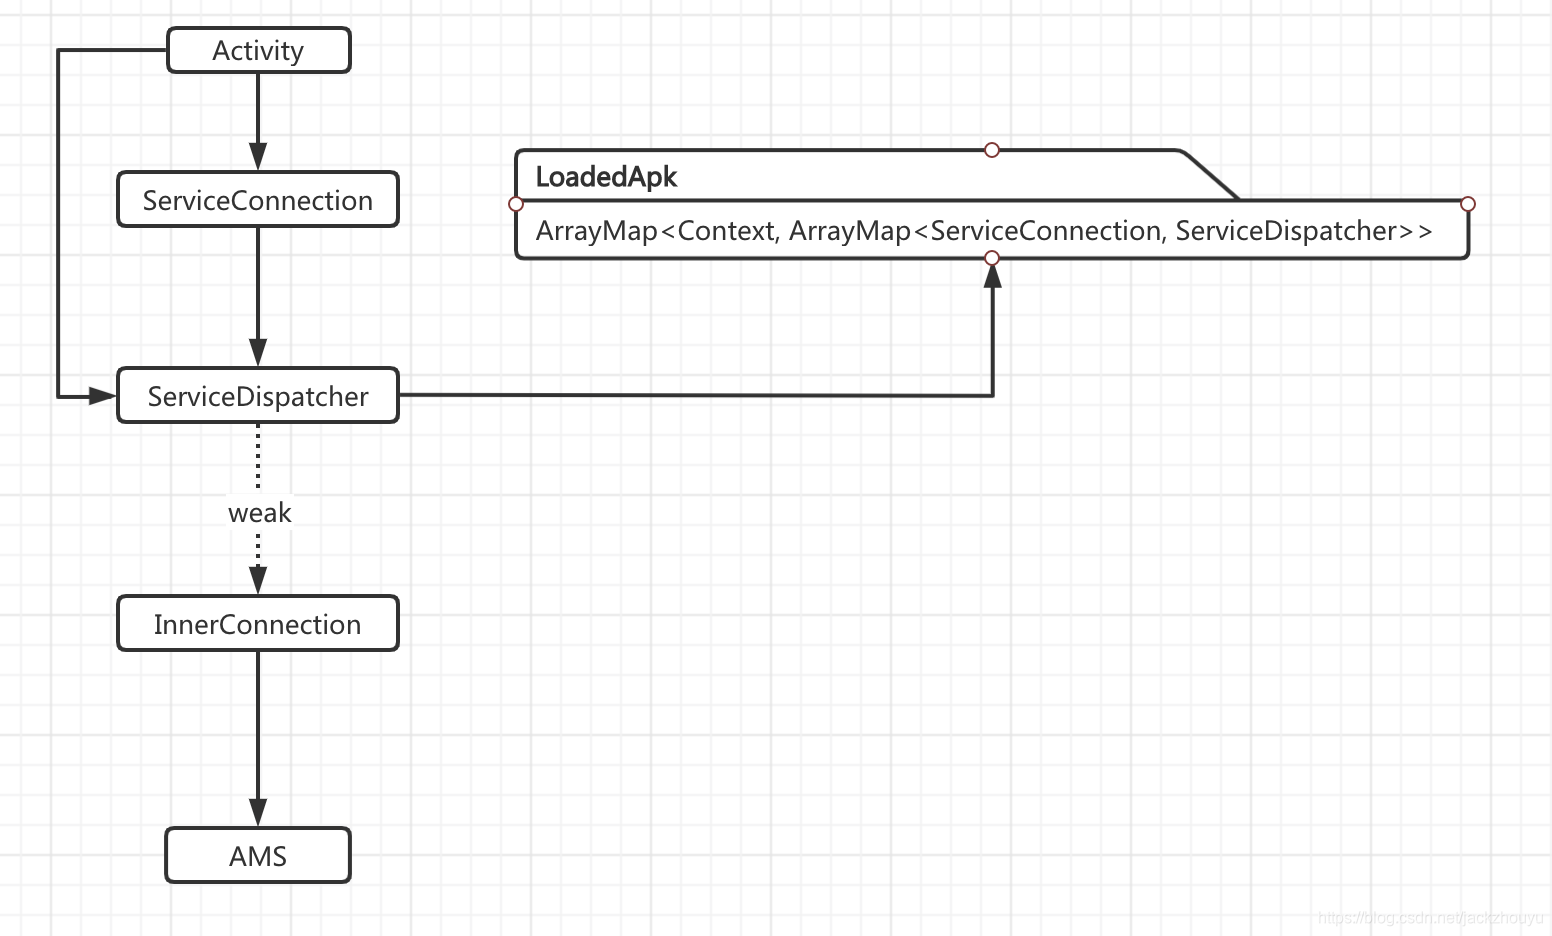
我们重点关注一下如何创建ServiceDispatcher这个类,进入LoadedApk去看看:
-------------------loadedApk----------------------------
public final IServiceConnection getServiceDispatcher(ServiceConnection c,
        Context context, Handler handler, int flags) {
    synchronized (mServices) {
        LoadedApk.ServiceDispatcher sd = null;
        map是LoadedApk的成员变量,根据key为context再获取一个ArrayMap,这个context就是Activity
        ArrayMap<ServiceConnection, LoadedApk.ServiceDispatcher> map = mServices.get(context);
        if (map != null) {
            if (DEBUG) Slog.d(TAG, "Returning existing dispatcher " + sd + " for conn " + c);
            sd = map.get(c);
        }
        如果为空
        if (sd == null) {
        	创建一个ServiceDispatcher
            sd = new ServiceDispatcher(c, context, handler, flags);
            if (DEBUG) Slog.d(TAG, "Creating new dispatcher " + sd + " for conn " + c);
            if (map == null) {
                map = new ArrayMap<>();
                创建成功后添加进到LoadedApk的成员Services去
                mServices.put(context, map);
            }
            map.put(c, sd);
            不为空,就要验证这个context了
        } else {
            sd.validate(context, handler);
        }
        return sd.getIServiceConnection();
    }
}
上面重点关注一下mService的类型,它的key是Context,value是ArrayMap<ServiceConnection, LoadedApk.ServiceDispatcher>类型;传入的的ContextImpl的outContext,也就是Activity,因为在Activity的LUNCH事件中,会将activity设置到ContextImpl中去;所以value就是该activity下对应的所有binderService产生的东西;进入ServiceDispatcher:
-----------------ServiceDispatcher----------------------
ServiceDispatcher(ServiceConnection conn,
                Context context, Handler activityThread, int flags) {
      保存InnerConnection为mIServiceConnection
	 mIServiceConnection = new InnerConnection(this);
	 mConnection = conn;
	 mContext = context; 保存context
	 mActivityThread = activityThread;
	 mLocation = new ServiceConnectionLeaked(null);
	 mLocation.fillInStackTrace();
	 mFlags = flags;
}

-----------------InnerConnection----------------------
InnerConnection继承IServiceConnection.Stub,它是一个aidl接口,会注册到AMS上
private static class InnerConnection extends IServiceConnection.Stub {
    final WeakReference<LoadedApk.ServiceDispatcher> mDispatcher;

    InnerConnection(LoadedApk.ServiceDispatcher sd) {
    	弱引用存储Dispatcher
        mDispatcher = new WeakReference<LoadedApk.ServiceDispatcher>(sd);
    }
	AMS找到service后,会回调connect方法
    public void connected(ComponentName name, IBinder service, boolean dead)
            throws RemoteException {
        通过弱引用会调用Dispatcher的connected方法
        LoadedApk.ServiceDispatcher sd = mDispatcher.get();
        if (sd != null) {
            sd.connected(name, service, dead);
        }
    }
}


public void connected(ComponentName name, IBinder service, boolean dead) {
    if (mActivityThread != null) {
    这里通过handler机制post到主线程,在RunConnection中最终会走到doConnected
        mActivityThread.post(new RunConnection(name, service, 0, dead));
    } else {
        doConnected(name, service, dead);
    }
}

public void doConnected(ComponentName name, IBinder service, boolean dead) {
   ServiceDispatcher.ConnectionInfo old;
   ServiceDispatcher.ConnectionInfo info;

   synchronized (this) {
       if (mForgotten) {
           // We unbound before receiving the connection; ignore
           // any connection received.
           return;
       }
       如果已经存在一个服务了,并且旧服务的binder等于当前服务,就直接返回,不进行向下回调
       old = mActiveConnections.get(name);
       if (old != null && old.binder == service) {
           // Huh, already have this one.  Oh well!
           return;
       }
	   不为null说明绑定成功了
       if (service != null) {
           封装为ConnectInfo类
           info = new ConnectionInfo();
           info.binder = service;
           info.deathMonitor = new DeathMonitor(name, service);
           try {
               service.linkToDeath(info.deathMonitor, 0);
               并把添加到mActiveConnections,这个成员用于保存远端binder接口
               mActiveConnections.put(name, info);
           } catch (RemoteException e) {
               // This service was dead before we got it...  just
               // don't do anything with it.
               mActiveConnections.remove(name);
               return;
           }
       } else {
           // The named service is being disconnected... clean up.
           mActiveConnections.remove(name);
       }

       if (old != null) {
           old.binder.unlinkToDeath(old.deathMonitor, 0);
       }
   }
   如果还存在老的,先断开
   if (old != null) {
       mConnection.onServiceDisconnected(name);
   }
   if (dead) {
       mConnection.onBindingDied(name);
   }
   执行回调到应用方法
   if (service != null) {
       mConnection.onServiceConnected(name, service);
   }
}
到这里,流程就走完了!总结一个引用持有图:
其实这个和广播分发也很像,参考我另一篇你遗漏的Android广播知识点,广播、服务都交于ContextImpl处理,最后由LoadedApk存储管理,其内部类ServiceDispatcher、ReceiverDispatcher处理回调逻辑,设置IServiceConnection和IReceiveConnect回调接口到AMS,成功后再回调回来执行Dispatcher,在回调activity;逻辑大同小异!如果你不进行unbindService,仍然会有内存泄漏,activity始终被LoadedApk所持有

 浙公网安备 33010602011771号