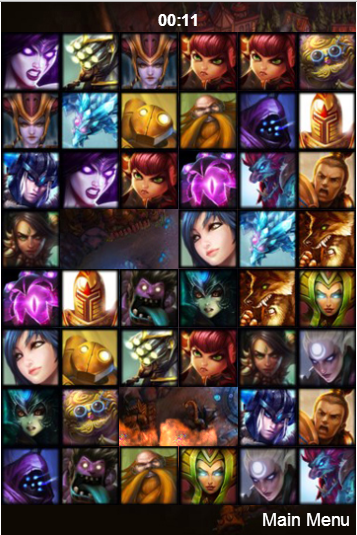
用cocos2d-html5做的消除类游戏《英雄爱消除》(3)——游戏主界面
游戏主界面,同时也是主程序,包括sprite的生成加入以及游戏状态的控制。

下面同样贴下源码再讲解;
/**
 * Power by  html5中文网(html5china.com)
 * author: jackyWHJ
 */
var STATE_PLAYING = 0;
var STATE_GAMEOVER = 1;

var g_sharedGameLayer;

var GameLayer = cc.Layer.extend({
    _time:0,
    _timeLabel:null,
    _timeString:"",

    screenRect:null,
    _state:STATE_PLAYING,
    _explosions:null,
    _texOpaqueBatch:null,
    _blocks:[],
    _heroFrameCache:null,
    init:function () {
        var bRet = false;
        if (this._super()) {
            cc.SpriteFrameCache.getInstance().addSpriteFrames(s_textureOpaquePack_plist);
            this._heroFrameCache = cc.SpriteFrameCache.getInstance();
            this._heroFrameCache.addSpriteFrames(s_textureNormalImage_plist);
            cc.SpriteFrameCache.getInstance().addSpriteFrames(s_textureLoveImage_plist);
            // reset global values
            LLK.map = [];//元素表,Block数组
            this._state = STATE_PLAYING;

            // OpaqueBatch
            var texOpaque = cc.TextureCache.getInstance().addImage(s_textureOpaquePack);
            this._texOpaqueBatch = cc.SpriteBatchNode.createWithTexture(texOpaque);
            this._texOpaqueBatch.setBlendFunc(gl.SRC_ALPHA, gl.ONE);
            this.addChild(this._texOpaqueBatch);

            var winSize = cc.Director.getInstance().getWinSize();
//            this._wayManager = new WayManager(this);
            this.screenRect = cc.rect(0, 0, winSize.width, winSize.height + 10);

            // explosion batch node
            cc.SpriteFrameCache.getInstance().addSpriteFrames(s_explosion_plist);
            var explosionTexture = cc.TextureCache.getInstance().addImage(s_explosion);
            this._explosions = cc.SpriteBatchNode.createWithTexture(explosionTexture);
            this._explosions.setBlendFunc(gl.SRC_ALPHA, gl.ONE);
            this.addChild(this._explosions);
            Explosion.sharedExplosion();

            this.initBackground();
            this.initBlock();
            // accept touch now!

            this._timeLabel = cc.LabelTTF.create("00:00","Arial Bold",16);
            this._timeLabel.setPosition(180,520);
            this._timeLabel.setColor(cc.c3b(255,255,255));
            this.addChild(this._timeLabel,10);

            if( 'keyboard' in sys.capabilities )
                this.setKeyboardEnabled(true);

            if( 'mouse' in sys.capabilities )
                this.setMouseEnabled(true);

            if( 'touches' in sys.capabilities )
                this.setTouchEnabled(true);
            if (LLK.SOUND) {
//                cc.log(cc.AudioEngine.getInstance().isMusicPlaying());
                cc.AudioEngine.getInstance().playMusic(s_bgMusic_mp3,true);
            }
            // schedule
            this.scheduleUpdate();
            this.schedule(this.scoreCounter, 1);
            bRet = true;

            g_sharedGameLayer = this;
        }
        return bRet;
    },

    initBlock:function(){
        var mapIndex = 0,i = 0,j = 0;
        var imgLen =  LLK.CONTAINER.NORMALIMAGES.length;
        if(LLK.MODE){
            imgLen =  LLK.CONTAINER.NORMALIMAGES.length;
            for ( i = 0; i < LLK.LEVEL.x*LLK.LEVEL.y; i+=2) {
                this._blocks[i] = this._blocks[i + 1] = LLK.CONTAINER.NORMALIMAGES[Math.floor(Math.random() * imgLen)];
            }
        }
        else{
            imgLen =  LLK.CONTAINER.MENGIMAGES.length;
            for ( i = 0; i < LLK.LEVEL.x*LLK.LEVEL.y; i+=2) {
                this._blocks[i] = this._blocks[i + 1] = LLK.CONTAINER.MENGIMAGES[Math.floor(Math.random() * imgLen)];
            }
        }
        var imgName = "";
        for ( j=0; j < LLK.LEVEL.y; j++) {
            for ( i=0; i < LLK.LEVEL.x; i++) {
                imgName = this.randomArray(this._blocks);
                var temp = new Block(imgName);
                temp.pointX = i;
                temp.pointY = j;
                temp.name = imgName;
                temp.id = mapIndex;
                LLK.map[temp.id] = temp;
                temp.setAnchorPoint(cc.p(0, 0));
                temp.setPosition(i*60, j*60+30);
                this.addChild(temp);
                mapIndex ++;
            }
        }
        LLK.COUNT = mapIndex;
    },
    randomArray:function (arr){
        var index = Math.floor(Math.random()*arr.length);
        return arr.splice(index,1)[0];
    },

    scoreCounter:function () {
        if( this._state == STATE_PLAYING ) {
            this._time++;

            var minute = 0 | (this._time / 60);
            var second = this._time % 60;
            minute = minute > 9 ? minute : "0" + minute;
            second = second > 9 ? second : "0" + second;
            this._timeString = minute + ":" + second;
            this._timeLabel.setString(this._timeString);
//            this._levelManager.loadLevelResource(this._time);
        }
    },

    initBackground:function () {
        // bg
        var bgImage = s_b03;
        if(Math.random() > 0.5){
            bgImage = s_b04;
        }
        this._backSky = cc.Sprite.create(bgImage);
        this._backSky.setAnchorPoint(cc.p(0, 0));
        this._backSkyHeight = this._backSky.getContentSize().height;
        this.addChild(this._backSky, -10);
    },
    onGameOver:function () {
        this._state = STATE_GAMEOVER;
        var scene = cc.Scene.create();
        scene.addChild(GameOver.create());
        cc.Director.getInstance().replaceScene(cc.TransitionFade.create(1.2, scene));
    }
});

GameLayer.create = function () {
    var sg = new GameLayer();
    if (sg && sg.init()) {
        return sg;
    }
    return null;
};

GameLayer.scene = function () {
    var scene = cc.Scene.create();
    var layer = GameLayer.create();
    scene.addChild(layer, 1);
    return scene;
};

GameLayer.prototype.addExplosions = function (explosion) {
    this._explosions.addChild(explosion);
};
GameLayer.prototype.addSpark = function (spark) {
    this._texOpaqueBatch.addChild(spark);
};
首先,我们同样是把该界面所需的纹理集添加进来
cc.SpriteFrameCache.getInstance().addSpriteFrames(s_textureOpaquePack_plist);
this._heroFrameCache = cc.SpriteFrameCache.getInstance();
this._heroFrameCache.addSpriteFrames(s_textureNormalImage_plist);
cc.SpriteFrameCache.getInstance().addSpriteFrames(s_textureLoveImage_plist);
这里因为我们这个游戏存在这2个模式,所以有2个纹理集,之后的程序中会根据当前选择的模式对应使用纹理集。
之后添加爆炸效果的纹理集,创建cc.SpriteBatchNode然后把它加入Layer。
       // explosion batch node
            cc.SpriteFrameCache.getInstance().addSpriteFrames(s_explosion_plist);
            var explosionTexture = cc.TextureCache.getInstance().addImage(s_explosion);
            this._explosions = cc.SpriteBatchNode.createWithTexture(explosionTexture);
            this._explosions.setBlendFunc(gl.SRC_ALPHA, gl.ONE);
            this.addChild(this._explosions);
            Explosion.sharedExplosion();
接下来便是初始化背景和Block,背景的我们在教程1有介绍这里就不再多说,说说initBlock方法吧
  initBlock:function(){
        var mapIndex = 0,i = 0,j = 0;
        var imgLen =  LLK.CONTAINER.NORMALIMAGES.length;
        if(LLK.MODE){
            imgLen =  LLK.CONTAINER.NORMALIMAGES.length;
            for ( i = 0; i < LLK.LEVEL.x*LLK.LEVEL.y; i+=2) {
                this._blocks[i] = this._blocks[i + 1] = LLK.CONTAINER.NORMALIMAGES[Math.floor(Math.random() * imgLen)];
            }
        }
        else{
            imgLen =  LLK.CONTAINER.MENGIMAGES.length;
            for ( i = 0; i < LLK.LEVEL.x*LLK.LEVEL.y; i+=2) {
                this._blocks[i] = this._blocks[i + 1] = LLK.CONTAINER.MENGIMAGES[Math.floor(Math.random() * imgLen)];
            }
        }
        var imgName = "";
        for ( j=0; j < LLK.LEVEL.y; j++) {
            for ( i=0; i < LLK.LEVEL.x; i++) {
                imgName = this.randomArray(this._blocks);
                var temp = new Block(imgName);
                temp.pointX = i;
                temp.pointY = j;
                temp.id = mapIndex;
                LLK.map[temp.id] = temp;
                temp.setAnchorPoint(cc.p(0, 0));
                temp.setPosition(i*60, j*60+30);
                this.addChild(temp);
                mapIndex ++;
            }
        }
        LLK.COUNT = mapIndex;
    },
在该方法中,我们根据当前选择的模式随机生成this._blocks数组,记住这里的block是成对出现的。之后我们根据我们的界面的XY层数从我们的this._blocks数组中随机取出元素,取出的元素作为参数初始化Block然后把它添加到Layer中,在生成Block的时候我们要注意给Block的坐标pointX 、pointY赋值,并且使用我们的map数组缓存Block数组,供之后的Block移动查找移动位置的Block使用,最后,我们不要忘记给我们的Block计数附上值。
之后在构造方法里我们做了这样一件事,把时间显示label添加到Layer
this._timeLabel = cc.LabelTTF.create("00:00","Arial Bold",16);
this._timeLabel.setPosition(180,520);
this._timeLabel.setColor(cc.c3b(255,255,255));
this.addChild(this._timeLabel,10);
接下来就是我们的时间统计了this.schedule(this.scoreCounter, 1);这里每隔一秒调用一下scoreCounter方法,我们来看看这个方法
  scoreCounter:function () {
        if( this._state == STATE_PLAYING ) {
            this._time++;

            var minute = 0 | (this._time / 60);
            var second = this._time % 60;
            minute = minute > 9 ? minute : "0" + minute;
            second = second > 9 ? second : "0" + second;
            this._timeString = minute + ":" + second;
            this._timeLabel.setString(this._timeString);
//            this._levelManager.loadLevelResource(this._time);
        }
    },
当游戏还在运行状态,时间计数每次加1然后转化成相应的时间显示形式之后修改时间显示label的内容。
之后,我们还有一个游戏结束的调用方法
  onGameOver:function () {
        this._state = STATE_GAMEOVER;
        var scene = cc.Scene.create();
        scene.addChild(GameOver.create());
        cc.Director.getInstance().replaceScene(cc.TransitionFade.create(1.2, scene));
    }
它做的是修改游戏的状态并且切换游戏场景。
下面是几个主要功能的教程
用cocos2d-html5做的消除类游戏《英雄爱消除》——概述
用cocos2d-html5做的消除类游戏《英雄爱消除》(1)——系统主菜单
用cocos2d-html5做的消除类游戏《英雄爱消除》(2)——Block设计实现
用cocos2d-html5做的消除类游戏《英雄爱消除》(3)——游戏主界面
用cocos2d-html5做的消除类游戏《英雄爱消除》(4)——游戏结束
ps:概述中有完整的源码链接


 浙公网安备 33010602011771号