Y73第三周作业
Y73第三周
云原生
各组件的功能
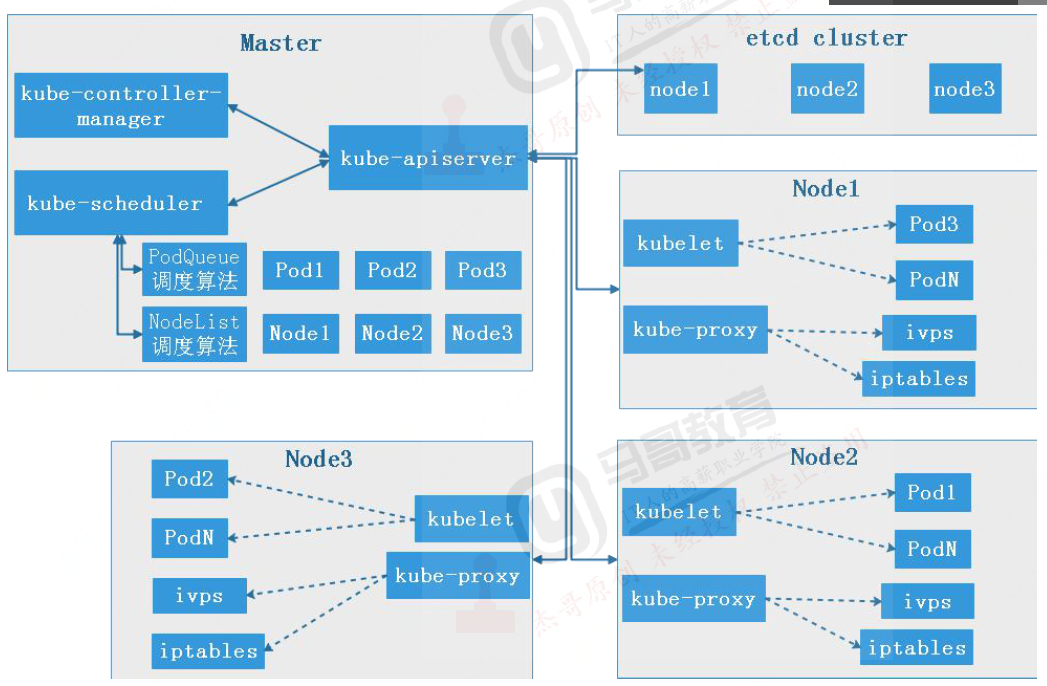
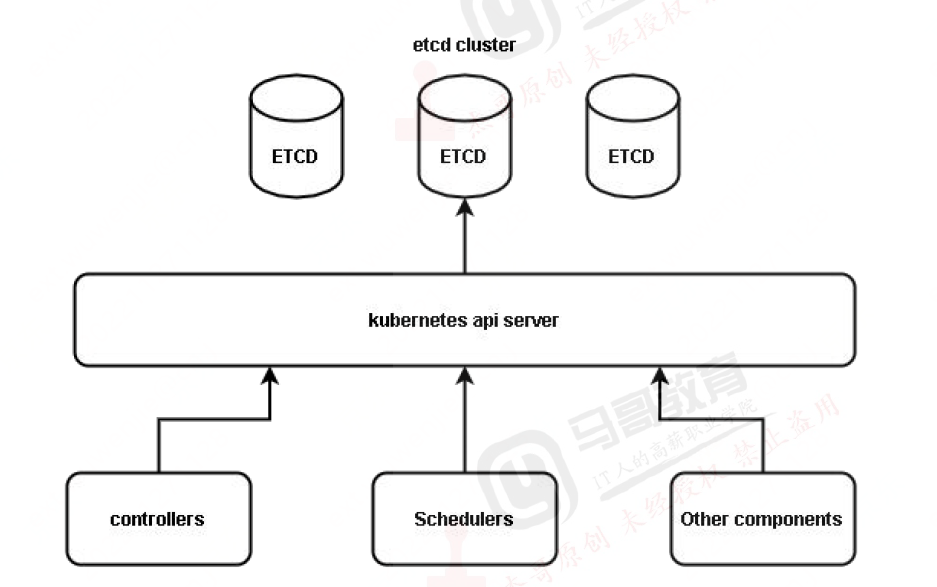
逻辑架构

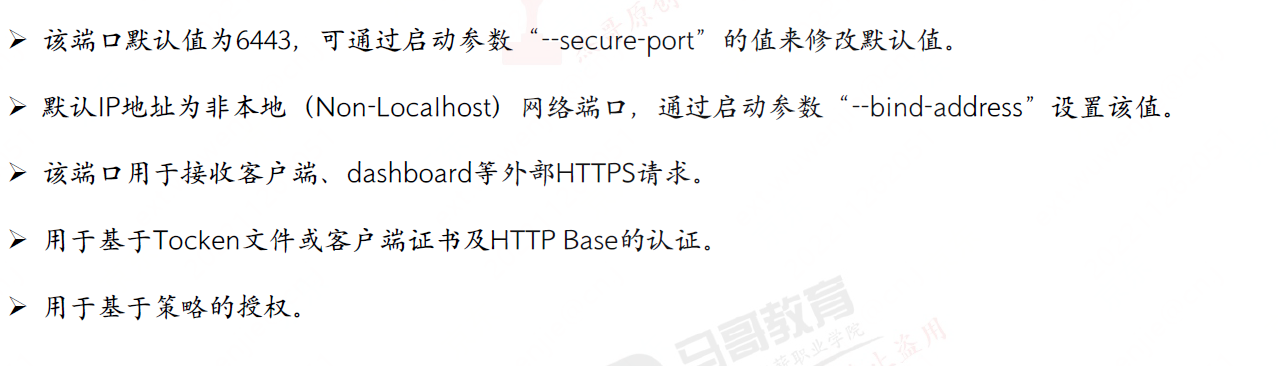
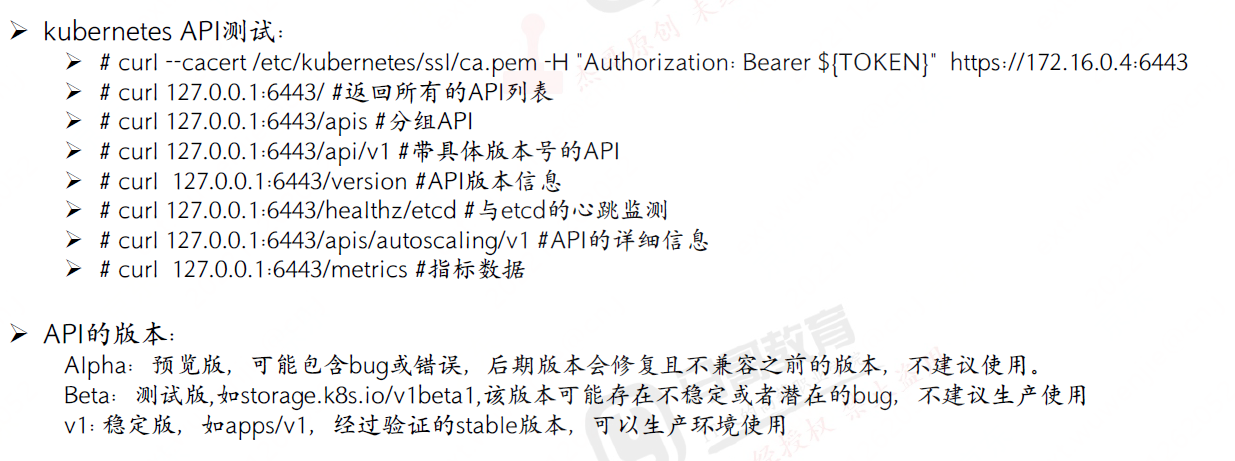
apiserver
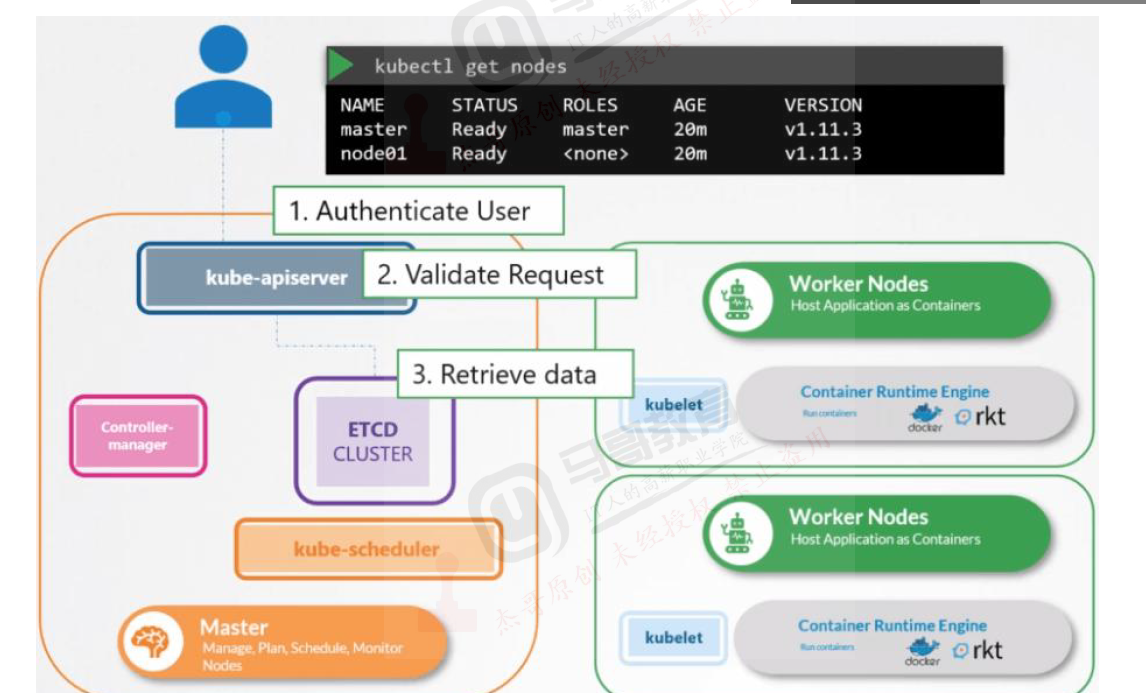
用于鉴权、准入的入口。是k8s的准入服务接口,提供权限认证和准入,用于k8s内资源的增删改查及watch等HTTP Rest接口,这些对象包括pods,services,replicationcontrollers等。是其他组件的交互接口,同时只有apiserver才能与etcd通信。
kubernetes 管理认证流程
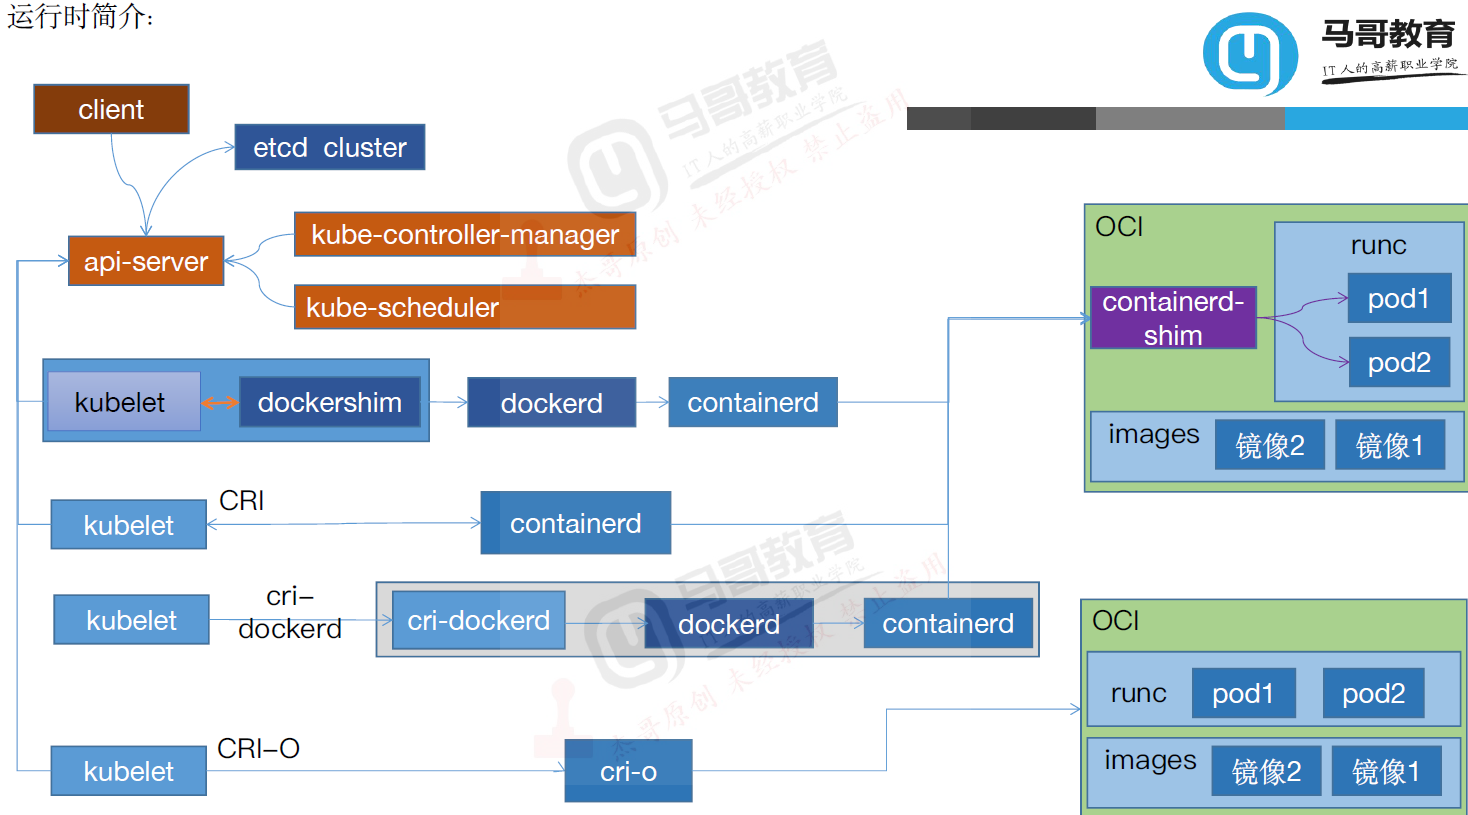
运行时runc
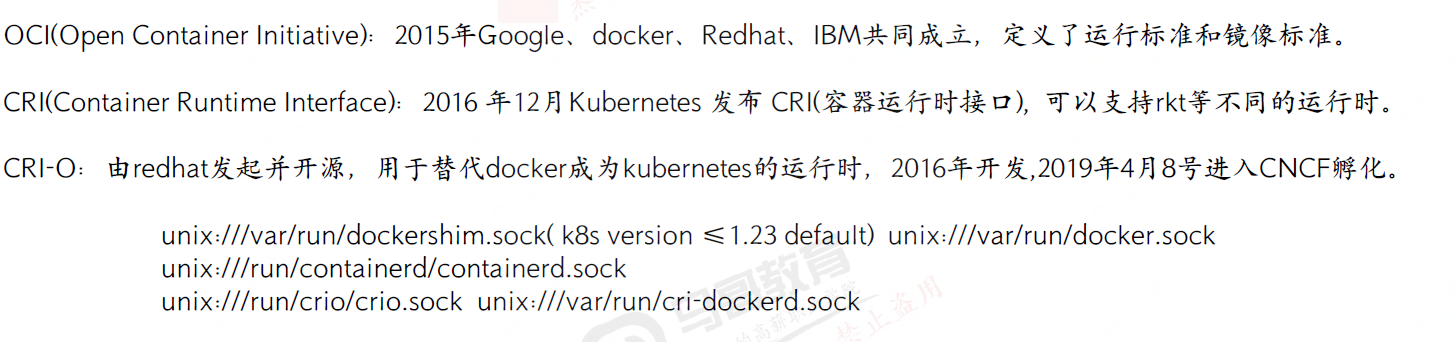
1.23前 docker,kubelet -- dockershim -- dockerd -- containerd
1.24 containerd,cri-docker
kubelet -- containerd
kubelet -- cri-dockerd -- dockerd -- containerd
CRI-O 是redhat推进的一种运行时模式
kube-scheduler
kubernetes调度器是一个控制面进程,负责将pods指派到节点上,称为bing
通过调度算法为待调度Pod列表的每个Pod从可用Node列表中选择一个最适的Node,并将信息写入到etcd中。
node节点上的kubelet通过APl Server监听到kubernetes Scheduler产生的Pod绑定信息,然后获取对应的Pod清单,下载lmage,并启动容器。
策略:
LeastRequestedPriority
优先从备选节点列表中选择资源消耗最小的节点(CPU+内存)。
CalculateNodeLabelPriority
优先选择含有指定Label的节点。
BalancedResourceAllocation
优先从备选节点列表中选择各项资源使用率最均衡的节点。
资源调度步骤
第一步 创建pod,
第二步,过滤掉资源不足的节点,Filter Nodes 过滤 ,不符合调度的node先过滤掉
第三步 ,在剩余可用的节点进行删选,Rank Nodes 打分
pod调度是逐个调度,符合的node保留,然后进行rank nodes打分
调度过程演示

api-server获取到创建pods请求进行一系统鉴权,请求,返回数据操作后将相关信息先写入etcd,kube-scheduler一直watch着apiserver的变化,发现有pods调度任务后,执行调度算法将相关pods调度到nodes节点,然后再将相关调度节点通过apiserver写入到etcd中,kubelet在nodes继续执行pod创建任务。
kube-controller-manager
kube-controler-manager:Controller Manager还句括一些子控制器(副本控制器、节点控制器、命名空间控制器和服务账号控制器等),控制器作为集群内部的管理控制中心,负责集群内的 Node、Pod副本、服务端点
(Endpoint)、命名空间(Namespace)、服务账号(ServiceAccount), 资源定额(ResourceQuota)的管理。
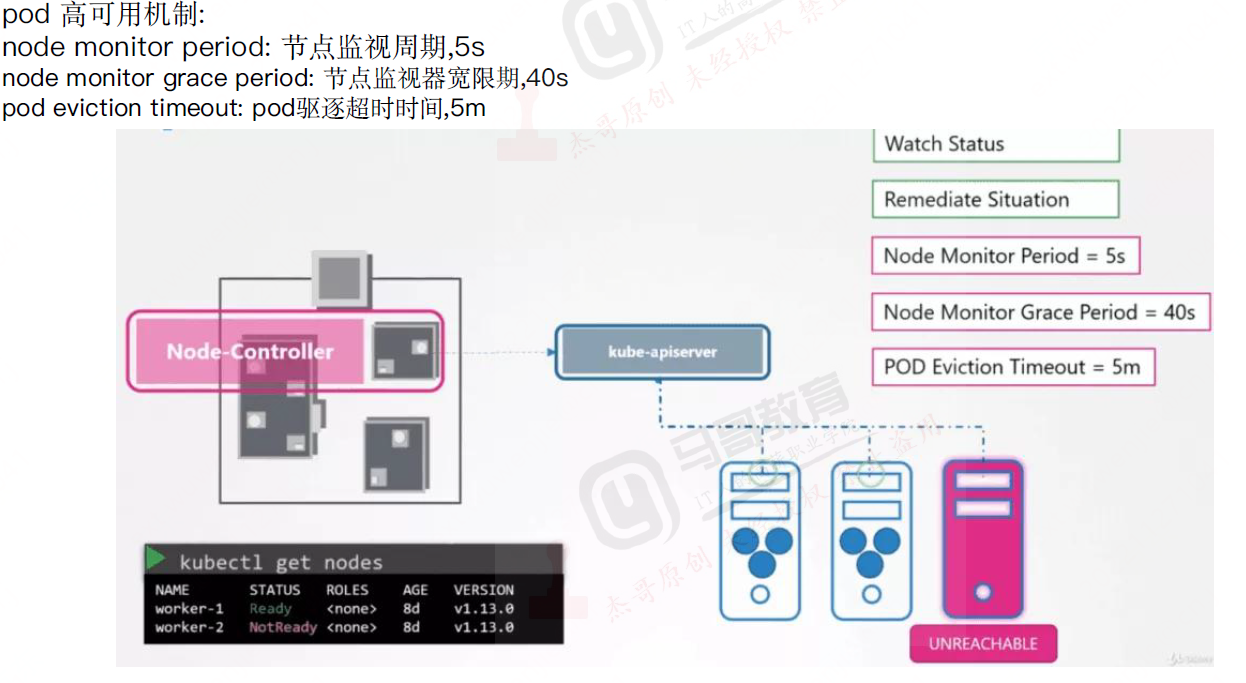
当某个Node意外宕机时,Controller Manager会及时发现并执行自动化修复流程,确保集群中的pod副本始终处于预期的工作状态。
controller-manager控制器每间隔5秒检查一次节点的状态。
如果controller-manager控制器没有收到自节点的心跳,则将该node节点被标记为不可达。 controller-manager将在标记为无法访问之前等待40秒。
如果该node节点被标记为无法访问后5分钟还没有恢复,controller-manage er会删除当前node节点的所有pod并在其它可用节点重建这些pod。
检查策略
5秒 等待 40秒 标记无法访问 5分钟没有恢复,在别的节点触发重建
controller返回信息给--apiserver--分配scheduler--最终由kubelet创建
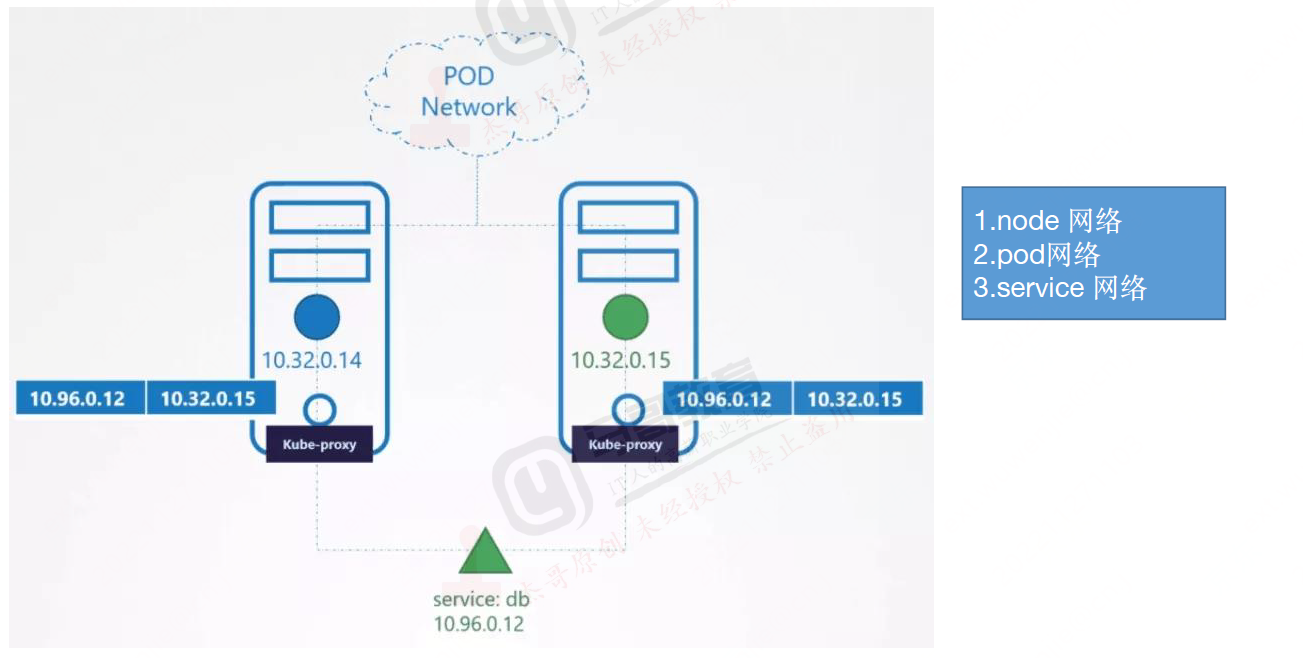
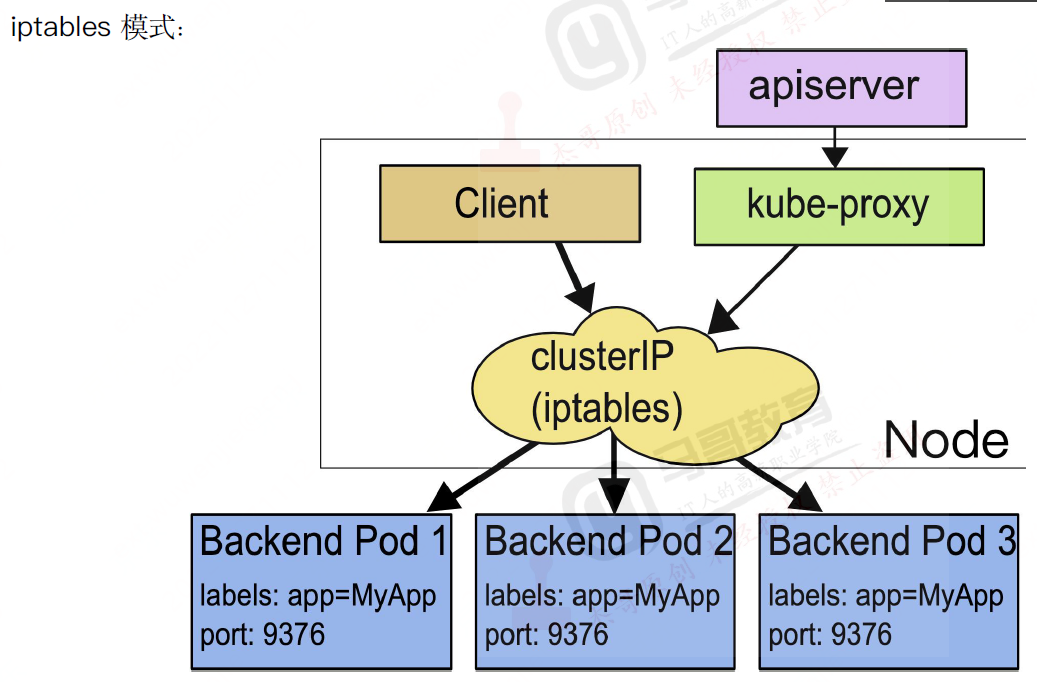
kube-proxy
管理当前节点上的iptables和ipvs规则

iptables 超过5000,会有性能问题,有大量转发规则
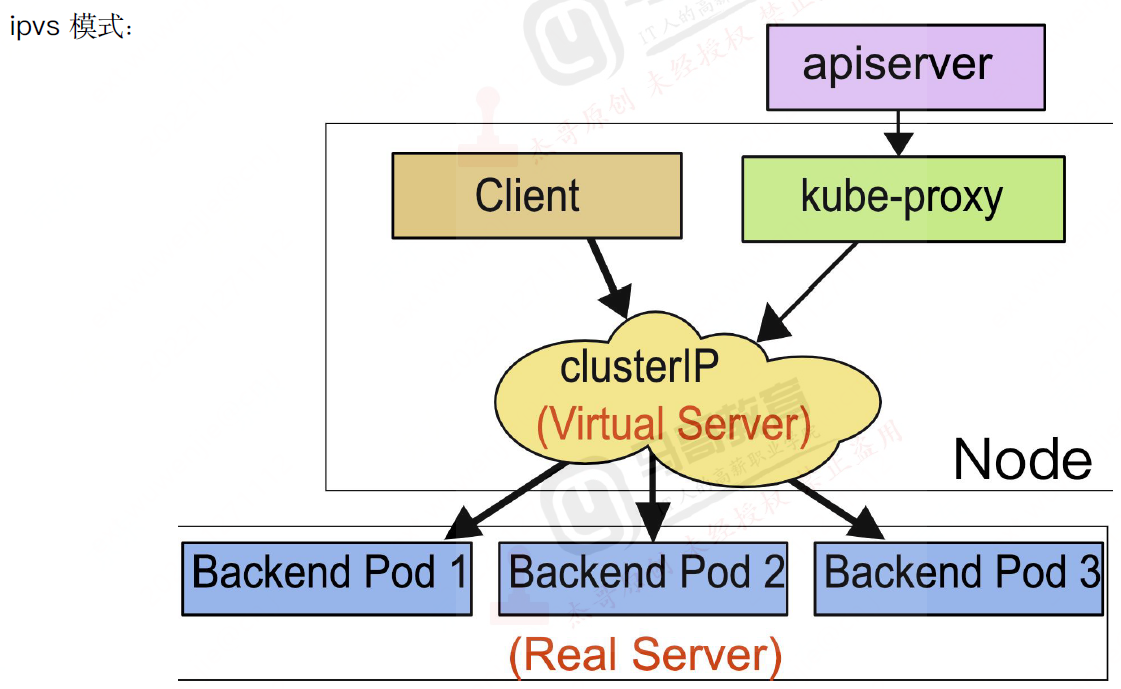
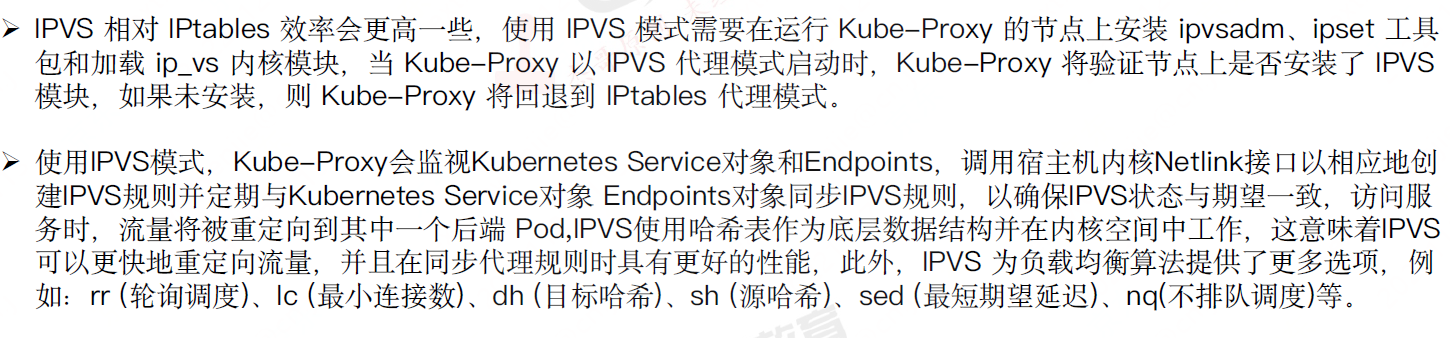
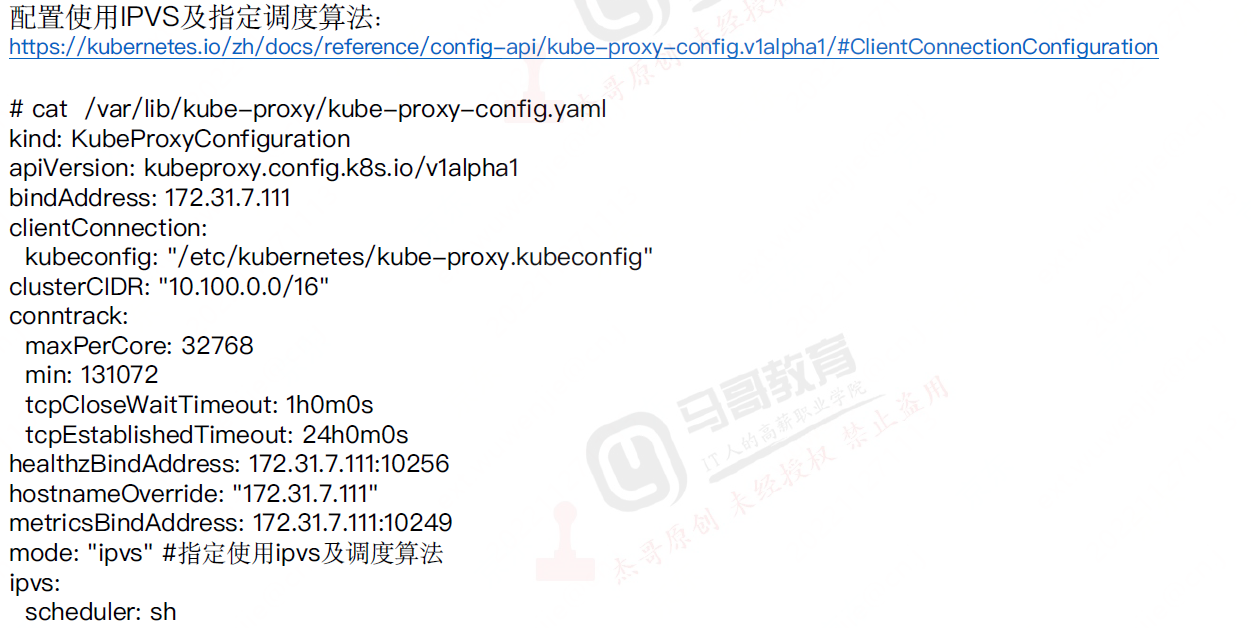
ipvs
查看当前使用哪种ipvs规则
ipvsadm -Ln
kubelet
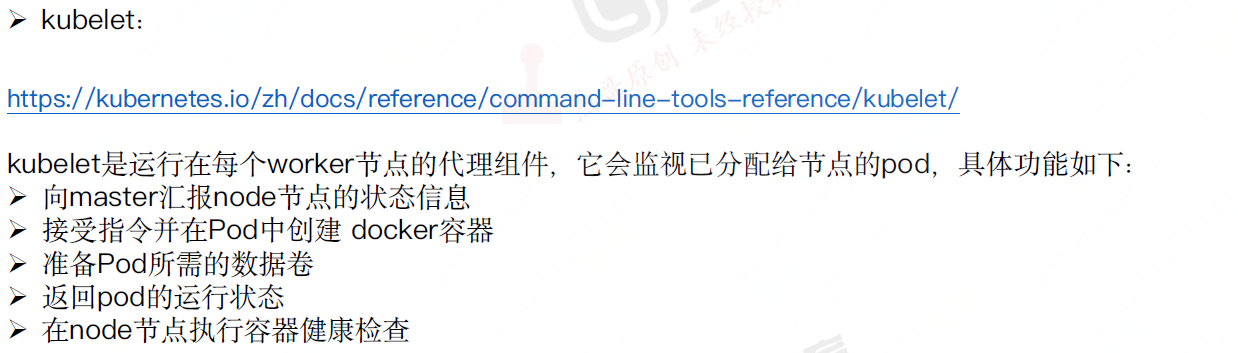
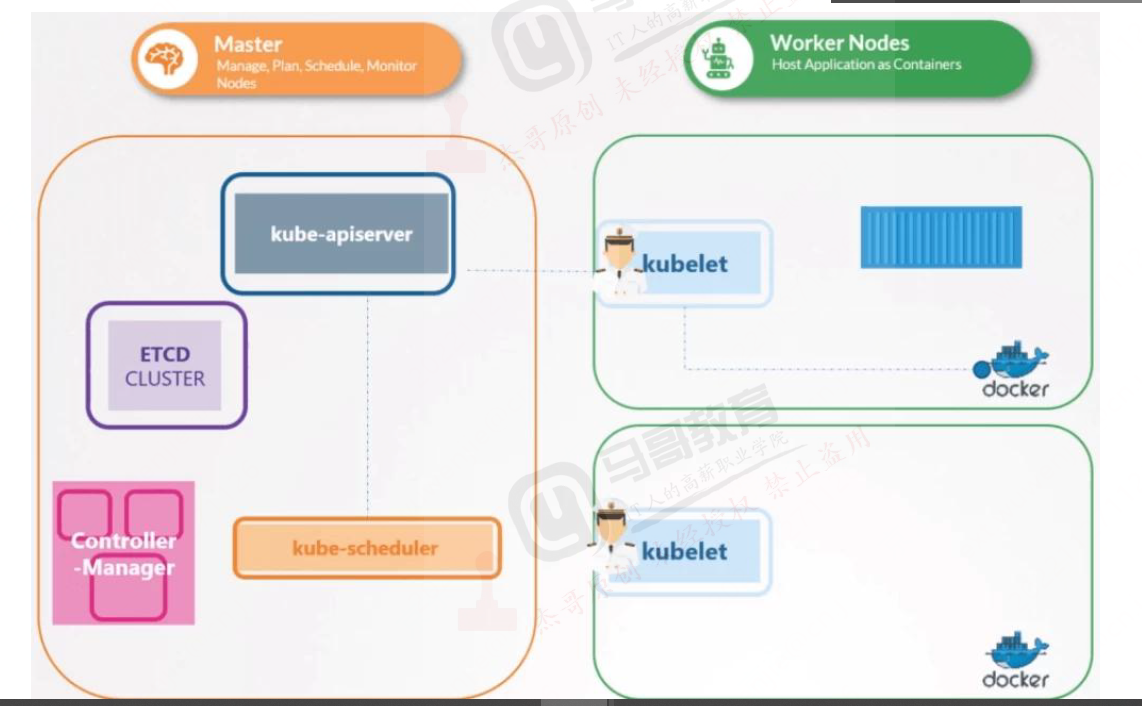
接受apiserver的pod创建,
1.接受apiserver的pod创建。调用运行时(docker、containerd)
2.对pod进行周期健康状态检查
3.给apiserver反馈pod状态
4.给apiserver反馈node状态
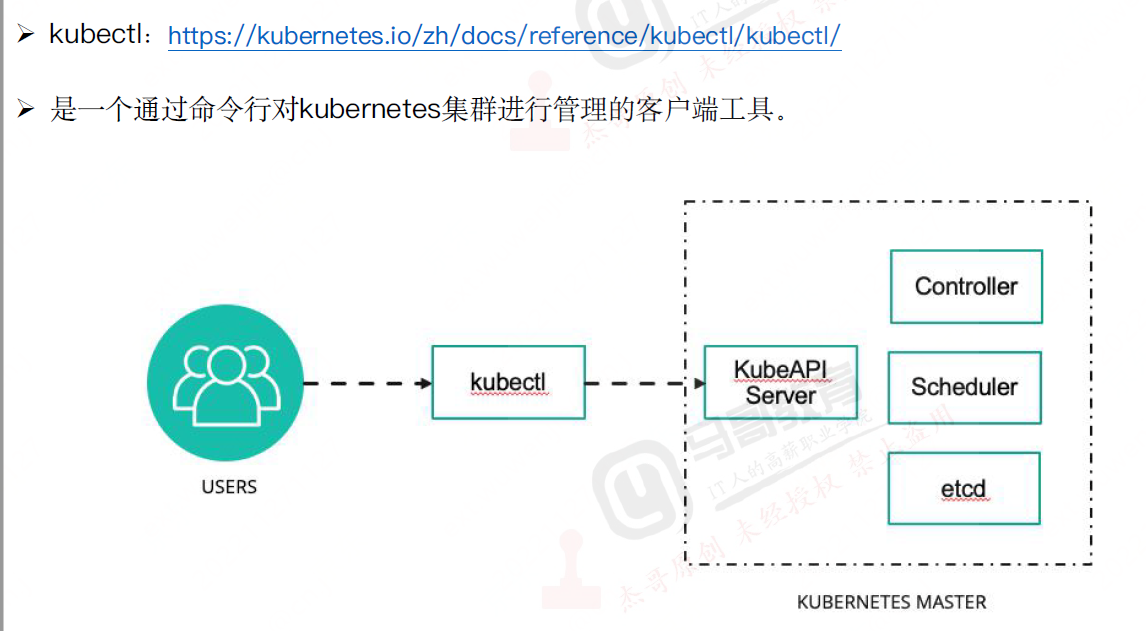
kubectl
ETCD
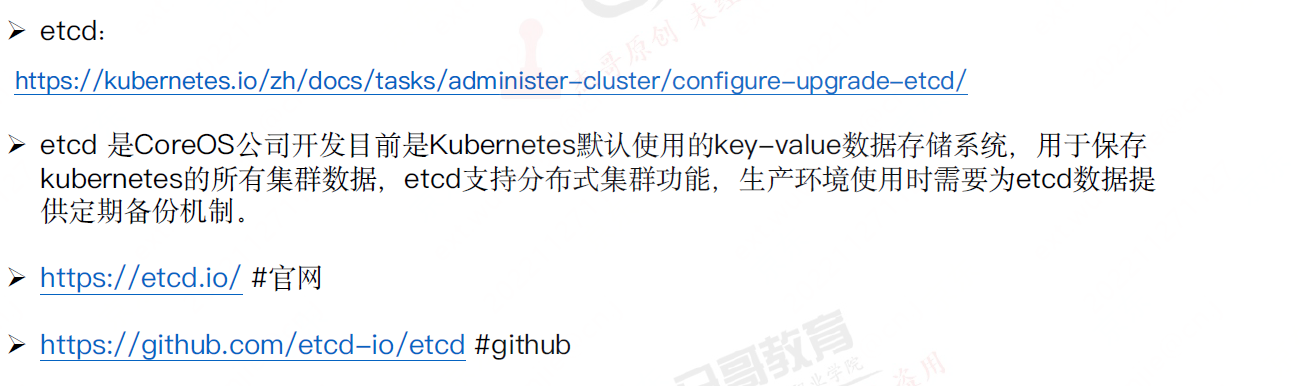
保持数据一置性,只有apiserver可以访问etcd
coredns

dashbord
安装containerd
apt安装containerd
验证安装版本
apt-cache madison containerd

安装containerd
apt install containerd
查看services文件
root@VM-4-8-ubuntu:~# cat /lib/systemd/system/containerd.service
# Copyright The containerd Authors.
#
# Licensed under the Apache License, Version 2.0 (the "License");
# you may not use this file except in compliance with the License.
# You may obtain a copy of the License at
#
#     http://www.apache.org/licenses/LICENSE-2.0
#
# Unless required by applicable law or agreed to in writing, software
# distributed under the License is distributed on an "AS IS" BASIS,
# WITHOUT WARRANTIES OR CONDITIONS OF ANY KIND, either express or implied.
# See the License for the specific language governing permissions and
# limitations under the License.

[Unit]
Description=containerd container runtime
Documentation=https://containerd.io
After=network.target local-fs.target

[Service]
ExecStartPre=-/sbin/modprobe overlay
ExecStart=/usr/bin/containerd

Type=notify
Delegate=yes
KillMode=process
Restart=always
RestartSec=5
# Having non-zero Limit*s causes performance problems due to accounting overhead
# in the kernel. We recommend using cgroups to do container-local accounting.
LimitNPROC=infinity
LimitCORE=infinity
LimitNOFILE=infinity
# Comment TasksMax if your systemd version does not supports it.
# Only systemd 226 and above support this version.
TasksMax=infinity
OOMScoreAdjust=-999

[Install]
WantedBy=multi-user.target
验证runc环境
root@VM-4-8-ubuntu:~# whereis runc
runc: /usr/sbin/runc /usr/share/man/man8/runc.8.gz
root@VM-4-8-ubuntu:~# whereis containerd
containerd: /usr/bin/containerd /usr/share/man/man8/containerd.8.gz
root@VM-4-8-ubuntu:~# runc -v
runc version 1.1.0-0ubuntu1~20.04.2
spec: 1.0.2-dev
go: go1.16.2
libseccomp: 2.5.1
root@VM-4-8-ubuntu:~# containerd -v
containerd github.com/containerd/containerd 1.5.9-0ubuntu1~20.04.5
添加镜像加速
mkdir /etc/containerd/
containerd config default > /etc/containerd/config.toml
vim /etc/containerd/config.toml
      [plugins."io.containerd.grpc.v1.cri".registry.mirrors]
#在这行下面增加
        [plugins."io.containerd.grpc.v1.cri".registry.mirrors."docker.io"]
          endpoint = ["https://https://2h85dbbg.mirror.aliyuncs.com"]
systemctl restart containerd
systemctl enable containerd
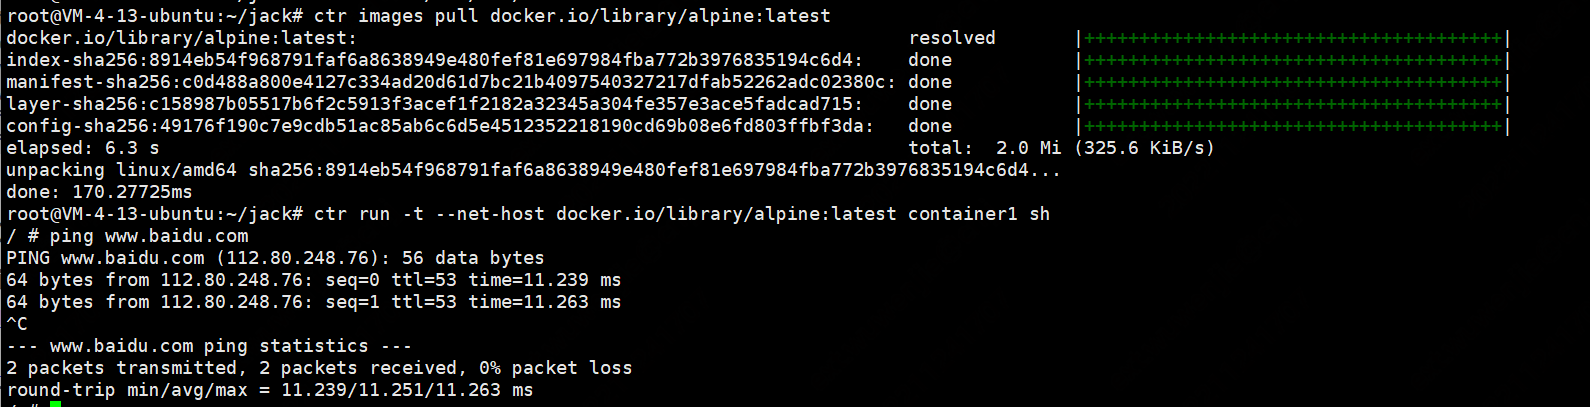
下载镜像
ctr images pull docker.io/library/alpine:latest
与docker不同,下载镜像要使用全路径url

containerd相比docker多了一个命名空间的逻辑概念,ctr命令默认是在default命名空间里,当使用crictl命令的时候,都是在k8s.io这个命名空间里
验证镜像
#ctr -n k8s.io images ls #指定namespaces
ctr images ls

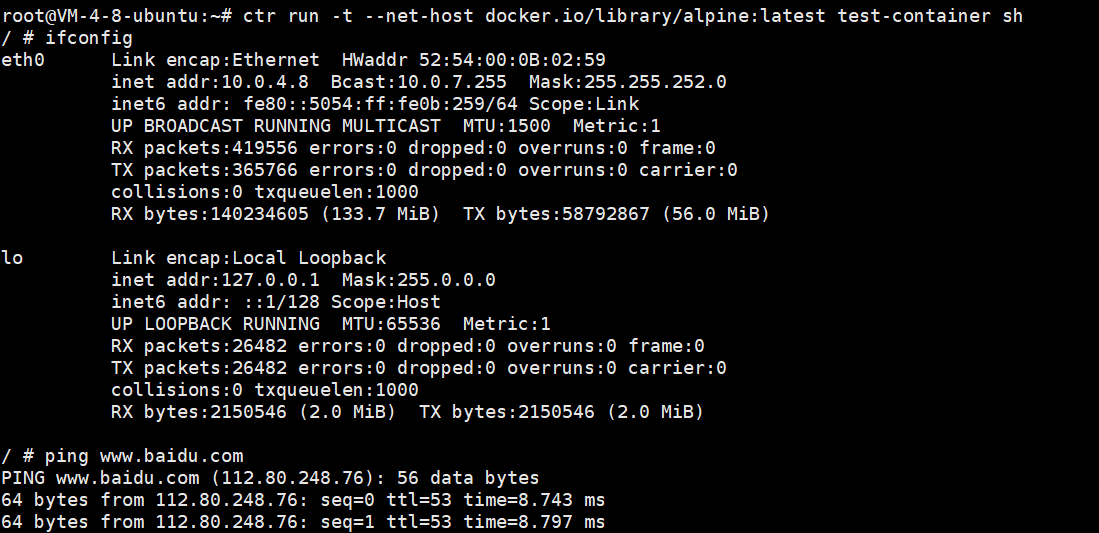
ctr客户端创建测试容器
ctr run -t --net-host docker.io/library/alpine:latest test-container sh
二进制安装containerd
下载地址https://github.com/containerd/containerd
tar xvf containerd-1.6.10-linux-amd64.tar.gz
cp bin/* /usr/bin/
创建配置文件containerd.service
vim  /lib/systemd/system/containerd.service
# Copyright The containerd Authors.
#
# Licensed under the Apache License, Version 2.0 (the "License");
# you may not use this file except in compliance with the License.
# You may obtain a copy of the License at
#
#     http://www.apache.org/licenses/LICENSE-2.0
#
# Unless required by applicable law or agreed to in writing, software
# distributed under the License is distributed on an "AS IS" BASIS,
# WITHOUT WARRANTIES OR CONDITIONS OF ANY KIND, either express or implied.
# See the License for the specific language governing permissions and
# limitations under the License.

[Unit]
Description=containerd container runtime
Documentation=https://containerd.io
After=network.target local-fs.target

[Service]
ExecStartPre=-/sbin/modprobe overlay
ExecStart=/usr/bin/containerd

Type=notify
Delegate=yes
KillMode=process
Restart=always
RestartSec=5
# Having non-zero Limit*s causes performance problems due to accounting overhead
# in the kernel. We recommend using cgroups to do container-local accounting.
LimitNPROC=infinity
LimitCORE=infinity
LimitNOFILE=infinity
# Comment TasksMax if your systemd version does not supports it.
# Only systemd 226 and above support this version.
TasksMax=infinity
OOMScoreAdjust=-999

[Install]
WantedBy=multi-user.target
配置文件
mkdir /etc/containerd/
containerd config default > /etc/containerd/config.toml
vim /etc/containerd/config.toml
      [plugins."io.containerd.grpc.v1.cri".registry.mirrors]
#在这行下面增加
        [plugins."io.containerd.grpc.v1.cri".registry.mirrors."docker.io"]
          endpoint = ["https://https://2h85dbbg.mirror.aliyuncs.com"]
systemctl restart containerd
systemctl enable containerd
部署runc
https://github.com/opencontainers/runc/releases
wget https://github.com/opencontainers/runc/releases/download/v1.1.4/runc.amd64
cp runc.amd64 /usr/bin/runc
chmod a+x /usr/bin/runc
下载镜像并运行容器
nerdctl--推荐使用
https://github.com/containerd/nerdctl
安装nerdctl
https://github.com/containerd/nerdctl/releases/download/v1.0.0/nerdctl-1.0.0-linux-amd64.tar.gz
tar xvf nerdctl-1.0.0-linux-amd64.tar.gz
cp nerdctl /usr/bin/
安装cni
wget https://github.com/containernetworking/plugins/releases/download/v1.1.1/cni-plugins-linux-amd64-v1.1.1.tgz
root@VM-4-13-ubuntu:~/jack# mkdir /opt/cni/bin -p
root@VM-4-13-ubuntu:~/jack# tar xvf cni-plugins-linux-amd64-v1.1.1.tgz -C /opt/cni/bin/
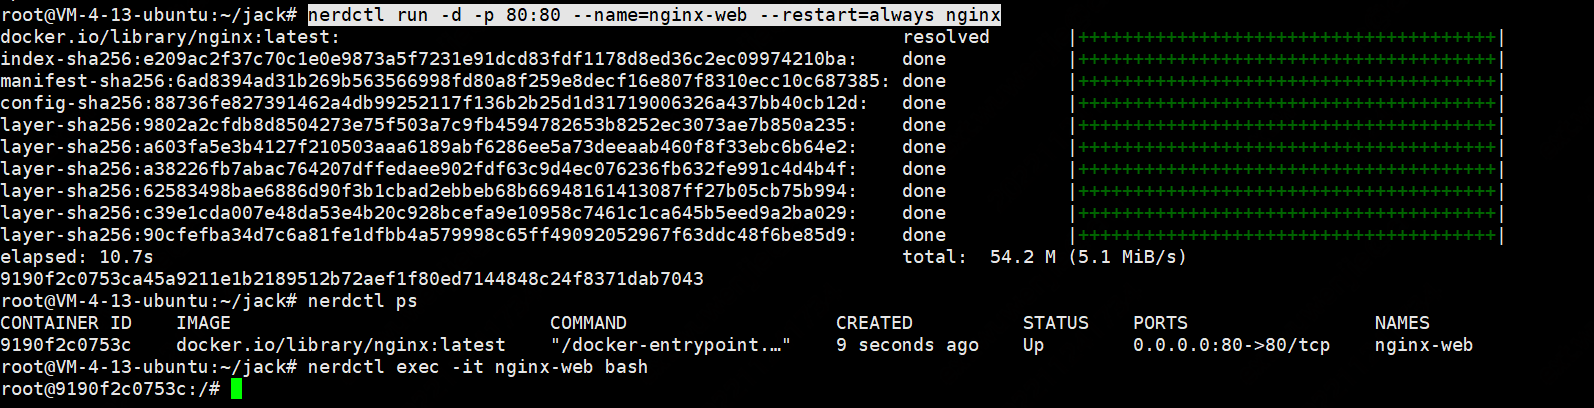
创建容器并指定端口
nerdctl run -d -p 80:80 --name=nginx-web --restart=always nginx
安装kubeadm-k8s
修改containerd的文件sandbox
sandbox_image = "registry.aliyuncs.com/google_containers/pause:3.5"
配置kubeadm源到阿里源
apt-get update && apt-get install -y apt-transport-https
curl https://mirrors.aliyun.com/kubernetes/apt/doc/apt-key.gpg | apt-key add -
cat <<EOF >/etc/apt/sources.list.d/kubernetes.list
deb https://mirrors.aliyun.com/kubernetes/apt/ kubernetes-xenial main
EOF
apt-get update
检查上面的包
apt-cache madison kubeadm
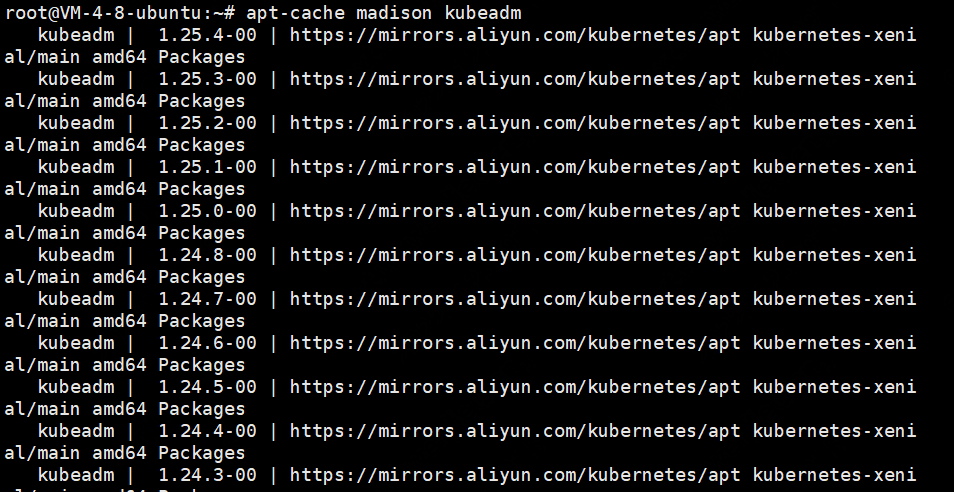
安装kubeadm-1.24.3-00
apt-get install kubeadm=1.24.3-00 kubectl=1.24.3-00 kubelet=1.24.3-00
列出kubeadm所需要的镜像
kubeadm config images list --kubernetes-version v1.24.3

由于k8s.grc.io国内无法访问,所以需要调整镜像源到阿里源下载
nerdctl pull registry.cn-hangzhou.aliyuncs.com/google_containers/kube-apiserver:v1.24.3
nerdctl pull registry.cn-hangzhou.aliyuncs.com/google_containers/kube-controller-manager:v1.24.3
nerdctl pull registry.cn-hangzhou.aliyuncs.com/google_containers/kube-scheduler:v1.24.3
nerdctl pull registry.cn-hangzhou.aliyuncs.com/google_containers/kube-proxy:v1.24.3
nerdctl pull registry.cn-hangzhou.aliyuncs.com/google_containers/pause:3.7
nerdctl pull registry.cn-hangzhou.aliyuncs.com/google_containers/etcd:3.5.3-0
nerdctl pull registry.cn-hangzhou.aliyuncs.com/google_containers/coredns:v1.8.6
内核参数修改
加载内核
modprobe br_netfilter
vim /etc/sysctl.conf
net.bridge.bridge-nf-call-iptables=1
net.ipv4.ip_forward=1
sysctl -p
kubeadm初始化
kubeadm init --apiserver-advertise-address=10.0.4.8 --apiserver-bind-port=6443 --kubernetes-version=v1.24.3 --pod-network-cidr=10.100.0.0/16 --service-cidr=10.200.0.0/16 --service-dns-domain=cluster.local --image-repository=registry.cn-hangzhou.aliyuncs.com/google_containers --ignore-preflight-errors=swap
Your Kubernetes control-plane has initialized successfully!

To start using your cluster, you need to run the following as a regular user:

  mkdir -p $HOME/.kube
  sudo cp -i /etc/kubernetes/admin.conf $HOME/.kube/config
  sudo chown $(id -u):$(id -g) $HOME/.kube/config

Alternatively, if you are the root user, you can run:

  export KUBECONFIG=/etc/kubernetes/admin.conf

You should now deploy a pod network to the cluster.
Run "kubectl apply -f [podnetwork].yaml" with one of the options listed at:
  https://kubernetes.io/docs/concepts/cluster-administration/addons/

Then you can join any number of worker nodes by running the following on each as root:

kubeadm join 10.0.4.8:6443 --token 65ipe6.zpxous5k398tq6j7 \
	--discovery-token-ca-cert-hash sha256:92b379a97e4e834bbd8d91d3a48a4bbc3102a72d2025a3ff4701f90daeda845a
如果kubeadm join中的tocken失效,可以使用
kubeadm token create --print-join-command
添加新的tocken
注意:需要将$HOME/.kube/config文件拷贝到node节点的同目录下
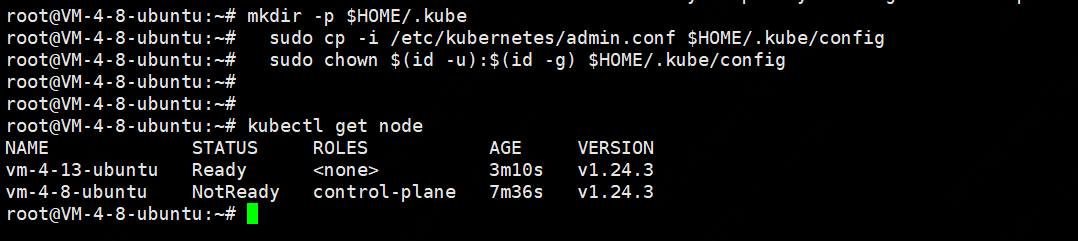
增加kubectl权限
mkdir -p $HOME/.kube
sudo cp -i /etc/kubernetes/admin.conf $HOME/.kube/config
sudo chown $(id -u):$(id -g) $HOME/.kube/config
安装calico网络插件
修改calico-ipip的yaml文件中pod值范围与自己的一直

如果calico组件无法正常工作还需要执行下面的操作
如出现下列报错
unable to connect to BIRDv4 socket: dial unix /var/run/bird/bird.ctl: connect: no such file or directory
增加如下配置
            - name: CLUSTER_TYPE
              value: "k8s,bgp"
              #在这个下面增加
            - name: IP_AUTODETECTION_METHOD
              value: "interface=eth0"
kubectl apply -f calico-ipip.yaml
在containderd中,所以k8s的镜像都在k8s.io这个namespaces中,通过下命令查看
nerdctl -n k8s.io images
完成后效果如下

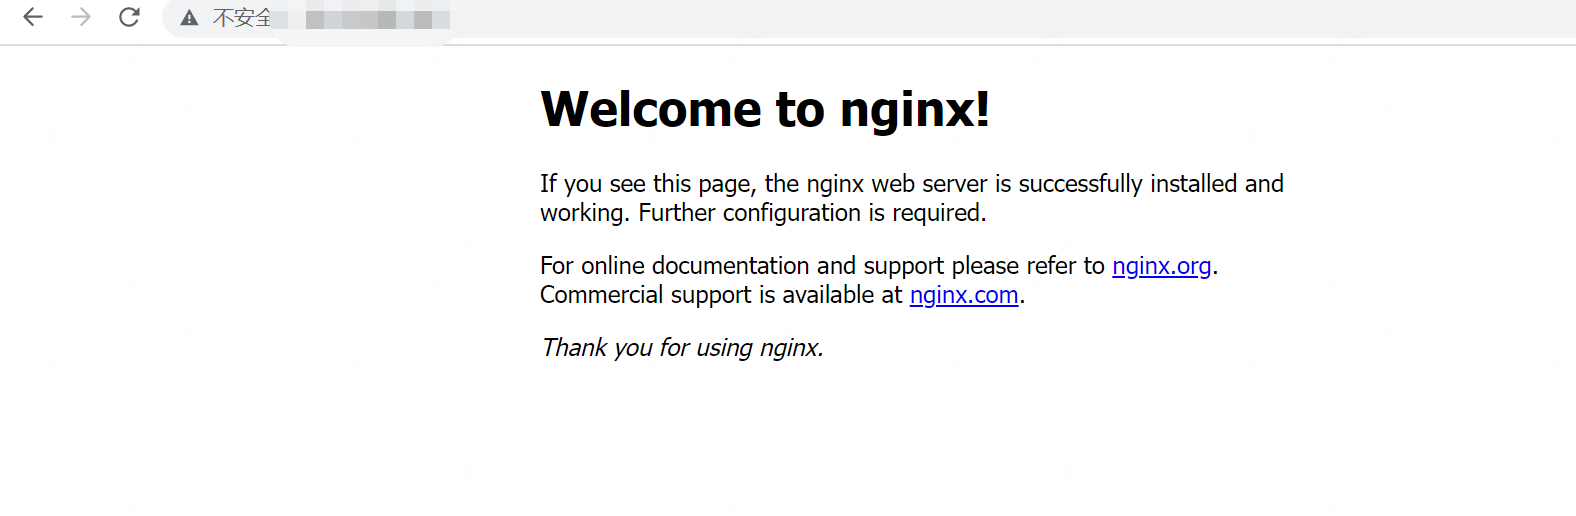
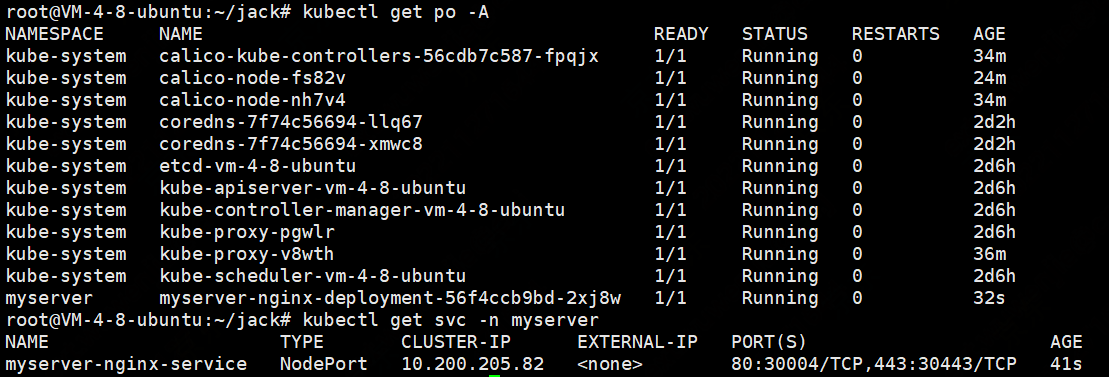
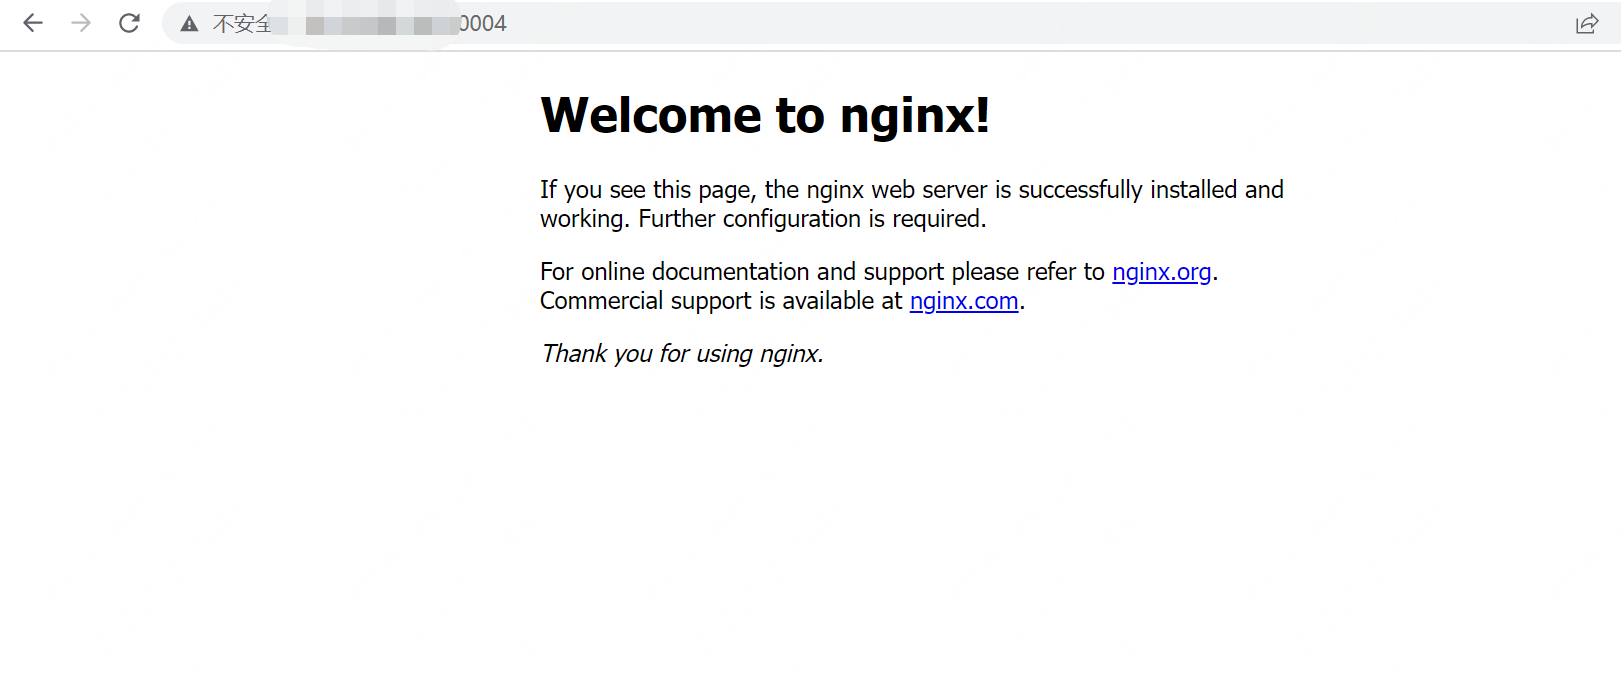
验证
部署nginx
kind: Deployment
#apiVersion: extensions/v1beta1
apiVersion: apps/v1
metadata:
  labels:
    app: myserver-nginx-deployment-label
  name: myserver-nginx-deployment
  namespace: myserver
spec:
  replicas: 1
  selector:
    matchLabels:
      app: myserver-nginx-selector
  template:
    metadata:
      labels:
        app: myserver-nginx-selector
    spec:
      containers:
      - name: myserver-nginx-container
        image: nginx
        #command: ["/apps/tomcat/bin/run_tomcat.sh"]
        #imagePullPolicy: IfNotPresent
        imagePullPolicy: Always
        ports:
        - containerPort: 80
          protocol: TCP
          name: http
        - containerPort: 443
          protocol: TCP
          name: https
        env:
        - name: "password"
          value: "123456"
        - name: "age"
          value: "18"
#        resources:
#          limits:
#            cpu: 2
#            memory: 2Gi
#          requests:
#            cpu: 500m
#            memory: 1Gi


---
kind: Service
apiVersion: v1
metadata:
  labels:
    app: myserver-nginx-service-label
  name: myserver-nginx-service
  namespace: myserver
spec:
  type: NodePort
  ports:
  - name: http
    port: 80
    protocol: TCP
    targetPort: 80
    nodePort: 30004
  - name: https
    port: 443
    protocol: TCP
    targetPort: 443
    nodePort: 30443
  selector:
    app: myserver-nginx-selector
kubectl apply -f nginx.yaml
部署harbor并实现https(SAN签发证书)
通过apt安装docker
如果你过去安装过 docker,先删掉:
sudo apt-get remove docker docker-engine docker.io containerd runc
首先安装依赖:
sudo apt-get install apt-transport-https ca-certificates curl gnupg2 software-properties-common
根据你的发行版,下面的内容有所不同。你使用的发行版: Debian Ubuntu
信任 Docker 的 GPG 公钥:
mkdir -p /etc/apt/keyrings/
curl -fsSL https://download.docker.com/linux/debian/gpg | sudo gpg --dearmor -o /etc/apt/keyrings/docker.gpg
添加软件仓库:
echo \
  "deb [arch=$(dpkg --print-architecture) signed-by=/etc/apt/keyrings/docker.gpg] https://mirrors.tuna.tsinghua.edu.cn/docker-ce/linux/debian \
  $(lsb_release -cs) stable" | sudo tee /etc/apt/sources.list.d/docker.list > /dev/null
最后安装
sudo apt-get update
apt-cache madison docker-ce
sudo apt-get install docker-ce
---清华源安装失败,下面为阿里源安装方法
# step 1: 安装必要的一些系统工具
sudo apt-get update
sudo apt-get -y install apt-transport-https ca-certificates curl software-properties-common
# step 2: 安装GPG证书
curl -fsSL https://mirrors.aliyun.com/docker-ce/linux/ubuntu/gpg | sudo apt-key add -
# Step 3: 写入软件源信息
sudo add-apt-repository "deb [arch=amd64] https://mirrors.aliyun.com/docker-ce/linux/ubuntu $(lsb_release -cs) stable"
# Step 4: 更新并安装Docker-CE
sudo apt-get -y update
sudo apt-get -y install docker-ce

# 安装指定版本的Docker-CE:
# Step 1: 查找Docker-CE的版本:
# apt-cache madison docker-ce
#   docker-ce | 17.03.1~ce-0~ubuntu-xenial | https://mirrors.aliyun.com/docker-ce/linux/ubuntu xenial/stable amd64 Packages
#   docker-ce | 17.03.0~ce-0~ubuntu-xenial | https://mirrors.aliyun.com/docker-ce/linux/ubuntu xenial/stable amd64 Packages
# Step 2: 安装指定版本的Docker-CE: (VERSION例如上面的17.03.1~ce-0~ubuntu-xenial)
# sudo apt-get -y install docker-ce=[VERSION]
安装harbor步骤省略。。。
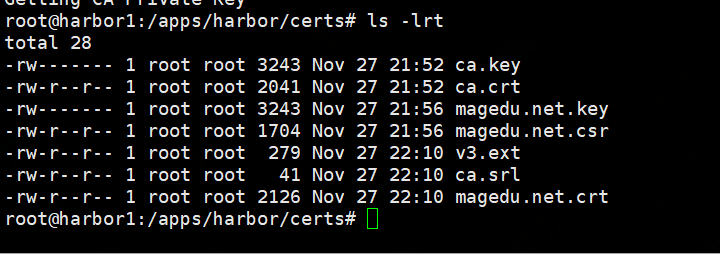
手工签发证书用于https的harbor
注意如果不按这种方法签发,containerd无法使用
自签名ca机构
mkdir  /apps/harbor/certs -p

cd /apps/harbor/certs

openssl genrsa -out ca.key 4096

openssl req -x509 -new -nodes -sha512 -days 3650 \
            -subj "/C=CN/ST=Beijing/L=Beijing/O=example/OU=Personal/CN=magedu.com" \
            -key ca.key \
            -out ca.crt
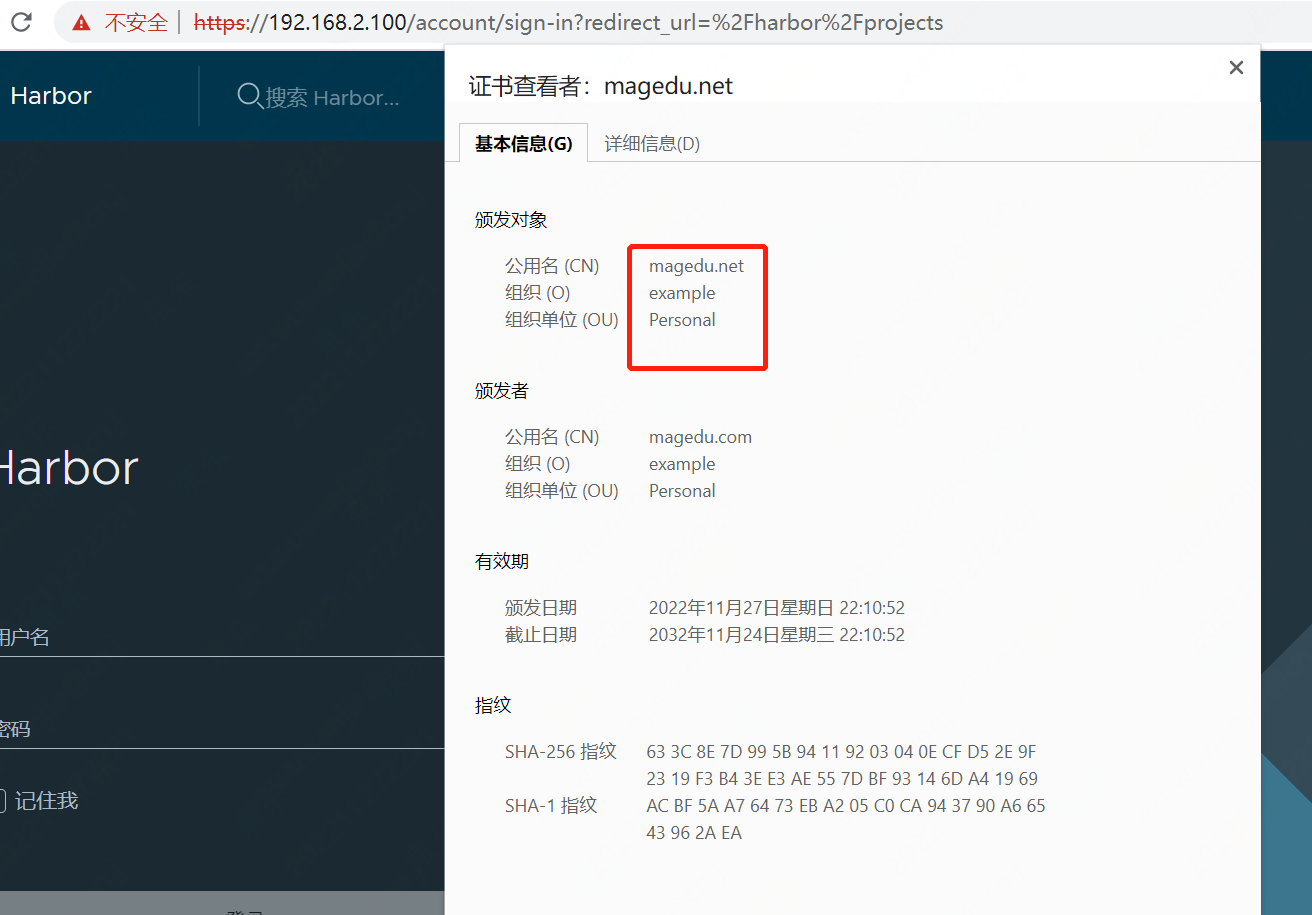
客户瑞域名证书申请
openssl genrsa -out magedu.net.key 4096

openssl req -sha512 -new \
            -subj "/C=CN/ST=Beijing/L=Beijing/O=example/OU=Personal/CN=magedu.net" \
            -key magedu.net.key \
            -out magedu.net.csr
准备签发环境:
cat > v3.ext <<-EOF
authorityKeyIdentifier=keyid,issuer
basicConstraints=CA:FALSE
keyUsage = digitalSignature, nonRepudiation, keyEncipherment, dataEncipherment
extendedKeyUsage = serverAuth
subjectAltName = @alt_names

[alt_names]
DNS.1=magedu.com
DNS.2=harbor.magedu.net
DNS.3=harbor.magedu.local
EOF
使用自签名CA签发
openssl x509 -req -sha512 -days 3650 \
            -extfile v3.ext \
            -CA ca.crt -CAkey ca.key -CAcreateserial \
            -in magedu.net.csr \
            -out magedu.net.crt
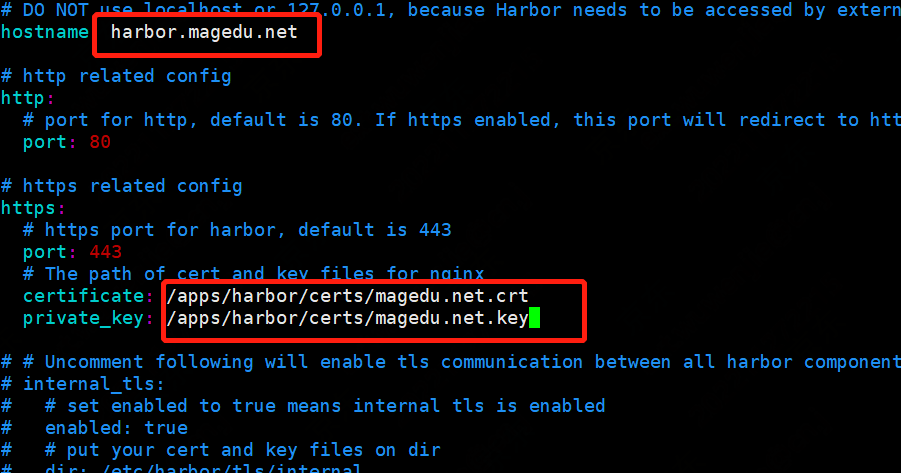
将v3.ext中写的域名修改harbor.yml文件,同时修改证书文件路径
确认启动成功
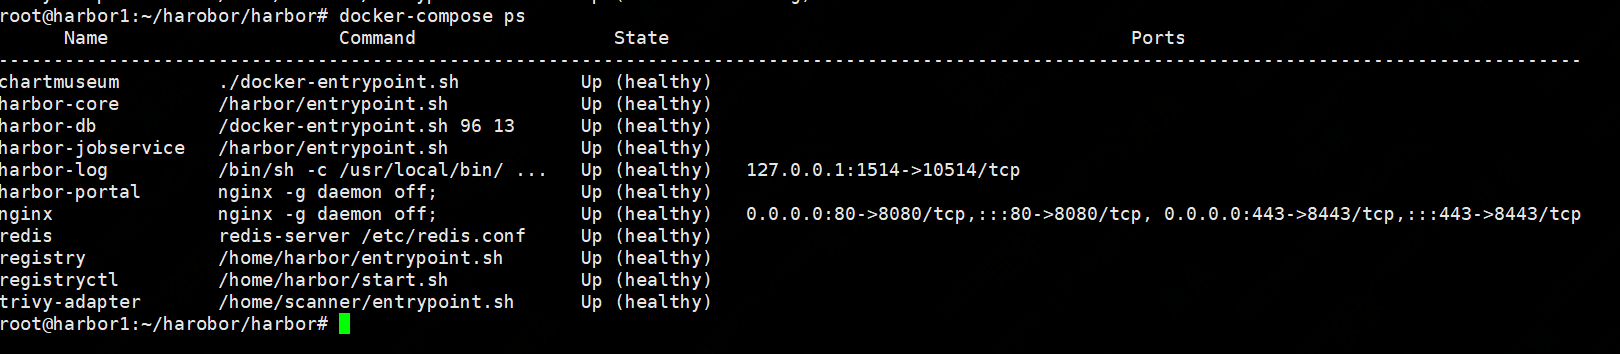
查看证书签发成功
部署haproxy和keepalived高可用负载均衡
由于使用老师镜像不能为https需要修改镜像源
vim /etc/apt/sources.list

# 默认注释了源码镜像以提高 apt update 速度,如有需要可自行取消注释
deb http://mirrors.tuna.tsinghua.edu.cn/ubuntu/ focal main restricted universe multiverse
# deb-src http://mirrors.tuna.tsinghua.edu.cn/ubuntu/ focal main restricted universe multiverse
deb http://mirrors.tuna.tsinghua.edu.cn/ubuntu/ focal-updates main restricted universe multiverse
# deb-src http://mirrors.tuna.tsinghua.edu.cn/ubuntu/ focal-updates main restricted universe multiverse
deb http://mirrors.tuna.tsinghua.edu.cn/ubuntu/ focal-backports main restricted universe multiverse
# deb-src http://mirrors.tuna.tsinghua.edu.cn/ubuntu/ focal-backports main restricted universe multiverse
deb http://mirrors.tuna.tsinghua.edu.cn/ubuntu/ focal-security main restricted universe multiverse
# deb-src http://mirrors.tuna.tsinghua.edu.cn/ubuntu/ focal-security main restricted universe multiverse

# 预发布软件源,不建议启用
# deb http://mirrors.tuna.tsinghua.edu.cn/ubuntu/ focal-proposed main restricted universe multiverse
# deb-src http://mirrors.tuna.tsinghua.edu.cn/ubuntu/ focal-proposed main restricted universe multiverse
apt-get install keepalived haproxy
配置keepalived.conf
vim /etc/keepalive/keepaliv.conf
! Configuration File for keepalived

global_defs {
   notification_email {
     acassen
   }
   notification_email_from Alexandre.Cassen@firewall.loc
   router_id LVS_DEVEL
}

vrrp_instance VI_1 {
    state MASTER
    interface eth0
    garp_master_delay 10
    smtp_alert
    virtual_router_id 50
    priority 100
    advert_int 1
    authentication {
        auth_type PASS
        auth_pass 1111
    }
    virtual_ipaddress {
        192.168.2.110 dev eth0 label eth0:1
    }
}
配置haproxy
vim /etc/haproxy/haproxy.cfg
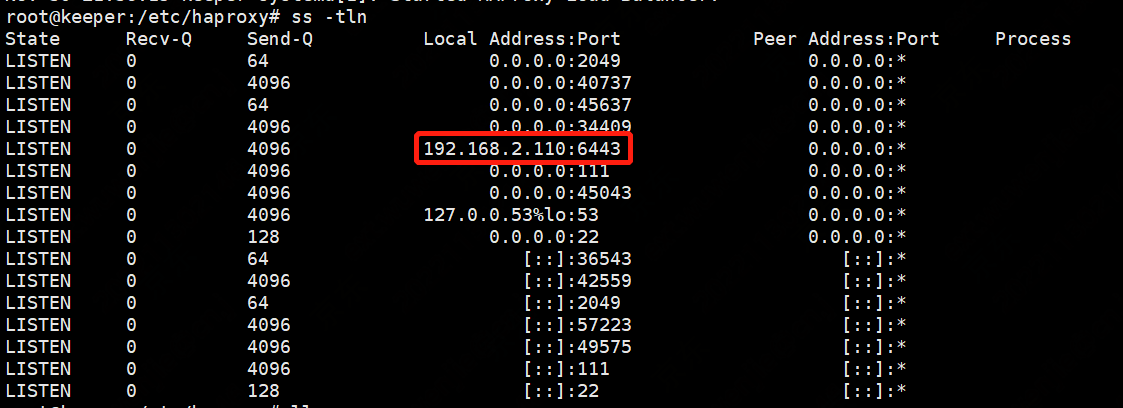
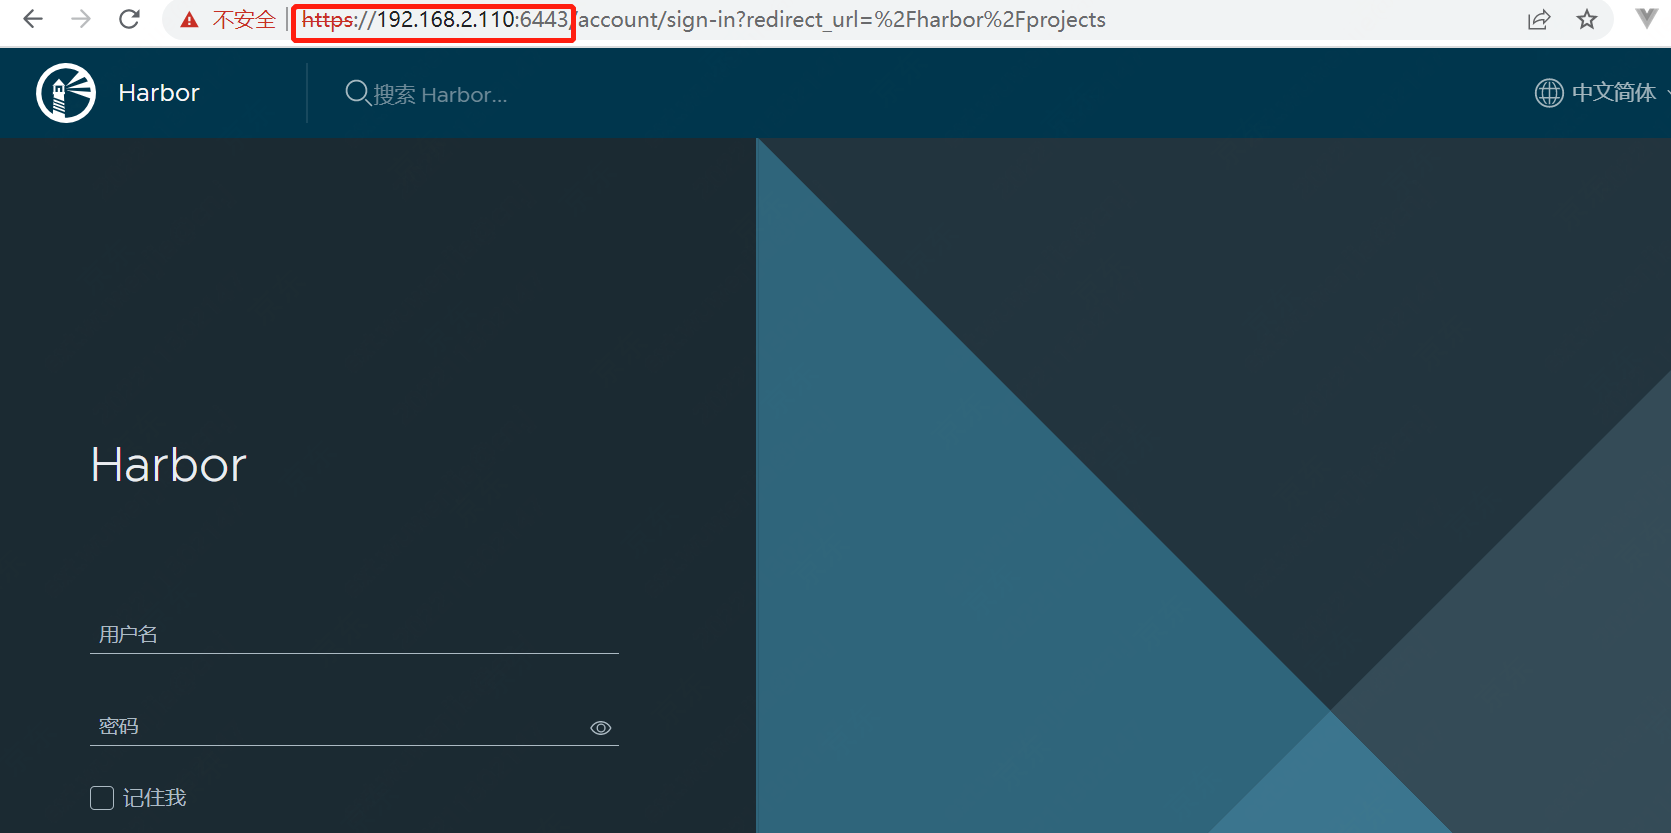
listen harbor_6443
bind 192.168.2.110:6443
mode tcp
server 192.168.2.100 192.168.2.100:443 check inter 2000 fall 3 rise 5
重启keepalive,haproxy
systemctl enable haproxy keepalived
systemctl restart haproxy keepalived
验证

 浙公网安备 33010602011771号