

Docker - NFS服务 - 多机器数据共享 - NAS和SAN
目录
3、查看rpcbind的端口 --port 111(需要在rpcbind服务开启的状态下看得到)
多台机器之间共享数据
nfs服务:
network file system :网络文件系统:作用是可以实现多台机器之间的文件共享
安装nfs服务
nfs服务器端配置:
1、安装软件包
[root@nfs-server ~]# yum install -y nfs-utils
2、启动服务,设置开机自启
[root@nfs-server ~]# systemctl start nfs
[root@nfs-server ~]# systemctl enable nfs
Created symlink from /etc/systemd/system/multi-user.target.wants/nfs-server.service to /usr/lib/systemd/system/nfs-server.service.
[root@nfs-server ~]# ps aux | grep nfs
root       1977  0.0  0.0      0     0 ?        S<   22:29   0:00 [nfsd4_callbacks]
root       1983  0.0  0.0      0     0 ?        S    22:29   0:00 [nfsd]
root       1984  0.0  0.0      0     0 ?        S    22:29   0:00 [nfsd]
root       1985  0.0  0.0      0     0 ?        S    22:29   0:00 [nfsd]
root       1986  0.0  0.0      0     0 ?        S    22:29   0:00 [nfsd]
root       1987  0.0  0.0      0     0 ?        S    22:29   0:00 [nfsd]
root       1988  0.0  0.0      0     0 ?        S    22:29   0:00 [nfsd]
root       1989  0.0  0.0      0     0 ?        S    22:29   0:00 [nfsd]
root       1990  0.0  0.0      0     0 ?        S    22:29   0:00 [nfsd]
root       2020  0.0  0.0 112824   972 pts/0    S+   22:29   0:00 grep --color=auto nfs
3、查看rpcbind的端口 --port 111(需要在rpcbind服务开启的状态下看得到)
nfsd将监听端口的
[root@nfs-server ~]# ss -anplut|grep rpc
udp    UNCONN     0      0         *:20048                 *:*                   users:(("rpc.mountd",pid=1971,fd=7))
udp    UNCONN     0      0         *:111                   *:*                   users:(("rpcbind",pid=1965,fd=6))
udp    UNCONN     0      0      127.0.0.1:855                   *:*                   users:(("rpc.statd",pid=1951,fd=5))
udp    UNCONN     0      0         *:864                   *:*                   users:(("rpcbind",pid=1965,fd=7))
udp    UNCONN     0      0         *:35219                 *:*                   users:(("rpc.statd",pid=1951,fd=8))
udp    UNCONN     0      0      [::]:20048              [::]:*                   users:(("rpc.mountd",pid=1971,fd=9))
udp    UNCONN     0      0      [::]:111                [::]:*                   users:(("rpcbind",pid=1965,fd=9))
udp    UNCONN     0      0      [::]:40739              [::]:*                   users:(("rpc.statd",pid=1951,fd=10))
udp    UNCONN     0      0      [::]:864                [::]:*                   users:(("rpcbind",pid=1965,fd=10))
tcp    LISTEN     0      128       *:111                   *:*                   users:(("rpcbind",pid=1965,fd=8))
tcp    LISTEN     0      128       *:20048                 *:*                   users:(("rpc.mountd",pid=1971,fd=8))
tcp    LISTEN     0      128       *:59518                 *:*                   users:(("rpc.statd",pid=1951,fd=9))
tcp    LISTEN     0      128    [::]:111                [::]:*                   users:(("rpcbind",pid=1965,fd=11))
tcp    LISTEN     0      128    [::]:20048              [::]:*                   users:(("rpc.mountd",pid=1971,fd=10))
tcp    LISTEN     0      128    [::]:44083              [::]:*                   users:(("rpc.statd",pid=1951,fd=11))
4、创建共享文件
[root@nfs-server ~]# cd /
[root@nfs-server /]# mkdir /web
[root@nfs-server /]# cd /web/
[root@nfs-server web]# ls
[root@nfs-server web]# echo "welcome to changsha nongda" > index.html
[root@nfs-server web]# ls
index.html
5、编辑/etc/exports文件
[root@nfs-server web]# vim /etc/exports
[root@nfs-server web]# cat /etc/exports
/web 192.168.44.0/24(rw,sync,all_squash)
/web :共享目录的路径
192.168.44.0/24:允许访问过来的机器的网段
(rw,sync,all_squash):拥有的权限, rw,可以读写, sync在host上修改了数据,同步到nfs服务器上面
all_squash :任何机器上的任何用户连接过来都看成一个普通的用户nobody对待
让共享目录生效
[root@nfs-server web]# exportfs -av
exporting 192.168.44.0/24:/web
6、设置共享目录的权限
[root@nfs-server web]# chown nobody:nobody /web
客户端配置:
1、客户机也要安装nfs软件,分别在docker1和docker2上面安装
[root@docker1 ~]# yum install nfs-utils -y
[root@docker2 ~]# yum install nfs-utils -y
2、新建挂载目录,然后挂载
[root@docker1 ~]# mkdir /nfs-web
[root@docker2 ~]# mkdir /nfs-web
[root@docker1 ~]# mount 192.168.44.203:/web /nfs-web/
[root@docker2 ~]# mount 192.168.44.203:/web /nfs-web/
查看挂载情况
[root@docker1 ~]# df -Th|grep nfs
192.168.44.203:/web     nfs4       17G  1.5G   16G    9% /nfs-web
[root@docker2 nfs-web]# df -Th|grep nfs
192.168.44.203:/web     nfs4       17G  1.5G   16G    9% /nfs-web
查看挂载文件夹里的内容
[root@docker1 ~]# cd /nfs-web/
[root@docker1 nfs-web]# ls
index.html
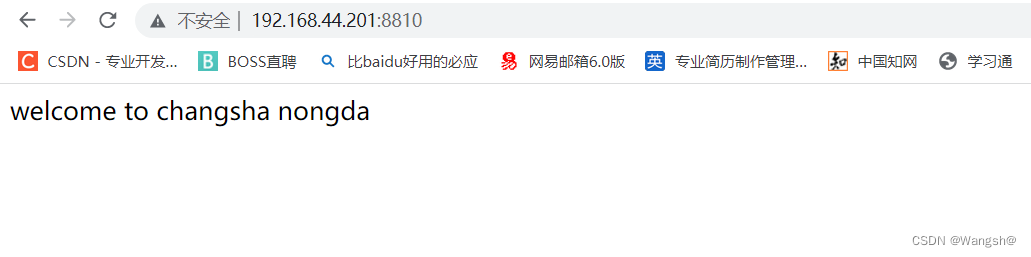
[root@docker1 nfs-web]# cat index.html
welcome to changsha nongda
[root@docker2 ~]# cd /nfs-web/
[root@docker2 nfs-web]# ls
index.html
[root@docker2 nfs-web]# cat index.html
welcome to changsha nongda
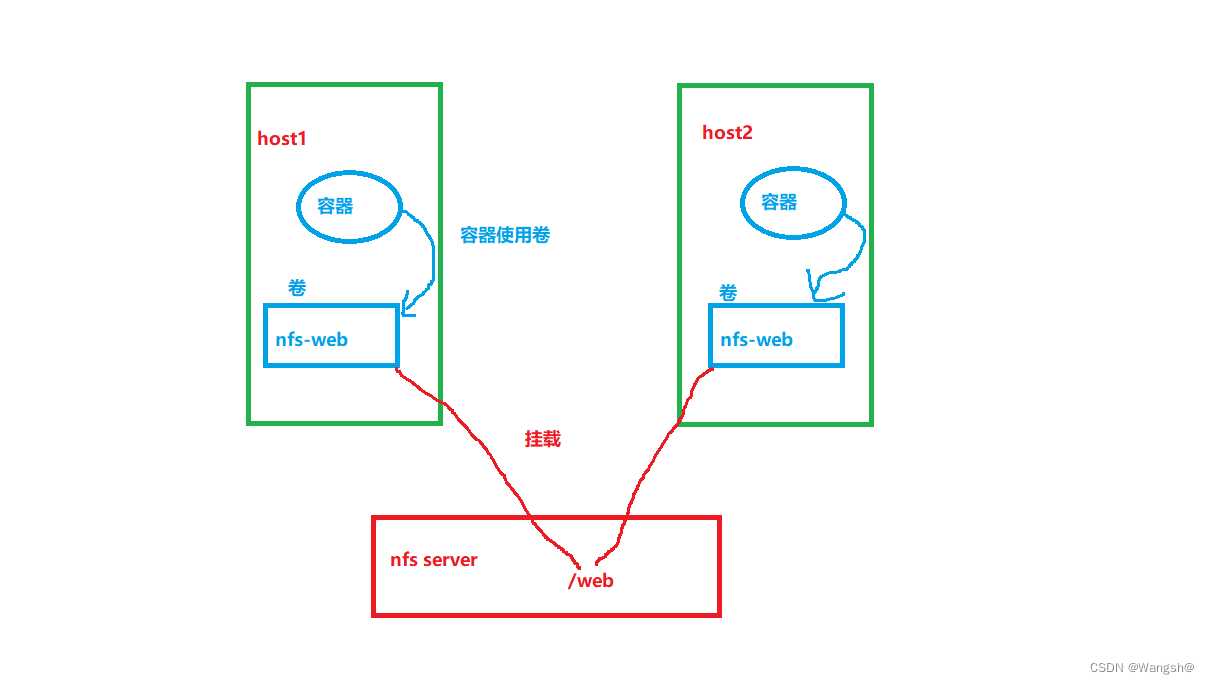
如何让容器使用nfs共享的目录?
1、直接挂载
在两台客户机上面分别起一个容器来直接挂载/nfs-web
[root@docker1 nfs-web]# docker run -d -p 8810:80 -v /nfs-web:/usr/share/nginx/html --name wang-nginx nginx
d5d0bb774f1c1e91957366d37d2919b688ec1abe9db8fa96503273f5ced1c779
[root@docker2 nfs-web]# docker run -d -p 8811:80 -v /nfs-web:/usr/share/nginx/html --name wang-nginx-1 nginx
6f6a847b1263306669708e969c6b22c71d305a2507cd4e1dcbb3e11492a6e0fa
访问web服务

####################################################################################################
2、尝试使用卷来对应nfs服务器共享的目录
在两台客户机上面创建卷,
创建一个nfs-qian-1的卷挂载到nfs服务器192.168.44.203共享的/web目录
[root@docker1 nfs-web]# docker volume create --driver local --opt type=nfs --opt o=addr=192.168.44.203,nolock,soft,rw,sync --opt device=:/web nfs-qian-1
nfs-qian-1
[root@docker2 nfs-web]# docker volume create --driver local --opt type=nfs --opt o=addr=192.168.44.203,nolock,soft,rw,sync --opt device=:/web nfs-qian-1
nfs-qian-1
[root@docker2 nfs-web]# docker volume ls
DRIVER VOLUME NAME
local nfs-qian-1
local nginx-web
查看卷的详细信息
[root@docker2 nfs-web]# docker inspect nfs-qian-1
[
    {
        "CreatedAt": "2022-09-01T11:51:02+08:00",
        "Driver": "local",
        "Labels": {},
        "Mountpoint": "/var/lib/docker/volumes/nfs-qian-1/_data",
        "Name": "nfs-qian-1",
        "Options": {
            "device": ":/web",
            "o": "addr=192.168.44.203,nolock,soft,rw,sync",
            "type": "nfs"
        },
        "Scope": "local"
    }
]
[root@docker2 nfs-web]#
接下来创建容器直接使用卷就行了 ,这样就实现了使用卷来共享nfs共享目录
使用nfs来实现文件共享解决方案是比价low的,是最廉价的解决方案
1、随便一台linux服务器,安装nfs服务,可以共享数据,对磁盘,cpu,内存要求极低,
2、使用的是传统的TCP/IP网络,容易受网络状况影响
3、nfs在网络不稳定的情况下,很容易丢失数据
####################################################################################################
SAN和NAS
存储区域网络(Storage Area Network ): SAN
存储区域网络 (Storage Area Network, SAN) 是企业最常用的存储网络架构,要求高吞吐量和低延迟的业务关键型业务往往采用这类架构运行。如今,采用全闪存存储的 SAN 部署数量增速迅猛。与旋转磁盘相比,全闪存存储可提供更出色的性能、稳定一致的低延迟以及更低的总成本。SAN 将数据存储在集中式共享存储中,使企业能够运用一致的方法和工具来实施安全防护、数据保护和灾难恢复
网络附加存储 (Network Attached Storage):NAS
网络存储基于标准网络协议实现数据传输,为网络中的windows,linux,mac os,等各种不同操作系统的计算机提供文件共享和数据备份


【推荐】国内首个AI IDE,深度理解中文开发场景,立即下载体验Trae
【推荐】编程新体验,更懂你的AI,立即体验豆包MarsCode编程助手
【推荐】抖音旗下AI助手豆包,你的智能百科全书,全免费不限次数
【推荐】轻量又高性能的 SSH 工具 IShell:AI 加持,快人一步
· 无需6万激活码!GitHub神秘组织3小时极速复刻Manus,手把手教你使用OpenManus搭建本
· Manus爆火,是硬核还是营销?
· 终于写完轮子一部分:tcp代理 了,记录一下
· 别再用vector<bool>了!Google高级工程师:这可能是STL最大的设计失误
· 单元测试从入门到精通