我的VSTO之路(四):深入介绍Word开发
在上一篇文章中,我介绍了Word的对象模型和一些基本开发技巧。为了更好的介绍Word插件开发,我为本文制作了一个Word书签的增强版,具体功能是让用户在Word中选择一段文本,为它添加书签并其标志为高亮,同时用户可以为这段书签写注释,以后当用户点击这个书签时,我就会显示注释。以下是我录制的视频介绍:
这个插件将包括以下几个技术点:
- 添加右键菜单
- 添加右键菜单、控制右键菜单显示
- WindowBeforeRightClick 事件
- 删除右键菜单
- 修改正文内容、样式
- 修改选定的内容
- 修改选定的样式
- 添加控件
- 添加书签
- 添加超链接
- 添加内容控件(Content Control)
- 基于用户选中内容,执行程序
- WindowSelectionChange 事件
- 根据当前光标的位置,显示悬浮框
以下是我对这些功能点的具体介绍
右键菜单
添加右键菜单
右键菜单是Word中相当常用的一个功能,我们在大部分的VSTO开发中也会通过修改这个菜单来扩展Word的功能。最通常地添加右键菜单的方法如下:
1: // 添加右键按钮
2: Office.CommandBarButton addBtn = (Office.CommandBarButton)Application.CommandBars["Text"].Controls.Add(Office.MsoControlType.msoControlButton, missing, missing, missing, false);
3:
4: // 开始一个新Group,即在我们添加的Menu前加一条分割线
5: addBtn.BeginGroup = true;
6:
7: // 为按钮设置Tag
8: addBtn.Tag = "BookMarkAddin";
9:
10: // 添加按钮上的文字
11: addBtn.Caption = "Add Bookmark";
12:
13: // 将按钮初始设为不激活状态
14: addBtn.Enabled = false;
显示的效果为
控制右键菜单显示
在很多情况下,我们希望根据用户选择内容来控制右键菜单的显示,那么我们就需要用到WindowBeforeRightClick事件。以下是我在范例中写的代码,只有当用户选择两个以上字符的时候,我才会把我刚才添加的右键菜单激活。请注意代码里面的一些注释,VSTO与Office的COM交互时,并不是很稳定,有很多需要注意的地方。
1: void Application_WindowBeforeRightClick(Word.Selection Sel, ref bool Cancel)
2: {
3: // 根据之前添加的Tag来找到我们添加的右键菜单
4: // 注意:我这里没有通过全局变量来控制右键菜单,而是通过findcontrol来取得按钮,因为这里的VSTO和COM对象处理有问题,使用全局变量来控制右键按钮不稳定
5: Office.CommandBarButton addBtn = (Office.CommandBarButton)Application.CommandBars.FindControl(Office.MsoControlType.msoControlButton, missing, "BookMarkAddin", false);
6: addBtn.Enabled = false;
7: addBtn.Click -= new Office._CommandBarButtonEvents_ClickEventHandler(_RightBtn_Click);
8:
9: if (!string.IsNullOrWhiteSpace(Sel.Range.Text) && Sel.Range.Text.Length > 2)
10: {
11: addBtn.Enabled = true;
12:
13: // 这里是另外一个注意点,每次Click事件都需要重新绑定,你需要在之前先取消绑定。
14: addBtn.Click += new Office._CommandBarButtonEvents_ClickEventHandler(_RightBtn_Click);
15: }
16: }
删除右键菜单
我建议在Addin启动和关闭时候(ThisAddIn_Startup与ThisAddIn_Shutdown中),每次都清除由我们添加的右键菜单,虽然按照微软的提示,如果在创建的时候把Temporary属性设为true,系统会在程序退出时自动帮你删除,但是根据我的经验,微软这个许诺没有兑现。
1: private void RemoveRightBtns()
2: {
3: Office.CommandBarControls siteBtns = Application.CommandBars.FindControls(Office.MsoControlType.msoControlButton, missing, "BookMarkAddin", false);
4: // 这里我写了一个循环,目标是清理所有由我创建的右键按钮,尤其是由于Addin Crash时所遗留的按钮
5: if (siteBtns != null)
6: {
7: foreach (Office.CommandBarControl btn in siteBtns)
8: {
9: btn.Delete(true);
10: }
11: }
12: }
修改正文内容、样式
修改选定的内容
Word文档内容的修改,主要是通过Range对象来实现的,比较容易。例如,你可以先通过 Application.ActiveDocument.Range(object start ,object end)方法来获得一个你需要的Range,然后通过Range.Text来修改正文的内容,例如:
1: Word.Range range = Application.ActiveDocument.Range(0, 10);
2: if (range != null)
3: {
4: range.Text = "Justin";
5: }
这里需要指出的是,获得Range的方式很多,你也可以通过用户选择的Selection对象来获得Range,详细内容可以参考我在上一篇随笔中的Word对象模型部分。
修改选定的样式
修改样式也是通过Range对象来实现的,这里我就写两个范例,一个是修改字体,一个是修改背景色(VSTO中称为高亮色),大家可以在这里进一步扩展出去很多东西。
1: // 设置字体
2: range.Font.Name = "宋体";
3:
4: // 添加下划线(点)
5: range.Font.Underline = Word.WdUnderline.wdUnderlineDotted;
6:
7: // 将背景色设为黄
8: range.HighlightColorIndex = Word.WdColorIndex.wdYellow;
添加控件
Word在正文中提供了非常丰富的控件,例如书签、超链接、注释等,这些控件可以方便用户编辑和阅读文档。所以也是我们开发人员需要注意的一个重点。添加书签(以及其他的控件),在Word中实现的方法很多,本质都是通过获得书签集合(或其他对象的集合),然后通过这个集合的Add方法来添加数据。一般在添加的同时,我们会指定这个控件所对应的Range,即这个空间所包含的范围。因为这种控件对象很多,我这里列举几个范例:
添加书签
对Word中一段文字添加书签,我们需要先去的这段文字的Range,然后通过以下方法来实现。
    // "VSTOBookMark"是书签的名字
    Word.Bookmark mark = _Range.Bookmarks.Add("VSTOBookMark", _Range);
添加超链接
添加超链接和添加书签类似,区别在于超链接需要指定url,且没有名字。
Word.Hyperlink link = range.Hyperlinks.Add(range, url);
添加内容控件(Content Control)
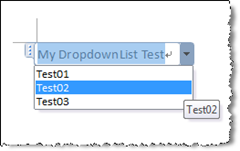
内容控件是Word 2007开始引如的新功能,是一批独立的控件,用于增强用户体验,这里我介绍如何如在Word文档中添加一个下拉框,这是一段Ribbon的代码,为了方便我讲解,我全部贴出来:
1: using System;
2: using System.Collections.Generic;
3: using System.Linq;
4: using System.Text;
5: using Microsoft.Office.Tools.Ribbon;
6:
7: using Office = Microsoft.Office.Core;
8: using Word = Microsoft.Office.Interop.Word;
9: using ToolsWord = Microsoft.Office.Tools.Word;
10:
11: namespace OfficeContentControlsDemo
12: {
13: public partial class Rb
14: {
15: private void Rb_Load(object sender, RibbonUIEventArgs e)
16: {
17:
18: }
19:
20: private void button1_Click(object sender, RibbonControlEventArgs e)
21: {
22: Word.Document currentDocument = Globals.ThisAddIn.Application.ActiveDocument;
23:
24: if (currentDocument.Paragraphs != null &&
25: currentDocument.Paragraphs.Count != 0)
26: {
27: // 在第一段文字前添加一个段落
28: currentDocument.Paragraphs[1].Range.InsertParagraphBefore();
29: currentDocument.Paragraphs[1].Range.Select();
30:
31: // 将Interop的Document对象转化为VSTO中的Document对象
32: ToolsWord.Document document = Globals.Factory.GetVstoObject(currentDocument);
33:
34: // 添加DropDownList
35: ToolsWord.DropDownListContentControl dropdown = document.Controls.AddDropDownListContentControl(currentDocument.Paragraphs[1].Range, "MyContentControl");
36: dropdown.PlaceholderText = "My DropdownList Test";
37: dropdown.DropDownListEntries.Add("Test01", "01", 1);
38: dropdown.DropDownListEntries.Add("Test02", "02", 2);
39: dropdown.DropDownListEntries.Add("Test03", "03", 3);
40: }
41: }
42: }
43: }
运行效果
这段代码有两个特殊的地方需要注意的:
- 首先,可能有人注意到了,我获得第一个段落对象时,使用的是Paragraphs[1]而不是Paragraphs[0],这是因为VSTO中的很多集合的下标不是从0开始的,这可能是延续VB的风格。
- 其实,我在这里把Introp的Doucment对象转化为了VSTO的Document对象。我们在前文中已经介绍了过了Introp的Doucment对象,它代表着一个Word文档,即便你刚打开你的Word,是一个空的新文档,也会有一个Document。而Microsoft.Office.Tools.Word下的Document。它们大体相同,区别在于
- Controls 属性: 使用此属性可在运行时在 Word 文档中添加托管控件或者移除控件。
- VstoSmartTags 属性: 使用此属性可在文档中添加Smart Tag(2010中 Smart Tag基本被废了
 )。
)。 - InnerObject 属性: 使用此属性获取 Microsoft.Office.Tools.Word.Document 的基础 Microsoft.Office.Interop.Word.Document 对象。
- 文档级事件: 仅在 Word 对象模型的应用程序级别提供的文档级事件,例如 BeforeClose 和 BeforeSave。 也就是说,在 Word 对象模型中,这些事件在 Microsoft.Office.Interop.Word.Application 对象上可用。(而不是 Microsoft.Office.Interop.Word.Document 对象)
基于用户选中内容,执行程序
在编程中,经常有客户向我提问,能否根据用户选择的内容显示相应的内容,这个功能看似复杂,其实实现起来很简单。
WindowSelectionChange 事件
WindowsSelectionChange事件是这个功能的核心,每次当用户移动光标或者点击Word正文内容时都会触发这个事件。事件参数为Selection,即当前选中的位置。接下来,我们来看一个实际的例子
根据当前光标的位置,显示悬浮框
这是如何实现的代码:
1: using System;
2: using System.Collections.Generic;
3: using System.Linq;
4: using System.Text;
5: using System.Xml.Linq;
6: using System.Windows.Forms;
7: using System.Drawing;
8:
9: using Word = Microsoft.Office.Interop.Word;
10: using Office = Microsoft.Office.Core;
11: using Microsoft.Office.Tools.Word;
12:
13: namespace BookMarkAddin
14: {
15: public partial class ThisAddIn
16: {
17: public FloatingPanel _FloatingPanel = null;
18:
19: private void ThisAddIn_Startup(object sender, System.EventArgs e)
20: {
21: this.Application.WindowSelectionChange += new Word.ApplicationEvents4_WindowSelectionChangeEventHandler(Application_WindowSelectionChange);
22: }
23:
24: void Application_WindowSelectionChange(Word.Selection Sel)
25: {
26: Globals.ThisAddIn._FloatingPanel = new FloatingPanel(bookmark);
27:
28: // 当前用户选中的屏幕坐标
29: Point currentPos = GetPositionForShowing(Sel);
30:
31: // 显示悬浮框
32: Globals.ThisAddIn._FloatingPanel.Location = currentPos;
33: Globals.ThisAddIn._FloatingPanel.Show();
34: }
35:
36: private static Point GetPositionForShowing(Word.Selection Sel)
37: {
38: // get range postion
39: int left = 0;
40: int top = 0;
41: int width = 0;
42: int height = 0;
43: Globals.ThisAddIn.Application.ActiveDocument.ActiveWindow.GetPoint(out left, out top, out width, out height, Sel.Range);
44:
45: Point currentPos = new Point(left, top);
46: if (Screen.PrimaryScreen.Bounds.Height - top > 340)
47: {
48: currentPos.Y += 20;
49: }
50: else
51: {
52: currentPos.Y -= 320;
53: }
54: return currentPos;
55: }
56:
57: private void ThisAddIn_Shutdown(object sender, System.EventArgs e)
58: {
59: try
60: {
61: this.Application.WindowSelectionChange -= new Word.ApplicationEvents4_WindowSelectionChangeEventHandler(Application_WindowSelectionChange);
62: }
63: catch { }
64: }
65:
66: #region VSTO generated code
67: // .......
68: #endregion
69: }
70: }
最终的效果可以参考本文开始的视频。这个功能可以推而广之,比如可以把用户当前选中的内容与Task Pane交互,这就看各位的需求了。
总结
至此,我已经介绍了Word插件开发的主要技巧,大家可以下载我制作的插件源代码,里面包含了这些功能。Word作为一个经历了13代的产品,包含的功能非常多,我不能在此全部介绍完毕。如果大家有什么问题,可以到VSTO之路小组中提问,我会和大家继续探讨,同时也方便新人查阅。一下篇文章,我将开始介绍Outlook的开发技巧,希望大家继续支持![]()
最后,本文欢迎转载,但请保留出处,大家如果有问题,可以联系我 justin.tyrael@gmail.com或者到VSTO之路小组中提问。


