nginx部署vue项目
windows版本
nginx基本命令
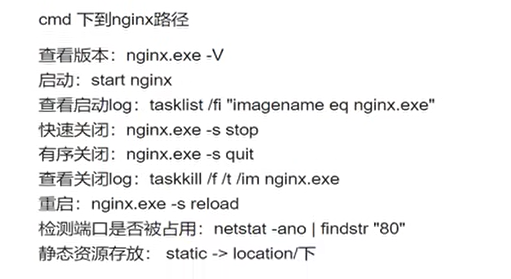
使用taskkill停止或关闭nginx:taskkill /f /t /im nginx.exe
(注意:使用taskkill /f /t /im nginx.exe命令关闭所启动的nginx时,不会删除logs中的nginx.pid文件)
1、首先 创建vue.config.js文件:
module.exports={
    publicPath: process.env.NODE_ENV == 'production' ? './' : '/',
}
这个代码是判断你是否为开发者然后设置路径。
2、 然后运行 npm run build 打包项目,最后生成一个 dist 文件夹。
3、打开 nginx 里面重要的文件夹就2个; 一个是html放页面文件的地方,把你dist里面的复制过来就行了。
4、 还有一个是 conf 文件夹里面是放配置文件的,主要是用 nginx.conf ,里面找到 serve 这个对象,listen 80 这个是设置端口号,里面还有一个
location /{
root html;
index index.html index.htm;
}
在里面加上try_files $uri $uri/ /index.html; 用于支持在 history 模式下,运行。
root表示文件夹
5、最后还要在 serve 对象里面加一个
location /api/ {
proxy_pass http://192.168.1.91:8080/;
}
http://192.168.1.91:8080/这个就是后端的接口, 作用是在nginx 下设置代理
6、在文件夹( nginx 所在文件夹) 输入 cmd , 然后输入 start nginx 就启动了
7、然后直接浏览器输入 localhost:80 就能访问到了
部署多个vue项目
1.修改配置
publicPath: process.env.NODE_ENV == 'production' ? '/other/' : '/',
2.打包vue项目,将dist文件夹复制到html文件夹下,然后修改dist名字为other
3.配置location
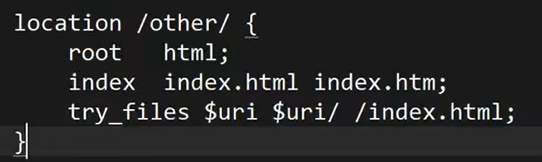
访问:http://localhost/other
nginx中需要配置多个server
在nginx中需要配置多个项目,所以需要配置多个server,配置如下:
http {
    include       mime.types;
    default_type  application/octet-stream;
    sendfile        on;
    keepalive_timeout  65;
    server {
      listen  81;
      server_name test;
       location / {
            root   html/test;
            index  index.html index.htm;
            try_files $uri $uri/ /index.html;
        }
        location /api/ {
            proxy_pass http://172.16.8.9:8888/;
        }
      error_page 500 502 503 504 /50x.html;
      location = /50x.html {
       root html;
      }
    }
    server {
      listen  82;
      server_name test2;
       location / {
            root   html/test2;
            index  index.html index.htm;
            try_files $uri $uri/ /index.html;
        }
        location /api/ {
            proxy_pass http://172.16.8.9:8888/;
        }
      error_page 500 502 503 504 /50x.html;
      location = /50x.html {
       root html;
      }
    }
    server {
        listen       80;
        server_name  localhost;
        location / {
            root   html;
            index  index.html index.htm;
            try_files $uri $uri/ /index.html;
        }
        location /api/ {
            proxy_pass http://172.16.8.9:8888/;
        }
        error_page   500 502 503 504  /50x.html;
        location = /50x.html {
            root   html;
        }
}
步骤1:html 下创建多个文件夹,不同的项目放到不同的文件夹下
如上:server_name为test2 的,访问路径就是 html/test2
步骤2:为不同的文件夹,配置不同的server, 端口号不同
步骤3:host文件去为server作映射
host文件地址:C:\Windows\System32\drivers\etc
打开host文件,
添加如下代码:
127.0.0.1 test

127.0.0.1 test2
使用 test:81 , 即可访问到 html/test 文件夹下面的项目
使用 test2:82 ,即可以访问 html/test2 文件夹下面的项目

 浙公网安备 33010602011771号