day23-20180524笔记
笔记:python3 消息队列queue、Pipe模块,Celery异步分布式
一、queue模块
1、消息队列queue模块
注意:Python2的消息队列模块是Queue,而Python3的消息队列是queue
queue 就是对队列,它是线程安全的
举例来说,我们去肯德基吃饭。厨房是给我们做饭的地方,前台负责把厨房做好的饭卖给顾客,顾客则去前台领取做好的饭。这里的前台就相当于我们的队列。
这个模型也叫生产者-消费者模型。
import queue

q = queue.Queue(maxsize=0)  # 构造一个先进显出队列,maxsize指定队列长度,为0 时,表示队列长度无限制。

q.join()    # 等到队列为kong的时候,在执行别的操作
q.qsize()   # 返回队列的大小 (不可靠)
q.empty()   # 当队列为空的时候,返回True 否则返回False (不可靠)
q.full()    # 当队列满的时候,返回True,否则返回False (不可靠)
q.put(item, block=True, timeout=None) #  将item放入Queue尾部,item必须存在,可以参数block默认为True,表示当队列满时,会等待队列给出可用位置,
                         为False时为非阻塞,此时如果队列已满,会引发queue.Full 异常。 可选参数timeout,表示 会阻塞设置的时间,过后,
                          如果队列无法给出放入item的位置,则引发 queue.Full 异常
q.get(block=True, timeout=None) #   移除并返回队列头部的一个值,可选参数block默认为True,表示获取值的时候,如果队列为空,则阻塞,为False时,不阻塞,
                      若此时队列为空,则引发 queue.Empty异常。 可选参数timeout,表示会阻塞设置的时候,过后,如果队列为空,则引发Empty异常。
q.put_nowait(item) #   等效于 put(item,block=False)
q.get_nowait() #    等效于 get(item,block=False)
#!/usr/bin/env python
# -*- coding: utf-8 -*-
# @Time    : 2018/5/24 20:31
# @Author  : yangyuanqiang
# @File    : demon1.py


'''
消息队列
一个是生产者producer
一个是消费者customer
创建一个队列  q = Queue()
发消息:    q.put()
收消息:    dat = q.get()
'''
import time
from multiprocessing import Queue, Pipe
from threading import Thread


def producer(q):
    print("start producer")
    for i in range(10):
        q.put(i)
        # print("producer has producer value {0}".format(i))
        time.sleep(0.3)
    print("end producer")

def customer(q):
    print("start customer")
    while 1:
        date = q.get()
        print("customer has get value {0}".format(date))


if __name__ == '__main__':
    q = Queue()
    p = Thread(target=producer, args=(q,))
    c = Thread(target=customer, args=(q,))
    p.start()
    c.start()
以上实例输出的结果
start producer
start customer
customer has get value 0
customer has get value 1
customer has get value 2
customer has get value 3
customer has get value 4
customer has get value 5
customer has get value 6
customer has get value 7
customer has get value 8
customer has get value 9
end producer
生产者--消费者:
#!/usr/bin/env python
# -*- coding: utf-8 -*-
# @Time    : 2018/5/25 21:36
# @Author  : yangyuanqiang
# @File    : demon5.py


import queue
import threading


message = queue.Queue(10)


def producer(i):
    while True:
        message.put(i)


def consumer(i):
    while True:
        msg = message.get()


for i in range(12):
    t = threading.Thread(target=producer, args=(i,))
    t.start()

for i in range(10):
    t = threading.Thread(target=consumer, args=(i,))
    t.start()
2、Pipe模块
返回2个连接对象(conn1, conn2),代表管道的两端,默认是双向通信.如果duplex=False,conn1只能用来接收消息,conn2只能用来发送消息.不同于os.open之处在于os.pipe()返回2个文件描述符(r, w),表示可读的和可写的
#!/usr/bin/env python
# -*- coding: utf-8 -*-
# @Time    : 2018/5/24 21:06
# @Author  : yangyuanqiang
# @File    : demon2.py


'''
Pipe的方法返回一个tuple    (conn1, conn2)
Pipe的方法还有一个参数duplex参数,如果deplex=True,叫双工模式
如果deplex=False conn1只负责接收,conn2只负责发送消息
发消息:    send
收消息:    recv
关闭管道:   close
'''
import time, multiprocessing
from multiprocessing import Process, Pipe


def proc1(pipe):
    for i in range(10):
        print("send {0}".format(i))
        pipe.send(i)
        time.sleep(0.1)

def proc2(pipe):
    n = 10
    while n:
        print("proc2 recv: {0}".format(pipe.recv()))
        n -= 1


if __name__ == '__main__':
    (p1, p2) = multiprocessing.Pipe(duplex=False)
    pr = Process(target=proc1, args=(p2,))  #发消息
    cu = Process(target=proc2, args=(p1,))  #收消息
    pr.start()
    cu.start()
以上实例输出的结果
#发送一个,接收一个
send 0
proc2 recv: 0
send 1
proc2 recv: 1
send 2
proc2 recv: 2
send 3
proc2 recv: 3
send 4
proc2 recv: 4
send 5
proc2 recv: 5
send 6
proc2 recv: 6
send 7
proc2 recv: 7
send 8
proc2 recv: 8
send 9
proc2 recv: 9
#!/usr/bin/env python
# -*- coding: utf-8 -*-
# @Time    : 2018/5/25 21:36
# @Author  : yangyuanqiang
# @File    : demon5.py


import os
from multiprocessing import Process, Pipe

def send(pipe):
    pipe.send(['spam'] + [42, 'egg'])
    pipe.close()

def talk(pipe):
    pipe.send(dict(name = 'Bob', spam = 42))
    reply = pipe.recv()
    print('talker got:', reply)

if __name__ == '__main__':
    (con1, con2) = Pipe()
    sender = Process(target = send, name = 'send', args = (con1, ))
    sender.start()
    print("con2 got: %s" % con2.recv())#从send收到消息
    con2.close()

    (parentEnd, childEnd) = Pipe()
    child = Process(target = talk, name = 'talk', args = (childEnd, ))
    child.start()
    print('parent got:', parentEnd.recv())
    parentEnd.send({x * 2 for x in 'spam'})
    child.join()
    print('parent exit')
以上实例输出的结果
con2 got: ['spam', 42, 'egg']
parent got: {'name': 'Bob', 'spam': 42}
talker got: {'mm', 'ss', 'pp', 'aa'}
parent exit
二、Celery异步分布式
什么是celery
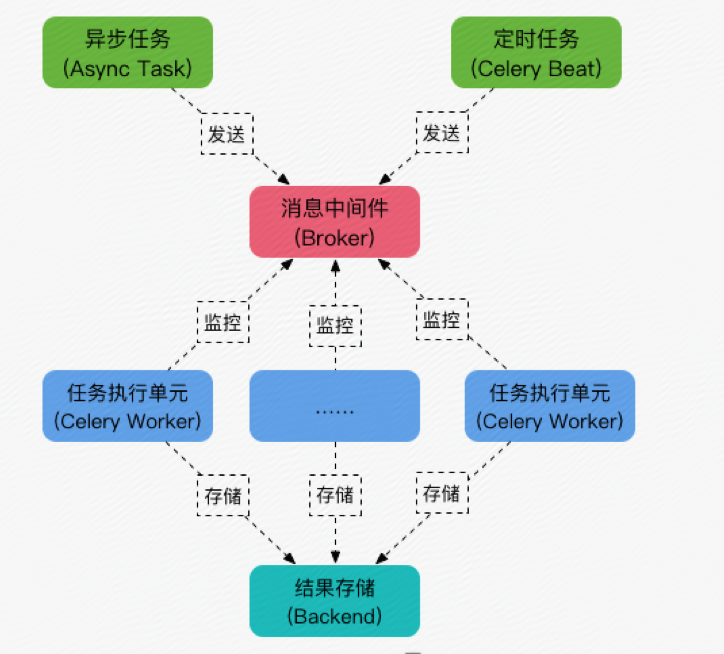
Celery是一个python开发的异步分布式任务调度模块。
Celery本身并不提供消息服务,使用第三方服务,也就是borker来传递任务,目前支持rebbimq,redis, 数据库等。
这里我们使用redis
连接url的格式为:
redis://:password@hostname:port/db_number
例如:
BROKER_URL = 'redis://localhost:6379/0'

安装celery
pip install celery
pip install redis
注意:linux服务器安装redis,请选择redis3.0版本,因为redis4.0版本要求密码认证才能连接redis
在服务器上安装redis服务器,并启动redis
第一个简单的例子:
#!/usr/bin/env python
# -*- coding: utf-8 -*-
# @Time    : 2018/5/24 22:31
# @Author  : yangyuanqiang
# @File    : ivan.py
import time

from celery import Celery

broker = "redis://192.168.3.11:6379/5"  #存生产者的信息
backend = "redis://192.168.3.11:6379/6"  #存处理完后的消息
app = Celery("ivan", broker=broker, backend=backend)  #ivan写的名字要跟创建py文件的名字保持一致

#以下内容写的是worker
@app.task
def add(x, y):
        time.sleep(5)
        return x+y
登录redis,操作以下步骤,因为以上代码操作的是5库和6库
ivandeMacBook-Pro:redis-3.0.0 ivan$ src/redis-cli

127.0.0.1:6379> select 5

OK

127.0.0.1:6379[5]> keys *

(empty list or set)

127.0.0.1:6379[5]> select 6

OK

127.0.0.1:6379[6]> keys *

(empty list or set)

127.0.0.1:6379[6]>
启动worker,消费者
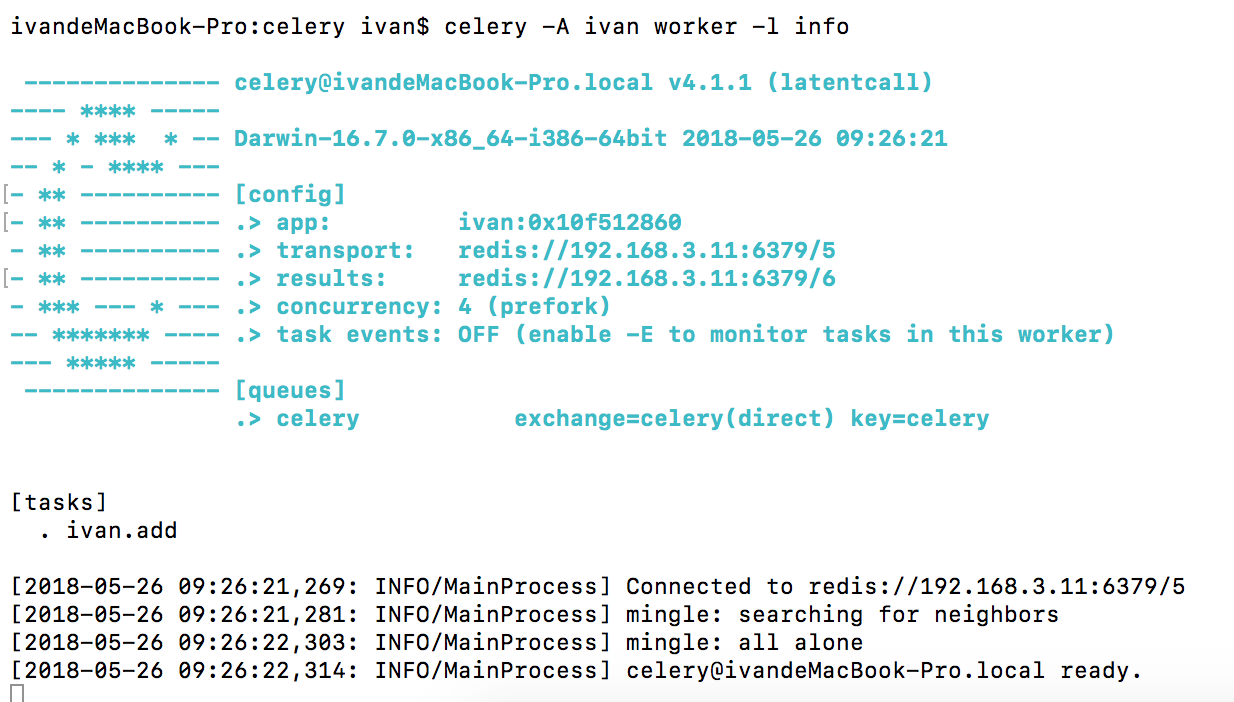
# celery -A ivan worker -l info
注意:celery -A   启动一个app, 后面跟app的名字,app名字需要和上面的文件名字一致。
启动以后,显示如图一下信息,说明启动成功:

生产者
#!/usr/bin/env python
# -*- coding: utf-8 -*-
# @Time    : 2018/5/24 22:10
# @Author  : yangyuanqiang
# @File    : demon4.py
'''
pip install redis
pip install celery

安装redis,启动redis

'''
import time

from ivan import add
re = add.delay(10, 20)
print(re.task_id)
print(re)   #传入ID
print(re.status)    #是否处理
time.sleep(8)
print(re.status)    #是否处理
print(re.get(timeout=1))    #获取结果
print(re.result)    #获取结果
以上实例输出的结果
593e0af5-163c-4d8c-b4bf-57db4e793631
593e0af5-163c-4d8c-b4bf-57db4e793631
PENDING
SUCCESS
30
30
查看linux服务器上的redis
[2018-05-26 10:20:07,810: INFO/MainProcess] Received task: ivan.add[593e0af5-163c-4d8c-b4bf-57db4e793631]
[2018-05-26 10:20:12,831: INFO/ForkPoolWorker-1] Task ivan.add[593e0af5-163c-4d8c-b4bf-57db4e793631] succeeded in 5.016767148999861s: 30
ivandeMacBook-Pro:redis-3.0.0 ivan$ src/redis-cli
127.0.0.1:6379> keys *
1) "site"
2) "list1"
127.0.0.1:6379> select 5
OK
127.0.0.1:6379[5]> keys *
1) "_kombu.binding.celeryev"
2) "_kombu.binding.celery.pidbox"
3) "_kombu.binding.celery"
4) "unacked_mutex"
127.0.0.1:6379[5]> type _kombu.binding.celery
set
127.0.0.1:6379[5]> smembers _kombu.binding.celery
1) "celery\x06\x16\x06\x16celery"
127.0.0.1:6379[5]> select 6
OK
127.0.0.1:6379[6]> keys *
1) "celery-task-meta-593e0af5-163c-4d8c-b4bf-57db4e793631"
127.0.0.1:6379[6]>
注意:在linux服务端启动消费者worker时,首先要查看下linux服务器下的python版本号,然后在pycharm上执行生产者程序时,必须跟linux服务器上的python版本保持一致,否则会报错,已踩坑里
Celery模块调用

既然celery是一个分布式的任务调度模块,那么celery是如何和分布式挂钩呢,celery可以支持多台不通的计算机执行不同的任务或者相同的任务。
如果要说celery的分布式应用的话,我觉得就要提到celery的消息路由机制,就要提一下AMQP协议。具体的可以查看AMQP的文档。简单地说就是可以有多个消息队列(Message Queue),不同的消息可以指定发送给不同的Message Queue,而这是通过Exchange来实现的。发送消息到Message Queue中时,可以指定routiing_key,Exchange通过routing_key来把消息路由(routes)到不同的Message Queue中去

多进程
多worker,多队列
#!/usr/bin/env python
# -*- coding: utf-8 -*-
# @Time    : 2018/5/26 10:31
# @Author  : yangyuanqiang
# @File    : tasks.py


from celery import Celery

app = Celery()
app.config_from_object("celeryconfig")

@app.task
def taskA(x,y):
    return x + y

@app.task
def taskB(x,y,z):
    return x + y + z

@app.task
def add(x,y,z):
    return x * y * z
上面的代码中,首先定义了一个Celery的对象,然后通过celeryconfig.py对celery对象进行设置。之后又分别定义了三个task,分别是taskA, taskB和add。接下来看看celeryconfig.py
注意:代码的缩进格式:
#!/usr/bin/env python
# -*- coding: utf-8 -*-
# @Time    : 2018/5/26 10:32
# @Author  : yangyuanqiang
# @File    : celeryconfig.py


from kombu import Exchange,Queue

BROKER_URL = "redis://192.168.3.11:6379/1"
CELERY_RESULT_BACKEND = "redis://192.168.3.11:6379/2"

CELERY_QUEUES = (
Queue("default",Exchange("default"),routing_key="default"),
Queue("for_task_A",Exchange("for_task_A"),routing_key="for_task_A"),
Queue("for_task_B",Exchange("for_task_B"),routing_key="for_task_B")
)

CELERY_ROUTES = {
'tasks.taskA':{"queue":"for_task_A","routing_key":"for_task_A"},
'tasks.taskB':{"queue":"for_task_B","routing_key":"for_task_B"}
}
配置文件一般单独写在一个文件中。

启动一个worker来指定taskA
ivandeMacBook-Pro:celery ivan$ celery -A tasks worker -l info -n workerA.%h -Q for_task_A

启动一个worker来指定taskB
celery -A tasks worker -l info -n workerB.%h -Q for_task_B
 执行以下程序
#!/usr/bin/env python
# -*- coding: utf-8 -*-
# @Time    : 2018/5/26 10:42
# @Author  : yangyuanqiang
# @File    : demon6.py


from tasks import *
re1 = taskA.delay(100, 200)
print(re1.result)
re2 = taskB.delay(1, 2, 3)
print(re2.result)
re3 = add.delay(1, 2, 3)
print(re3.status)     #PENDING
以上实例输出的结果
None
None
PENDING
查看linux服务器上tasks_A的输出结果
[2018-05-26 10:53:30,586: INFO/MainProcess] Received task: tasks.taskA[f282b8f3-cf17-43e3-bdc9-95088816a15c]
[2018-05-26 10:53:30,588: INFO/ForkPoolWorker-1] Task tasks.taskA[f282b8f3-cf17-43e3-bdc9-95088816a15c] succeeded in 0.0006585959999938495s: 300
tasks_B的输出结果
[2018-05-26 10:53:30,589: INFO/MainProcess] Received task: tasks.taskB[c645b2ec-ee1f-4dc0-9d3c-f7b9b428a798]
[2018-05-26 10:53:30,591: INFO/ForkPoolWorker-1] Task tasks.taskB[c645b2ec-ee1f-4dc0-9d3c-f7b9b428a798] succeeded in 0.0005881699999008561s: 6


