CUDA_10.1.105_418.96_windows + cuDNN-10.1-windows7-x64-v7.6.5.32 + python3.8.5 + tenserflow2.2.0
高版本CUDA 在算力低的显卡上不执行核函数,报错:no kernel image is available for execution on the device
1.参考这篇博文,卸载高版本的CUDA,但是卸载CUDA后又要重新下载新的CUDA,配置环境,个人觉得很麻烦,那么可以参考第二种方案
2.在nvcc 编译的时候指定显卡算力,具体的
在VS2013项目右键-->属性-->配置属性-->CUDA C/C++ --> Command Line 里增加 -arch sm_xx ,这里的xx 是跟算力有关,例如GT640M的算力是3.0,那么就是 -arch sm_30
查看CUDA版本信息
(1)命令: nvidia-smi (C:\Program Files\NVIDIA Corporation\NVSMI\nvidia-smi.exe)
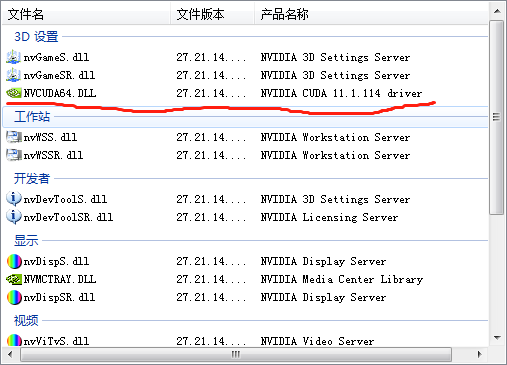
(2)桌面右击NVIDIA控制面板

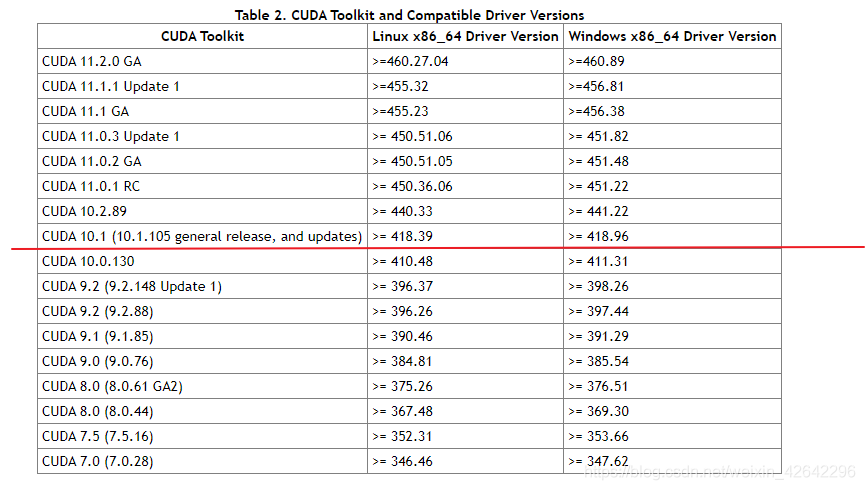
桌面右击>NVIDIA控制面板>左下角系统信息>组件>查看系统CUDA版本(一般向下兼容)
GeForce系列的显卡以及各个显卡的计算能力(compute capability)
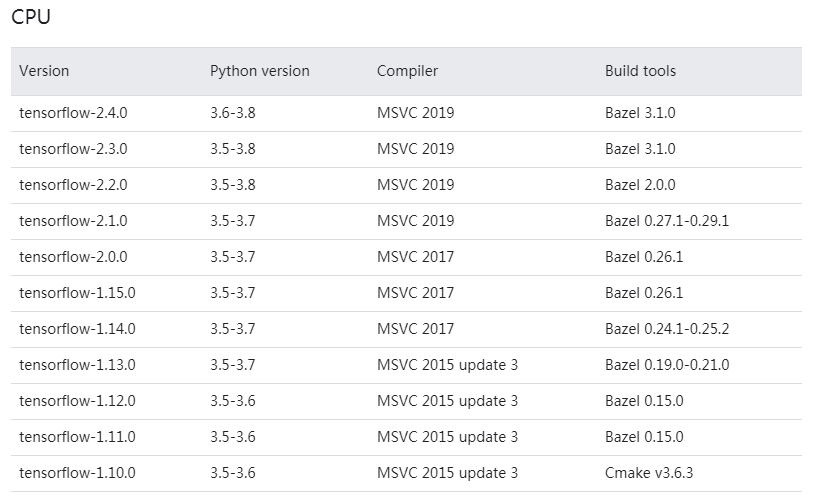
python、tensorflow、CUDA、cuDNN版本对应关系:https://tensorflow.google.cn/install/source_windows#gpu

CUDA下载地址:https://developer.nvidia.com/cuda-toolkit-archive
cuDNN下载地址:https://developer.nvidia.com/rdp/cudnn-archive
cuDNN需登录,可qq登录,点i agree,选择对应cuda版本,对应操作系统下载
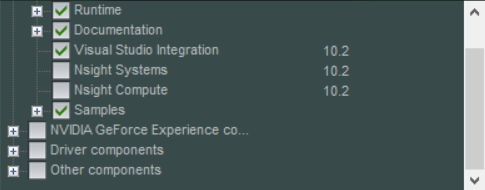
貌似不用提前装vs2017(太大),此处的vs最好不要勾选,Nsight两个有人勾选(不知道干嘛的)
可以自己在D盘新建安装目录
D:\CUDA\NVIDIA_GPU_Computing_Toolkit;
D:\CUDA\Samples;
安装成功后cmd>nvcc -V 验证,提示版本表示成功,但不意味着可以使用

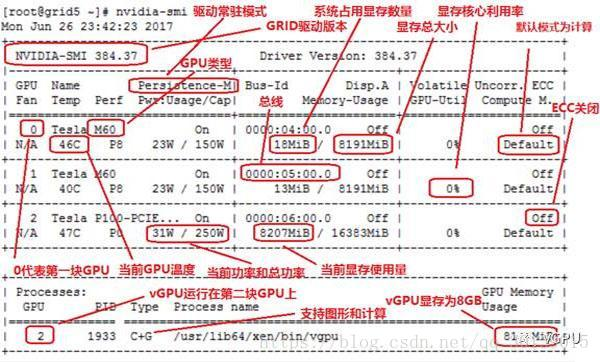
查看GPU运行时的监测界面 nvidia-smi (C:\Program Files\NVIDIA Corporation\NVSMI\nvidia-smi.exe)

配置环境变量

CUDA_SDK_PATH = D:\CUDA\CUDA Samples
# 可以看到后面四个都是使用相对路径的
CUDA_SDK_LIB_PATH = %CUDA_SDK_PATH%\common\lib\x64
CUDA_SDK_BIN_PATH = %CUDA_SDK_PATH%\bin\win64
CUDA_LIB_PATH = %CUDA_PATH%\lib\x64
CUDA_BIN_PATH = %CUDA_PATH%\bin
检查环境变量配置是否成功:cmd>set cuda

D:\CUDA\NVIDIA_GPU_Computing_Toolkit\extras\demo_suite下 shift+右键 打开cmd
cmd>deviceQuery.exe
cmd>bandwidthTest.exe
如果都出现result=PASS表示成功
cuDNN解压
将文件夹下的(bin、include、lib)移动到d:\CUDA\NVIDIA_GPU_Computing_Toolkit下
把D:\CUDA\NVIDIA GPU Computing Toolkit\extras\CUPTI\lib64\cupti64_102.dll
拷贝到D:\CUDA\NVIDIA GPU Computing Toolkit\bin
https://www.dll-files.com/cudart64_110.dll.html
安装tensorflow
配置anaconda下载源
C:\Users\Administrator\AppData\Roaming\pip\pip.ini
[global]
index-url = https://mirrors.aliyun.com/pypi/simple/
# 清华源
pip config set global.index-url https://pypi.tuna.tsinghua.edu.cn/simple
# 阿里源
pip config set global.index-url https://mirrors.aliyun.com/pypi/simple/
# 腾讯源
pip config set global.index-url http://mirrors.cloud.tencent.com/pypi/simple
# 豆瓣源
pip config set global.index-url http://pypi.douban.com/simple/
conda config --add channels https://mirrors.tuna.tsinghua.edu.cn/anaconda/pkgs/free
conda config --add channels https://mirrors.tuna.tsinghua.edu.cn/anaconda/pkgs/main
conda config --add channels https://mirrors.tuna.tsinghua.edu.cn/anaconda/pkgs/pro
conda config --add channels https://mirrors.tuna.tsinghua.edu.cn/anaconda/pkgs/msys2这个源跟python的pip下载源一样的。配置文件位置: C:\Users\your_name下名为.condarc文件。
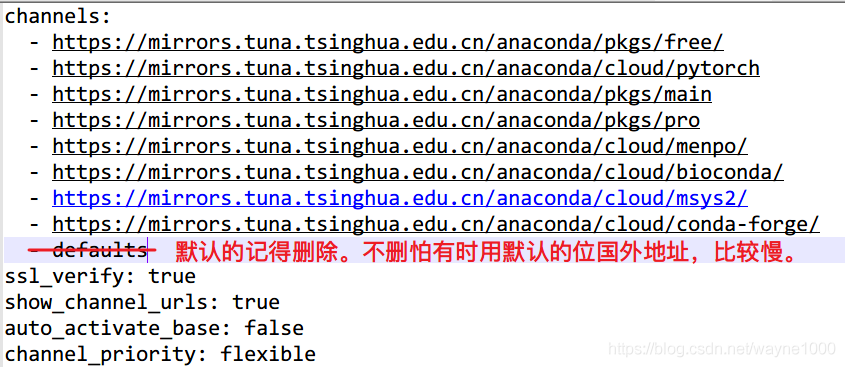
channels:
  - https://mirrors.tuna.tsinghua.edu.cn/anaconda/pkgs/free/
  - https://mirrors.tuna.tsinghua.edu.cn/anaconda/cloud/pytorch
  - https://mirrors.tuna.tsinghua.edu.cn/anaconda/pkgs/main
  - https://mirrors.tuna.tsinghua.edu.cn/anaconda/pkgs/pro
  - https://mirrors.tuna.tsinghua.edu.cn/anaconda/cloud/menpo/
  - https://mirrors.tuna.tsinghua.edu.cn/anaconda/cloud/bioconda/
  - https://mirrors.tuna.tsinghua.edu.cn/anaconda/cloud/msys2/
  - https://mirrors.tuna.tsinghua.edu.cn/anaconda/cloud/conda-forge/
ssl_verify: true
show_channel_urls: true
auto_activate_base: false
channel_priority: flexible
安装pytorch
conda create -n tensorflow python==3.8.5
conda activate tensorflow
#conda deactivate
pip install tensorflow-gpu==2.2.0 #-i https://pypi.tuna.tsinghua.edu.cn/simple
pip install tensorflow-gpu==2.2.0 -i http://mirrors.aliyun.com/pypi/simple/ --trusted-host mirrors.aliyun.com
pip install tensorflow-gpu==2.4 -i http://pypi.douban.com/simple --trusted-host pypi.douban.com
验证tensorflow-gpu
import tensorflow as tf
#tf.test.is_gpu_available() #检测gpu版本是否可用
tf.config.list_physical_devices('GPU')
tf.test.gpu_device_name()
conda create -n pytorch python=3.8.5
conda activate pytorch
#conda install torch torchvision torchaudio cudatoolkit==10.1 #https://download.pytorch.org/whl/torch_stable.html
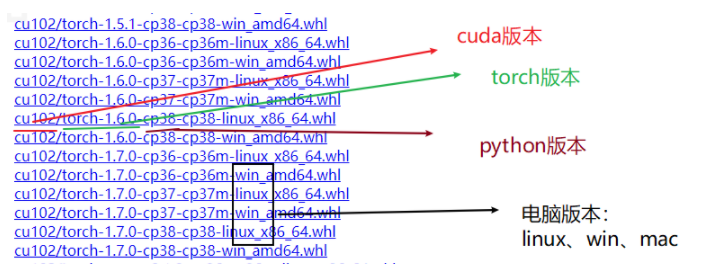
pip install torch==1.6.0+cu101 torchvision==0.7.0+cu101 torchaudio==0.6.0 -f https://download.pytorch.org/whl/torch_stable.html
pip install torch==1.7.1+cu110 torchvision==0.8.2+cu110 torchaudio==0.7.2 -f https://download.pytorch.org/whl/torch_stable.html
安装mmcv
https://github.com/open-mmlab/mmcv
https://github.com/open-mmlab/mmcv/releases
>> pip install mmcv-full=={mmcv_version} -f https://download.openmmlab.com/mmcv/dist/cu101/torch1.6.0/index.html
https://download.openmmlab.com/mmcv/dist/index.html
https://www.zywvvd.com/2021/04/20/deep_learning/windows-mmcv-1-2-7-install/windows-mmcv-1-2-7-install/
conda remove -n your_env_name(虚拟环境名称) --all
conda remove --name your_env_name package_name(包名)
python
import torch
print(torch.__version__)
conda install ipykernel
python -m ipykernel install --user --name pytorch --display-name "pytorch"
jupyter notebook --generate-config
打开该文件,找到notebook_dir,
将#c.NotebookApp.notebook_dir = ''改为:前面的注释#要去掉。
c.NotebookApp.notebook_dir = 'C:\\Users\\liufe\\Desktop\\Jupyter Projects'
测试tensorflow-gpu是否可用
import tensorflow as tf
import timeit

with tf.device('/cpu:0'):
    cpu_a = tf.random.normal([10000, 100])
    cpu_b = tf.random.normal([100, 2000])
    print(cpu_a.device, cpu_b.device)

with tf.device('/gpu:0'):
    gpu_a = tf.random.normal([10000, 100])
    gpu_b = tf.random.normal([100, 2000])
    print(gpu_a.device, gpu_b.device)

def cpu_run():
    with tf.device('/cpu:0'):
        c = tf.matmul(cpu_a, cpu_b)
    return c

def gpu_run():
    with tf.device('/gpu:0'):
        c = tf.matmul(gpu_a, gpu_b)
    return c

# warm up	这里就当是先给gpu热热身了
cpu_time = timeit.timeit(cpu_run, number=10)
gpu_time = timeit.timeit(gpu_run, number=10)
print('warmup:', cpu_time, gpu_time)


cpu_time = timeit.timeit(cpu_run, number=10)
gpu_time = timeit.timeit(gpu_run, number=10)
print('run time:', cpu_time, gpu_time)
参考:
anaconda安装pytorch, cuda版本10.2,cudnn版本10.2-windows10-x64-v8.0.3.33


