mysql安装部署
mysql包的下载地址
https://dev.mysql.com/downloads/mysql/

Cmake官网下载地址:
https://cmake.org/download/
编译安装mysql
第一步:下载环境
[root@zxw6 ~]# yum install -y gcc gcc-c++ ncurses-devel perl openssl openssl-devel
第二步:卸载系统的mysql
[root@zxw6 ~]# rpm -qa | grep -i "mysql"
[root@zxw6 ~]# rpm -qa | grep -i "mysql"  | xargs rpm -e --nodeps
删除mysql的管理文件
[root@zxw6 ~]# find / -name mysql
第三步:创建mysql用户及组
[root@zxw6 ~]# groupadd mysql
[root@zxw6 ~]# useradd -g mysql mysql -s /bin/false
第四步:创建mysql数据目录和安装目录
[root@zxw6 ~]# mdkir -p /usr/local/mysql
[root@zxw6 ~]# mkdir -p /data/mysql
第五步:赋予权限
[root@zxw6 ~]# chown -R mysql :/data/mysql
第六步:上传安装包并解压
[root@zxw6 cmake-3.22.0]# tar -xf cmake-3.22.0.tar.gz
[root@zxw6 cmake-3.22.0]# tar -xf mysql-5.7.28-tar.gz
[root@zxw6 mysql]# ls
cmake-3.22.0  cmake-3.22.0.tar.gz  mysql  mysql-5.7.28-tar.gz
第七步:编译安装cmake编译工具。(先执行./configure检查配置,再执行make编译,最后执行make install 安装)
[root@zxw6 cmake-3.22.0]# pwd
/usr/local/mysql/cmake-3.22.0
[root@zxw6 cmake-3.22.0]# ./configure
-- Configuring done
-- Generating done
-- Build files have been written to: /usr/local/mysql/cmake-3.22.0
[root@zxw6 cmake-3.22.0]# make && make install
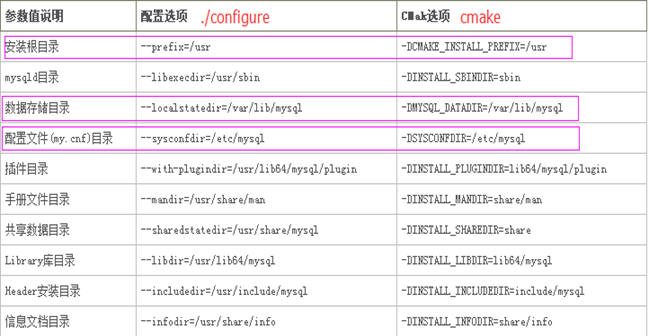
官方 工具选项解析

-DCMAKE_INSTALL_PREFIX=/usr/local/es/mysql57/ \ #安装目录
-DMYSQL_UNIX_ADDR=/tmp/mysql.sock \ 服务器侦听套接字连接的Unix套接字文件路径,默认/tmp/mysql.sock。 这个值可以在服务器启动时用–socket选项来设置。所以这条可以去掉
-DMYSQL_DATADIR=/data/mysql \ MySQL数据目录的位置。 该值可以在服务器启动时使用–datadir选项进行设置。
-DSYSCONFDIR=/etc \ 默认的my.cnf选项文件目录。 此位置不能在服务器启动时设置,但可以使用–defaults-file = file_name选项使用给定的选项文件启动服务器,其中file_name是该文件的完整路径名。
-DMYSQL_USER=mysql \ 指定用户名
-DMYSQL_TCP_PORT=3306 \ 服务器侦听TCP / IP连接的端口号。默认值是3306。 该值可以在服务器启动时使用–port选项进行设置。
-DWITH_XTRADB_STORAGE_ENGINE=1 \ 储存引擎 XTRADB
-DWITH_INNOBASE_STORAGE_ENGINE=1 \ 储存引擎 INNOBASE
-DWITH_PARTITION_STORAGE_ENGINE=1 \储存引擎 PARTITION
-DWITH_BLACKHOLE_STORAGE_ENGINE=1 \储存引擎 BLACKHOLE
-DWITH_MYISAM_STORAGE_ENGINE=1 \ 储存引擎 MYISAM
-DWITH_READLINE=1 \
-DENABLED_LOCAL_INFILE=1 \ 该选项控制MySQL客户端库的已编译默认LOCAL功能???啥意思
-DWITH_EXTRA_CHARSETS=1 \ 这个为什么是1,文档不是name ,字符串吗? 要包含哪些额外的字符集: all complex none
-DDEFAULT_CHARSET=utf8 \ 服务器字符集。默认情况下,MySQL使用latin1(cp1252西欧)字符集。 该值可以在服务器启动时使用–character_set_server选项进行设置。
-DDEFAULT_COLLATION=utf8_general_ci \ 服务器整理。默认情况下,MySQL使用latin1_swedish_ci。该值可以在服务器启动时使用–character_set_server选项进行设置。
-DEXTRA_CHARSETS=all \
-DWITH_BIG_TABLES=1 \
-DWITH_DEBUG=0 是否包含调试支持。
第八步:编译安装mysql软件包。(先执行 cmake . -DCMAKE_INSTALL_PREFIX=/usr/local/mysql -DMYSQL_DATADIR=/data/mysql -DSYSCONFDIR=/etc 再执行make 最后执行 make install )
[root@zxw6 boost]# cmake . -DCMAKE_INSTALL_PREFIX=/usr/local/mysql -DMYSQL_DATADIR=/data/mysql -DSYSCONFDIR=/etc
错误解决
CMake Error at cmake/boost.cmake:88 (MESSAGE):
  You can download it with -DDOWNLOAD_BOOST=1 -DWITH_BOOST=<directory>

  This CMake script will look for boost in <directory>.  If it is not there,
  it will download and unpack it (in that directory) for you.

  If you are inside a firewall, you may need to use an http proxy:

  export http_proxy=http://example.com:80

Call Stack (most recent call first):
  cmake/boost.cmake:245 (COULD_NOT_FIND_BOOST)
  CMakeLists.txt:536 (INCLUDE)
[root@zxw6 mysql-5.7.35]# mkdir -p /usr/local/boost
[root@zxw6 mysql-5.7.35]# wget http://www.sourceforge.net/projects/boost/files/boost/1.74.0/boost_1_74_0.tar.gz
[root@zxw6 mysql-5.7.35]# tar xf boost_1_74_0.tar.gz
CMake Warning at cmake/bison.cmake:27 (MESSAGE):
  Bison executable not found in PATH
Call Stack (most recent call first):
  sql/CMakeLists.txt:601 (INCLUDE)


CMake Warning at cmake/bison.cmake:27 (MESSAGE):
  Bison executable not found in PATH
Call Stack (most recent call first):
  libmysqld/CMakeLists.txt:215 (INCLUDE)
解决
[root@zxw6 mysql-5.7.35]# yum install bison -y
再次执行
[root@zxw6 mysql-5.7.35]# cmake . -DCMAKE_INSTALL_PREFIX=/usr/local/mysql -DMYSQL_DATADIR=/data/mysql -DSYSCONFDIR=/etc  -DDOWNLOAD_BOOST=1 -DWITH_BOOST=/usr/local/boost/

[root@zxw6 mysql-5.7.35]# make && make install
第九步:加入systemctl管理
[root@zxw6 mysql-5.7.35]# pwd
/usr/local/mysql/mysql-5.7.35
[root@zxw6 mysql-5.7.35]# cp support-files/mysql.server /etc/init.d/mysqld
第十步:加入开机自启
[root@zxw6 mysql-5.7.35]# chkconfig --add mysqld
[root@zxw6 mysql-5.7.35]# chkconfig

注意:该输出结果只显示 SysV 服务,并不包含原生 systemd 服务。SysV 配置数据可能被原生 systemd 配置覆盖。
      如果您想列出 systemd 服务,请执行 'systemctl list-unit-files'。
      欲查看对特定 target 启用的服务请执行
      'systemctl list-dependencies [target]'。

mysqld          0:关    1:关    2:开    3:开    4:开    5:开    6:关
netconsole      0:关    1:关    2:关    3:关    4:关    5:关    6:关
network         0:关    1:关    2:开    3:开    4:开    5:开    6:关


[root@zxw6 mysql-5.7.35]# chkconfig --level 16 mysqld off|关   on|开
第十一步:修改配置文件
[root@zxw6 mysql-5.7.35]# cat /etc/my.cnf
[mysqld]
datadir=/data/mysql/
basedir=/usr/local/mysql/
socket=/var/lib/mysql/mysql.sock
# Disabling symbolic-links is recommended to prevent assorted security risks
symbolic-links=0
# Settings user and group are ignored when systemd is used.
# If you need to run mysqld under a different user or group,
# customize your systemd unit file for mariadb according to the
# instructions in http://fedoraproject.org/wiki/Systemd

[mysqld_safe]
log-error=/var/log/mariadb/mariadb.log
pid-file=/var/run/mariadb/mariadb.pid

#
# include all files from the config directory
#
!includedir /etc/my.cnf.d
第十二步:初始化数据目录
[root@zxw6 ~]# cat /etc/profile.d/mysql.sh
export PATH=$PATH:/usr/local/mysql/bin
[root@zxw6 ~]# source /etc/profile.d/mysql.sh
[root@zxw6 ~]# chown -R mysql:mysql  /usr/local/mysql
[root@zxw6 ~]# mysqld  --initialize --user=mysql --datadir=/data/mysql  --basedir=/usr/local/mysql
第十三步:启动数据库
[root@zxw6 ~]# mysqld --user=root &
登陆数据库
 查看密码/var/log/mysqld.log
如果无法查看,修改配置文件,在最后添加
[root@zxw6 bin]# cat /etc/my.cnf
[server]
skip-grant-tables
[root@zxw6 bin]# ps -ef | grep mysql
[root@zxw6 bin]# kill -9 $mysql pid
再次启动
[root@zxw6 bin]# mysqld --user=root &
[root@zxw6 ~]# mysql -uroot
mysql>

修改密码三种方法

#flush privileges;
update user set password=password("newpassword") where user='root';
alter user root@'localhost' identified by'newpassword';
set password for root@localhost =password('newpassword');

 浙公网安备 33010602011771号