Spring知识点小结(一)
一、Spring的简介
1、spring是一个full-stack轻量级开源框架
2、spring的两大核心
IoC: inverse of control 控制反转:反转是对象的创建权,由原来自己new方式变成让spring容器(IoC容器)创建对象 作用:完成解耦合
AOP: 面向切面编程(底层实现:动态代理) 作用:不修改源码的情况下,对目标方法进行增强
3、spring优点
方便解耦 简化开发:IoC
aop编程支持:aop
声明式事务的支持:声明式事务控制
方便程序测试:spring集成junit
方便集成各种优秀框架:ssh整合
降低javaEEAPI的使用难度:
spring提供了很多工具模版 XXXTemplate
例如:
JdbcTemplate(相当于DBUtils)
HibernateTemplate
RedisTemplate
JmsTemplate
... ...
二、Spring的快速入
开发步骤:
1、导入spring的相关jar
4个基本包:beans、core、context、expression
日志:apache-commons-logging.jar、apache-log4j.jar(log4j.properties)
2、定义Bean
public class CustomerDaoImpl implements CustomerDao {
@Override
public void save() {
System.out.println("save running......");
}
}
3、配置xml文件
习惯将该xml文件命名为applicationContext.xml 存放到src下
约束头位置:spring-framework-4.2.4.RELEASE/docs/spring-framework-reference/html/xsd-configuration.html
<?xml version="1.0" encoding="UTF-8"?>
<beans xmlns="http://www.springframework.org/schema/beans"
xmlns:xsi="http://www.w3.org/2001/XMLSchema-instance"
xsi:schemaLocation="
http://www.springframework.org/schema/beans http://www.springframework.org/schema/beans/spring-beans.xsd">
<bean id="customerDao" class="com.itheima.dao.impl.CustomerDaoImpl"></bean>
</beans>
4、通过spring客户端代码获得Bean对象
ApplicationContext app = new ClassPathXmlApplicationContext("applicationContext.xml");
CustomerDao customerDao = (CustomerDao) app.getBean("customerDao");
customerDao.save();

三、Spring的配置
<!--
1、bean的基本配置(重点)
id: 产生对象在spring容器中的唯一标识
class: 要创建的bean的全限定名
scope: bean的作用域,取值很多
singleton(默认值): 单例
prototype: 原型,多例
Spring创建Bean的时机?
singleton:加载spring配置文件时 Bean创建
prototype:当getBean时创建Bean对象
<bean id="customerDao" class="com.itheima.dao.impl.CustomerDaoImpl" scope="prototype"></bean>
-->
<!-- 2、bean的初始化和销毁方法配置(了解)
init-method:指定该Bean的初始化方法
destroy-method:指定该Bean的销毁方法
<bean id="customerDao" class="com.itheima.dao.impl.CustomerDaoImpl" init-method="init" destroy-method="destroy"></bean>
-->
<!-- 3、bean的实例化三种方式
3.1 通过无参构造创建bean(有参构造) 重点
3.2 通过静态工厂方式(工厂方法是静态的) (了解了解了解)
<bean id="customerDao" class="com.itheima.factory.StaticBeanFactory" factory-method="getCustomerDao"></bean>
3.3 通过实例工厂方式 (了解了解了解)
<bean id="beanFactory" class="com.itheima.factory.InstanceBeanFactory"></bean>
<bean id="customerDao" factory-bean="beanFactory" factory-method="getCustomerDao"></bean>
-->
<!-- 配置dao -->
<bean id="customerDao" class="com.itheima.dao.impl.CustomerDaoImpl"></bean>
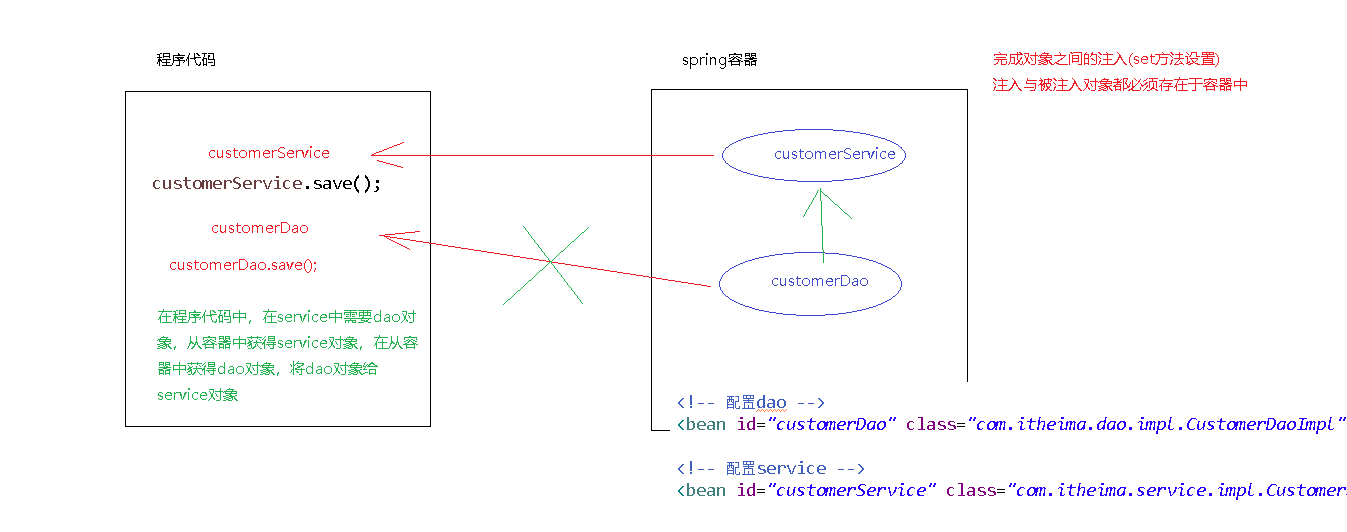
<!-- 4、配置service (依赖注入DI)
property:属性
name:Service对象的属性名称 setXxx中xxx
ref:根据id引用spring容器中的Bean对象
依赖注入:DI
解释:service要想正常的工作 内部必须依赖于dao
问题:IoC与DI是否是同一件事情?
IoC:控制反转,在spring容器中创建Bean
DI:依赖注入,在创建Bean时 将数据注入到Bean中
<bean id="customerService" class="com.itheima.service.impl.CustomerServiceImpl">
<property name="customerDao" ref="customerDao"></property>
</bean>
-->
<!-- 5、依赖注入的数据类型
5.1 对象引用(ref)
<property name="customerDao" ref="customerDao"></property>
5.2 普通属性
<property name="username" value="zhangsan"></property>
5.3 集合属性
见下面
-->
<bean id="customerService" class="com.itheima.service.impl.CustomerServiceImpl">
<property name="customerDao" ref="customerDao"></property>
<property name="username" value="zhangsan"></property>
<property name="strList">
<list>
<value>aaa</value>
<value>bbb</value>
</list>
</property>
<property name="customerList">
<list>
<ref bean="customer1"/>
<ref bean="customer2"/>
</list>
</property>
<property name="customerMap">
<map>
<entry key="c1" value-ref="customer1"></entry>
<entry key="c2" value-ref="customer2"></entry>
</map>
</property>
<property name="props">
<props>
<prop key="p1">ppp1</prop>
<prop key="p2">ppp2</prop>
</props>
</property>
</bean>
<!-- Customer -->
<bean id="customer1" class="com.itheima.domain.Customer">
<property name="name" value="tom"></property>
<property name="age" value="18"></property>
</bean>
<bean id="customer2" class="com.itheima.domain.Customer">
<property name="name" value="jeck"></property>
<property name="age" value="19"></property>
</bean>
<!--
6、注入的三种方式
6.1 set方法注入(重点)
6.2 构造方法注入
6.3 p命名空间注入 (也是set方法注入)
对set方法注入的简化操作
在xml中引入p命名空间
xmlns:p="http://www.springframework.org/schema/p"
-->
<bean id="customerService2" class="com.itheima.service.impl.CustomerServiceImpl2" p:username="lucy" p:customer-ref="customer2">
<constructor-arg name="name" value="zhangsan"></constructor-arg>
<constructor-arg name="age" value="20"></constructor-arg>
<constructor-arg name="customer" ref="customer1"></constructor-arg>
</bean>
四、Spring相关API
@Test
//测试Spring的相关API
public void test8(){
/*
* 加载spring配置文件 创建spring容器
* ApplicationContext接口的实现主要3个
* ClassPathXmlApplicationContext:
* ClassPath:该配置存在位置,类路径(src)
* Xml:加载配置的文件类型
* FileSystemXmlApplicationContext:
* FileSystem:该配置存在位置,文件系统(磁盘路径)
* Xml:加载配置的文件类型
*
* AnnotationConfigApplicationContext:
* AnnotationConfig: 注解配置 当消除xml配置文件后 配置使用注解替代后
*
*
*/
ApplicationContext app = new ClassPathXmlApplicationContext("applicationContext.xml");
//ApplicationContext app = new FileSystemXmlApplicationContext("D:\\java\\workspace\\workspack-heima311\\SpringDay01\\src\\applicationContext.xml");
//ApplicationContext app = new AnnotationConfigApplicationContext();
/*
* getBean有两种方式:
* 根据id从容器中获得Bean
* 根据类型从容器中获得Bean
*/
CustomerService customerService = (CustomerService) app.getBean("customerService2");
//CustomerService customerService = app.getBean(CustomerService.class);
customerService.save();
}

 浙公网安备 33010602011771号