【原创】SpringCloud:基于Spring Cloud netflix全家桶搭建一个完整的微服务架构系统
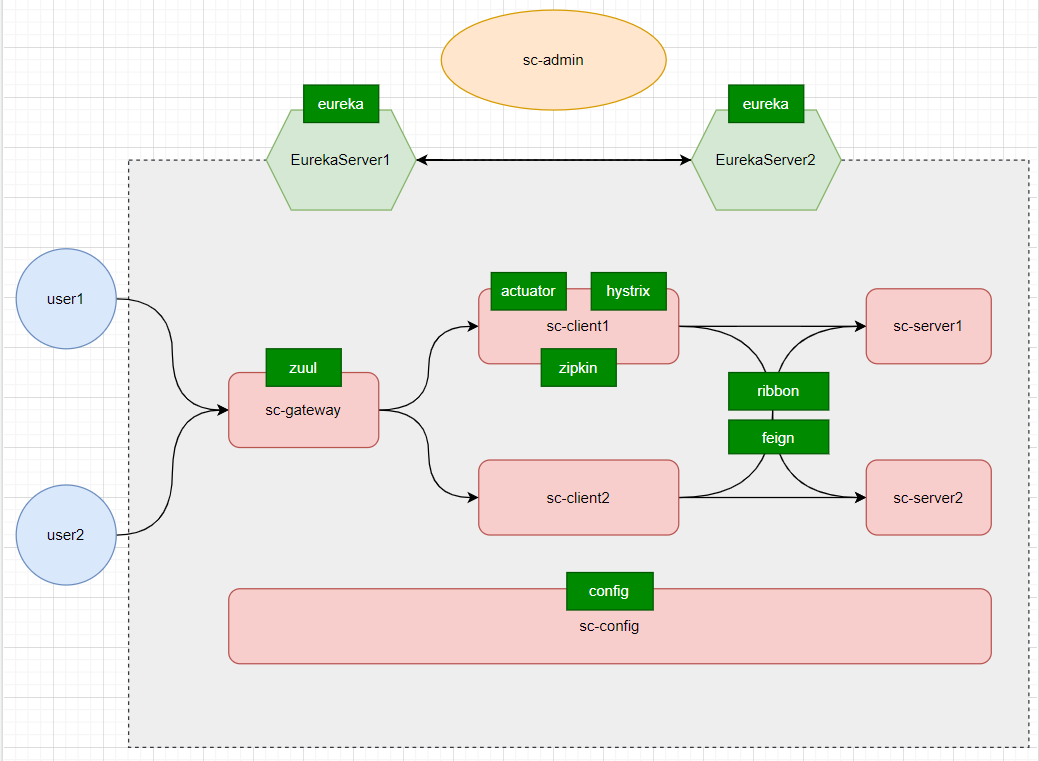
整体架构

服务规划
完整Host配置
192.168.0.12 ek1.com
192.168.0.12 ek2.com
192.168.0.12 scServer1
192.168.0.12 scServer2
192.168.0.12 scclient1
192.168.0.12 scclient2
192.168.0.12 scgateway
192.168.0.12 sczipkin
192.168.0.12 scadmin
192.168.0.12 scconfig
配置Eureka Server注册中心(集群模式)
Host配置
192.168.0.12 ek1.com
192.168.0.12 ek2.com
maven依赖
<dependency>
    <groupId>org.springframework.cloud</groupId>
    <artifactId>spring-cloud-starter-netflix-eureka-server</artifactId>
</dependency>
<dependency>
    <groupId>org.springframework.cloud</groupId>
    <artifactId>spring-cloud-starter-netflix-eureka-client</artifactId>
</dependency>
ek1 application.properties
#服务器端口
server.port=9001
#应用名称,高可用的两个eureka节点必须保持一致
spring.application.name=eurekaServer

#eureka多节点配置
#是否注册
eureka.client.enabled=true
#是否将自己注册到其他Eureka Server,默认为true需要
eureka.client.register-with-eureka=true
#是否从eureka server获取注册信息, 需要
eureka.client.fetch-registry=true
#设置服务注册中心的URL,用于client和server端交流
#此节点应向其他节点发起请求
eureka.client.serviceUrl.defaultZone=http://ek2.com:9002/eureka/
#主机名,必填
eureka.instance.hostname=ek1.com
#分组名称
#eureka.instance.app-group-name=eurekaServerGroup
#是否开启自我保护
eureka.server.enable-self-preservation=true
#触发自我保护阀值
eureka.server.renewal-percent-threshold=0.85
#失效服务间隔
eureka.server.eviction-interval-timer-in-ms=6000
ek2 application.properties
#服务器端口
server.port=9002
#应用名称,两个eureka节点必须保持一致
spring.application.name=eurekaServer

#eureka多节点配置
#是否将自己注册到其他Eureka Server,默认为true需要
eureka.client.register-with-eureka=true
#是否从eureka server获取注册信息, 需要
eureka.client.fetch-registry=true
#设置服务注册中心的URL,用于client和server端交流
#此节点应向其他节点发起请求
eureka.client.serviceUrl.defaultZone=http://ek1.com:9001/eureka/
#主机名,必填
eureka.instance.hostname=ek2.com
#分组名称
#eureka.instance.app-group-name=eurekaServerGroup
management.endpoint.shutdown.enabled=true
应用开启EurekaServer
@EnableEurekaServer // 启用Eureka服务端
EurekaServer配置优化
TODO
EurekaServer地址
配置Eureka Clients
Host配置
192.168.0.12 scServer1
192.168.0.12 scServer2
maven依赖
<dependency>
    <groupId>org.springframework.cloud</groupId>
    <artifactId>spring-cloud-starter-netflix-eureka-client</artifactId>
</dependency>
scServer1 application.properties
server.port=8001
spring.application.name=scServer

#eureka client config
#是否注册
eureka.client.enabled=true
#是否将自己注册到其他Eureka Server,默认为true需要
eureka.client.register-with-eureka=true
#是否从eureka server获取注册信息, 需要
eureka.client.fetch-registry=true
#设置服务注册中心的URL,用于client和server端交流
#重要说明:client默认向配置的第1个server地址注册,第1个注册不成功后再依次向第2个,第3个注册(最多重试3次)
eureka.client.serviceUrl.defaultZone=http://ek1.com:9002/eureka/,http://ek2.com:9002/eureka/
#主机名,必填
eureka.instance.hostname=scServer1
#续约发送间隔默认30秒,心跳间隔
eureka.instance.lease-renewal-interval-in-seconds=5
#表示client间隔多久去拉取服务注册信息,默认为30秒,如果要迅速获取服务注册状态,可以缩小该值,比如5秒
eureka.client.registry-fetch-interval-seconds=5
#续约到期时间(默认90秒)
eureka.instance.lease-expiration-duration-in-seconds=90
#将实例IP注册到Eureka Server上(多网卡适用,其他服务可通过IP访问)
#eureka.instance.prefer-ip-address=true
#eureka.instance.ip-address=192.168.0.12
#是否开启健康检测,对应EurekaServer控制台的Status状态
eureka.client.healthcheck.enabled=true
scServer2 application.properties
server.port=8002
spring.application.name=scServer

#eureka client config
#是否注册
eureka.client.enabled=true
#是否将自己注册到其他Eureka Server,默认为true需要
eureka.client.register-with-eureka=true
#是否从eureka server获取注册信息, 需要
eureka.client.fetch-registry=true
#设置服务注册中心的URL,用于client和server端交流
#重要说明:client默认向配置的第1个server地址注册,第1个注册不成功后再依次向第2个,第3个注册(最多重试3次)
eureka.client.serviceUrl.defaultZone=http://ek1.com:9002/eureka/,http://ek2.com:9002/eureka/
#主机名,必填
eureka.instance.hostname=scServer2
#续约发送间隔默认30秒,心跳间隔
eureka.instance.lease-renewal-interval-in-seconds=5
#表示client间隔多久去拉取服务注册信息,默认为30秒,如果要迅速获取服务注册状态,可以缩小该值,比如5秒
eureka.client.registry-fetch-interval-seconds=5
#续约到期时间(默认90秒)
eureka.instance.lease-expiration-duration-in-seconds=90
#将实例IP注册到Eureka Server上(多网卡适用,其他服务可通过IP访问)
#eureka.instance.prefer-ip-address=true
#eureka.instance.ip-address=192.168.0.12
#是否开启健康检测,对应EurekaServer控制台的Status状态
eureka.client.healthcheck.enabled=true
测试地址
- http://scserver1:8001/user/getName
- http://scserver2:8002/user/getName
- 手工下线:http://scserver1:8001/health/adjust?status=down
配置客户端服务调用(基于RestTemplate)及负载均衡(Ribbon)
说明:
- 请参考sc-client1应用代码实现;
- spring-cloud-starter-netflix-eureka-client依赖中已存在Ribbon依赖信息(不需要重复导包)。
RestTemplate客户端配置
/**
 * Web配置
 *
 * @author binglang
 * @date 2021/11/24 10:44
 **/
@Configuration
public class WebConfig implements WebMvcConfigurer {
    // 开启负载均衡
    @LoadBalanced
    @Bean
    public RestTemplate restTemplate() {
        return new RestTemplate();
    }
}
客户端调用
    /**
     * 测试RestTemplate服务调用
     */
    @GetMapping(value = "/getUserNameByRestTemplate")
    // 整合Hystrix配置服务降级
    // @HystrixCommand(fallbackMethod = "fallback")
    public String getUserNameByRestTemplate() {
        String serviceUrl = "http://SCSERVER/user/getName";
        String username = restTemplate.getForObject(serviceUrl, String.class);

        return username;
    }
测试地址
配置客户端服务调用(基于Feign)及负载均衡(Ribbon)
说明:请参考sc-client1应用代码实现。
maven依赖
<dependency>
    <groupId>org.springframework.cloud</groupId>
    <artifactId>spring-cloud-starter-openfeign</artifactId>
</dependency>
应用开启Feign客户端
@EnableFeignClients
实现流程
// 二方库sc-common定义服务公共接口
com.binglangaimo.sccommon.service.feign.ICommonUserService

// 服务提供方sc-server1,sc-server2必须实现此接口
com.binglangaimo.scserver1.controller.UserController

// 服务调用方sc-client1定义带@FeignClient注解接口
com.binglangaimo.scclient1.service.TestFeignService

// 服务调用
com.binglangaimo.scclient1.controller.TestController#getUserNameByFeign()
测试地址
配置服务容错Hystrix
maven依赖
<dependency>
    <groupId>org.springframework.cloud</groupId>
    <artifactId>spring-cloud-starter-netflix-hystrix</artifactId>
</dependency>
应用开启Hystrix断路器
@EnableCircuitBreaker // 开启Hystrix断路器
应用配置
说明:参考sc-client1/src/main/resources/application.properties
#feign配置
#feign调用开启支持hystrix断路器
feign.hystrix.enabled=true
三种实现方式:
参考代码实现:com.binglangaimo.scclient1.service.TestFeignService
- 请求方法上加@HystrixCommand注解
- @FeignClient(value = "SCSERVER", fallback = TestFeignServiceFallBack.class)
- @FeignClient(qualifier = "testFeignServiceClient", value = "SCSERVER", fallbackFactory = TestFeignServiceFallBackFactory.class)
配置Hystrix Dashboard
maven依赖
<dependency>
    <groupId>org.springframework.cloud</groupId>
    <artifactId>spring-cloud-starter-netflix-hystrix-dashboard</artifactId>
</dependency>
应用开启Hystrix Dashboard
@EnableHystrixDashboard // 开启Hystrix Dashboard
应用配置
#hystrix配置,不配置会报错,参考:https://www.cnblogs.com/itsharehome/p/15628220.html
hystrix.dashboard.proxy-stream-allow-list=scclient1

#actuator监控参数
#开启所有端点(不推荐),生产环境仅开启需要的即可
management.endpoints.web.exposure.include=*
监控地址
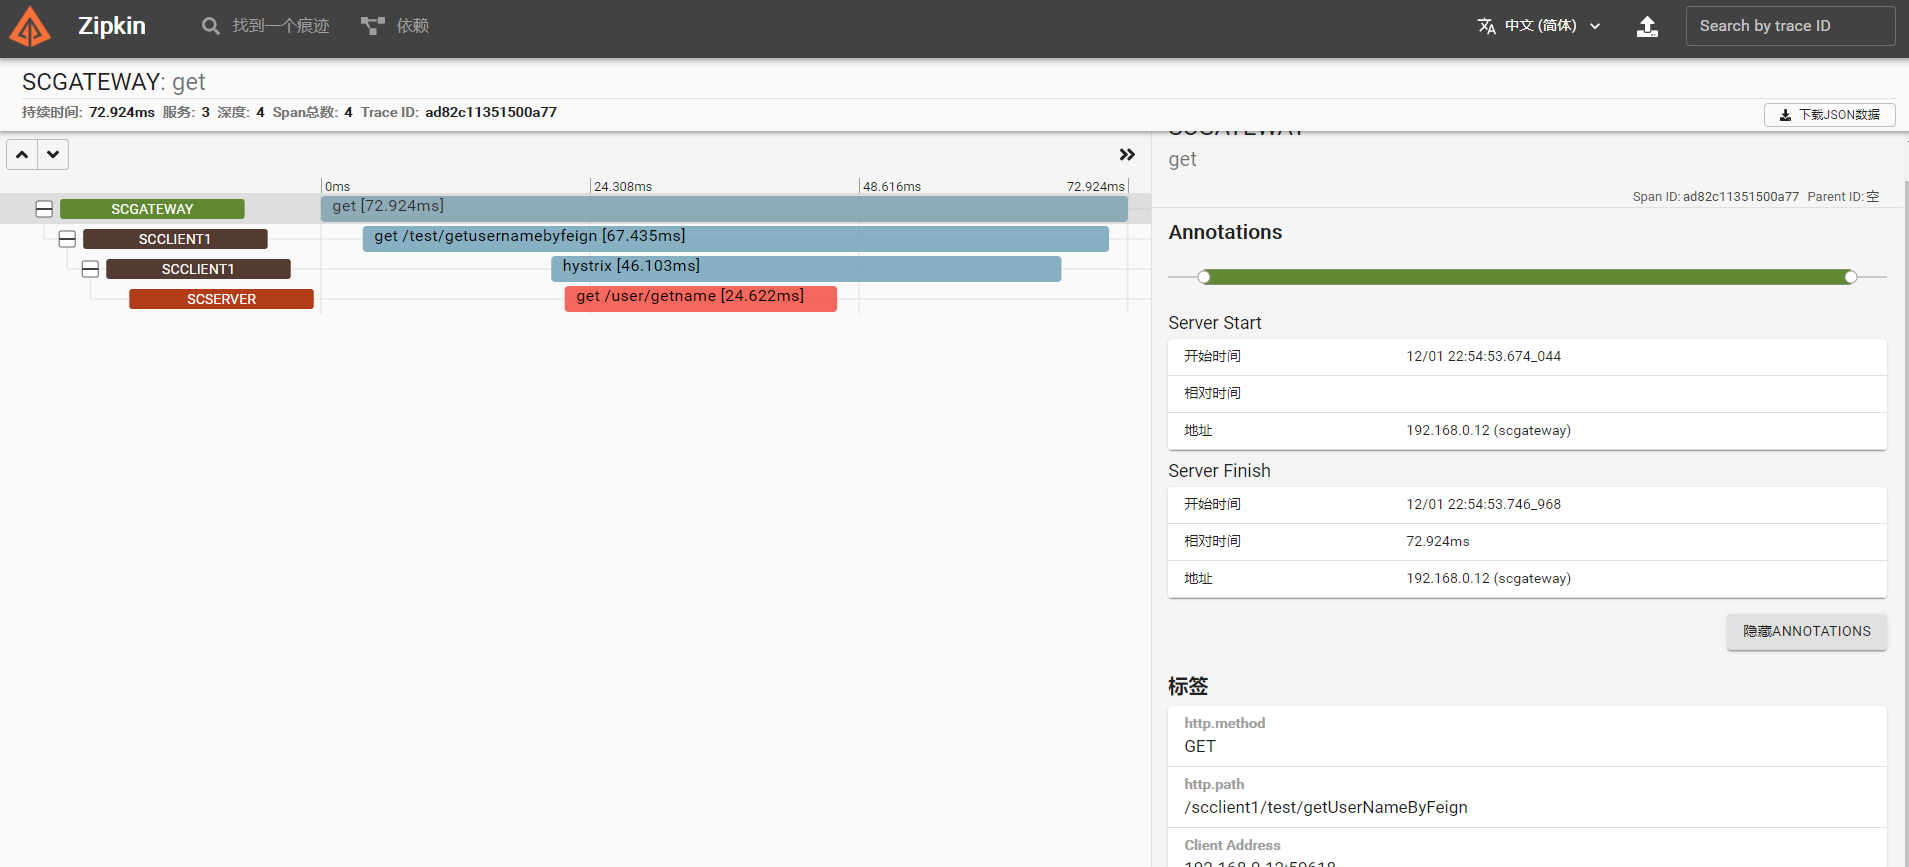
配置服务跟踪Sleuth+Zipkin
说明:需要被跟踪的服务都需要做以下配置。可参考sc-client1实现。
原理说明
- sleuth负责收集跟踪信息并通过http请求发送给zipkin server;
- zipkin server将跟踪信息进行存储(默认内存,可以配置使用mysql,ES等),以及提供RESTful API;
- zipkin ui通过调用api进行数据展示。
maven依赖
<dependency>
    <groupId>org.springframework.cloud</groupId>
    <artifactId>spring-cloud-starter-sleuth</artifactId>
</dependency>
<dependency>
    <groupId>org.springframework.cloud</groupId>
    <artifactId>spring-cloud-starter-zipkin</artifactId>
</dependency>
应用配置
#zipkin配置
#zipkin server地址
spring.zipkin.base-url=http://sczipkin:9411/
#采样频率
spring.sleuth.sampler.rate=10
下载并启动Zipkin
// 下载命令
curl -sSL https://zipkin.io/quickstart.sh | bash -s

// 启动zipkin
java -jar zipkin.jar
测试地址
配置服务网关Zuul
说明:请参考sc-gateway应用实现。
maven依赖
<dependency>
    <groupId>org.springframework.cloud</groupId>
    <artifactId>spring-cloud-starter-netflix-zuul</artifactId>
</dependency>
应用配置
sc-gateway/src/main/resources/application.properties
应用开启zuul网关
@EnableZuulProxy // 开启Zuul网关
测试地址
- http://scgateway:8888/scclient1/test/getUserNameByFeign
- http://scgateway:8888/scserver/user/getName
- 开启前缀访问:http://scgateway:8888/api/v1/scserver/user/getName
- 开启监控:http://scgateway:8888/actuator/routes
配置服务配置中心Spring Cloud Config
说明:sc-config为配置中心(Config Server);sc-client2支持从配置中心获取配置(Config client)。
config服务端
maven依赖
<dependency>
    <groupId>org.springframework.cloud</groupId>
    <artifactId>spring-cloud-config-server</artifactId>
</dependency>
应用配置
重要说明:
- Config Server支持配置从本地或远端(git or svn)获取配置信息;
- 项目config目录用于存储配置信息(支持eureke client、actuator等公共配置通过include方式引入);
- Config Server配置远端获取配置支持SSH密钥验证方式,但并不支持读取本地密钥文件获取密钥信息,只能将密钥字符串配置在应用配置文件中。我对MultipleJGitEnvironmentProperties bean进行了增强实现,使其支持此功能。
server.port=9999
spring.application.name=scConfig

#config注册中心配置
#使用local配置
#spring.profiles.active=native
#spring.cloud.config.server.native.search-locations=file:xxx/WWW/study/springcloud/config
#使用git配置
spring.cloud.config.server.git.uri=git@gitee.com:binglangaimo/springcloud.git
spring.cloud.config.server.git.strict-host-key-checking=false
spring.cloud.config.server.git.private-key=file:C:/Users/xxx/.ssh/id_rsa #支持从本地文件中读取密钥信息,保证了密钥信息的安全
spring.cloud.config.server.git.ignore-local-ssh-settings=false
spring.cloud.config.server.git.default-label=netflix
spring.cloud.config.server.git.search-paths=config
应用开启Config Server
@EnableConfigServer
测试验证
- local:http://scconfig:9999/scClient2/local
- git:http://scconfig:9999/netflix/scClient2-local.properties
config 客户端
maven依赖
<dependency>
    <groupId>org.springframework.cloud</groupId>
    <artifactId>spring-cloud-config-client</artifactId>
</dependency>
应用配置(bootstrap.properties)
spring.application.name=scClient2
spring.profiles.active=local

#从注册中心获取配置
spring.cloud.config.uri=http://scconfig:9999
spring.cloud.config.fail-fast=true
测试获取配置
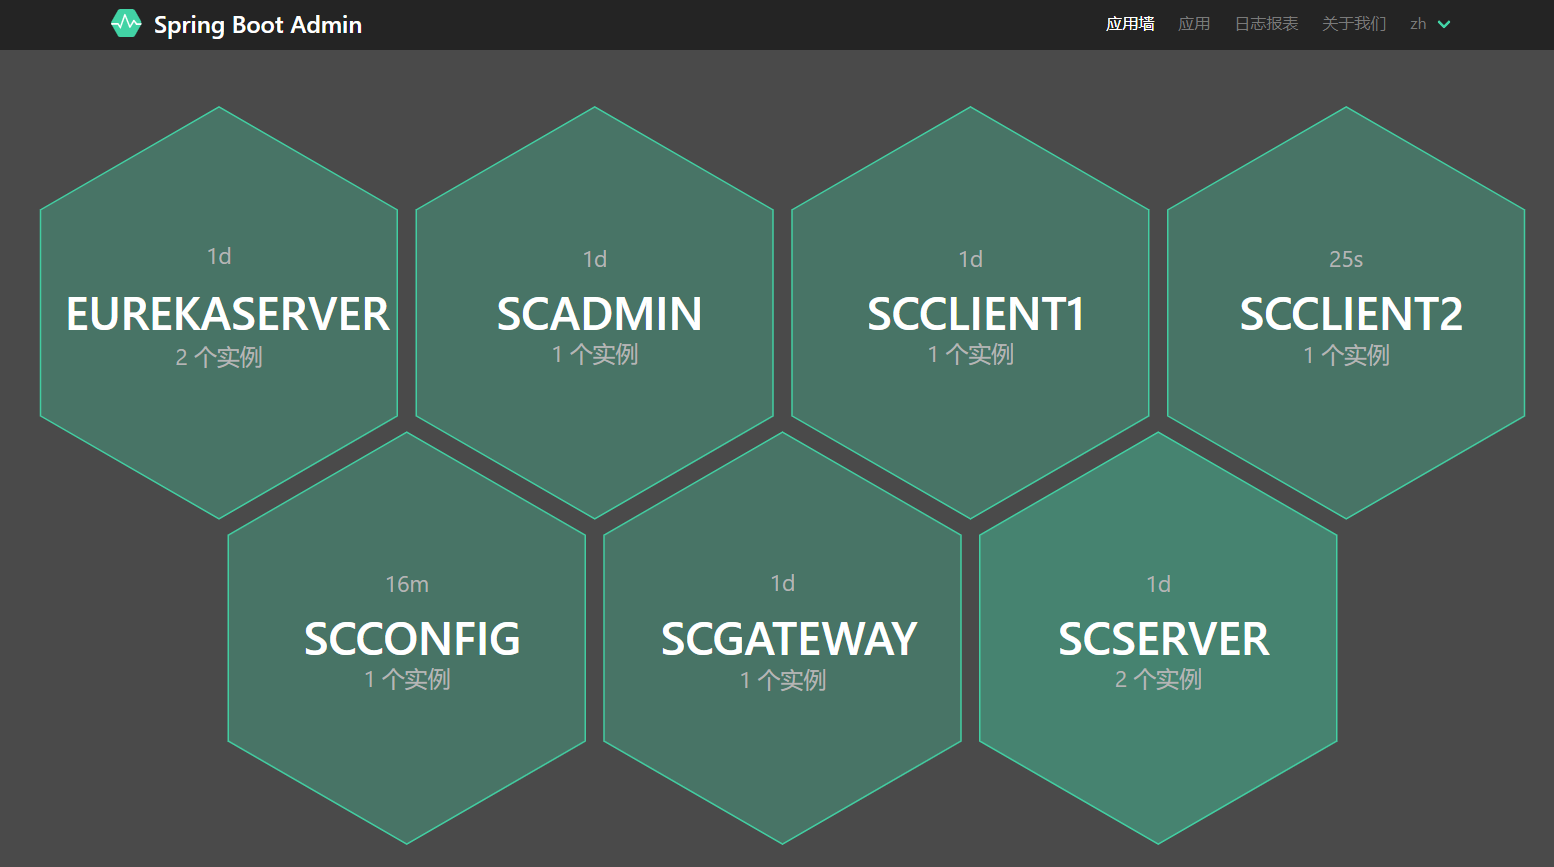
配置服务总控Spring Boot Admin
说明:
- 参考sc-admin应用实现;
- Spring Boot Admin需要依赖于actuator收集信息,所以请将所有需要监控的服务配置actuator。
maven依赖
<dependency>
    <groupId>de.codecentric</groupId>
    <artifactId>spring-boot-admin-starter-server</artifactId>
</dependency>
<dependency>
    <groupId>de.codecentric</groupId>
    <artifactId>spring-boot-admin-server-ui</artifactId>
</dependency>
应用配置
server.port=8080
spring.application.name=scAdmin

#此处为eureka client公共配置,不重复粘贴了

#此处为actuator公共配置,不重复粘贴了
应用开启AdminServer
@EnableAdminServer // 开启Admin监控
发送钉钉消息
com.binglangaimo.scadmin.notify.DingDingNotifier实现类
测试地址
代码仓库
我的个人gitee-https://gitee.com/binglangaimo/springcloud。(重点申明:代码仅供学习参考使用,未经作者授权,请勿用于商业用途)。


