Spring常见面试题
AOP的实现方式
- JDK动态代理
- CGLib动态代理
要理解Spring AOP的底层实现,首先要理解代理的概念。在 Spring AOP 中,代理是一个对象,它拦截方法调用并将它们委托给底层目标对象。 Spring AOP 使用动态代理或 CGLIB 代理来创建这些代理。动态代理是在运行时使用 java.lang.reflect.Proxy 类创建的,而 CGLIB 代理是在运行时使用 CGLIB 库创建的。 当 Spring 管理的 bean 被标记为 AOP 方面时,Spring 为该 bean 创建一个代理并将该方面应用于代理。代理拦截 bean 上的方法调用并将它们委托给目标对象,同时还应用方面建议。 Spring AOP支持多种类型的通知,包括before advice、after return advice、after throw advice和around advice。 before advice在目标方法调用前执行,after returning advice在目标方法成功返回后执行,after throwing advice在目标方法抛出异常后执行,around advice包裹目标方法可以执行前后代码方法调用。 总之,Spring AOP 使用代理来拦截方法调用并向它们应用建议。动态代理和 CGLIB 代理之间的选择取决于被代理的对象类型和被应用的建议类型。
JDK动态代理和CGLib动态代理有什么区别?
要在 Java 中创建动态代理,您可以使用 JDK 动态代理或 CGLIB 代理。 JDK 动态代理是在运行时使用 java.lang.reflect.Proxy 类创建的。要使用 JDK 动态代理创建动态代理,您需要定义代理将实现的接口,然后创建 InvocationHandler 接口的实例,以下是一个例子:
public interface MyInterface {
    void doSomething();
}

public class MyInvocationHandler implements InvocationHandler {
    private Object target;

    public MyInvocationHandler(Object target) {
        this.target = target;
    }

    public Object invoke(Object proxy, Method method, Object[] args) throws Throwable {
        System.out.println("Before method invocation");
        Object result = method.invoke(target, args);
        System.out.println("After method invocation");
        return result;
    }
}

public class Main {
    public static void main(String[] args) {
        MyInterface target = new MyInterfaceImpl();
        MyInvocationHandler handler = new MyInvocationHandler(target);
        MyInterface proxy = (MyInterface) Proxy.newProxyInstance(
            Main.class.getClassLoader(),
            new Class[] { MyInterface.class },
            handler);
        proxy.doSomething();
    }
}
在这个例子中,我们定义了一个类 MyTargetClass,它有一个方法 doSomething()。我们还定义了一个实现 MethodInterceptor 接口的类 MyMethodInterceptor。在 Main 类中,我们创建了一个 Enhancer 的实例,并将超类设置为 MyTargetClass,并将回调设置为 MyMethodInterceptor 的一个实例。然后我们使用 enhancer.create() 创建一个 CGLIB 代理并将其转换为 MyTargetClass。最后,我们在代理上调用一个方法,该方法将被方法拦截器拦截。 JDK 动态代理和 CGLIB 代理各有优缺点,选择它们取决于您的应用程序的具体要求。 JDK 动态代理使用起来更简单,只能与接口一起使用,而 CGLIB 代理更强大,可以与类和接口一起使用,但它们需要 CGLIB 库在classpath上。
public class MyTargetClass {
    public void doSomething() {
        System.out.println("Doing something");
    }
}

public class MyMethodInterceptor implements MethodInterceptor {
    public Object intercept(Object obj, Method method, Object[] args, MethodProxy proxy) throws Throwable {
        System.out.println("Before method invocation");
        Object result = proxy.invokeSuper(obj, args);
        System.out.println("After method invocation");
        return result;
    }
}

public class Main {
    public static void main(String[] args) {
        Enhancer enhancer = new Enhancer();
        enhancer.setSuperclass(MyTargetClass.class);
        enhancer.setCallback(new MyMethodInterceptor());
        MyTargetClass proxy = (MyTargetClass) enhancer.create();
        proxy.doSomething();
    }
}
JDKProxy和CGLib的主要区别:
- JDKProxy实现方式为反射+代理,CGLib实现方式为ASM字节码
- JDKProxy只能作用于接口上,CGLib没有限制
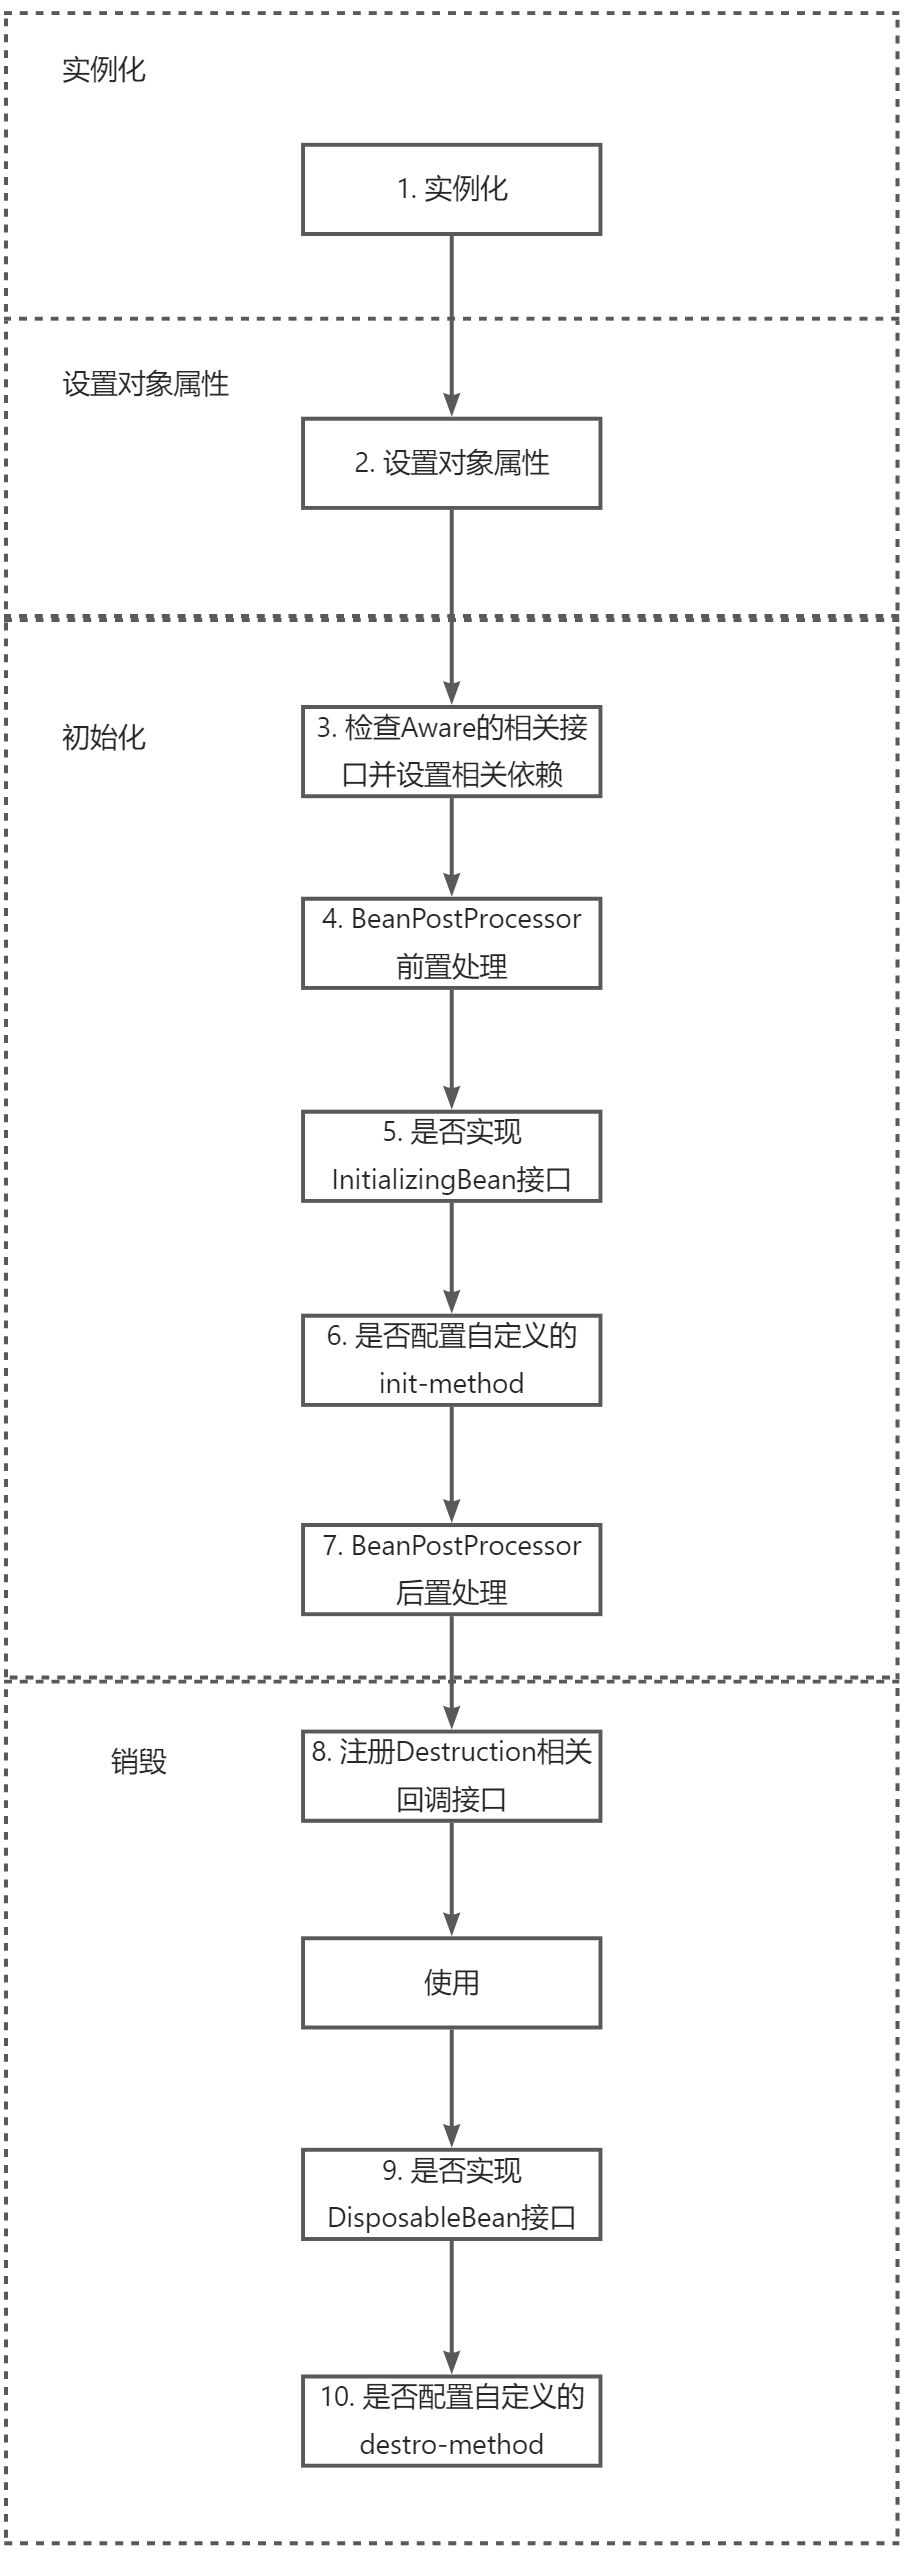
SpringBean生命周期
生命周期主要源码
protected Object createBean(String beanName, RootBeanDefinition mbd, @Nullable Object[] args)
			throws BeanCreationException {

		if (logger.isTraceEnabled()) {
			logger.trace("Creating instance of bean '" + beanName + "'");
		}
		RootBeanDefinition mbdToUse = mbd;

		// Make sure bean class is actually resolved at this point, and
		// clone the bean definition in case of a dynamically resolved Class
		// which cannot be stored in the shared merged bean definition.
		Class<?> resolvedClass = resolveBeanClass(mbd, beanName);
		if (resolvedClass != null && !mbd.hasBeanClass() && mbd.getBeanClassName() != null) {
			mbdToUse = new RootBeanDefinition(mbd);
			mbdToUse.setBeanClass(resolvedClass);
		}

		// Prepare method overrides.
		try {
			mbdToUse.prepareMethodOverrides();
		}
		catch (BeanDefinitionValidationException ex) {
			throw new BeanDefinitionStoreException(mbdToUse.getResourceDescription(),
					beanName, "Validation of method overrides failed", ex);
		}

		try {
			// 给 BeanPostProcessors 创建目标Bean代理对象的机会
			Object bean = resolveBeforeInstantiation(beanName, mbdToUse);
			if (bean != null) {
				return bean;
			}
		}
		catch (Throwable ex) {
			throw new BeanCreationException(mbdToUse.getResourceDescription(), beanName,
					"BeanPostProcessor before instantiation of bean failed", ex);
		}

		try {
			Object beanInstance = doCreateBean(beanName, mbdToUse, args);
			if (logger.isTraceEnabled()) {
				logger.trace("Finished creating instance of bean '" + beanName + "'");
			}
			return beanInstance;
		}
		catch (BeanCreationException | ImplicitlyAppearedSingletonException ex) {
			// A previously detected exception with proper bean creation context already,
			// or illegal singleton state to be communicated up to DefaultSingletonBeanRegistry.
			throw ex;
		}
		catch (Throwable ex) {
			throw new BeanCreationException(
					mbdToUse.getResourceDescription(), beanName, "Unexpected exception during bean creation", ex);
		}
	}
createBean方法中,比较重要的是
Object bean = resolveBeforeInstantiation(beanName, mbdToUse);
这段代码调用了BeanPostProcessor的前置处理和后置处理,如果返回的bean不为空,就不走doCreateBean方法,直接返回对象,这也是实现AOP的核心
protected Object doCreateBean(String beanName, RootBeanDefinition mbd, @Nullable Object[] args)
			throws BeanCreationException {

		// 创建Bean实例
		BeanWrapper instanceWrapper = null;
		if (mbd.isSingleton()) {
			instanceWrapper = this.factoryBeanInstanceCache.remove(beanName);
		}
		if (instanceWrapper == null) {
			instanceWrapper = createBeanInstance(beanName, mbd, args);
		}
		Object bean = instanceWrapper.getWrappedInstance();
		Class<?> beanType = instanceWrapper.getWrappedClass();
		if (beanType != NullBean.class) {
			mbd.resolvedTargetType = beanType;
		}

		// Allow post-processors to modify the merged bean definition.
		synchronized (mbd.postProcessingLock) {
			if (!mbd.postProcessed) {
				try {
					applyMergedBeanDefinitionPostProcessors(mbd, beanType, beanName);
				}
				catch (Throwable ex) {
					throw new BeanCreationException(mbd.getResourceDescription(), beanName,
							"Post-processing of merged bean definition failed", ex);
				}
				mbd.markAsPostProcessed();
			}
		}

		// Eagerly cache singletons to be able to resolve circular references
		// even when triggered by lifecycle interfaces like BeanFactoryAware.
		boolean earlySingletonExposure = (mbd.isSingleton() && this.allowCircularReferences &&
				isSingletonCurrentlyInCreation(beanName));
		if (earlySingletonExposure) {
			if (logger.isTraceEnabled()) {
				logger.trace("Eagerly caching bean '" + beanName +
						"' to allow for resolving potential circular references");
			}
			addSingletonFactory(beanName, () -> getEarlyBeanReference(beanName, mbd, bean));
		}

		Object exposedObject = bean;
		try {
            //填充对象属性
			populateBean(beanName, mbd, instanceWrapper);
            //初始化Bean
			exposedObject = initializeBean(beanName, exposedObject, mbd);
		}
		catch (Throwable ex) {
			if (ex instanceof BeanCreationException bce && beanName.equals(bce.getBeanName())) {
				throw bce;
			}
			else {
				throw new BeanCreationException(mbd.getResourceDescription(), beanName, ex.getMessage(), ex);
			}
		}

		if (earlySingletonExposure) {
			Object earlySingletonReference = getSingleton(beanName, false);
			if (earlySingletonReference != null) {
				if (exposedObject == bean) {
					exposedObject = earlySingletonReference;
				}
				else if (!this.allowRawInjectionDespiteWrapping && hasDependentBean(beanName)) {
					String[] dependentBeans = getDependentBeans(beanName);
					Set<String> actualDependentBeans = new LinkedHashSet<>(dependentBeans.length);
					for (String dependentBean : dependentBeans) {
						if (!removeSingletonIfCreatedForTypeCheckOnly(dependentBean)) {
							actualDependentBeans.add(dependentBean);
						}
					}
					if (!actualDependentBeans.isEmpty()) {
						throw new BeanCurrentlyInCreationException(beanName,
								"Bean with name '" + beanName + "' has been injected into other beans [" +
								StringUtils.collectionToCommaDelimitedString(actualDependentBeans) +
								"] in its raw version as part of a circular reference, but has eventually been " +
								"wrapped. This means that said other beans do not use the final version of the " +
								"bean. This is often the result of over-eager type matching - consider using " +
								"'getBeanNamesForType' with the 'allowEagerInit' flag turned off, for example.");
					}
				}
			}
		}

		// 注册销毁回调方法
		try {
			registerDisposableBeanIfNecessary(beanName, bean, mbd);
		}
		catch (BeanDefinitionValidationException ex) {
			throw new BeanCreationException(
					mbd.getResourceDescription(), beanName, "Invalid destruction signature", ex);
		}

		return exposedObject;
	}
上述代码有点多,看起来很乱,我们精简一下,这样就可以很清楚的看出来,主要的四个步骤
- 创建Bean实例
- 填充对象属性
- 初始化Bean
- 注册销毁回调方法
protected Object doCreateBean(String beanName, RootBeanDefinition mbd, @Nullable Object[] args)
			throws BeanCreationException {

		// 1. 创建Bean实例
		BeanWrapper instanceWrapper = null;
		if (mbd.isSingleton()) {
			instanceWrapper = this.factoryBeanInstanceCache.remove(beanName);
		}
		if (instanceWrapper == null) {
			instanceWrapper = createBeanInstance(beanName, mbd, args);
		}

		Object exposedObject = bean;
		try {
            //2. 填充对象属性
			populateBean(beanName, mbd, instanceWrapper);
            //3. 初始化Bean
			exposedObject = initializeBean(beanName, exposedObject, mbd);
		}
		catch (Throwable ex) {

		}

		// 4. 注册销毁回调方法
		try {
			registerDisposableBeanIfNecessary(beanName, bean, mbd);
		}
		catch (BeanDefinitionValidationException ex) {
        }

		return exposedObject;
	}
124步没什么好说的,我们主要看一下第3步的源码,也就是initializeBean方法对应源码
protected Object initializeBean(String beanName, Object bean, @Nullable RootBeanDefinition mbd) {
    // 检查 Aware 相关接口并设置相关依赖
    invokeAwareMethods(beanName, bean);

    // BeanPostProcessor 前置处理
    Object wrappedBean = bean;
    if (mbd == null || !mbd.isSynthetic()) {
        wrappedBean = applyBeanPostProcessorsBeforeInitialization(wrappedBean, beanName);
    }

    // 调用Bean的初始化方法
    try {
        invokeInitMethods(beanName, wrappedBean, mbd);
    } catch (Throwable ex) {
        throw new BeanCreationException(
                (mbd != null ? mbd.getResourceDescription() : null),
                beanName, "Invocation of init method failed", ex);
    }

    // BeanPostProcessor 前置处理
    if (mbd == null || !mbd.isSynthetic()) {
        wrappedBean = applyBeanPostProcessorsAfterInitialization(wrappedBean, beanName);
    }

    return wrappedBean;
}
接下来我们看一下invokeAwareMethods
private void invokeAwareMethods(String beanName, Object bean) {
		if (bean instanceof Aware) {
			if (bean instanceof BeanNameAware beanNameAware) {
				beanNameAware.setBeanName(beanName);
			}
			if (bean instanceof BeanClassLoaderAware beanClassLoaderAware) {
				ClassLoader bcl = getBeanClassLoader();
				if (bcl != null) {
					beanClassLoaderAware.setBeanClassLoader(bcl);
				}
			}
			if (bean instanceof BeanFactoryAware beanFactoryAware) {
				beanFactoryAware.setBeanFactory(AbstractAutowireCapableBeanFactory.this);
			}
		}
	}
这块代码主要提供了三个作用
- BeanNameAware:注入当前 bean 对应 beanName;
- BeanClassLoaderAware:注入加载当前 bean 的 ClassLoader;
- BeanFactoryAware:注入 当前BeanFactory容器 的引用。
返回initializeBean方法,我们接着看applyBeanPostProcessorsBeforeInitialization方法干了些什么
public Object applyBeanPostProcessorsBeforeInitialization(Object existingBean, String beanName)
			throws BeansException {

		Object result = existingBean;
		for (BeanPostProcessor processor : getBeanPostProcessors()) {
			Object current = processor.postProcessBeforeInitialization(result, beanName);
			if (current == null) {
				return result;
			}
			result = current;
		}
		return result;
	}
applyBeanPostProcessorsBeforeInitialization方法主要是遍历实现的BeanPostProcessor接口,逐个调用前置处理方法,后置处理同理
返回initializeBean,我们接着看invokeInitMethods
protected void invokeInitMethods(String beanName, Object bean, @Nullable RootBeanDefinition mbd)
    throws Throwable {

    boolean isInitializingBean = (bean instanceof InitializingBean);
    if (isInitializingBean && (mbd == null || !mbd.hasAnyExternallyManagedInitMethod("afterPropertiesSet"))) {
        if (logger.isTraceEnabled()) {
            logger.trace("Invoking afterPropertiesSet() on bean with name '" + beanName + "'");
        }
        ((InitializingBean) bean).afterPropertiesSet();
    }

    if (mbd != null && bean.getClass() != NullBean.class) {
        String[] initMethodNames = mbd.getInitMethodNames();
        if (initMethodNames != null) {
            for (String initMethodName : initMethodNames) {
                if (StringUtils.hasLength(initMethodName) &&
                    !(isInitializingBean && "afterPropertiesSet".equals(initMethodName)) &&
                    !mbd.hasAnyExternallyManagedInitMethod(initMethodName)) {
                    invokeCustomInitMethod(beanName, bean, mbd, initMethodName);
                }
            }
        }
    }
}
现在它的所有属性都已设置,检查 bean 是否实现了 InitializingBean 或定义了自定义 init 方法,如果实现了则调用必要的回调。
applyBeanPostProcessorsAfterInitialization和applyBeanPostProcessorsBeforeInitialization几乎一样,就不做过多介绍
BeanFactory和FactoryBean的区别
BeanFactory 是 Spring Framework 中的一个核心接口,它提供了一种从 Spring 容器中获取 bean 实例的方法。它负责管理bean的生命周期,包括实例化、配置和销毁。 BeanFactory 是基本容器,提供 Spring Framework 的基本功能。 另一方面,FactoryBean 是 Spring Framework 中的另一个核心接口,它提供了一种在 Spring 容器中创建和配置对象的方法。它负责创建和配置您要在应用程序中使用的对象。 FactoryBean 用于创建无法使用标准 bean 实例化机制创建的复杂对象。 综上所述,BeanFactory 负责管理bean 的生命周期,而FactoryBean 负责在Spring 容器中创建和配置对象。
@Autowired和@Resource的区别?
@Autowired 用于按类型或名称注入依赖,而@Resource 用于按名称注入依赖。
@Qualifier 注解有什么作用
@Qualifier 注解与@Autowired 或@Resource 注解结合使用,用于指定当Spring 容器中存在多个相同类型的bean 时应该注入哪个bean。
Spring怎么解决循环依赖的问题?
为了解决循环依赖,Spring 使用了三级缓存。一级缓存用于存储 bean 定义。二级缓存用于存放已经创建但还没有完全初始化的前期bean实例。三级缓存用于存放完全初始化的bean实例。
当检测到循环依赖时,Spring 会创建一个部分初始化的 bean 实例并将其存储在二级缓存中。这允许 Spring 通过将部分初始化的 bean 实例注入到依赖它的另一个 bean 中来解决循环依赖。一旦解决了循环依赖,Spring 就可以完全初始化 bean 实例并将其存储在三级缓存中。
核心源码来自 Spring 框架中的 AbstractAutowireCapableBeanFactory 类。此类负责创建和初始化 bean 实例。核心部分在doCreateBean 方法种,该方法在创建新 bean 实例时调用。
以下为部分代码:
// 提前暴露单例对象解决循环依赖(循环依赖)
boolean earlySingletonExposure = (mbd.isSingleton() && this.allowCircularReferences &&
        isSingletonCurrentlyInCreation(beanName)); // Check if early singleton exposure is allowed
if (earlySingletonExposure) { // 如果是提前暴露了
    if (logger.isTraceEnabled()) {
        logger.trace("Eagerly caching bean '" + beanName +
                "' to allow for resolving potential circular references"); // Log a message indicating that the bean is being eagerly cached
    }
    addSingletonFactory(beanName, () -> getEarlyBeanReference(beanName, mbd, bean)); // 添加bean进入三级缓存
}

// 初始化实例
Object exposedObject = bean; // Set the exposedObject to the bean
try {
    populateBean(beanName, mbd, instanceWrapper); // Populate the bean with property values
    exposedObject = initializeBean(beanName, exposedObject, mbd); // Initialize the bean
}
catch (Throwable ex) { // Catch any exceptions that occur during initialization
    if (ex instanceof BeanCreationException && beanName.equals(((BeanCreationException) ex).getBeanName())) {
        throw (BeanCreationException) ex; // If the exception is a BeanCreationException and the bean name matches, re-throw the exception
    }
    else {
        throw new BeanCreationException(
                mbd.getResourceDescription(), beanName, "Initialization of bean failed", ex); // Otherwise, throw a new BeanCreationException
    }
}
// 如果提前暴露对象,则尝试从缓存中获取。
if (earlySingletonExposure) {
			Object earlySingletonReference = getSingleton(beanName, false);
			if (earlySingletonReference != null) {
				if (exposedObject == bean) {
					exposedObject = earlySingletonReference;
				}
				else if (!this.allowRawInjectionDespiteWrapping && hasDependentBean(beanName)) {
					String[] dependentBeans = getDependentBeans(beanName);
					Set<String> actualDependentBeans = new LinkedHashSet<>(dependentBeans.length);
					for (String dependentBean : dependentBeans) {
						if (!removeSingletonIfCreatedForTypeCheckOnly(dependentBean)) {
							actualDependentBeans.add(dependentBean);
						}
					}
					if (!actualDependentBeans.isEmpty()) {
						throw new BeanCurrentlyInCreationException(beanName,
								"Bean with name '" + beanName + "' has been injected into other beans [" +
								StringUtils.collectionToCommaDelimitedString(actualDependentBeans) +
								"] in its raw version as part of a circular reference, but has eventually been " +
								"wrapped. This means that said other beans do not use the final version of the " +
								"bean. This is often the result of over-eager type matching - consider using " +
								"'getBeanNamesForType' with the 'allowEagerInit' flag turned off, for example.");
					}
				}
			}
		}
事务失效场景?
- 方法访问权限问题
事务注解为非public的时候,事务不会利用AOP生成新的代理,只会使用原方法
Method methodToInspect = ClassUtils.getMostSpecificMethod(method, targetClass);
if (methodToInspect != method) {
    // Fallback is to allow public visibility on the interface method.
    if (Modifier.isProtected(methodToInspect.getModifiers()) ||
            Modifier.isPrivate(methodToInspect.getModifiers())) {
        methodToInspect = method;
    }
}
- 使用final修饰方法
使用final修饰方法,字面意思就是不允许方法重写,那么Spring Aop就无法为方法生成代理
- 方法内部调用
先上例子
@Transactional
public void outerMethod() {
    // This method call will not have transactional behavior
    innerMethod();
}

private void innerMethod() {
    // This method call will not have transactional behavior
    someOtherMethod();
}

@Transactional
public void someOtherMethod() {
    // This method call will have transactional behavior
}
在上面的例子里,someOtherMethod方法的事务不会生效,利用this关键字调用内部事务方法,是使用的实例调用,并没有用到代理类,解决办法:1. 把相关逻辑抽取出来,利用事务管理起来,2. 用spring bean去调用,或者3. AopContext.currentProxy()获取当前代理类进行方法调用
- Service未被Spring管理
这个就不多说了,未被Spring管理不可能生成代理对象
- 异步调用失效
在Spring中,如果异步调用了一个带有事务注解的方法,那么事务注解将失效,事务将不会生效。这是因为Spring的事务管理器是基于线程绑定的,而异步调用会切换线程,导致事务上下文无法传递。
具体来说,当一个带有事务注解的方法被异步调用时,Spring会创建一个新的线程来执行该方法。由于新线程没有事务上下文,因此无法继承原始线程的事务上下文。这意味着在新线程中执行的数据库操作将不会受到事务管理器的管理,也就是说,事务将失效。
为了解决这个问题,可以使用Spring提供的异步调用支持来处理异步方法。在异步方法上添加@Async注解,并在调用该方法的类或方法上添加@EnableAsync注解。这样可以确保异步方法在同一个事务上下文中执行,并且事务注解将会生效。
需要注意的是,在使用异步调用时,要确保所有的数据库操作都在同一个事务中进行。如果在异步调用中执行了多个数据库操作,并且每个操作都有自己的事务,则可能会导致数据不一致的问题。因此,在使用异步调用时,需要仔细考虑事务传播行为和隔离级别等设置,以确保数据的一致性和完整性。
- 异常被捕获并处理:如果抛出了未被Spring事务管理器捕获的异常,则事务将失效。例如,如果在try-catch块中捕获了异常并处理了它,则Spring事务管理器无法检测到该异常并回滚事务。

 浙公网安备 33010602011771号