SpringCloud Alibaba-7-网关
1. 什么是API网关
API网关:是一个服务器,是系统的唯一入口。同时也可以实现服务的路由、负载均衡、鉴权、限流、熔断等功能。
API网关出现的原因:是微服务架构的出现,不同的微服务一般会有不同的网络地址,而外部客户端可能需要调用多个服务的接口才能完成一个业务需求,如果让客户端直接与各个微服务通信,会有以下的问题:
1. 客户端请求多个微服务,各个服务ip不一样,增加客户端复杂度。
2. 存在跨域,在一定场景下处理相对复杂。
3. 认证复杂,每个服务都需要独立认证。
4. 与微服务耦合太强,微服务变更,客户端需要变更
2. 使用API网关的好处
所有的外部请求都会先经过API 网关这一层。也就是说,API 的实现方面更多的考虑业务逻辑,而安全、性能、监控可以交由 API 网关来做,这样既提高业务灵活性又不缺安全性。
- 易于监控
- 统一认证
- 减少客户端与微服务交互,解耦接口依赖
3. 常用网关
Nginx+lua

Zuul                              Zuul是一种提供动态路由、监视、弹性、安全性等功能的边缘服务。Zuul是Netflix出品的一个基于JVM路由和服务端的负载均衡器。

SpringCoud Gateway                Spring Cloud GateWay是Spring Cloud的⼀个全新项⽬【SpringCloud公司开发的】,⽬标是取代Netflix Zuul。
3. GateWay入门使用,以Springcloud Alibaba-6-服务容错为例
基本概念
-
断言:用于进行条件判断,只有断言都返回真,才会真正的执行路由。
-
路由:路由是构建网关的基本模块,它由ID,目标URI,断言Predicates集合,过滤器Filters集合组成,如果断言为true,则匹配该路由。
-
过滤器:可以在请求被路由前后修改请求和响应的内容。基于过滤器可以实现:安全,监控,限流等问题。
3.0 创建一个服务
ip配置为8000端口,当访问这个服务,就是访问我们的getWay。
server:
  port: 8000

spring:
  application:
    name: shop-gateway

  cloud:
    nacos:
      discovery:
        server-addr: localhost:8848 # 当有了注册中心时,网关也是一个服务,所以需要注册到注册中心去。

    gateway:
      discovery:
        locator:
          enabled: true # 让gateway可以发现nacos中的微服务

      routes:
        - id: product
          uri: lb://service-product
          predicates:
            - Path=/product/**
        - id: order
          uri: lb://service-order
          predicates:
            - Path=/order/**
        - id: user
          uri: lb://service-user
          predicates:
            - Path=/user/**
3.1 导入依赖
<?xml version="1.0" encoding="UTF-8"?>
<project xmlns="http://maven.apache.org/POM/4.0.0" xmlns:xsi="http://www.w3.org/2001/XMLSchema-instance"
         xsi:schemaLocation="http://maven.apache.org/POM/4.0.0 https://maven.apache.org/xsd/maven-4.0.0.xsd">
    <modelVersion>4.0.0</modelVersion>
    <artifactId>shop-gateway</artifactId>
    <version>0.0.1-SNAPSHOT</version>
    <name>shop-gateway</name>
    <description>Demo project for Spring Boot</description>

    <parent>
        <groupId>com.lihao</groupId>
        <artifactId>alibaba</artifactId>
        <version>0.0.1-SNAPSHOT</version>
    </parent>

    <dependencies>
        <!--gateway网关-->
        <dependency>
            <groupId>org.springframework.cloud</groupId>
            <artifactId>spring-cloud-starter-gateway</artifactId>
        </dependency>

        <!--nacos客户端-->
        <dependency>
            <groupId>com.alibaba.cloud</groupId>
            <artifactId>spring-cloud-starter-alibaba-nacos-discovery</artifactId>
        </dependency>

        <dependency>
            <groupId>org.springframework.boot</groupId>
            <artifactId>spring-boot-starter-test</artifactId>
            <scope>test</scope>
        </dependency>
    </dependencies>
</project>
3.2 开启nacos注册中心,注册网关到注册中心
@SpringBootApplication
@EnableDiscoveryClient // 开启nacos注册中心
public class ShopGatewayApplication {

	public static void main(String[] args) {
		SpringApplication.run(ShopGatewayApplication.class, args);
	}

}
3.3 现象
原本访问 http://localhost:8081/product/list 是查询所有产品信息。
原本访问 http://localhost:8091/order/list 是查询所有订单信息。
原本访问 http://localhost:8071/user/list 是查询所有用户信息。
有了网关后,你可以通过 http://localhost:8000/product/list 查询所有产品信息。
有了网关后,你可以通过 http://localhost:8000/order/list 是查询所有订单信息。
有了网关后,你可以通过 http://localhost:8000/user/list 是查询所有用户信息。
4. 概念介绍
1. 路由介绍:
Routes:主要由 路由id、目标uri、断言集合和过滤器集合组成。
-
路由标识,要求唯一,名称任意(默认值 uuid,一般不用,需要自定义)
-
uri:请求最终被转发到的目标地址
-
order: 路由优先级,数字越小,优先级越高
-
predicates:断言数组,即判断条件,如果返回值是true,则转发请求到 uri 属性指定的服务中
-
filters:过滤器数组,在请求传递过程中,对请求做一些修改
2. 断言介绍:
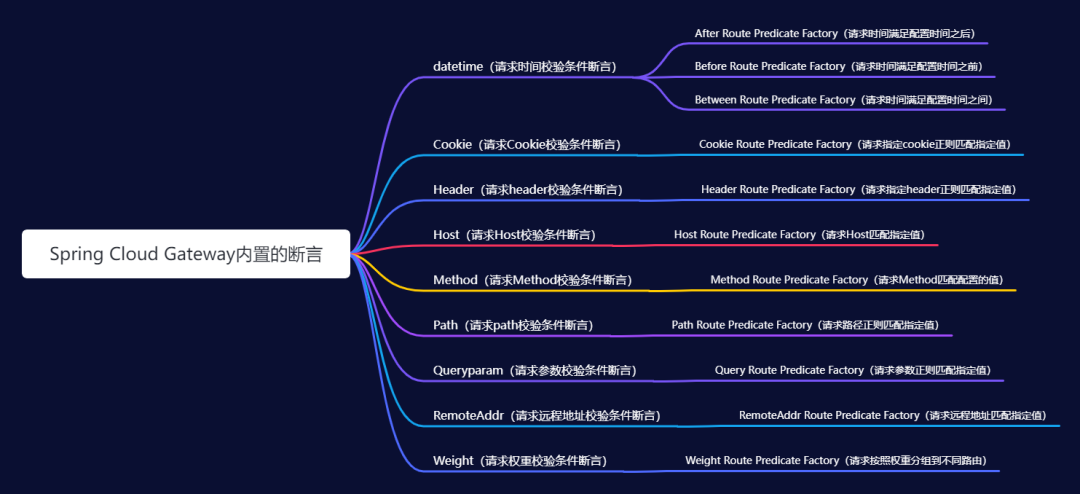
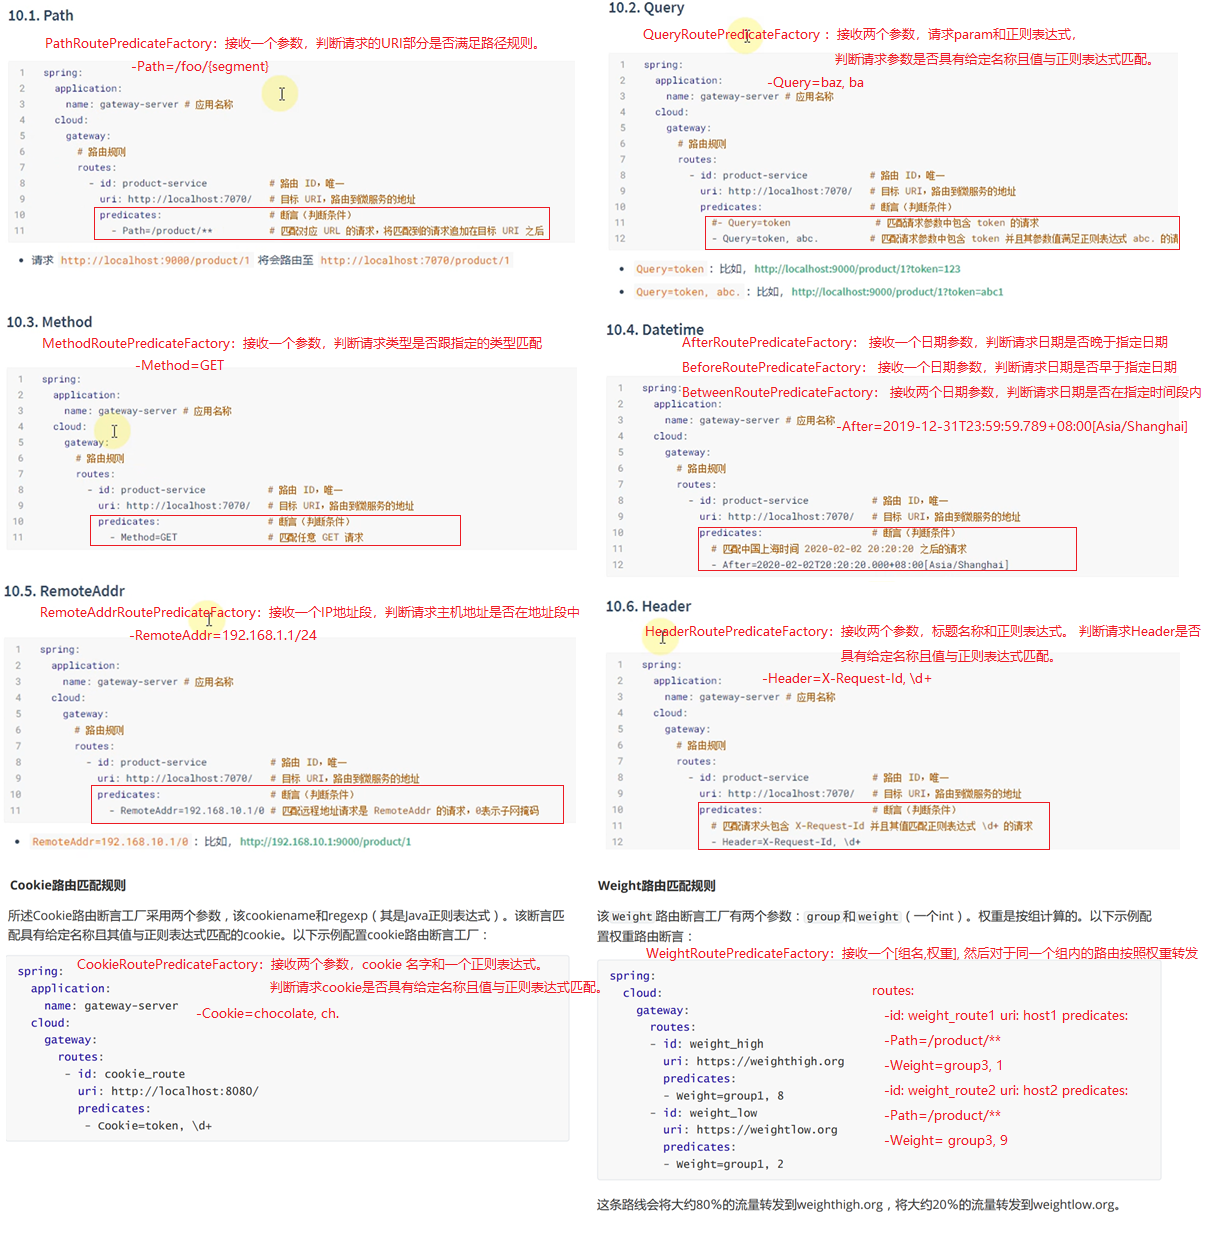
Spring Cloud Gateway包括许多内置的路由断言工厂。所有这些断言都与HTTP请求的不同属性匹配。您可以将多个路由断言工厂与逻辑 and 语句结合使用。
Spring Cloud Gateway 中的断言命名都是有规范的,格式:“xxx + RoutePredicateFactory”,比如权重断言 WeightRoutePredicateFactory,那么配置时直接取前面的 “Weight”。
也可以自定义断言工厂,用到的时候百度吧。
3. 过滤器介绍:
过滤器按区域划分,可分为全局,局部两种过滤器。
- 局部GatewayFilter:会应用到单个路由上
- 全局GlobalFilter:会应用到所有路由上
过滤器按作用点划分,可分为Pre(前置),Post(后置)两种过滤器。
- Pre:在请求转发到后端微服务之前执行。
- Post:在请求执行完成之后执行。
3.1 内置局部过滤器GatewayFilter
在Spring Cloud Gateway中内置了很多局部Filter。


Spring Cloud Gateway 中的过滤器命名都是有规范的,格式: "xxx + “GatewayFilterFactory”,比如StripPrefixGatewayFilterFactory,那么配置时直接取前面的 “StripPrefix”。
server:
  port: 8000

spring:
  cloud:
    gateway:
      routes:
        - id: product
          uri: lb://service-product
          predicates:
            - Path=/product/**

          filters:
            - StripPrefix=1
内置局部过滤器——————Path路径过滤器介绍:(用的较多)
Path相关过滤器可以实现URL重写,通过重写URL可以实现隐藏真实路径提高安全性。
Path相关过滤器采用路径正则表达式参数和替换参数,使用Java正则表达式来灵活地重写请求路径。

3.2 自定义局部过滤器
Gateway过滤器-自定义局部过滤器
自定义(局部)网关过滤器:https://www.bilibili.com/video/BV1R7411774f?p=42&spm_id_from=pageDriver
因为Gateway提供了很多Gateway内置网关(局部)过滤器,所以一般很少使用Gateway自定义网关过滤器。
3.3 内置全局过滤器GlobalFilter

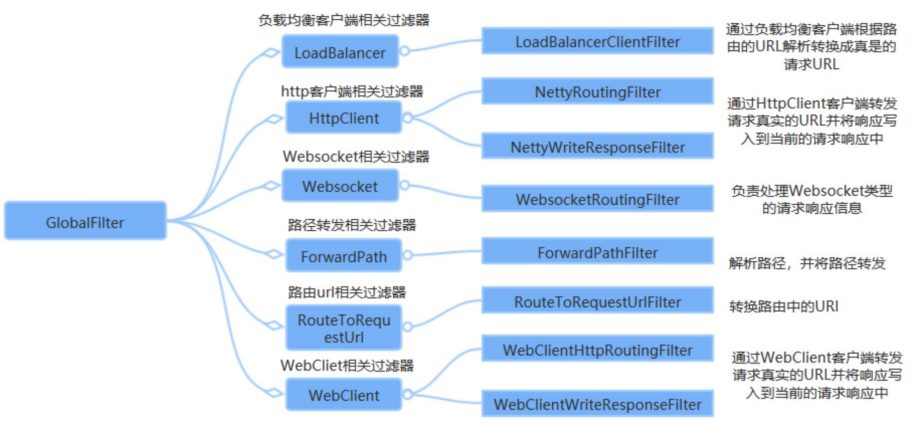
在Spring Cloud Gateway中内置了很多全局Filter。
全局:会应用到所有的路由上。通过全局过滤器可以实现对权限的统一校验,安全性验证等功能。
多个 GlobalFilter 可以通过 @Order 或者 getOrder() 方法指定执行顺序,order值越小,执行的优先级越高。
3.4 自定义全局过滤器
常见需求:用户需要登录了才放行。
    1. 当客户端第一次请求服务时,服务端对用户进行信息认证(登录)
    2. 认证通过,将用户信息进行加密形成token,返回给客户端,作为登录凭证
    3. 以后每次请求,客户端都携带认证的token
    4. 服务端对token进行解密,判断是否有效
// 自定义类实现 GlobalFilter , Ordered 接口,加上@Component注解即可;
@Component
public class MyCustomerGlobalFilter implements GlobalFilter ,Ordered {

  // 参数1:是一个响应交互的契约。提供对HTTP请求和响应的访问,并公开额外的服务器端处理相关属性和特性,如请求属性。
  // 参数2:用于承载请求相关的属性和请求体,Spring Cloud Gateway中底层使用Netty处理网络请求。
  @Override
  public Mono<Void> filter(ServerWebExchange exchange, GatewayFilterChain chain) {
      ServerHttpRequest request = exchange.getRequest();
      ServerHttpResponse response = exchange.getResponse();

      // 判断token,并验证账号密码
      String token = request.getQueryParams().getFirst("token"); // 获取请求对象中参数名为 token 的值,获取第一个参数的值。
      if (StringUtils.isBlank(token)) {

          System.out.println("鉴权失败");
          exchange.getResponse().setStatusCode(HttpStatus.UNAUTHORIZED);

          return response.setComplete();
      }

      if(token.equale("abc")){
          // 放行
          return chain.filter(exchange);
      }
  }

  // 该方法用于声明该过滤器执行的优先级
  @Override
  public int getOrder() {   // 返回值越低,表示过滤器执行的优先级越高。
    return 0;
  }
}
4. 网关集成Sentinel实现限流,以Springcloud Alibaba-6-服务容错为例
网关是所有请求的公共入口,所以可以在网关进行限流。
注意:由于版本的问题,某些版本可能不是像如下这样配置依赖的。
Sentinel提供了SpringCloud Gateway的适配模块,可以提供两种资源维度的限流:
- route维度:即在Spring配置文件中配置的路由条目,资源名为对应的routeId
- 自定义API维度:用户可以利用Sentinel提供的API来自定义一些API分组
4.1 网关服务添加依赖
<dependency>
	<groupId>com.alibaba.csp</groupId>
	<artifactId>sentinel-spring-cloud-gateway-adapter</artifactId>
</dependency>
<dependency>
    <groupId>com.alibaba.cloud</groupId>
    <artifactId>spring-cloud-starter-alibaba-sentinel</artifactId>
</dependency>
<dependency>
    <groupId>com.alibaba.cloud</groupId>
    <artifactId>spring-cloud-alibaba-sentinel-gateway</artifactId>
</dependency>
4.2 网关服务添加配置
server:
  port: 8000

spring:
  application:
    name: shop-gateway

  cloud:
    nacos:
      discovery:
        server-addr: localhost:8848 # 当有了注册中心时,网关也是一个服务,所以需要注册到注册中心去。
    gateway:
      discovery:
        locator:
          enabled: true # 让gateway可以发现nacos中的微服务

      routes:
        - id: product
          uri: lb://service-product
          predicates:
            - Path=/product/**
        - id: order
          uri: lb://service-order
          predicates:
            - Path=/order/**
        - id: user
          uri: lb://service-user
          predicates:
            - Path=/user/**

    sentinel: # 网关整合sentinel
      transport:
        port: 8719
        dashboard: localhost:9000
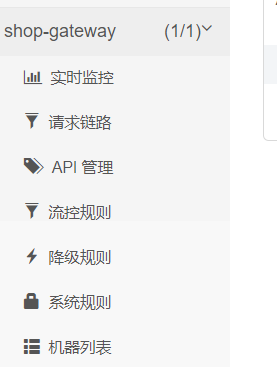
4.3 现象
和之前不一样了,少了几个功能。
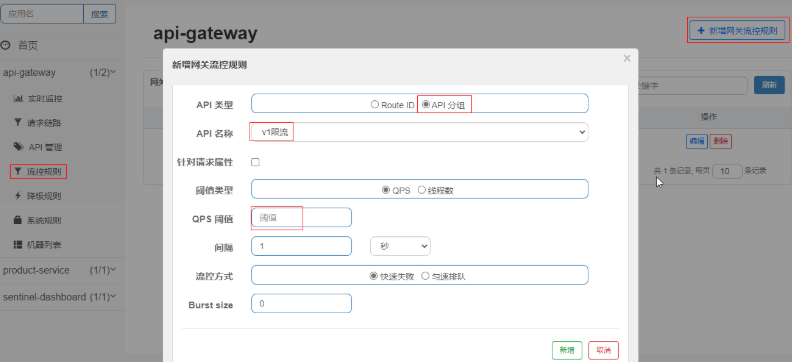
4.4 以API分组限流为例
Sentinel中支持按照API分组进行限流,就是我们可以按照特定规则进行限流。
在管控台页面中提供了三种方式的API分组管理
- 精准匹配
- 前缀匹配
- 正则匹配
@RestController
@RequestMapping("/v1")
public class TestController {
    @RequestMapping("/test1")
    public String test1(){
        return "test1";
    }
    @RequestMapping("/test2")
    public String test2(){
        return "test2";
    }
    @RequestMapping("/test3/test")
    public String test3(){
        return "test3";
    }
}
步骤:
- 在
API管理中新建API分组,匹配模式选择前缀匹配。匹配串写请求URL地址。 - 在
流控规则中,API类型中选择API分组,然后在API名称中选择我们刚刚定义的V1限流 - 此时所有以product-service开头的路径都会被限流


4.5修改限流默认返回格式
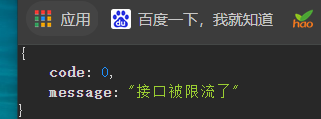
当出现限流后,会返回默认的提示。很不友好,我们做一个友好的提示。

步骤:
- 在网关服务的启动类中,添加一个新配置。
@SpringBootApplication
@EnableDiscoveryClient // 开启nacos注册中心
public class ShopGatewayApplication {

	public static void main(String[] args) {
		SpringApplication.run(ShopGatewayApplication.class, args);
	}

    // 固定代码写法
	@PostConstruct
	public void initBlockHandlers() {
		BlockRequestHandler blockRequestHandler = new BlockRequestHandler() {
			public Mono<ServerResponse> handleRequest(ServerWebExchange serverWebExchange, Throwable throwable) {
				Map map = new HashMap<>();
				map.put("code", 0);
				map.put("message", "接口被限流了");
				return ServerResponse.status(HttpStatus.OK).
					contentType(MediaType.APPLICATION_JSON).
					body(BodyInserters.fromValue(map));
			}
		};
		GatewayCallbackManager.setBlockHandler(blockRequestHandler);
	}
}
5. 跨域问题的解决
方法一:配置类方式
@Configuration
public class CorsConfig {
    @Bean
    public CorsWebFilter corsFilter() {
        CorsConfiguration config = new CorsConfiguration();
        config.addAllowedMethod("*");
        config.addAllowedOrigin("*");
        config.addAllowedHeader("*");

        UrlBasedCorsConfigurationSource source = new UrlBasedCorsConfigurationSource(new PathPatternParser());
        source.registerCorsConfiguration("/**", config);

        return new CorsWebFilter(source);
    }
}
方法二:配置文件方式
spring:
  cloud:
    gateway:
      globalcors: # 全局的跨域处理
        add-to-simple-url-handler-mapping: true # 解决options请求被拦截问题
        corsConfigurations:
          '[/**]':
            allowedOrigins: # 允许哪些网站的跨域请求   # 需要 注意的是在springboot2.4之前的版本是使用allowed-origins: "*",在springboot2.4之后的版本是 allowed-origin-patterns: "*"。
              - "http://localhost:8090"
              - "http://www.leyou.com"
            allowedMethods: # 允许的跨域ajax的请求方式
              - "GET"
              - "POST"
              - "DELETE"
              - "PUT"
              - "OPTIONS"
            allowedHeaders: "*" # 允许在请求中携带的头信息
            allowCredentials: true # 是否允许携带cookie
            maxAge: 360000 # 这次跨域检测的有效期
6. 自定义全局异常处理器
来源:https://blog.csdn.net/a745233700/article/details/122917167
一旦路由的微服务下线或者失联了,Spring Cloud Gateway直接返回了一个错误页面,如下图:

显然这种异常信息不友好,前后端分离架构中必须定制返回的异常信息。传统的Spring Boot 服务中都是使用 @ControllerAdvice 来包装全局异常处理的,但是由于服务下线,请求并没有到达。
因此必须在网关中也要定制一层全局异常处理,这样才能更加友好的和客户端交互。
pring Cloud Gateway提供了多种全局处理的方式,今天只介绍其中一种方式,实现还算比较优雅:
直接创建一个类 GlobalErrorExceptionHandler,实现 ErrorWebExceptionHandler,重写其中的 handle 方法,代码如下:
/**
 * 用于网关的全局异常处理
 * @Order(-1):优先级一定要比ResponseStatusExceptionHandler低
 */
@Slf4j
@Order(-1)
@Component
@RequiredArgsConstructor
public class GlobalErrorExceptionHandler implements ErrorWebExceptionHandler {

 private final ObjectMapper objectMapper;

 @SuppressWarnings({"rawtypes", "unchecked", "NullableProblems"})
 @Override
 public Mono<Void> handle(ServerWebExchange exchange, Throwable ex) {
  ServerHttpResponse response = exchange.getResponse();
  if (response.isCommitted()) {
   return Mono.error(ex);
  }

  // JOSN格式返回
  response.getHeaders().setContentType(MediaType.APPLICATION_JSON);
  if (ex instanceof ResponseStatusException) {
   response.setStatusCode(((ResponseStatusException) ex).getStatus());
  }

  return response.writeWith(Mono.fromSupplier(() -> {
   DataBufferFactory bufferFactory = response.bufferFactory();
   try {
    //todo 返回响应结果,根据业务需求,自己定制
    CommonResponse resultMsg = new CommonResponse("500",ex.getMessage(),null);
    return bufferFactory.wrap(objectMapper.writeValueAsBytes(resultMsg));
   }
   catch (JsonProcessingException e) {
    log.error("Error writing response", ex);
    return bufferFactory.wrap(new byte[0]);
   }
  }));
 }
}


