SpringBoot启动流程
大致流程
关于SpringBoot的启动流程,大致是这样的
-
加载启动类
启动类是使用了@SpringBootApplication注解标注的类,该注解包含了@SpringBootConfiguration、@EnableAutoConfiguration、@ComponentScan三个注解的功能。SpringBoot通过扫描启动类所在的包及子包,自动配置相应的Bean -
加载配置文件
SpringBoot程序默认从applicaiton.properties或application.yml中加载配置,也可以通过在启动类上标注@PropertySource来引入其他的配置文件 -
创建Spring容器
SpringBoot使用SpringBootApplication类创建Spring容器,SpringApplication类是SpringBoot的核心类,它提供了配置和管理Bean的方法。如果是Web应用,SpringApplication会创建一个内置的Web服务器 -
加载自动配置
SpringBoot通过@EnableAutoConfiguration来完成自动配置,根据starter依赖中的Configuration和Bean的装配情况,自动装配相应的Bean -
运行SpringBoot应用程序
当一切准备就绪后,SpringBoot就会启动应用程序,如果是Web应用,就会启动内置的Web服务器,如果使用的是Web服务器,可以将应用程序打包成一个可以直接运行的jar文件
源码解读
当我们执行启动类中的SpringApplication.run()方法后,
SpringBoot的动作实际上可以大致分为两部分:实例化SpringApplication和运行SpringApplication
参考文章
9千字长文带你了解SpringBoot启动过程–史上最详细 SpringBoot启动流程-图文并茂_Fly丶X的博客-CSDN博客
spring boot 启动流程分析 - 掘金
图片来自以上两篇文章
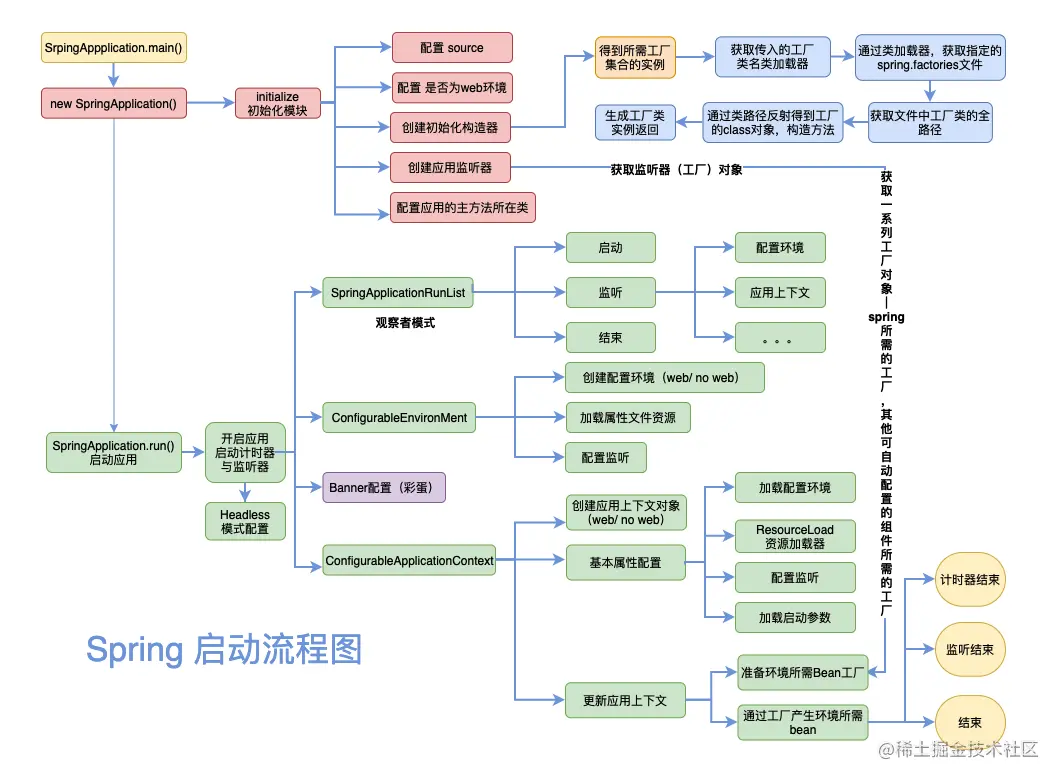

实例化SpringApplication
我们查看源码
当执行了静态方法SpringApplcation.run()后,就来到了这两个方法
public static ConfigurableApplicationContext run(Class<?> primarySource, String... args) {
    return run(new Class[]{primarySource}, args);
}

public static ConfigurableApplicationContext run(Class<?>[] primarySources, String[] args) {
    return (new SpringApplication(primarySources)).run(args);
}
进入到SpringApplication的构造方法,在实例化中干了哪些事情?
public SpringApplication(Class<?>... primarySources) {
    this((ResourceLoader)null, primarySources);
}

public SpringApplication(ResourceLoader resourceLoader, Class<?>... primarySources) {
    this.sources = new LinkedHashSet();
    this.bannerMode = Mode.CONSOLE;
    this.logStartupInfo = true;
    this.addCommandLineProperties = true;
    this.addConversionService = true;
    this.headless = true;
    this.registerShutdownHook = true;
    this.additionalProfiles = Collections.emptySet();
    this.isCustomEnvironment = false;
    this.lazyInitialization = false;
    this.applicationContextFactory = ApplicationContextFactory.DEFAULT;
    this.applicationStartup = ApplicationStartup.DEFAULT;
    this.resourceLoader = resourceLoader;
    Assert.notNull(primarySources, "PrimarySources must not be null");
    this.primarySources = new LinkedHashSet(Arrays.asList(primarySources));
    // 1. 判断此应用是否是Web应用
    this.webApplicationType = WebApplicationType.deduceFromClasspath();
    // 2.加载类加载器
    this.bootstrapRegistryInitializers = new ArrayList(this.getSpringFactoriesInstances(BootstrapRegistryInitializer.class));
    this.setInitializers(this.getSpringFactoriesInstances(ApplicationContextInitializer.class));
    // 3. 加载监听器
    this.setListeners(this.getSpringFactoriesInstances(ApplicationListener.class));
    // 4. 设置主类
    this.mainApplicationClass = this.deduceMainApplicationClass();
}
1. 判断应用类型
通过一个枚举类WebApplicationType的静态方法来判断应用类型
package org.springframework.boot;

import org.springframework.util.ClassUtils;

public enum WebApplicationType {
    NONE,
    SERVLET,
    REACTIVE;
	// Web 应用相关的类
    private static final String[] SERVLET_INDICATOR_CLASSES = new String[]{"javax.servlet.Servlet", "org.springframework.web.context.ConfigurableWebApplicationContext"};
    private static final String WEBMVC_INDICATOR_CLASS = "org.springframework.web.servlet.DispatcherServlet";
    private static final String WEBFLUX_INDICATOR_CLASS = "org.springframework.web.reactive.DispatcherHandler";
    private static final String JERSEY_INDICATOR_CLASS = "org.glassfish.jersey.servlet.ServletContainer";

    private WebApplicationType() {
    }

    static WebApplicationType deduceFromClasspath() {
        if (ClassUtils.isPresent("org.springframework.web.reactive.DispatcherHandler", (ClassLoader)null) && !ClassUtils.isPresent("org.springframework.web.servlet.DispatcherServlet", (ClassLoader)null) && !ClassUtils.isPresent("org.glassfish.jersey.servlet.ServletContainer", (ClassLoader)null)) {
            return REACTIVE;
        } else {
            String[] var0 = SERVLET_INDICATOR_CLASSES;
            int var1 = var0.length;

            for(int var2 = 0; var2 < var1; ++var2) {
                String className = var0[var2];
                if (!ClassUtils.isPresent(className, (ClassLoader)null)) {
                    return NONE;
                }
            }

            return SERVLET;
        }
    }
}
在此方法中,通过扫描Classpath中是否有预设的几个Web应用相关的类,来判断此应用是否是一个Web应用。
此处提供了几个Web关键类的全限定名,拿到了全限定名,就可以利用反射的机制来判断是否存在这些类。
此枚举类有三个类型:
- NONE
- SERVLET
- REACTIVE
其中REACTIVE的意思就是标志这个SpringBoot应用程序就是一个普通的boot项目
2. 加载Initializer初始化构造器
此处是加载Spring-boot中自带的初始化器,并不是第三方的starter中的初始化器。
会扫描spring-boot自动的jar中META-INF/spring.factories文件中定义的配置类和相关Bean
可以利用此机制,实现自己的初始化器。
3. 加载应用监听器Listener
同样,仍然是在spring-boot自带的jar中的META-INF/spring.factories文件中加载。
此监听器的类型是ApplicationListener,也就是对整个应用程序的监听器。
4. 设置主类
我们的启动类,就是主类,使用了@SpringBootApplication注解标注,并且包含main方法的类。
通过deduceMainApplicationClass()方法来推断主类所在的位置,确定主类的位置,为后面的包扫描提供条件。
执行SpringApplication的run()
实例化完成SpringApplication后,就会执行SpringApplication实例的run()方法
在该方法中,大致完成了以下几件事情:
- 启动应用监听器
- 准备Environment
- 发布事件
- 创建上下文对象、bean
- 刷新refresh()上下文对象
- 结束
public static ConfigurableApplicationContext run(Class<?>[] primarySources, String[] args) {
    return (new SpringApplication(primarySources)).run(args);
}
此方法会返回一个ConfigurableApplicationContext的实例,我们可以在启动类中拿到这个返回值。
看run()方法的源码
public ConfigurableApplicationContext run(String... args) {
	// 1. 开启计时
    long startTime = System.nanoTime();
    DefaultBootstrapContext bootstrapContext = this.createBootstrapContext();
    // Spring上下文对象
    ConfigurableApplicationContext context = null;
    this.configureHeadlessProperty();
    // 2. 实例化应用监听器并封装
    SpringApplicationRunListeners listeners = this.getRunListeners(args);
    // 启动应用监听器
    listeners.starting(bootstrapContext, this.mainApplicationClass);

    try {
	    // 3.准备环境参数以及初始化环境
        ApplicationArguments applicationArguments = new DefaultApplicationArguments(args);
        ConfigurableEnvironment environment = this.prepareEnvironment(listeners, bootstrapContext, applicationArguments);
        this.configureIgnoreBeanInfo(environment);
        // 4. 打印Banner,无所吊用
        Banner printedBanner = this.printBanner(environment);
        // 5. 实例化Spring上下文对象
        context = this.createApplicationContext();
        context.setApplicationStartup(this.applicationStartup);
        // 6.Spring容器初始化
        this.prepareContext(bootstrapContext, context, environment, listeners, applicationArguments, printedBanner);
        // 7. 刷新容器
        this.refreshContext(context);
        this.afterRefresh(context, applicationArguments);
        Duration timeTakenToStartup = Duration.ofNanos(System.nanoTime() - startTime);
        if (this.logStartupInfo) {
            (new StartupInfoLogger(this.mainApplicationClass)).logStarted(this.getApplicationLog(), timeTakenToStartup);
        }

        listeners.started(context, timeTakenToStartup);
        this.callRunners(context, applicationArguments);
    } catch (Throwable var12) {
        this.handleRunFailure(context, var12, listeners);
        throw new IllegalStateException(var12);
    }

    try {
        Duration timeTakenToReady = Duration.ofNanos(System.nanoTime() - startTime);
        listeners.ready(context, timeTakenToReady);
        return context;
    } catch (Throwable var11) {
        this.handleRunFailure(context, var11, (SpringApplicationRunListeners)null);
        throw new IllegalStateException(var11);
    }
}
1. 启动计时器
我现在使用的Springboot版本是2.7.10,发现取消了计时器这个类,而是直接通过来获取启动耗时
System.nanoTime()

如果你是低版本的Springboot,会发现有这样的几行代码,这就是启动计时器
// 实例化计时器
StopWatch stopWatch = new StopWatch();
// 开始计时
stopWatch.start();
不论是否使用了计时器,目的都是来记录SpringBoot的启动流程。
2.启动应用监听器
通过这几行代码
// 获取所有的应用监听器
SpringApplicationRunListeners listeners = this.getRunListeners(args);
// 启动
listeners.starting(bootstrapContext, this.mainApplicationClass);
在getRunListener()方法中
private SpringApplicationRunListeners getRunListeners(String[] args) {
    Class<?>[] types = new Class[]{SpringApplication.class, String[].class};
    return new SpringApplicationRunListeners(logger, this.getSpringFactoriesInstances(SpringApplicationRunListener.class, types, this, args), this.applicationStartup);
}
通过一个Class类型的数组来封装所有的监听器
再看SpringApplicationRunListeners的构造方法
class SpringApplicationRunListeners {
    private final Log log;
    private final List<SpringApplicationRunListener> listeners;
    private final ApplicationStartup applicationStartup;

    SpringApplicationRunListeners(Log log, Collection<? extends SpringApplicationRunListener> listeners, ApplicationStartup applicationStartup) {
        this.log = log;
        this.listeners = new ArrayList(listeners);
        this.applicationStartup = applicationStartup;
    }
}
在这个SpringApplicationRunListeners内部,通过一个List集合来封装所有的应用监听器,以此来达到统一管理所有的应用监听器
3.准备Environment
通过以下代码
// 准备应用参数
ApplicationArguments applicationArguments = new DefaultApplicationArguments(args);
// 准备Environment
ConfigurableEnvironment environment = this.prepareEnvironment(listeners, bootstrapContext, applicationArguments);
Environment接口是对程序运行环境的抽象,是保存系统配置的中心
来打开prepareEnvironment()方法
private ConfigurableEnvironment prepareEnvironment(SpringApplicationRunListeners listeners, DefaultBootstrapContext bootstrapContext, ApplicationArguments applicationArguments) {
// 1. 创建Environment实例,自动根据环境的不同,创建对应的Environment实例
    ConfigurableEnvironment environment = this.getOrCreateEnvironment();
// 2. 设置启动参数到Environment实例中
    this.configureEnvironment(environment, applicationArguments.getSourceArgs());
// 3. 更新参数
    ConfigurationPropertySources.attach(environment);
// 4. 通过应用监听器来发布事件
    listeners.environmentPrepared(bootstrapContext, environment);
    DefaultPropertiesPropertySource.moveToEnd(environment);
    Assert.state(!environment.containsProperty("spring.main.environment-prefix"), "Environment prefix cannot be set via properties.");
// 5. 绑定主类
    this.bindToSpringApplication(environment);
    if (!this.isCustomEnvironment) {
        EnvironmentConverter environmentConverter = new EnvironmentConverter(this.getClassLoader());
        environment = environmentConverter.convertEnvironmentIfNecessary(environment, this.deduceEnvironmentClass());
    }

    ConfigurationPropertySources.attach(environment);
    return environment;
}
4. 实例化SpringContext对象
// 实例化SpringContext对象
context = this.createApplicationContext();
context.setApplicationStartup(this.applicationStartup);
// 设置SpringContext参数
this.prepareContext(bootstrapContext, context, environment, listeners, applicationArguments, printedBanner);
在prepareContext()方法中,
private void prepareContext(DefaultBootstrapContext bootstrapContext, ConfigurableApplicationContext context, ConfigurableEnvironment environment, SpringApplicationRunListeners listeners, ApplicationArguments applicationArguments, Banner printedBanner) {
// 1. 绑定环境Enviroment
    context.setEnvironment(environment);
// 2. 如果Application有设置BeanName、resourceLoader等,
// 就将其注入到Context中
    this.postProcessApplicationContext(context);
    this.applyInitializers(context);
// 3. 发布ApplicationContextInitializer事件
    listeners.contextPrepared(context);
    bootstrapContext.close(context);
    if (this.logStartupInfo) {
        this.logStartupInfo(context.getParent() == null);
        this.logStartupProfileInfo(context);
    }
5. 刷新容器
对Context做出了一系列设置后,刷新容器
// 刷新SpringContext容器
this.refreshContext(context);

 浙公网安备 33010602011771号