
Powershell 命令行安装 Windows 作业系统
使用 powershell 完全安装或重灌 windows 作业系统的正确姿势
note:完全使用 powershell 指令,绝非在 powershell 终端下键入传统的 cmd 指令。使用传统的 dism.exe 指令可以展开 windows 映像,但是最大的问题是没有一个快捷的挂载 iso 镜像的方式,为此到了 powershell,完全是另一番新的天地。完全可以使用 mount-diskimage 即可轻松挂载 iso 镜像
1.初始化磁盘
initialize-disk -number 磁盘编号
2.创建分区 note:
Specifies the type of GPT partition to create (by GUID). By default, the New-Partition cmdlet creates a basic GPT data partition.
The GUIDs of valid types are:
-- System Partition (c12a7328-f81f-11d2-ba4b-00a0c93ec93b)
-- Microsoft Reserved (e3c9e316-0b5c-4db8-817d-f92df00215ae)
-- Basic data (ebd0a0a2-b9e5-4433-87c0-68b6b72699c7)
-- Microsoft Recovery (de94bba4-06d1-4d40-a16a-bfd50179d6ac)(可选)
gpt类型分区:
new-partition -disknumber 磁盘编号 -size 分区大小 -assigndriveletter -gpttype "{}" | format-volume -filesystem "文件系统" -newfilesystemlabel "卷标名称"
mbr类型分区:
new-partition -disknumber 磁盘编号 -size 分区大小 -assigndriveletter -mbrtype -ifs -isactive | format-volume -filesystem "文件系统" -newfilesystemlabel "卷标名称"
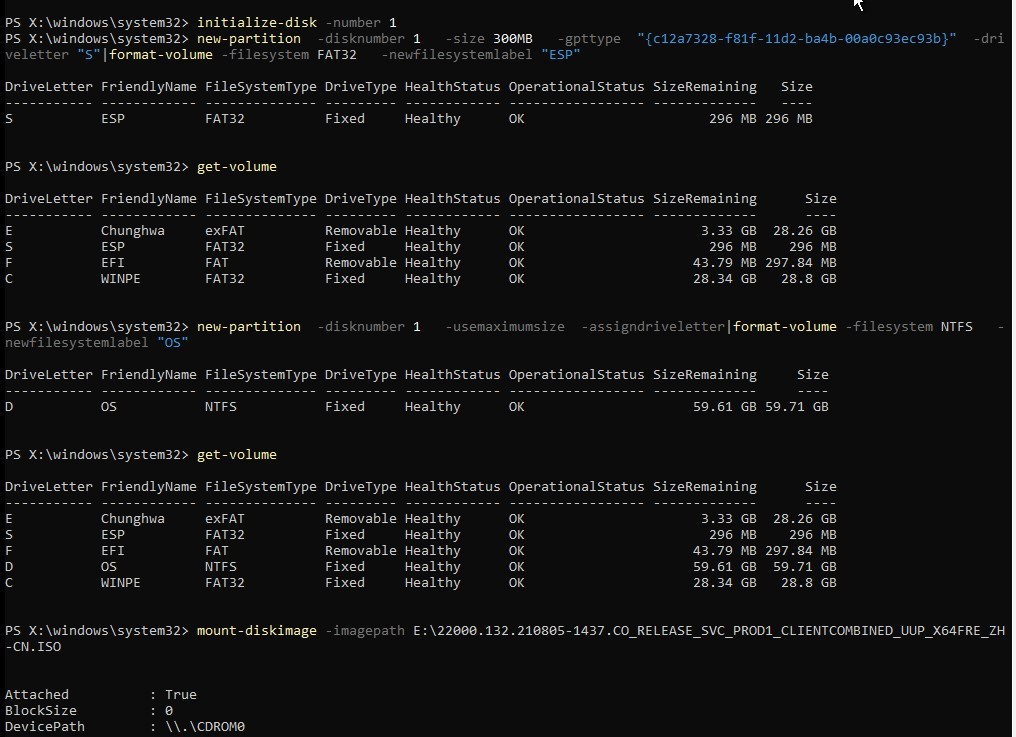
比如使用第一块磁盘 创建 esp 分区:300MB
new-partition -disknumber 1 -size 300MB -assigndriveletter -gpttype "{c12a7328-f81f-11d2-ba4b-00a0c93ec93b}" | format-volume -filesystem "FAT32" -newfilesystemlabel "ESP"
比如使用第一块磁盘 创建 MSR 分区:200MB 无需盘符
new-partition -disknumber 1 -size 200MB -gpttype "{e3c9e316-0b5c4db8-817d-f92df00215ae}" | format-volume -filesystem "NTFS" newfilesystemlabel "MSR"
比如使用第一块磁盘 创建 Windows 分区:剩余空间
new-partition -disknumber 1 -usemaximumsize -assigndriveletter | formatvolume -filesystem "NTFS" -newfilesystemlabel "OS"
如果是需要创建 mbr 的系统主分区(激活分区),请使用:
new-partition -disknumber 1 -usemaximumsize -assigndriveletter -mbrtype -ifs -isactive | format-volume -filesystem "NTFS" -newfilesystemlabel "OS"
注:
-size 指定分区大小,单位 MB 或 GB.
-usemaximumsize 如果想把所有剩余空间都作为一个分区请使用-usemaximumsize 选项即可
-assigndriveletter:表示自动为分区分配盘符。如果是 MSR(微软保留分区)则不需要此选项。因为保留分区不需要盘符,不是属于普通用户使用,一般也用不上
|:表示管道。类unix用户(linux,unix)应该熟悉管道。当然除了powershell,还有传统的cmd也支持管道
-filesystem:表示文件系统:支持 fat32,exfat,ntfs,慎用 refs 文件系统
-newfilesystemlabel:为分区命名卷标
如果你的磁盘是 mbr 需要转换为 gpt,请使用 mbr2gpt 命令。
mbr2gpt /validate /disk:磁盘编号 /allowfullos
挂载镜像:假设你的 D:\有一个 windows10.iso 的系统镜像
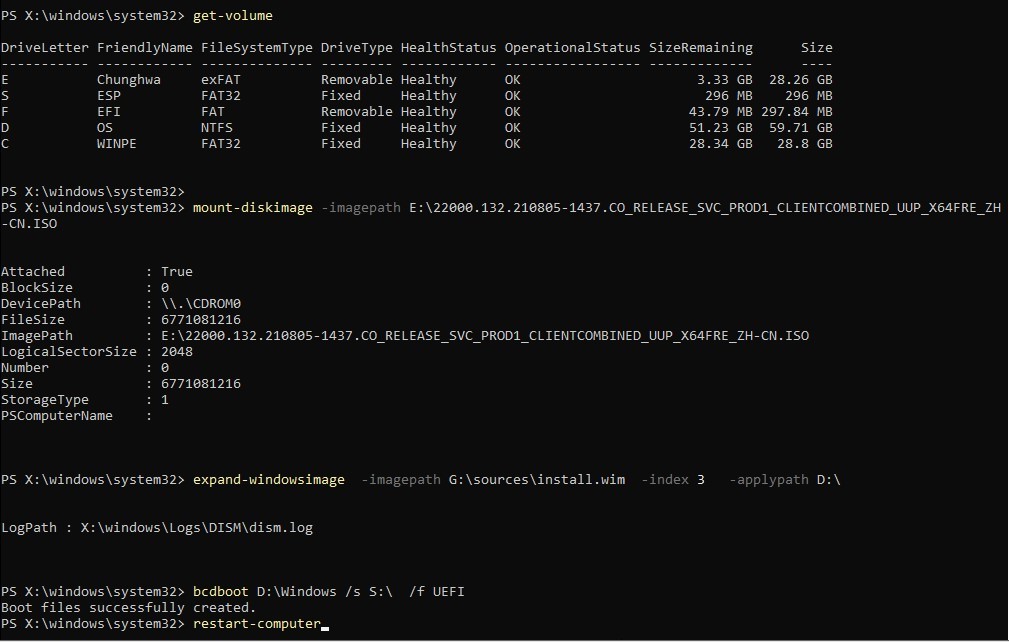
mount-diskimage -imagepath D:\windows10.iso
get-volume:查看卷信息
假设刚刚挂载的系统镜像,盘符是 I:\
展开映像:
比如:将 I:\sources\install.wim 映像解压到 G:\
expand-windowsimage -imagepath I:\sources\install.wim -index 版本索引号 -applypath G:\
索引号可以根据 get-windowsimage 指令获得。比如
get-windowsimage -imagepath F:\sources\install.wim
添加 系统引导: 根据你的实际情况,以下选项选择一个即可
bcdboot C:\Windows -s C:\ -f BIOS :添加 BIOS 引导:
bcdboot C:\Windows -s Z:\ -f UEFI :添加 UEFI 引导:
bcdboot C:\Windows -s Z:\ -f ALL :添加BIOS+UEFI引导
注:C:\表示 windows 驱动器(类似 类unix作业系统的根分区);Z:\表示引导驱动器(类似类unix作业系统的 boot分区)
restart-computer:重启系统 进入系统初始化,完成系统安装
完整过程图示如下:

本文来自博客园,作者:田园诗人,转载请注明原文链接:https://www.cnblogs.com/iterx/p/15314066.html

 浙公网安备 33010602011771号