1. 被监控机配置
1.1. 上传监控客户端
进入目录/home/monitor,上传node_exporter-0.14.0.linux-amd64.tar.gz 文件(用monitor用户上传)。
1.2. 启动监控客户端进程
解压,命令:tar -zxvf node_exporter-0.14.0.linux-amd64.tar.gz
进入目录,命令:cd node_exporter-0.14.0.linux-amd64
启动监控客户端进程,命令(后台运行):nohup ./node_exporter &
查看进程是否启动,命令:ps -ef |grep prometheus
2. 监控机配置
使用tester账户登录到Prometheus服务端监控机。
进入prometheus目录,命令cd ~/prometheus-1.6.1.linux-amd64
编辑prometheus监控列表,命令vi prometheus.yml
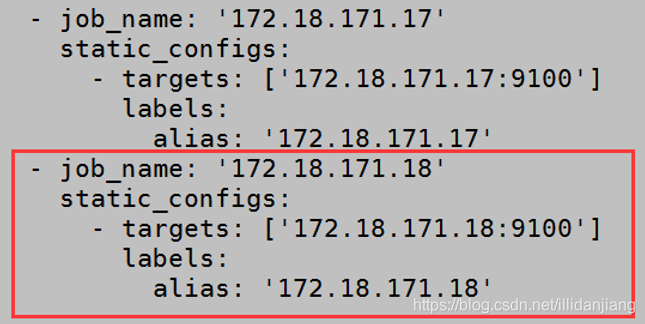
在列表末尾添加新的被监控机信息,如下图所示,我们要将IP为172.18.171.18的机器添加到监控中。
填写完成并保存。
编辑监控列表注意事项:添加时要注意缩进格式及“-”,少缩进或少“-”都会导致监控配置失败。
2.1. 重启prometheus服务
先查看服务进程是否存在,如果已经存在就kill掉进程。如下图所示,进程已存在。
杀掉进程后重启prometheus服务。
服务重启命令:nohup ./prometheus -config.file prometheus.yml &
注意:
若tester账户没有kill权限,需要切换到root账户(前提是tester用户已被授权)后再杀掉prometheus进程,切换账户命令sudo su - root
转载于:https://blog.csdn.net/illidanjiang/article/details/89642331


